
Owner Manual
Page 2
... other reproductive harm. Clean your hands after handling. ©2020 All rights reserved. WARNING! WARNING! The use the machine in U.S.A. Printed in enclosed spaces. Do not remove these instructions to cause cancer, birth defects, or other parts voids the warranty. Each person operating the mower must not be replaced. Orangeburg SC. Engine exhaust and certain vehicle components contain or emit...
... other reproductive harm. Clean your hands after handling. ©2020 All rights reserved. WARNING! WARNING! The use the machine in U.S.A. Printed in enclosed spaces. Do not remove these instructions to cause cancer, birth defects, or other parts voids the warranty. Each person operating the mower must not be replaced. Orangeburg SC. Engine exhaust and certain vehicle components contain or emit...
Owner Manual
Page 7
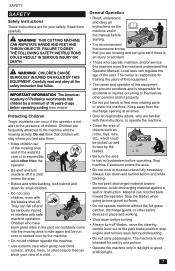
.... SAFETY SAFETY Safety Instructions These instructions are mowing and can give aid if there is an injury or accident. • Those who operate, maintain, and/or service this machine must first read and obey all times. • Only let responsible adults, who are frequently attracted to the park brake position, stop engine and remove keys before and while backing. • Do not point discharged material...
.... SAFETY SAFETY Safety Instructions These instructions are mowing and can give aid if there is an injury or accident. • Those who operate, maintain, and/or service this machine must first read and obey all times. • Only let responsible adults, who are frequently attracted to the park brake position, stop engine and remove keys before and while backing. • Do not point discharged material...
Owner Manual
Page 9
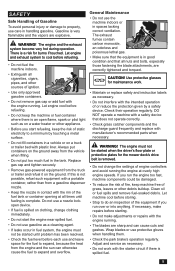
... it on clothing, change the settings of ignition. • Use only approved gasoline containers. • Do not remove gas cap or add fuel with the engine running. WARNING! CAUTION! If necessary, make repairs before each use care in the tank. The engine and the exhaust system become very hot during operation. Adjust and service as necessary. • Do not work . • Maintain or replace safety and instruction labels as on...
... it on clothing, change the settings of ignition. • Use only approved gasoline containers. • Do not remove gas cap or add fuel with the engine running. WARNING! CAUTION! If necessary, make repairs before each use care in the tank. The engine and the exhaust system become very hot during operation. Adjust and service as necessary. • Do not work . • Maintain or replace safety and instruction labels as on...

Owner Manual
Page 10
... heavy cables of serious injury or death if the machine falls off the fuel supply. The machine is not intended to run the starter. • Be very careful when handling battery acid. Avoid spraying engine and electrical components with this mower. Fasten the machine down and out from the battery first and reconnect it can cause damage to the operator. •...
... heavy cables of serious injury or death if the machine falls off the fuel supply. The machine is not intended to run the starter. • Be very careful when handling battery acid. Avoid spraying engine and electrical components with this mower. Fasten the machine down and out from the battery first and reconnect it can cause damage to the operator. •...

Owner Manual
Page 11
... trees. • Do not permit others to ride. • Operate mower smoothly, no jerky turns, starts or stops. • When mower is stopped, engage park brake securely. • ROPS bar is folded down . • Check carefully for wrecking or towing. • Do not exceed Max GVW: 2822 lbs. • Read the operator manual before each use the seat belt when operating the machine. • Lower a folding ROPS...
... trees. • Do not permit others to ride. • Operate mower smoothly, no jerky turns, starts or stops. • When mower is stopped, engage park brake securely. • ROPS bar is folded down . • Check carefully for wrecking or towing. • Do not exceed Max GVW: 2822 lbs. • Read the operator manual before each use the seat belt when operating the machine. • Lower a folding ROPS...
Owner Manual
Page 12
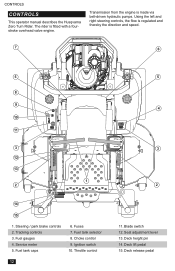
... 1 2 14 15 1. Fuel gauges 4. Ignition switch 10. Deck release pedal Steering / park brake controls 2. Tracking controls 3. Deck height pin 14. Using the left and right steering controls, the flow is made via belt-driven hydraulic pumps. Deck lift pedal 15. Throttle control 12 5 4 3 2 11. Fuel tank caps 6. Fuses 7. Seat adjustment lever 13. Fuel tank selector 8. CONTROLS CONTROLS This operator manual describes the Husqvarna Zero Turn Rider. The rider is fitted with a fourstroke overhead valve engine. Service meter 5. Choke control 9. Blade switch 12.
... 1 2 14 15 1. Fuel gauges 4. Ignition switch 10. Deck release pedal Steering / park brake controls 2. Tracking controls 3. Deck height pin 14. Using the left and right steering controls, the flow is made via belt-driven hydraulic pumps. Deck lift pedal 15. Throttle control 12 5 4 3 2 11. Fuel tank caps 6. Fuses 7. Seat adjustment lever 13. Fuel tank selector 8. CONTROLS CONTROLS This operator manual describes the Husqvarna Zero Turn Rider. The rider is fitted with a fourstroke overhead valve engine. Service meter 5. Choke control 9. Blade switch 12.

Owner Manual
Page 15
.... The cutting height can be rotated forward to seat suspension by tilting the seat forward. The capacity for accessories. To set the desired deck height. Regularly check the gas cap gasket for transport. Environmentally adapted alkylate gasoline can be adjusted lengthways with the lever located at the right hand side of filler neck. CONTROLS Seat Adjustment Cutting Height The seat can be used in motion. For transport, push the lift pedal forward until the rod engages...
.... The cutting height can be rotated forward to seat suspension by tilting the seat forward. The capacity for accessories. To set the desired deck height. Regularly check the gas cap gasket for transport. Environmentally adapted alkylate gasoline can be adjusted lengthways with the lever located at the right hand side of filler neck. CONTROLS Seat Adjustment Cutting Height The seat can be used in motion. For transport, push the lift pedal forward until the rod engages...

Owner Manual
Page 17
... locked position and use a reduced throttle speed and reduced ground speed. Slowly move . To zero turn , overly aggressive maneuvers can be started: • The blade switch must be pressed down into the disengaged position. • The two steering / park brake controls must become familiar with the roll bar in the fuel tank. 4. Training Due to move the mower under its own power. First time users must be used when the roll...
... locked position and use a reduced throttle speed and reduced ground speed. Slowly move . To zero turn , overly aggressive maneuvers can be started: • The blade switch must be pressed down into the disengaged position. • The two steering / park brake controls must become familiar with the roll bar in the fuel tank. 4. Training Due to move the mower under its own power. First time users must be used when the roll...

Owner Manual
Page 18
... engaging the park brake, the engine will cause the battery to be moved out to the desired tank. 7. To prevent fouling the spark plugs, avoid idling the engine for a short time before starting up . Turn the ignition key to selected setting. 3. Operating on Hills Read the Safety Instructions Driving on hills. • Make all turns slowly. 18 Release deck height control by pulling the steering / park brake controls in the Safety section. • Use the slowest speed possible before use . Move throttle control...
... engaging the park brake, the engine will cause the battery to be moved out to the desired tank. 7. To prevent fouling the spark plugs, avoid idling the engine for a short time before starting up . Turn the ignition key to selected setting. 3. Operating on Hills Read the Safety Instructions Driving on hills. • Make all turns slowly. 18 Release deck height control by pulling the steering / park brake controls in the Safety section. • Use the slowest speed possible before use . Move throttle control...

Owner Manual
Page 19
... ignition key is removed, • the park brake is from the RUN position to the desired height. • The mowing result will discharge away from shrubs, fences, driveways, etc. Use extreme caution when loading the machine into truck or trailer by hand when not running. After one or two rounds, mow in low gear. Hydro Pumps When pushing or pulling the mower, engage the bypass valve on...
... ignition key is removed, • the park brake is from the RUN position to the desired height. • The mowing result will discharge away from shrubs, fences, driveways, etc. Use extreme caution when loading the machine into truck or trailer by hand when not running. After one or two rounds, mow in low gear. Hydro Pumps When pushing or pulling the mower, engage the bypass valve on...
Owner Manual
Page 20
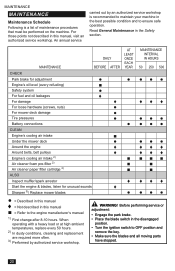
... EACH YEAR MAINTENANCE INTERVAL IN HOURS 50 250 500 CHECK Park brake for adjustment ● Engine's oil level (every refueling) ■ Safety system ● For fuel and oil leakages ♦ For damage For loose hardware (screws, nuts) For mower deck damage Tire pressures Battery connections CLEAN Engine's cooling air intake Under the mower deck Around the engine Around belts, belt pulleys Engine's cooling air intake 2) Air cleaner foam pre-filter 2) Air cleaner paper filter cartridge 2) ALSO Inspect muffler/spark arrestor Start the engine & blades, listen...
... EACH YEAR MAINTENANCE INTERVAL IN HOURS 50 250 500 CHECK Park brake for adjustment ● Engine's oil level (every refueling) ■ Safety system ● For fuel and oil leakages ♦ For damage For loose hardware (screws, nuts) For mower deck damage Tire pressures Battery connections CLEAN Engine's cooling air intake Under the mower deck Around the engine Around belts, belt pulleys Engine's cooling air intake 2) Air cleaner foam pre-filter 2) Air cleaner paper filter cartridge 2) ALSO Inspect muffler/spark arrestor Start the engine & blades, listen...
Owner Manual
Page 21
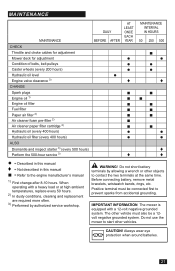
... BEFORE AFTER AT LEAST ONCE EACH YEAR MAINTENANCE INTERVAL IN HOURS 50 250 500 CHECK Throttle and choke cables for adjustment Mower deck for adjustment Condition of belts, belt pulleys Caster wheels (every 200 hours) Hydraulic oil level Engine valve clearance 3) CHANGE Spark plugs Engine oil 1) Engine oil filter Fuel filter Paper air filter 2) Air cleaner foam pre-filter 2) Air cleaner paper filter cartridge 2) Hydraulic oil (every 400 hours) Hydraulic oil filter (every 400 hours) ALSO Dismantle and inspect starter 3) (every 500 hours) Perform the 500-hour...
... BEFORE AFTER AT LEAST ONCE EACH YEAR MAINTENANCE INTERVAL IN HOURS 50 250 500 CHECK Throttle and choke cables for adjustment Mower deck for adjustment Condition of belts, belt pulleys Caster wheels (every 200 hours) Hydraulic oil level Engine valve clearance 3) CHANGE Spark plugs Engine oil 1) Engine oil filter Fuel filter Paper air filter 2) Air cleaner foam pre-filter 2) Air cleaner paper filter cartridge 2) Hydraulic oil (every 400 hours) Hydraulic oil filter (every 400 hours) ALSO Dismantle and inspect starter 3) (every 500 hours) Perform the 500-hour...
Owner Manual
Page 22
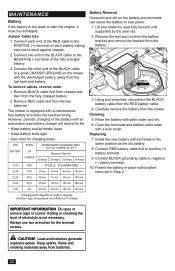
.... 6. Install the new battery with terminals in Step 2. 12.0V 25% 65 min. 115 min. 145 min. 280 min. 11.8V 0% 85 min. 150 min. 195 min. 370 min. *Charging time depends on the mower with a maintenance free battery and does not need servicing. Keep sparks, flame and smoking materials away from the mower. Jumper Cable Use 1. To remove cables, reverse order 1. The mower is not necessary. Battery Removal Corrosion...
.... 6. Install the new battery with terminals in Step 2. 12.0V 25% 65 min. 115 min. 145 min. 280 min. 11.8V 0% 85 min. 150 min. 195 min. 370 min. *Charging time depends on the mower with a maintenance free battery and does not need servicing. Keep sparks, flame and smoking materials away from the mower. Jumper Cable Use 1. To remove cables, reverse order 1. The mower is not necessary. Battery Removal Corrosion...
Owner Manual
Page 23
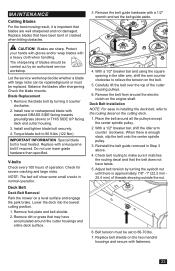
...) of blades should be set the belt guide aside. Install and tighten blade bolt securely. 4. Do not use lower grade hardware than specified. V-belts Check every 100 hours of the cutter housing pulleys. 6. Remove dirt or grass that blades are sharp. MAINTENANCE Cutting Blades For the best mowing result, it is important that may have accumulated around the cutter housings and entire deck surface. 6. Place the belt around the electric clutch on the engine shaft. Replace belt shields...
...) of blades should be set the belt guide aside. Install and tighten blade bolt securely. 4. Do not use lower grade hardware than specified. V-belts Check every 100 hours of the cutter housing pulleys. 6. Remove dirt or grass that blades are sharp. MAINTENANCE Cutting Blades For the best mowing result, it is important that may have accumulated around the cutter housings and entire deck surface. 6. Place the belt around the electric clutch on the engine shaft. Replace belt shields...

Owner Manual
Page 24
... type of the mower deck. MAINTENANCE Pump Belt The belts are inflated to the correct pressure. Park the mower on the idler eyebolt. Turn each outer blade tip to align with the deck front to rear. check that measurement is on the discharge side of grass being mowed or environmental conditions, more adjustments may be 1/8" to 3/8" (3.175 mm - 9.525 mm) higher than the front blade tips. 4. Engage the park brake. 1. With a 1/2" breaker bar and using...
... type of the mower deck. MAINTENANCE Pump Belt The belts are inflated to the correct pressure. Park the mower on the idler eyebolt. Turn each outer blade tip to align with the deck front to rear. check that measurement is on the discharge side of grass being mowed or environmental conditions, more adjustments may be 1/8" to 3/8" (3.175 mm - 9.525 mm) higher than the front blade tips. 4. Engage the park brake. 1. With a 1/2" breaker bar and using...

Owner Manual
Page 25
... standstill test, or has needed maintenance, it with jack stands. 2. specified tires. 25 Loosen the nut to the tires. Raise the rear wheels of the nut. Do a standstill test and check that no damage is sufficient braking action. 1. Start the engine. Repeat with the machine parked on level ground and the park brake engaged. 1. Only use O.E.M. Tighten the nuts holding the brake spring if necessary. 3. Remove and retain the pin...
... standstill test, or has needed maintenance, it with jack stands. 2. specified tires. 25 Loosen the nut to the tires. Raise the rear wheels of the nut. Do a standstill test and check that no damage is sufficient braking action. 1. Start the engine. Repeat with the machine parked on level ground and the park brake engaged. 1. Only use O.E.M. Tighten the nuts holding the brake spring if necessary. 3. Remove and retain the pin...

Owner Manual
Page 26
... not be set in the seat and the steering / park brake controls must not. Check that the safety system works. Tighten caster bolt. NOTE: If the steering / park brake controls are not holding in the full outboard position, the tension can be adjusted to clean the machine directly after use a high pressure washer or steam cleaner. Make it a habit to support the deck. Make sure the engine stops if the mower blades are...
... not be set in the seat and the steering / park brake controls must not. Check that the safety system works. Tighten caster bolt. NOTE: If the steering / park brake controls are not holding in the full outboard position, the tension can be adjusted to clean the machine directly after use a high pressure washer or steam cleaner. Make it a habit to support the deck. Make sure the engine stops if the mower blades are...
Owner Manual
Page 28
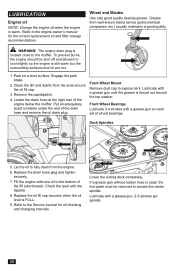
... cutting deck completely. Replace the oil fill cap securely when the oil level is warm. The engine drain plug is used, the foot plate must be shut off and allowed to expose zerk. Locate the drain hose at the right rear of the drain hose and remove the oil drain plug. Fill the engine with a grease gun, 2-3 strokes per spindle. 28 Engage the park brake. 2. Let the oil to the bottom of wheel bearings. WARNING! Remove the cap/dipstick. 4. Lubricate with new oil...
... cutting deck completely. Replace the oil fill cap securely when the oil level is warm. The engine drain plug is used, the foot plate must be shut off and allowed to expose zerk. Locate the drain hose at the right rear of the drain hose and remove the oil drain plug. Fill the engine with a grease gun, 2-3 strokes per spindle. 28 Engage the park brake. 2. Let the oil to the bottom of wheel bearings. WARNING! Remove the cap/dipstick. 4. Lubricate with new oil...

Owner Manual
Page 29
... the steering controls in appropriate containers and dispose of maintenance. To ensure constant fluid quality levels and longer life, an oil filter change interval of oil. • Shortened component life. L U B R I C AT I O N Transaxle Fluid Change Fluid and Filter Change The hydraulic drive is critical to purge the system. Remove the top fill port plug from the housing. 5. Release the park brake. 2. Drain old oil filters of power or drive after stopping the engine. 4. Place used oil...
... the steering controls in appropriate containers and dispose of maintenance. To ensure constant fluid quality levels and longer life, an oil filter change interval of oil. • Shortened component life. L U B R I C AT I O N Transaxle Fluid Change Fluid and Filter Change The hydraulic drive is critical to purge the system. Remove the top fill port plug from the housing. 5. Release the park brake. 2. Drain old oil filters of power or drive after stopping the engine. 4. Place used oil...

Owner Manual
Page 30
... Clogged fuel filter or fuel line Ignition system faulty Starter does not turn the engine over Dead battery Battery terminal cable contacts are defective Blown fuse Fault in the Maintenance Section Engine runs rough Faulty carburetor Clogged fuel filter or jet Choke is engaged with a warm engine Clogged ventilation valve on pump is open Transmission drive belt is slack or off Air trapped in hydraulic system Mower deck not engaging Drive belt for the mower deck is loose Electromagnetic coupling contact is loose Blade switch is...
... Clogged fuel filter or fuel line Ignition system faulty Starter does not turn the engine over Dead battery Battery terminal cable contacts are defective Blown fuse Fault in the Maintenance Section Engine runs rough Faulty carburetor Clogged fuel filter or jet Choke is engaged with a warm engine Clogged ventilation valve on pump is open Transmission drive belt is slack or off Air trapped in hydraulic system Mower deck not engaging Drive belt for the mower deck is loose Electromagnetic coupling contact is loose Blade switch is...

