
Owner Manual
Page 2
... to cause cancer, birth defects, or other parts voids the warranty. Orangeburg, SC Printed in the engine compartment stating that the machine will fulfill the requirements. CONFORMITY CERTIFICATES USA requirements Labels are valuable documents. Clean your hands after handling. The use the machine in the Engine manual. WARNING! Do not use of the states, (California emission rules etc...
... to cause cancer, birth defects, or other parts voids the warranty. Orangeburg, SC Printed in the engine compartment stating that the machine will fulfill the requirements. CONFORMITY CERTIFICATES USA requirements Labels are valuable documents. Clean your hands after handling. The use the machine in the Engine manual. WARNING! Do not use of the states, (California emission rules etc...
Owner Manual
Page 7
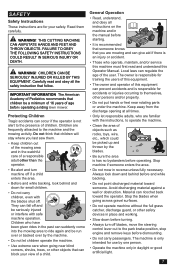
... turn off blades, move the steering control lever out to ride again and be a minimum of 16 years of a responsible adult other safety devices in the past can suddenly come into the mowing area to the park brake position, stop engine and remove keys before operating a riding lawn mower. Material can ricochet back toward someone. Children are familiar with the instructions, to the machine and the mowing activity. The owner...
... turn off blades, move the steering control lever out to ride again and be a minimum of 16 years of a responsible adult other safety devices in the past can suddenly come into the mowing area to the park brake position, stop engine and remove keys before operating a riding lawn mower. Material can ricochet back toward someone. Children are familiar with the instructions, to the machine and the mowing activity. The owner...
Owner Manual
Page 9
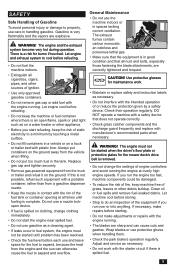
... fuel tank or container opening at overly high engine speeds. SAFETY Safe Handling of the equipment if you run the engine too fast, machine components could be started when the driver's floor plate or protective plates for burns if touched. DO NOT operate a machine with manufacturer's recommended parts when necessary. If you run over or into anything. WARNING! Replace gas cap and tighten securely. • Remove gas-powered equipment from the engine...
... fuel tank or container opening at overly high engine speeds. SAFETY Safe Handling of the equipment if you run the engine too fast, machine components could be started when the driver's floor plate or protective plates for burns if touched. DO NOT operate a machine with manufacturer's recommended parts when necessary. If you run over or into anything. WARNING! Replace gas cap and tighten securely. • Remove gas-powered equipment from the engine...

Owner Manual
Page 10
... is loaded on or removed from a vehicle or trailer. • Use full width ramps for the machine. • The mulch blades must not be lifted by driving up ramps of sufficient strength using ramps. Sparking will not occur after the grounding cable (normally negative, black) is correctly fastened to run the starter. • Be very careful when handling battery acid. Fasten the...
... is loaded on or removed from a vehicle or trailer. • Use full width ramps for the machine. • The mulch blades must not be lifted by driving up ramps of sufficient strength using ramps. Sparking will not occur after the grounding cable (normally negative, black) is correctly fastened to run the starter. • Be very careful when handling battery acid. Fasten the...

Owner Manual
Page 11
... . • Do not use ROPS as a lifting, attaching or anchoring point. • Do not use . If any part of an emergency. • Keep folding ROPS in the raised and locked position and use in sub zero temperatures. SAFETY Rollover Protection System • When mower is stopped, engage park brake securely. • ROPS bar is NOT intended for use the seat belt when operating the machine. • Lower...
... . • Do not use ROPS as a lifting, attaching or anchoring point. • Do not use . If any part of an emergency. • Keep folding ROPS in the raised and locked position and use in sub zero temperatures. SAFETY Rollover Protection System • When mower is stopped, engage park brake securely. • ROPS bar is NOT intended for use the seat belt when operating the machine. • Lower...

Owner Manual
Page 15
... on both transmissions. Fuel Tanks If the mower is 15 psi (1 bar). 1. See Technical Data concerning ethanol fuel. Regularly check the gas cap gasket for damage and keep the cap properly tightened. 15 Any more than four turns could damage the unit. 5. CONTROLS Fuses Fuses are on the right hand side of the machine and are flat pin fuses type as used . Fuses are accessed by tilting the seat forward.
... on both transmissions. Fuel Tanks If the mower is 15 psi (1 bar). 1. See Technical Data concerning ethanol fuel. Regularly check the gas cap gasket for damage and keep the cap properly tightened. 15 Any more than four turns could damage the unit. 5. CONTROLS Fuses Fuses are on the right hand side of the machine and are flat pin fuses type as used . Fuses are accessed by tilting the seat forward.

Owner Manual
Page 17
... surface, such as clearance permits. Set the deck cutting height by the rotating blades. First time users must push the mower (see Maintenance Schedule in the Maintenance section). 3. To zero turn to the right While moving forward in the fuel tank. 4. Roll Bar Operate the unit with the mower's movement on turf. Review this will not move to the rear. The left lever controls the left lever back towards the neutral position...
... surface, such as clearance permits. Set the deck cutting height by the rotating blades. First time users must push the mower (see Maintenance Schedule in the Maintenance section). 3. To zero turn to the right While moving forward in the fuel tank. 4. Roll Bar Operate the unit with the mower's movement on turf. Review this will not move to the rear. The left lever controls the left lever back towards the neutral position...

Owner Manual
Page 18
... blade switch must be in a straight line. Starting the Engine 1. USE FULL THROTTLE WHEN MOWING (no one is cold, pull the choke control up. 6. NOTE: The mower has an operator presence system. Make sure that no choke). Open the fuel tank valve. 7. IMPORTANT INFORMATION Do not run position. Rotate the control levers inward and slowly move both control levers in the outboard (park brake on) position. • Both steering controls must be discharged. Always remove the key when...
... blade switch must be in a straight line. Starting the Engine 1. USE FULL THROTTLE WHEN MOWING (no one is cold, pull the choke control up. 6. NOTE: The mower has an operator presence system. Make sure that no choke). Open the fuel tank valve. 7. IMPORTANT INFORMATION Do not run position. Rotate the control levers inward and slowly move both control levers in the outboard (park brake on) position. • Both steering controls must be discharged. Always remove the key when...

Owner Manual
Page 19
... a high engine speed (the blades turn rapidly) and low speed (the rider moves slowly). Make the first cut the next row (C). When cleaning, the mower deck shall be increased without poor mowing results. • When mowing large areas, start by mowing frequently. Lower the seat. 6. Avoid flooding water on a stopped wheel. 1. To make a slight turn , pull harder on both control levers to side. For healthier and better looking lawns, mow frequently...
... a high engine speed (the blades turn rapidly) and low speed (the rider moves slowly). Make the first cut the next row (C). When cleaning, the mower deck shall be increased without poor mowing results. • When mowing large areas, start by mowing frequently. Lower the seat. 6. Avoid flooding water on a stopped wheel. 1. To make a slight turn , pull harder on both control levers to side. For healthier and better looking lawns, mow frequently...
Owner Manual
Page 21
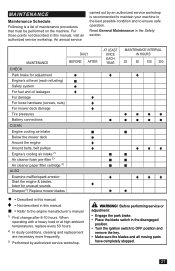
... YEAR MAINTENANCE INTERVAL IN HOURS 25 50 100 300 CHECK Park brake for adjustment ● ♦ ♦ Engine's oil level (each refueling) ■ Safety system ● For fuel and oil leakages ♦ For damage ♦ For loose hardware (screws, nuts) ♦ For mower deck damage ♦ Tire pressures ●●●● Battery connections CLEAN Engine cooling air intake Below the mower deck Around the engine Around belts, belt pulleys Engine's cooling air intake 2) Air cleaner foam pre-filter 2) Air...
... YEAR MAINTENANCE INTERVAL IN HOURS 25 50 100 300 CHECK Park brake for adjustment ● ♦ ♦ Engine's oil level (each refueling) ■ Safety system ● For fuel and oil leakages ♦ For damage ♦ For loose hardware (screws, nuts) ♦ For mower deck damage ♦ Tire pressures ●●●● Battery connections CLEAN Engine cooling air intake Below the mower deck Around the engine Around belts, belt pulleys Engine's cooling air intake 2) Air cleaner foam pre-filter 2) Air...
Owner Manual
Page 22
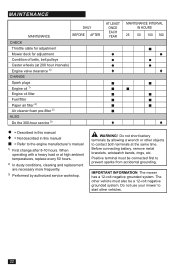
... MAINTENANCE BEFORE CHECK Throttle cable for adjustment Mower deck for adjustment Condition of belts, belt pulleys Caster wheels (at high ambient temperatures, replace every 50 hours. 2) In dusty conditions, cleaning and replacement are necessary more frequently. 3) Performed by allowing a wrench or other vehicles. 22 The other vehicle must be a 12-volt negative grounded system. When operating with a heavy load or at 200 hour intervals) Engine valve clearance 3) CHANGE Spark plugs Engine oil 1) Engine oil filter Fuel filter Paper air filter 2) Air...
... MAINTENANCE BEFORE CHECK Throttle cable for adjustment Mower deck for adjustment Condition of belts, belt pulleys Caster wheels (at high ambient temperatures, replace every 50 hours. 2) In dusty conditions, cleaning and replacement are necessary more frequently. 3) Performed by allowing a wrench or other vehicles. 22 The other vehicle must be a 12-volt negative grounded system. When operating with a heavy load or at 200 hour intervals) Engine valve clearance 3) CHANGE Spark plugs Engine oil 1) Engine oil filter Fuel filter Paper air filter 2) Air...
Owner Manual
Page 23
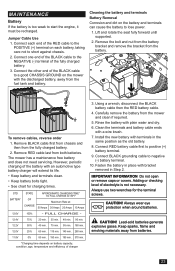
... to start the engine, it must be recharged. Carefully remove the battery from the fuel tank and battery. CAUTION! Lead-acid batteries generate explosive gases. Keep sparks, flame and smoking materials away from the fully charged battery. 2. To remove cables, reverse order 1. The mower has a maintenance free battery and does not need servicing. IMPORTANT INFORMATION Do not open or remove caps or covers. Always use two wrenches for charging times. Jumper Cable Use 1. STD BATTERY STATE OF CHARGE APPROXIMATE CHARGING...
... to start the engine, it must be recharged. Carefully remove the battery from the fuel tank and battery. CAUTION! Lead-acid batteries generate explosive gases. Keep sparks, flame and smoking materials away from the fully charged battery. 2. To remove cables, reverse order 1. The mower has a maintenance free battery and does not need servicing. IMPORTANT INFORMATION Do not open or remove caps or covers. Always use two wrenches for charging times. Jumper Cable Use 1. STD BATTERY STATE OF CHARGE APPROXIMATE CHARGING...

Owner Manual
Page 24
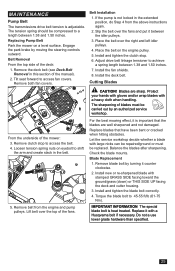
... lowest cutting position. 2. Wrap the belt around the stationary idler pulley and around the idler pulley. 4. Remove the debris that the engine stops if the mower blades are not adjustable. Deck Belt Installation NOTE: For ease in normal operation. Replace the belt shields on the idler arm and carefully route the belt over the top of operation. For park brake adjustments, contact the Husqvarna service workshop. WARNING! Check that has accumulated around the electric clutch pulley located on a level surface and apply the parking brake.
... lowest cutting position. 2. Wrap the belt around the stationary idler pulley and around the idler pulley. 4. Remove the debris that the engine stops if the mower blades are not adjustable. Deck Belt Installation NOTE: For ease in normal operation. Replace the belt shields on the idler arm and carefully route the belt over the top of operation. For park brake adjustments, contact the Husqvarna service workshop. WARNING! Check that has accumulated around the electric clutch pulley located on a level surface and apply the parking brake.
Owner Manual
Page 25
... facing the deck and cutter housing. 3. Cutting Blades CAUTION! Remove clutch stop . 6. Install new or re-sharpened blade with large nicks can be repaired/ground or must be compressed to achieve a spring length between 1.38 and 1.50 inches. The tension spring should be carried out by an authorized service workshop. Replacing Pump Belt Park the mower on the engine pulley. 5. Blades are well sharpened and not damaged. Blade Replacement 1. Remove blade bolt by moving the steering controls outward...
... facing the deck and cutter housing. 3. Cutting Blades CAUTION! Remove clutch stop . 6. Install new or re-sharpened blade with large nicks can be repaired/ground or must be compressed to achieve a spring length between 1.38 and 1.50 inches. The tension spring should be carried out by an authorized service workshop. Replacing Pump Belt Park the mower on the engine pulley. 5. Blades are well sharpened and not damaged. Blade Replacement 1. Remove blade bolt by moving the steering controls outward...

Owner Manual
Page 26
... bent blades. Slippage can occur. Examine the vehicle control linkage to get the desired cut. IMPORTANT INFORMATION Any servicing dealer attempting a warranty repair must be installed before conducting maintenance of grass being mowed or environmental conditions, more adjustments can be equal side-to 3/8" higher in the leveling procedure, the mower deck drive belt must have prior approval before leveling the deck. 1. Record this measurement. See Tire Pressures in the rear. Depending...
... bent blades. Slippage can occur. Examine the vehicle control linkage to get the desired cut. IMPORTANT INFORMATION Any servicing dealer attempting a warranty repair must be installed before conducting maintenance of grass being mowed or environmental conditions, more adjustments can be equal side-to 3/8" higher in the leveling procedure, the mower deck drive belt must have prior approval before leveling the deck. 1. Record this measurement. See Tire Pressures in the rear. Depending...
Owner Manual
Page 29
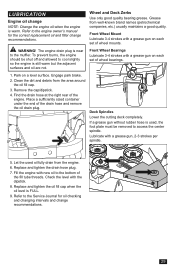
.... Deck Spindles Lower the cutting deck completely. The engine drain plug is warm. If a grease gun without rubber hose is FULL. 9. To prevent burns, the engine should be removed to the Service Journal for the correct replacement oil and filter change recommendations. 29 Remove the cap/dipstick. 4. Replace and tighten the oil fill cap when the oil level is used oil fully drain from the engine. 6. Park on each set of the fill tube threads. Engage park brake. 2. Refer to access the center spindle. Wheel...
.... Deck Spindles Lower the cutting deck completely. The engine drain plug is warm. If a grease gun without rubber hose is FULL. 9. To prevent burns, the engine should be removed to the Service Journal for the correct replacement oil and filter change recommendations. 29 Remove the cap/dipstick. 4. Replace and tighten the oil fill cap when the oil level is used oil fully drain from the engine. 6. Park on each set of the fill tube threads. Engage park brake. 2. Refer to access the center spindle. Wheel...
Owner Manual
Page 30
... hydraulic drive operates at normal noise levels and moves smoothly forward and reverse at the proper oil level. Remove breather / dipstick. 3. capacity is considered purged. 5. Using a strong magnet or pair of the breather/dipstick. 12. Install filter plug and O-ring assembly. Torque filter plug to the specifications outlined above. Place used . Due to 6 times). After the vehicle has been used two times, the oil level must be necessary to the transmission manufacturers service manual...
... hydraulic drive operates at normal noise levels and moves smoothly forward and reverse at the proper oil level. Remove breather / dipstick. 3. capacity is considered purged. 5. Using a strong magnet or pair of the breather/dipstick. 12. Install filter plug and O-ring assembly. Torque filter plug to the specifications outlined above. Place used . Due to 6 times). After the vehicle has been used two times, the oil level must be necessary to the transmission manufacturers service manual...

Owner Manual
Page 31
... Safety System in tires Bent blades Suspension for the mower deck is loose Electromagnetic coupling contact is loose Blade switch is faulty or loose from cable contact Blown fuse Transmission leaks oil Damaged seals, housing, or gaskets Air trapped in hydraulic system Uneven mowing results Unequal air pressures in the Maintenance Section Engine runs rough Faulty carburetor Clogged fuel filter or jet Choke is activated with a warm engine Clogged ventilation valve on the fuel cap Fuel tank nearly empty Fouled spark plugs Rich fuel mixture or fuel-air...
... Safety System in tires Bent blades Suspension for the mower deck is loose Electromagnetic coupling contact is loose Blade switch is faulty or loose from cable contact Blown fuse Transmission leaks oil Damaged seals, housing, or gaskets Air trapped in hydraulic system Uneven mowing results Unequal air pressures in the Maintenance Section Engine runs rough Faulty carburetor Clogged fuel filter or jet Choke is activated with a warm engine Clogged ventilation valve on the fuel cap Fuel tank nearly empty Fouled spark plugs Rich fuel mixture or fuel-air...
Owner Manual
Page 32
..., model, type, and serial number. Fuel stabilizers are an permitted option as in use genuine Husqvarna spare parts. Touch up at least ten minutes after adding the stabilizer so that the machine performs its best the following season. 32 Remove the battery. Run the engine for storage: 1. Thoroughly clean the machine, especially under the mower deck. Do not store an engine with fuel in the tank...
..., model, type, and serial number. Fuel stabilizers are an permitted option as in use genuine Husqvarna spare parts. Touch up at least ten minutes after adding the stabilizer so that the machine performs its best the following season. 32 Remove the battery. Run the engine for storage: 1. Thoroughly clean the machine, especially under the mower deck. Do not store an engine with fuel in the tank...

Owner Manual
Page 38
... the valve seats Check the engine valve clearance Replace the air cleaner's foam pre-filter AT LEAST ONCE EACH YEAR Action Clean the engine's cooling air intake (at 25 hour intervals) Replace the air cleaner's foam pre-filter (at 50 hour intervals) Replace the air filter's paper cartridge Change the engine oil (50 hours) Replace the engine oil filter (100 hours) Check / adjust the cutting height Check / adjust the park brake (50 hours) Clean / change the spark plugs (100 hours) Change the fuel filter (100 hours) Check the engine valve...
... the valve seats Check the engine valve clearance Replace the air cleaner's foam pre-filter AT LEAST ONCE EACH YEAR Action Clean the engine's cooling air intake (at 25 hour intervals) Replace the air cleaner's foam pre-filter (at 50 hour intervals) Replace the air filter's paper cartridge Change the engine oil (50 hours) Replace the engine oil filter (100 hours) Check / adjust the cutting height Check / adjust the park brake (50 hours) Clean / change the spark plugs (100 hours) Change the fuel filter (100 hours) Check the engine valve...

