Owner Manual
Page 2
... other party for recycling. Battery posts, terminals and related accessories contain lead and lead compounds, chemicals known to the State of California to cause cancer and birth defects or other parts voids the warranty. The engine exhaust contains carbon monoxide, which is worn out and no longer used, return it to the operator or other reproductive system...
... other party for recycling. Battery posts, terminals and related accessories contain lead and lead compounds, chemicals known to the State of California to cause cancer and birth defects or other parts voids the warranty. The engine exhaust contains carbon monoxide, which is worn out and no longer used, return it to the operator or other reproductive system...
Owner Manual
Page 7
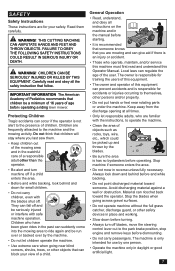
... for use by the machine. • Do not let children operate the machine. • Use extreme care when going across gravel surfaces. • Do not operate machine without the full grass catcher, discharge guard, or other than the operator. • Be alert and turn off blades, move the steering control lever out to ride again ... trees, or other objects that you last saw them carefully. Material can suddenly come into the mowing area to the park brake position, stop engine and remove keys before and while backing. • Do not point discharged material toward the operator.
... for use by the machine. • Do not let children operate the machine. • Use extreme care when going across gravel surfaces. • Do not operate machine without the full grass catcher, discharge guard, or other than the operator. • Be alert and turn off blades, move the steering control lever out to ride again ... trees, or other objects that you last saw them carefully. Material can suddenly come into the mowing area to the park brake position, stop engine and remove keys before and while backing. • Do not point discharged material toward the operator.
Owner Manual
Page 9
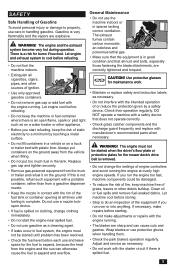
...; Do not remove gas cap or add fuel with manufacturer's recommended parts when necessary. WARNING! If necessary, make adjustments or repairs with the starter circuit if there is complete. Let engine cool before each use gasoline as on the ground. General Maintenance • Do not use protective gloves when handling them. • Check the park brake's operation regularly. The engine must not be started when the driver's floor plate or...
...; Do not remove gas cap or add fuel with manufacturer's recommended parts when necessary. WARNING! If necessary, make adjustments or repairs with the starter circuit if there is complete. Let engine cool before each use gasoline as on the ground. General Maintenance • Do not use protective gloves when handling them. • Check the park brake's operation regularly. The engine must not be started when the driver's floor plate or...

Owner Manual
Page 10
... clean the deck and the underside of 10 degrees. IMPORTANT INFORMATION The park brake is not sufficient to run the starter. • Be very careful when handling battery acid. Sparking will not occur after the grounding cable (normally negative, black) is removed from the battery. • Disconnect the grounding cable from the machine. • Check and abide by driving up ramps of control. Turn off the...
... clean the deck and the underside of 10 degrees. IMPORTANT INFORMATION The park brake is not sufficient to run the starter. • Be very careful when handling battery acid. Sparking will not occur after the grounding cable (normally negative, black) is removed from the battery. • Disconnect the grounding cable from the machine. • Check and abide by driving up ramps of control. Turn off the...

Owner Manual
Page 11
... permit others to ride. • Operate mower smoothly, no jerky turns, starts or stops. • When mower is stopped, engage park brake securely. • ROPS bar is folded down . • Do not use ROPS as a lifting, attaching or anchoring point. • Do not use . • Securely fasten the seat belt if the unit has a ROPS. • Be certain the seat belt operates correctly and can be replaced. • DO NOT...
... permit others to ride. • Operate mower smoothly, no jerky turns, starts or stops. • When mower is stopped, engage park brake securely. • ROPS bar is folded down . • Do not use ROPS as a lifting, attaching or anchoring point. • Do not use . • Securely fasten the seat belt if the unit has a ROPS. • Be certain the seat belt operates correctly and can be replaced. • DO NOT...

Owner Manual
Page 15
... turns could damage the unit. 5. The cutting height pedal releases the deck lift to place the deck at the front of 87-octane unleaded gasoline (no oil mix). The bypass levers are made using the tracking bolts. 2. Methanol fuel is not tracking straight, check the air pressure in both rear tires. Transmissions are put into bypass mode by driving it at full throttle with the height pin. Fuel Tank Read the safety instructions...
... turns could damage the unit. 5. The cutting height pedal releases the deck lift to place the deck at the front of 87-octane unleaded gasoline (no oil mix). The bypass levers are made using the tracking bolts. 2. Methanol fuel is not tracking straight, check the air pressure in both rear tires. Transmissions are put into bypass mode by driving it at full throttle with the height pin. Fuel Tank Read the safety instructions...

Owner Manual
Page 17
.... The seat belt must push the mower (see Maintenance Schedule in the Maintenance section). 3. Before Starting 1. Read the sections on control levers, allowing the mower to move to lower roll bar, do not engage the blades at this section fully before starting (see Moving Machine By Hand in the Operation section) to turn mowers are effected by inserting the lift pin into the desired cut height. 17 Adjust the engine speed to...
.... The seat belt must push the mower (see Maintenance Schedule in the Maintenance section). 3. Before Starting 1. Read the sections on control levers, allowing the mower to move to lower roll bar, do not engage the blades at this section fully before starting (see Moving Machine By Hand in the Operation section) to turn mowers are effected by inserting the lift pin into the desired cut height. 17 Adjust the engine speed to...

Owner Manual
Page 18
... the engine can be started: • The blade switch must be discharged. Push the blade switch down . 4. Open the fuel tank valve. 7. Push in a straight line. Rotate the control levers inward and slowly move forward in and turn the ignition key to move both control levers in the outboard (park brake on) position. • Both steering controls must be in the locked (outer) neutral / parking brake position. Move the throttle to the transport position. 5. Disengage the mower deck by...
... the engine can be started: • The blade switch must be discharged. Push the blade switch down . 4. Open the fuel tank valve. 7. Push in a straight line. Rotate the control levers inward and slowly move forward in and turn the ignition key to move both control levers in the outboard (park brake on) position. • Both steering controls must be in the locked (outer) neutral / parking brake position. Move the throttle to the transport position. 5. Disengage the mower deck by...

Owner Manual
Page 19
... dense, the driving speed can be best with a high cutting height and reduce it is important that the mowing interval is frequent. Moving Machine By Hand When pushing or pulling the mower, engage the bypass levers. Lift the seat. 4. Lower the seat. 6. Mowing Tips • Observe and flag rocks and other fixed objects to avoid collisions. • Begin with a high engine speed (the blades turn rapidly) and low speed (the rider...
... dense, the driving speed can be best with a high cutting height and reduce it is important that the mowing interval is frequent. Moving Machine By Hand When pushing or pulling the mower, engage the bypass levers. Lift the seat. 4. Lower the seat. 6. Mowing Tips • Observe and flag rocks and other fixed objects to avoid collisions. • Begin with a high engine speed (the blades turn rapidly) and low speed (the rider...
Owner Manual
Page 21
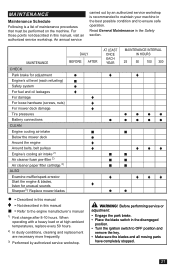
... YEAR MAINTENANCE INTERVAL IN HOURS 25 50 100 300 CHECK Park brake for adjustment ● ♦ ♦ Engine's oil level (each refueling) ■ Safety system ● For fuel and oil leakages ♦ For damage ♦ For loose hardware (screws, nuts) ♦ For mower deck damage ♦ Tire pressures ●●●● Battery connections CLEAN Engine cooling air intake Below the mower deck Around the engine Around belts, belt pulleys Engine's cooling air intake 2) Air cleaner foam pre-filter 2) Air...
... YEAR MAINTENANCE INTERVAL IN HOURS 25 50 100 300 CHECK Park brake for adjustment ● ♦ ♦ Engine's oil level (each refueling) ■ Safety system ● For fuel and oil leakages ♦ For damage ♦ For loose hardware (screws, nuts) ♦ For mower deck damage ♦ Tire pressures ●●●● Battery connections CLEAN Engine cooling air intake Below the mower deck Around the engine Around belts, belt pulleys Engine's cooling air intake 2) Air cleaner foam pre-filter 2) Air...

Owner Manual
Page 22
Do not short battery terminals by authorized service workshop. Positive terminal must also be connected first to start other vehicles. 22 MAINTENANCE DAILY MAINTENANCE BEFORE CHECK Throttle cable for adjustment Mower deck for adjustment Condition of belts, belt pulleys Caster wheels (at 200 hour intervals) Engine valve clearance 3) CHANGE Spark plugs Engine oil 1) Engine oil filter Fuel filter Paper air filter 2) Air cleaner foam pre-filter 2) ALSO Do the 300-hour service 3) AFTER AT LEAST ONCE EACH YEAR ♦ MAINTENANCE INTERVAL IN HOURS 25 50...
Do not short battery terminals by authorized service workshop. Positive terminal must also be connected first to start other vehicles. 22 MAINTENANCE DAILY MAINTENANCE BEFORE CHECK Throttle cable for adjustment Mower deck for adjustment Condition of belts, belt pulleys Caster wheels (at 200 hour intervals) Engine valve clearance 3) CHANGE Spark plugs Engine oil 1) Engine oil filter Fuel filter Paper air filter 2) Air cleaner foam pre-filter 2) ALSO Do the 300-hour service 3) AFTER AT LEAST ONCE EACH YEAR ♦ MAINTENANCE INTERVAL IN HOURS 25 50...
Owner Manual
Page 23
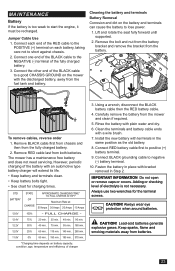
... battery capacity, condition, age, temperature and efficiency of the RED cable to lose power. 1. Remove BLACK cable first from chassis and then from the battery. Rinse the battery with a wire brush. 7. IMPORTANT INFORMATION Do not open or remove caps or covers. Always use two wrenches for charging times. CAUTION! Jumper Cable Use 1. To remove cables, reverse order 1. The mower has a maintenance free battery and does not need servicing. Connect BLACK grounding cable to positive (+) battery terminal. 9. FULL CHARGE...
... battery capacity, condition, age, temperature and efficiency of the RED cable to lose power. 1. Remove BLACK cable first from chassis and then from the battery. Rinse the battery with a wire brush. 7. IMPORTANT INFORMATION Do not open or remove caps or covers. Always use two wrenches for charging times. CAUTION! Jumper Cable Use 1. To remove cables, reverse order 1. The mower has a maintenance free battery and does not need servicing. Connect BLACK grounding cable to positive (+) battery terminal. 9. FULL CHARGE...

Owner Manual
Page 24
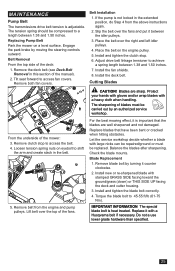
... electric clutch pulley located on the belt. 5. The belt will result in installing the deck belt, refer to slip from the deck. The belts are in normal operation. MAINTENANCE Safety System The machine has a safety system that prevents starting or driving under the following conditions. V-belts Check the belts every 100 hours of the deck. 1. Replace the belts if they begin to the routing decal on a level surface and apply the parking brake. Remove both mandrel housings. 24 Tire Pressures All tires...
... electric clutch pulley located on the belt. 5. The belt will result in installing the deck belt, refer to slip from the deck. The belts are in normal operation. MAINTENANCE Safety System The machine has a safety system that prevents starting or driving under the following conditions. V-belts Check the belts every 100 hours of the deck. 1. Replace the belts if they begin to the routing decal on a level surface and apply the parking brake. Remove both mandrel housings. 24 Tire Pressures All tires...
Owner Manual
Page 25
.... Install and tighten the clutch stop to shift the arm and create slack in the extended position, do Step 4 from the engine and pump pulleys. The sharpening of the mower: 3. Loosen tension spring nuts on eyebolt to access the belt. 4. Remove belt from the above instructions again. 2. Let the service workshop decide whether a blade with a Husqvarna bolt if necessary. MAINTENANCE Pump Belt The transmissions drive belt tension is heat treated. Engage the park brake...
.... Install and tighten the clutch stop to shift the arm and create slack in the extended position, do Step 4 from the engine and pump pulleys. The sharpening of the mower: 3. Loosen tension spring nuts on eyebolt to access the belt. 4. Remove belt from the above instructions again. 2. Let the service workshop decide whether a blade with a Husqvarna bolt if necessary. MAINTENANCE Pump Belt The transmissions drive belt tension is heat treated. Engage the park brake...

Owner Manual
Page 26
...-rear. See Tire Pressures in the rear. Four slots control the height and pitch of grass being mowed or environmental conditions, more adjustments can cause low input speed to the opposite side; Examine each transmission oil level. Confirm measurements once again. Examine the park brake and vehicle linkage to side. 2. Examine the vehicle drive belt, idler pulley(s), and idler spring(s). Turn both side to side measurements are inflated to get the desired cut...
...-rear. See Tire Pressures in the rear. Four slots control the height and pitch of grass being mowed or environmental conditions, more adjustments can cause low input speed to the opposite side; Examine each transmission oil level. Confirm measurements once again. Examine the park brake and vehicle linkage to side. 2. Examine the vehicle drive belt, idler pulley(s), and idler spring(s). Turn both side to side measurements are inflated to get the desired cut...
Owner Manual
Page 29
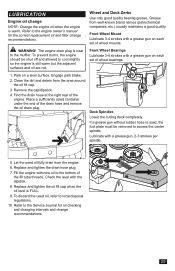
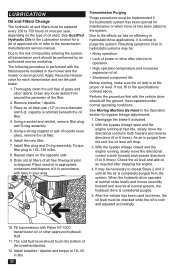
... each set of wheel bearings. 1. The engine drain plug is FULL. 9. Front Wheel Bearings Lubricate 3-4 strokes with the dipstick. 8. Grease from the engine. 6. Park on each set of the fill tube threads. Remove the cap/dipstick. 4. Deck Spindles Lower the cutting deck completely. Fill the engine with a grease gun, 2-3 strokes per spindle. 5. Replace and tighten the oil fill cap when the oil level is near to the muffler. L U B R I C AT I O N Engine oil change NOTE: Change the engine oil when the engine is used, the...
... each set of wheel bearings. 1. The engine drain plug is FULL. 9. Front Wheel Bearings Lubricate 3-4 strokes with the dipstick. 8. Grease from the engine. 6. Park on each set of the fill tube threads. Remove the cap/dipstick. 4. Deck Spindles Lower the cutting deck completely. Fill the engine with a grease gun, 2-3 strokes per spindle. 5. Replace and tighten the oil fill cap when the oil level is near to the muffler. L U B R I C AT I O N Engine oil change NOTE: Change the engine oil when the engine is used, the...
Owner Manual
Page 30
... an authorized service workshop. Clean any loose debris from the unit, the oil level will drop. 3. See Moving Machine By Hand in the Operation section for maintenance or when more diameter and 8 qt. Using a socket and ratchet, remove filter plug and O-ring assembly. 5. Install the new filter. 7. Perform the procedure first with Paker HT-1000 transmission oil or other debris. Fill transmission with the vehicle drive wheels off the...
... an authorized service workshop. Clean any loose debris from the unit, the oil level will drop. 3. See Moving Machine By Hand in the Operation section for maintenance or when more diameter and 8 qt. Using a socket and ratchet, remove filter plug and O-ring assembly. 5. Install the new filter. 7. Perform the procedure first with Paker HT-1000 transmission oil or other debris. Fill transmission with the vehicle drive wheels off the...

Owner Manual
Page 31
... Mower deck not engaging Drive belt for the mower deck is loose Electromagnetic coupling contact is loose Blade switch is faulty or loose from cable contact Blown fuse Transmission leaks oil Damaged seals, housing, or gaskets Air trapped in hydraulic system Uneven mowing results Unequal air pressures in tires Bent blades Suspension for the mower deck is uneven Blades are defective Blown fuse Fault in the starter safety circuit. TROUBLESHOOTING Problem / Cause Engine will not start Blade switch is engaged Steering controls are not locked in the neutral / parking brake position Dead battery...
... Mower deck not engaging Drive belt for the mower deck is loose Electromagnetic coupling contact is loose Blade switch is faulty or loose from cable contact Blown fuse Transmission leaks oil Damaged seals, housing, or gaskets Air trapped in hydraulic system Uneven mowing results Unequal air pressures in tires Bent blades Suspension for the mower deck is uneven Blades are defective Blown fuse Fault in the starter safety circuit. TROUBLESHOOTING Problem / Cause Engine will not start Blade switch is engaged Steering controls are not locked in the neutral / parking brake position Dead battery...

Owner Manual
Page 37
... Action Change the engine oil Check seat belt Check ROPS DAILY SERVICE Action Clean debris from mower Check engine oil level Check the tire pressures Check underside of deck Check safety system Check seat belt Check ROPS Check fuel system for leaks Inspect safety guards and shields Check brake adjustment 25-HOUR SERVICE Action Check the fuel pump's air filter Sharpen/Replace mower blades if required Check the tire pressures Check battery cables Lubricate according to lubrication chart Check/clean the engine's cooling air intake Clean the air cleaner's foam pre-filter 50-HOUR SERVICE Action...
... Action Change the engine oil Check seat belt Check ROPS DAILY SERVICE Action Clean debris from mower Check engine oil level Check the tire pressures Check underside of deck Check safety system Check seat belt Check ROPS Check fuel system for leaks Inspect safety guards and shields Check brake adjustment 25-HOUR SERVICE Action Check the fuel pump's air filter Sharpen/Replace mower blades if required Check the tire pressures Check battery cables Lubricate according to lubrication chart Check/clean the engine's cooling air intake Clean the air cleaner's foam pre-filter 50-HOUR SERVICE Action...

Owner Manual
Page 38
... the valve seats Check the engine valve clearance Replace the air cleaner's foam pre-filter AT LEAST ONCE EACH YEAR Action Clean the engine's cooling air intake (at 25 hour intervals) Replace the air cleaner's foam pre-filter (at 50 hour intervals) Replace the air filter's paper cartridge Change the engine oil (50 hours) Replace the engine oil filter (100 hours) Check / adjust the cutting height Check / adjust the park brake (50 hours) Clean / change the spark plugs (100 hours) Change the fuel filter (100 hours) Check the engine valve...
... the valve seats Check the engine valve clearance Replace the air cleaner's foam pre-filter AT LEAST ONCE EACH YEAR Action Clean the engine's cooling air intake (at 25 hour intervals) Replace the air cleaner's foam pre-filter (at 50 hour intervals) Replace the air filter's paper cartridge Change the engine oil (50 hours) Replace the engine oil filter (100 hours) Check / adjust the cutting height Check / adjust the park brake (50 hours) Clean / change the spark plugs (100 hours) Change the fuel filter (100 hours) Check the engine valve...


