
Owners Manual
Page 2
... to the operator or other parts voids the warranty. Note that the machine will fulfill the requirements. Orangeburg, SC Printed in these instructions, and must not be placed based on the engine and/or in the Engine manual. Do not modify or install non-standard equipment to operate the mower. Modifications to special requirements for repairs. Wash hands after handling. ©2014...
... to the operator or other parts voids the warranty. Note that the machine will fulfill the requirements. Orangeburg, SC Printed in these instructions, and must not be placed based on the engine and/or in the Engine manual. Do not modify or install non-standard equipment to operate the mower. Modifications to special requirements for repairs. Wash hands after handling. ©2014...

Owners Manual
Page 3
... Control Locations 11 Steering Control Levers 12 Park Brake 12 Ignition Switch 12 Throttle Control 13 Blade Switch 13 Service Meter 13 Choke Control 13 Fuse 14 Seat Adjustment Lever 14 Fuel Shut Off Valve 14 Cutting Height Lever 14 Bypass Linkages 14 Fuel Tank 15 Tracking 15 OPERATION 16 Training 16 Steering 16 Before Starting 16 Starting the Engine 16 Running 17 Stopping the Engine 18 Mowing Tips 18 Operating On Hills 18 Jumper Cable Use 19 Moving Machine By Hand 19 MAINTENANCE 20 Maintenance Schedule 20 Battery 22 Park Brake 22 Safety...
... Control Locations 11 Steering Control Levers 12 Park Brake 12 Ignition Switch 12 Throttle Control 13 Blade Switch 13 Service Meter 13 Choke Control 13 Fuse 14 Seat Adjustment Lever 14 Fuel Shut Off Valve 14 Cutting Height Lever 14 Bypass Linkages 14 Fuel Tank 15 Tracking 15 OPERATION 16 Training 16 Steering 16 Before Starting 16 Starting the Engine 16 Running 17 Stopping the Engine 18 Mowing Tips 18 Operating On Hills 18 Jumper Cable Use 19 Moving Machine By Hand 19 MAINTENANCE 20 Maintenance Schedule 20 Battery 22 Park Brake 22 Safety...

Owners Manual
Page 6
... damage, particularly if the reader should neglect to follow instructions given in the manual. Keep away from the discharge deck, do not use without deflector or grass catcher Do not touch parts Shut off engine, remove key before performing Read Operator Manual maintenance or repair Keep a safe distance from the machine Use on the machine and in the manual. Choke Fuel Warning! xx xxxxxxxx xxxx xxxxxx. Xxxx xxxxxx xxxxx xxxx...
... damage, particularly if the reader should neglect to follow instructions given in the manual. Keep away from the discharge deck, do not use without deflector or grass catcher Do not touch parts Shut off engine, remove key before performing Read Operator Manual maintenance or repair Keep a safe distance from the machine Use on the machine and in the manual. Choke Fuel Warning! xx xxxxxxxx xxxx xxxxxx. Xxxx xxxxxx xxxxx xxxx...

Owners Manual
Page 7
... Tragic accidents can occur if the operator is only intended for use by one person. • Disengage blades when not mowing. Children are often attracted to the park brake position, stop before cleaning the machine, removing the grass catcher or unclogging the discharge guard. • Operate the machine only in daylight or good artificial light. • Do not operate the machine while under the machine...
... Tragic accidents can occur if the operator is only intended for use by one person. • Disengage blades when not mowing. Children are often attracted to the park brake position, stop before cleaning the machine, removing the grass catcher or unclogging the discharge guard. • Operate the machine only in daylight or good artificial light. • Do not operate the machine while under the machine...

Owners Manual
Page 8
... remove gas cap or add fuel with the engine running. Always place containers on a water heater or other attachments; WARNING! When using the machine. • Never use the machine when barefoot. • Always wear protective shoes or boots, preferably with steel toe caps. • Always wear approved protective glasses or a full visor when assembling or driving. • Always wear gloves when handling the blades...
... remove gas cap or add fuel with the engine running. Always place containers on a water heater or other attachments; WARNING! When using the machine. • Never use the machine when barefoot. • Always wear protective shoes or boots, preferably with steel toe caps. • Always wear approved protective glasses or a full visor when assembling or driving. • Always wear gloves when handling the blades...

Owners Manual
Page 9
..., keep machine free of deck, avoid spraying engine and electrical components with water. • Check grass catcher components and the discharge guard frequently and replace with manufacturer's recommended parts when necessary. • Do not change clothing immediately. • Do not start the engine near open flames or sparks. Use protective glasses for the machine. • Check the park brake's functionality regularly. General Maintenance • Never use protective gloves when handling them. •...
..., keep machine free of deck, avoid spraying engine and electrical components with water. • Check grass catcher components and the discharge guard frequently and replace with manufacturer's recommended parts when necessary. • Do not change clothing immediately. • Do not start the engine near open flames or sparks. Use protective glasses for the machine. • Check the park brake's functionality regularly. General Maintenance • Never use protective gloves when handling them. •...
Owners Manual
Page 14
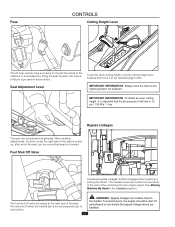
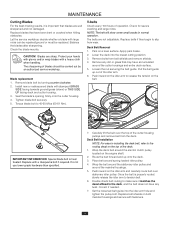
.... Seat Adjustment Lever IMPORTANT INFORMATION Always raise the deck to cool before the bypass linkage levers are located on the left hand side of the unit below the rear engine guard. IMPORTANT INFORMATION To obtain an even cutting height, it to the muffler. Fuse CONTROLS Cutting Height Lever The 20 amp primary fuse is accessed by tilting the seat forward. The fuse is important that the air pressure in the Operation section...
.... Seat Adjustment Lever IMPORTANT INFORMATION Always raise the deck to cool before the bypass linkage levers are located on the left hand side of the unit below the rear engine guard. IMPORTANT INFORMATION To obtain an even cutting height, it to the muffler. Fuse CONTROLS Cutting Height Lever The 20 amp primary fuse is accessed by tilting the seat forward. The fuse is important that the air pressure in the Operation section...
Owners Manual
Page 16
... wheel. To move the unit under its own power, the operator must be pressed down into the disengaged position. • Both steering / park brake controls must sit in the seat and start the engine (see Maintenance Schedule in the fuel tank. 4. Pull back slightly on Safety and Controls before starting (see Before Starting in the reverse position, complete the turn. To turn to the left While moving the steering control levers inward. Check that direction. To zero turn...
... wheel. To move the unit under its own power, the operator must be pressed down into the disengaged position. • Both steering / park brake controls must sit in the seat and start the engine (see Maintenance Schedule in the fuel tank. 4. Pull back slightly on Safety and Controls before starting (see Before Starting in the reverse position, complete the turn. To turn to the left While moving the steering control levers inward. Check that direction. To zero turn...

Owners Manual
Page 17
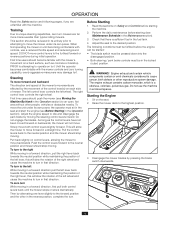
... the steering / park brake controls out to the desired cutting height. 5. Lower the mower deck to the locked position. 8. If the engine is equipped with the throttle. OPERATION 4. USE FULL THROTTLE WHEN MOWING. NOTE: The mower is cold, the choke control should be thrown by pulling the blade switch up . 3. When the engine starts, immediately release the ignition key back to move both control levers slightly forward to the run position. WARNING! Engage the mower deck by the rotating blades. Rotate control levers...
... the steering / park brake controls out to the desired cutting height. 5. Lower the mower deck to the locked position. 8. If the engine is equipped with the throttle. OPERATION 4. USE FULL THROTTLE WHEN MOWING. NOTE: The mower is cold, the choke control should be thrown by pulling the blade switch up . 3. When the engine starts, immediately release the ignition key back to move both control levers slightly forward to the run position. WARNING! Engage the mower deck by the rotating blades. Rotate control levers...

Owners Manual
Page 18
... engine is absolutely necessary, pull steering controls into the neutral position and the push to regain forward motion. • Make all turns slowly. Disengage the mower deck by pressing the blade switch down. • When mowing large areas, start by mowing often. Operating On Hills Read the Safety Instructions Driving on hills. • If stopping is off. • Use compressed air to clean top surface of the unit to engage the park brake...
... engine is absolutely necessary, pull steering controls into the neutral position and the push to regain forward motion. • Make all turns slowly. Disengage the mower deck by pressing the blade switch down. • When mowing large areas, start by mowing often. Operating On Hills Read the Safety Instructions Driving on hills. • If stopping is off. • Use compressed air to clean top surface of the unit to engage the park brake...

Owners Manual
Page 19
... away from the fully charged battery. 2. Remove BLACK cable first from chassis and then from batteries. Release the levers with a 12-volt negative grounded system. Always wear eye protection when around batteries. The other vehicles. Make no adjustments without: • the engine stopped, • the ignition key removed, • the park brake activated WARNING! OPERATION Weak Battery If the battery is too weak to start other vehicle must...
... away from the fully charged battery. 2. Remove BLACK cable first from chassis and then from batteries. Release the levers with a 12-volt negative grounded system. Always wear eye protection when around batteries. The other vehicles. Make no adjustments without: • the engine stopped, • the ignition key removed, • the park brake activated WARNING! OPERATION Weak Battery If the battery is too weak to start other vehicle must...

Owners Manual
Page 20
...an authorized service workshop. Daily MAINTENANCE Check the park brake Check the engine's oil level (every refueling) Check the safety system Check for fuel and oil leakages Check/clean the engine's cooling air intake Check the mower deck Check for loose hardware (screws, nuts) Clean under the mower deck Start the engine and blades, listen for unusual sounds Check for damage Thoroughly clean around the engine Clean around belts, belt pulleys Check the tire pressures Check battery connections Sharpen3)/ Replace mower blades Clean the engine's cooling air intake 2) Clean the foam air cleaner...
...an authorized service workshop. Daily MAINTENANCE Check the park brake Check the engine's oil level (every refueling) Check the safety system Check for fuel and oil leakages Check/clean the engine's cooling air intake Check the mower deck Check for loose hardware (screws, nuts) Clean under the mower deck Start the engine and blades, listen for unusual sounds Check for damage Thoroughly clean around the engine Clean around belts, belt pulleys Check the tire pressures Check battery connections Sharpen3)/ Replace mower blades Clean the engine's cooling air intake 2) Clean the foam air cleaner...

Owners Manual
Page 21
...once each year Maintenance interval in the disengaged position. • Turn the ignition switch to penetrate the skin, causing serious injury. When operating with a heavy load or at once. MAINTENANCE MAINTENANCE Check/adjust throttle cable Check the condition of belts, belt pulleys Change the engine oil 1) Replace the engine oil filter Clean/replace the spark plugs Replace the fuel filter Replace paper air filter 2) Check the caster wheels (every 200 hours) Replace the air cleaner's foam pre-filter 2) Check/adjust the mower deck Check the engine valve clearance 3) Perform the...
...once each year Maintenance interval in the disengaged position. • Turn the ignition switch to penetrate the skin, causing serious injury. When operating with a heavy load or at once. MAINTENANCE MAINTENANCE Check/adjust throttle cable Check the condition of belts, belt pulleys Change the engine oil 1) Replace the engine oil filter Clean/replace the spark plugs Replace the fuel filter Replace paper air filter 2) Check the caster wheels (every 200 hours) Replace the air cleaner's foam pre-filter 2) Check/adjust the mower deck Check the engine valve clearance 3) Perform the...
Owners Manual
Page 22
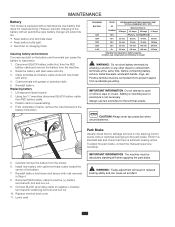
.... 370 min. *Charging time depends on the steering control levers, links or switches belonging to positive (+) battery terminal with an automotive type battery charger will result in Step 4. 8. To adjust the park brake, contact the Husqvarna service workshop. 5. WARNING! MAINTENANCE Battery Your mower is found on battery capacity, condition, age, temperature and efficiency of charger WARNING! Replacing battery 1. Using two ½" wrenches disconnect BLACK battery cable then RED battery cable. 3. Before connecting battery, remove metal bracelets, wristwatch...
.... 370 min. *Charging time depends on the steering control levers, links or switches belonging to positive (+) battery terminal with an automotive type battery charger will result in Step 4. 8. To adjust the park brake, contact the Husqvarna service workshop. 5. WARNING! MAINTENANCE Battery Your mower is found on battery capacity, condition, age, temperature and efficiency of charger WARNING! Replacing battery 1. Using two ½" wrenches disconnect BLACK battery cable then RED battery cable. 3. Before connecting battery, remove metal bracelets, wristwatch...

Owners Manual
Page 23
...; the mower deck is disengaged. • the steering / park brake controls are engaged and the driver temporarily moves off and repair the safety system before using the machine again. IMPORTANT INFORMATION DO NOT add any type of the conditions is not met. specified tires. Make daily inspections to ensure that wheels rotate freely. Install in reverse order. Excessive loads created by attempting to your dealer for loose or...
...; the mower deck is disengaged. • the steering / park brake controls are engaged and the driver temporarily moves off and repair the safety system before using the machine again. IMPORTANT INFORMATION DO NOT add any type of the conditions is not met. specified tires. Make daily inspections to ensure that wheels rotate freely. Install in reverse order. Excessive loads created by attempting to your dealer for loose or...
Owners Manual
Page 24
... deck into the idler arm hole and tighten the pulley bolt. Push inward on the idler arm to the routing decal on both mandrel housings and secure with fasteners. 24 Replace with stamped GRASS SIDE facing towards ground/grass (down) or THIS SIDE UP facing deck and cutter housing. 3. Deck Belt Installation NOTE: For ease in normal operation. Push inward on the engine shaft. 2. Correct if needed. 7. Replace belt shields on the top of the deck. 1. MAINTENANCE Cutting Blades...
... deck into the idler arm hole and tighten the pulley bolt. Push inward on the idler arm to the routing decal on both mandrel housings and secure with fasteners. 24 Replace with stamped GRASS SIDE facing towards ground/grass (down) or THIS SIDE UP facing deck and cutter housing. 3. Deck Belt Installation NOTE: For ease in normal operation. Push inward on the engine shaft. 2. Correct if needed. 7. Replace belt shields on the top of the deck. 1. MAINTENANCE Cutting Blades...

Owners Manual
Page 25
... front blade tip. 2. If tires are under the mower deck, will place the mower deck in the rear, remove the foot plate access the front deck CAUTION! The deck should be properly adjusted. Do not spray water on the discharge side of leveling procedure, mower deck drive belt must be required to 3/8" higher in a standard measurement position. Do not use (after it a habit to wash away debris. MAINTENANCE Adjusting the Mower Deck...
... front blade tip. 2. If tires are under the mower deck, will place the mower deck in the rear, remove the foot plate access the front deck CAUTION! The deck should be properly adjusted. Do not spray water on the discharge side of leveling procedure, mower deck drive belt must be required to 3/8" higher in a standard measurement position. Do not use (after it a habit to wash away debris. MAINTENANCE Adjusting the Mower Deck...
Owners Manual
Page 27
... loose from cable contact Blown fuse Transaxle leaks oil Damaged seals, housing, or gaskets Air trapped in hydraulic system Uneven mowing results Different air pressure in the Maintenance Section Safety switches are not fully inserted Engine runs rough Faulty carburetor Clogged fuel filter or jet Choke control is pulled out with a warm engine Clogged ventilation valve on the left and right sides. TROUBLESHOOTING Problem / Cause Engine will not start Blade switch is engaged Steering controls are not locked in the outer position Battery...
... loose from cable contact Blown fuse Transaxle leaks oil Damaged seals, housing, or gaskets Air trapped in hydraulic system Uneven mowing results Different air pressure in the Maintenance Section Safety switches are not fully inserted Engine runs rough Faulty carburetor Clogged fuel filter or jet Choke control is pulled out with a warm engine Clogged ventilation valve on the left and right sides. TROUBLESHOOTING Problem / Cause Engine will not start Blade switch is engaged Steering controls are not locked in the outer position Battery...

Owners Manual
Page 28
.... Clean, charge and store the battery in use genuine Husqvarna spare parts. An annual check-up damage to ensure that may have become loose. 3. Add stabilizer to avoid corrosion. 2. Inspect the machine for storage: 1. Empty the fuel tanks or add a fuel stabilizer. Start the engine and allow it reaches the carburetor. Service When ordering spare parts, please specify the purchase year, model, type, and serial number. To ready...
.... Clean, charge and store the battery in use genuine Husqvarna spare parts. An annual check-up damage to ensure that may have become loose. 3. Add stabilizer to avoid corrosion. 2. Inspect the machine for storage: 1. Empty the fuel tanks or add a fuel stabilizer. Start the engine and allow it reaches the carburetor. Service When ordering spare parts, please specify the purchase year, model, type, and serial number. To ready...

Owners Manual
Page 34
...-hour service Change the engine oil filter Clean/replace the spark plugs Replace the fuel filter Check V-belts Check / tighten caster wheel axle bolts (every 200 hours) Change the air filter's paper cartridge Change hydraulic pump oil and filter. (200 hours) Date, mtr reading, stamp, sign q q q q q q q q q Action 300-Hour Service Perform the 25-hour service Perform the 50-hour service Perform the 100-hour service Check / adjust the mower deck Clean the combustion chamber and grind the valve seats Check the engine valve clearance Replace the air cleaner...
...-hour service Change the engine oil filter Clean/replace the spark plugs Replace the fuel filter Check V-belts Check / tighten caster wheel axle bolts (every 200 hours) Change the air filter's paper cartridge Change hydraulic pump oil and filter. (200 hours) Date, mtr reading, stamp, sign q q q q q q q q q Action 300-Hour Service Perform the 25-hour service Perform the 50-hour service Perform the 100-hour service Check / adjust the mower deck Clean the combustion chamber and grind the valve seats Check the engine valve clearance Replace the air cleaner...


