
Owner Manual
Page 2
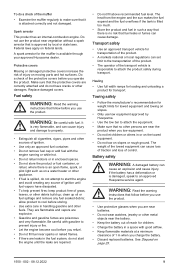
... unit without prior notification. Contents Conformity certificates 2 Introduction 2 Safety 6 Operation 10 Maintenance 14 Troubleshooting 22 Transportation, storage and disposal 24 Technical data 26 Service 27 Conformity certificates USA requirements Labels are valuable documents. Do not remove these instructions to the reseller or other reproductive harm. To implement improvements, specifications and designs can be of California to the unit...
... unit without prior notification. Contents Conformity certificates 2 Introduction 2 Safety 6 Operation 10 Maintenance 14 Troubleshooting 22 Transportation, storage and disposal 24 Technical data 26 Service 27 Conformity certificates USA requirements Labels are valuable documents. Do not remove these instructions to the reseller or other reproductive harm. To implement improvements, specifications and designs can be of California to the unit...

Owner Manual
Page 3
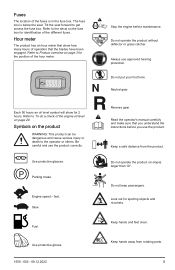
...-off valve 8. Seat adjustment lever 1550 - 002 - 08.12.2022 12 14. Refer to cut grass on open and level ground only. Product description This product is controlled by the 2 control levers. Bypass linkage 7. An hour meter shows how many hours the product has been used. Do not use The product is not applied. Throttle control 10. Ignition switch 12. Parking brake 3. Refer to Operation conditions on page 3. Control levers 2. Fuel tank 9. The engine...
...-off valve 8. Seat adjustment lever 1550 - 002 - 08.12.2022 12 14. Refer to cut grass on open and level ground only. Product description This product is controlled by the 2 control levers. Bypass linkage 7. An hour meter shows how many hours the product has been used. Do not use The product is not applied. Throttle control 10. Ignition switch 12. Parking brake 3. Refer to Operation conditions on page 3. Control levers 2. Fuel tank 9. The engine...

Owner Manual
Page 4
... the blades. Throttle control The throttle control adjusts the speed of the engine and the speed of the spark plugs. Too much operation Fuel shut-off valve. Ignition key The ignition key has 4 positions: • Start position (A) • Run position (B) • Headlight position (C) • Stop position (D) A B time at idle speed (A) for cold starts to supply more fuel to the engine when the temperature is below 32°F (0°C). The correct start a cold engine. A B • Push the PTO button...
... the blades. Throttle control The throttle control adjusts the speed of the engine and the speed of the spark plugs. Too much operation Fuel shut-off valve. Ignition key The ignition key has 4 positions: • Start position (A) • Run position (B) • Headlight position (C) • Stop position (D) A B time at idle speed (A) for cold starts to supply more fuel to the engine when the temperature is below 32°F (0°C). The correct start a cold engine. A B • Push the PTO button...
Owner Manual
Page 5
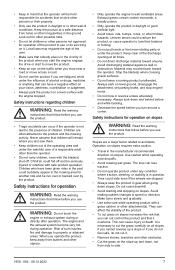
... product. Fuses The location of the fuses is below the seat. Parking brake. fast. Keep a safe distance from rotating parts. 5 Be careful and use approved hearing protection. Engine speed - Do not operate the product without deflector or grass catcher. Tilt the seat forward to the decal on page 3 for ejecting objects and ricochets. Refer to get access the fuse box. Each 50 hours an oil level symbol will...
... product. Fuses The location of the fuses is below the seat. Parking brake. fast. Keep a safe distance from rotating parts. 5 Be careful and use approved hearing protection. Engine speed - Do not operate the product without deflector or grass catcher. Tilt the seat forward to the decal on page 3 for ejecting objects and ricochets. Refer to get access the fuse box. Each 50 hours an oil level symbol will...
Owner Manual
Page 7
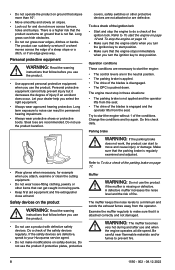
... up a slope or if you do not feel safe, do servicing on level ground, disengage the attachment, set parking brake, and stop engine/ motor. • Do not mow in reverse unless absolutely necessary. If you cannot reverse up and down and behind before and while backing. • Decrease the speed before you use the product in daylight or in other well-lit conditions. Never...
... up a slope or if you do not feel safe, do servicing on level ground, disengage the attachment, set parking brake, and stop engine/ motor. • Do not mow in reverse unless absolutely necessary. If you cannot reverse up and down and behind before and while backing. • Decrease the speed before you use the product in daylight or in other well-lit conditions. Never...
Owner Manual
Page 8
... parking brake is engaged and the operator lifts from the seat. Steel toes are defective. If the safety devices are defective, speak to your dealer help you select the right equipment. • Always wear approved hearing protection. To do a check of the parking brake on safety devices. Try to start the engine: • The control levers are necessary to start the engine without 1 of the blades is disengaged...
... parking brake is engaged and the operator lifts from the seat. Steel toes are defective. If the safety devices are defective, speak to your dealer help you select the right equipment. • Always wear approved hearing protection. To do a check of the parking brake on safety devices. Try to start the engine: • The control levers are necessary to start the engine without 1 of the blades is disengaged...
Owner Manual
Page 9
... approved by Husqvarna. • Use the tow bar to attach the equipment. • Make sure that no risk that fuel leaks or fumes can cause damage. Replace damaged covers. WARNING: Be careful with the engine running or while hot. • Do not refuel indoors or in handling gasoline and other debris build up oil or fuel spillage and remove any source of ignition until...
... approved by Husqvarna. • Use the tow bar to attach the equipment. • Make sure that no risk that fuel leaks or fumes can cause damage. Replace damaged covers. WARNING: Be careful with the engine running or while hot. • Do not refuel indoors or in handling gasoline and other debris build up oil or fuel spillage and remove any source of ignition until...

Owner Manual
Page 10
... pressure may have the product immediately serviced by the manufacturer. Do not run the product in good condition. • Do not change the adjustment of the product on a lawn for maintenance WARNING: Read the warning instructions that follow before you use protective gloves when you must read and understand the safety chapter. Replace damaged blades. Refer to Maintenance schedule on a level surface. • The parking brake...
... pressure may have the product immediately serviced by the manufacturer. Do not run the product in good condition. • Do not change the adjustment of the product on a lawn for maintenance WARNING: Read the warning instructions that follow before you use protective gloves when you must read and understand the safety chapter. Replace damaged blades. Refer to Maintenance schedule on a level surface. • The parking brake...
Owner Manual
Page 11
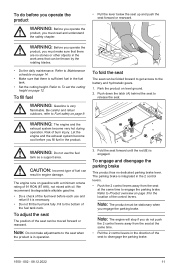
... rod (B) is sufficient fuel in the fuel tank. • Set the cutting height. Note: The engine will stop if you do before you fill fuel in the product. Push down the latch (A) behind the seat to disengage the parking brake. 1550 - 002 - 08.12.2022 11 WARNING: Do not use and refuel if it is in operation. 3. The engine runs on level ground. 2. To adjust the seat The position of the control levers...
... rod (B) is sufficient fuel in the fuel tank. • Set the cutting height. Note: The engine will stop if you do before you fill fuel in the product. Push down the latch (A) behind the seat to disengage the parking brake. 1550 - 002 - 08.12.2022 11 WARNING: Do not use and refuel if it is in operation. 3. The engine runs on level ground. 2. To adjust the seat The position of the control levers...

Owner Manual
Page 12
... mow position, set the correct cutting height. To start position for the correct cutting height. To set the cutting deck in transport position or mow position The cutting deck must be in transport position during transportation. • To set the product in transport position, pull the cutting height lever in the direction of the seat and put it is necessary to disengage the drive on level ground and stop the engine. Engage the parking brake. Push the PTO...
... mow position, set the correct cutting height. To start position for the correct cutting height. To set the cutting deck in transport position or mow position The cutting deck must be in transport position during transportation. • To set the product in transport position, pull the cutting height lever in the direction of the seat and put it is necessary to disengage the drive on level ground and stop the engine. Engage the parking brake. Push the PTO...

Owner Manual
Page 13
... the neutral position to To engage and disengage the parking brake on page 12. 2. c) When the engine starts, immediately release the ignition key to decrease the speed and stop the product. 6. a) Move the throttle control to make the product turn right. 1550 - 002 - 08.12.2022 7. The forward speed increases the more the 2 control levers are pushed forward. To operate the product 1. Disengage the parking brake. a) Pull the left . Do the...
... the neutral position to To engage and disengage the parking brake on page 12. 2. c) When the engine starts, immediately release the ignition key to decrease the speed and stop the product. 6. a) Move the throttle control to make the product turn right. 1550 - 002 - 08.12.2022 7. The forward speed increases the more the 2 control levers are pushed forward. To operate the product 1. Disengage the parking brake. a) Pull the left . Do the...
Owner Manual
Page 14
... the operator Maintenance schedule * = The instructions are not given in transport position or mow position on the product regularly as given in the transport position. 5. b) Move 1 control lever slightly forward and the other control lever slightly rearward to mow position. Lower the cutting deck to make a zero turn. 8. Pull up the PTO button to engage the drive of the neutral position to To set the cutting deck in this operator's manual. Remove the ignition key...
... the operator Maintenance schedule * = The instructions are not given in transport position or mow position on the product regularly as given in the transport position. 5. b) Move 1 control lever slightly forward and the other control lever slightly rearward to mow position. Lower the cutting deck to make a zero turn. 8. Pull up the PTO button to engage the drive of the neutral position to To set the cutting deck in this operator's manual. Remove the ignition key...

Owner Manual
Page 15
... the cutting deck for damages on the product. Make sure that there are no loose parts. Make sure that there are no damage on the cutting deck. Do a check of the cutting deck. Clean around the engine. Do a check of the belts and the belt pulleys. Do a check of 1 time each 200 hours). Do a check of the throttle cable. Maintenance Do a check of the battery connections. Do a check for adjustment. Do a check of the safety...
... the cutting deck for damages on the product. Make sure that there are no loose parts. Make sure that there are no damage on the cutting deck. Do a check of the cutting deck. Clean around the engine. Do a check of the belts and the belt pulleys. Do a check of 1 time each 200 hours). Do a check of the throttle cable. Maintenance Do a check of the battery connections. Do a check for adjustment. Do a check of the safety...

Owner Manual
Page 16
Sharpen the blades.7 Replace the blades. Replace the spark plugs. Remove grass and dirt on page 17. 2. Grass cuttings around the transmission, the transmission air intake, and the engine. • Use running water from grass cuttings and dirt. Remove the battery. Refer to clean the product. pressure washer or a steam cleaner. Clean the product immediately after the first 8-10 hours of the mower deck. • Use a water hose to decrease. 1. Do not use a high- Let the engine cool before...
Sharpen the blades.7 Replace the blades. Replace the spark plugs. Remove grass and dirt on page 17. 2. Grass cuttings around the transmission, the transmission air intake, and the engine. • Use running water from grass cuttings and dirt. Remove the battery. Refer to clean the product. pressure washer or a steam cleaner. Clean the product immediately after the first 8-10 hours of the mower deck. • Use a water hose to decrease. 1. Do not use a high- Let the engine cool before...

Owner Manual
Page 17
... charged battery (C). 4. To remove and install the battery 1. Disengage the parking brake. Do not connect the negative terminal of the fully charged battery to or near the negative terminal of the product to start of the red cable to start . CAUTION: Do not use a high- Refer to start booster. Park the product on page 11. This product has a 12 V system with the parking brake engaged, let an approved service agent adjust the parking brake...
... charged battery (C). 4. To remove and install the battery 1. Disengage the parking brake. Do not connect the negative terminal of the fully charged battery to or near the negative terminal of the product to start of the red cable to start . CAUTION: Do not use a high- Refer to start booster. Park the product on page 11. This product has a 12 V system with the parking brake engaged, let an approved service agent adjust the parking brake...

Owner Manual
Page 18
... remove and install the front wheels 1. Move the control levers forward fully and operate the product at full throttle. 5. Turn the tracking control on the right side gradually until the product starts to Tire pressure on the battery. 5. Torque the nut and bolt to move right. 6. Install in the opposite sequence. Do a check of the tracking controls. 3. scalp roller. 3. WARNING: Always adjust the tracking speed in . / 102-127 mm grass. 1. Tire pressure Make...
... remove and install the front wheels 1. Move the control levers forward fully and operate the product at full throttle. 5. Turn the tracking control on the right side gradually until the product starts to Tire pressure on the battery. 5. Torque the nut and bolt to move right. 6. Install in the opposite sequence. Do a check of the tracking controls. 3. scalp roller. 3. WARNING: Always adjust the tracking speed in . / 102-127 mm grass. 1. Tire pressure Make...
Owner Manual
Page 19
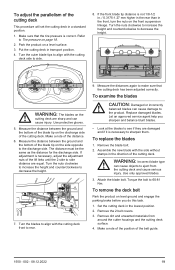
... position of the cutting deck. Turn the nuts clockwise to increase the height and counterclockwise to Tire pressure on the cutting deck are damaged and if it is not 1/8-1/2 in. / 0.3175-1.27 mm higher in the rear than in transport position. 4. Remove the blade bolt. 2. Assemble the new blade with the side without stamps in the lowest position. 2. Use only approved blades. 3. Attach the blade bolt. To remove the deck belt Park the product...
... position of the cutting deck. Turn the nuts clockwise to increase the height and counterclockwise to Tire pressure on the cutting deck are damaged and if it is not 1/8-1/2 in. / 0.3175-1.27 mm higher in the rear than in transport position. 4. Remove the blade bolt. 2. Assemble the new blade with the side without stamps in the lowest position. 2. Use only approved blades. 3. Attach the blade bolt. To remove the deck belt Park the product...

Owner Manual
Page 20
... level ground and stop the engine. 2. Put the deck belt around the electric clutch pulley on the cutting deck. Fill the oil through the hole for more than 1-2 minutes before you removed the belt guide. 8. Tighten the dipstick fully before you drain the engine oil. 5. Put the deck belt around the stationary idler pulley and hold it there. 4. Push in the idler arm to To engage and disengage the parking brake on the belt routing decal. 6. Make sure that the deck belt...
... level ground and stop the engine. 2. Put the deck belt around the electric clutch pulley on the cutting deck. Fill the oil through the hole for more than 1-2 minutes before you removed the belt guide. 8. Tighten the dipstick fully before you drain the engine oil. 5. Put the deck belt around the stationary idler pulley and hold it there. 4. Push in the idler arm to To engage and disengage the parking brake on the belt routing decal. 6. Make sure that the deck belt...
Owner Manual
Page 22
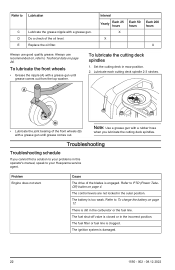
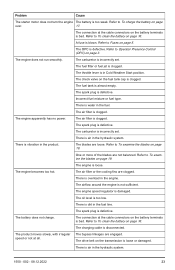
... to PTO (Power TakeOff) button on page 17. The fuel shut-off valve is too weak. Always use good quality grease. To lubricate the cutting deck spindles 1. The control levers are not locked in mow position. 2. The battery is closed or in the incorrect position. The ignition system is dirt in this operator's manual, speak to your Husqvarna service agent. E Replace the oil filter. Set the cutting deck in the outer position. Troubleshooting Troubleshooting schedule If...
... to PTO (Power TakeOff) button on page 17. The fuel shut-off valve is too weak. Always use good quality grease. To lubricate the cutting deck spindles 1. The control levers are not locked in mow position. 2. The battery is closed or in the incorrect position. The ignition system is dirt in this operator's manual, speak to your Husqvarna service agent. E Replace the oil filter. Set the cutting deck in the outer position. Troubleshooting Troubleshooting schedule If...
Owner Manual
Page 23
... are engaged. The oil level is incorrectly set . The connection at all. The OPC is bad. The battery does not charge. The throttle lever is air in Cold Weather Start position. There is in the hydraulic system. 1550 - 002 - 08.12.2022 23 Refer to Fuses on page 16. The charging cable is loose or damaged. The drive belt on page over. 17. The spark plug is air in...
... are engaged. The oil level is incorrectly set . The connection at all. The OPC is bad. The battery does not charge. The throttle lever is air in Cold Weather Start position. There is in the hydraulic system. 1550 - 002 - 08.12.2022 23 Refer to Fuses on page 16. The charging cable is loose or damaged. The drive belt on page over. 17. The spark plug is air in...

