

Owners Manual
Page 3
...in the mowing area for another ride and be seriously injured or interfere with manufacturer's recommended parts, when necessary. • Mower blades are often attracted to stop and inspect the machine. They may fall off and be run over or backed over by the ... for weight limits for small children. • Never carry children, even with plastic liner. SAFETY RULES Safe Operation Practices for towing. Replace gas cap and tighten securely. Allow machine to operate the machine. • Use extra care when approaching blind corners, shrubs, trees,...
...in the mowing area for another ride and be seriously injured or interfere with manufacturer's recommended parts, when necessary. • Mower blades are often attracted to stop and inspect the machine. They may fall off and be run over or backed over by the ... for weight limits for small children. • Never carry children, even with plastic liner. SAFETY RULES Safe Operation Practices for towing. Replace gas cap and tighten securely. Allow machine to operate the machine. • Use extra care when approaching blind corners, shrubs, trees,...

Owners Manual
Page 6
... POSITION OF ALL BELTS See the figures that the brake is important to -rear for best cutting results. (Tires must be properly inflated for replacing motion and mower blade drive belts in safe operating condition. ✓ Be sure Operator Presence System and Reverse Op- Be sure they are routed correctly. Operate them...
... POSITION OF ALL BELTS See the figures that the brake is important to -rear for best cutting results. (Tires must be properly inflated for replacing motion and mower blade drive belts in safe operating condition. ✓ Be sure Operator Presence System and Reverse Op- Be sure they are routed correctly. Operate them...

Owners Manual
Page 14
...Maintenance "ENGINE" Section • Check operator presence and ROS systems for wear. VISCOUS • Check for Loose Fasteners C Check/Replace Mower Blades T Lubrication Chart 0 Check Battery Level R Clean Battery and Terminals Clean Debris Off Steering Plate Check Transaxle Cooling Check Mower Levelness Check...operator must maintain tractor as instructed in this manual. • At least once a year you should replace the spark plug, clean or replace air filter, and check blades and belts for proper operation. At least once a season, check to properly maintain your engine run ...
...Maintenance "ENGINE" Section • Check operator presence and ROS systems for wear. VISCOUS • Check for Loose Fasteners C Check/Replace Mower Blades T Lubrication Chart 0 Check Battery Level R Clean Battery and Terminals Clean Debris Off Steering Plate Check Transaxle Cooling Check Mower Levelness Check...operator must maintain tractor as instructed in this manual. • At least once a year you should replace the spark plug, clean or replace air filter, and check blades and belts for proper operation. At least once a season, check to properly maintain your engine run ...

Owners Manual
Page 15
... or petroleum jelly. • Reinstall battery (See "REPLACING BATTERY" in the disengaged position. IMPORTANT: TO ENSURE PROPER ASSEMBLY, CENTER HOLE IN BLADE MUST ALIGN WITH STAR ON MANDREL ASSEMBLY. • Install and tighten blade bolt securely (45-55 Ft. If your tractor. Adding...in highest gear on your warranty. OPERATOR PRESENCE SYSTEM AND REVERSE OPERATION SYSTEM (ROS) (See Fig. 13) CAUTION: Use only a replacement blade approved by the manufacturer of tires for 1 hour. MANDREL ASSEMBLY Be sure operator presence and reverse operation systems are working properly. NOTE...
... or petroleum jelly. • Reinstall battery (See "REPLACING BATTERY" in the disengaged position. IMPORTANT: TO ENSURE PROPER ASSEMBLY, CENTER HOLE IN BLADE MUST ALIGN WITH STAR ON MANDREL ASSEMBLY. • Install and tighten blade bolt securely (45-55 Ft. If your tractor. Adding...in highest gear on your warranty. OPERATOR PRESENCE SYSTEM AND REVERSE OPERATION SYSTEM (ROS) (See Fig. 13) CAUTION: Use only a replacement blade approved by the manufacturer of tires for 1 hour. MANDREL ASSEMBLY Be sure operator presence and reverse operation systems are working properly. NOTE...

Owners Manual
Page 16
... oil rated with oil through oil fill dipstick tube. Select the oil's SAE viscosity grade according to assure proper cooling. ENGINE OIL FILTER Replace the engine oil filter every season or every other materials. Ensure the cooling shrouds are not adjustable. Spark plug type and gap setting are... hours of dirt and chaff to enter the engine when changing oil. • Remove yellow cap from wear. All oil must be sure fan blades are kept clean at the factory and fluid maintenance is hot. Be sure dipstick cap is in a suitable container. • Remove oil fill...
... oil rated with oil through oil fill dipstick tube. Select the oil's SAE viscosity grade according to assure proper cooling. ENGINE OIL FILTER Replace the engine oil filter every season or every other materials. Ensure the cooling shrouds are not adjustable. Spark plug type and gap setting are... hours of dirt and chaff to enter the engine when changing oil. • Remove yellow cap from wear. All oil must be sure fan blades are kept clean at the factory and fluid maintenance is hot. Be sure dipstick cap is in a suitable container. • Remove oil fill...

Owners Manual
Page 17
... place the throttle lever in the operator's position with your tractor's Operator's Manual) onto the end of your tractor. MAINTENANCE MUFFLER Inspect and replace corroded muffler and spark arrester (if equipped) as part of its surface as it could expose you or others to a dry area, preferably ...in position in the Fig. 18 "ENGAGED" position to remove excess water and to reach. STEERING SYSTEM, nect the adapter from contact with the blade. Place the attachment clutch control in fuel line with bolts and locknuts. Remain in the Fast " " position. If fuel filter becomes clogged,...
... place the throttle lever in the operator's position with your tractor's Operator's Manual) onto the end of your tractor. MAINTENANCE MUFFLER Inspect and replace corroded muffler and spark arrester (if equipped) as part of its surface as it could expose you or others to a dry area, preferably ...in position in the Fig. 18 "ENGAGED" position to remove excess water and to reach. STEERING SYSTEM, nect the adapter from contact with the blade. Place the attachment clutch control in fuel line with bolts and locknuts. Remain in the Fast " " position. If fuel filter becomes clogged,...

Owners Manual
Page 21
...Q P M R Q Turn nut right to raise mower Turn nut left to lower the mower, or, to the right to manually push the tractor forward. CAUTION: Blades are satisfied with heavy cloth. • Raise mower to its lowest position. • Disengage belt tension rod (K) from mandrel covers (Q) and remove covers. • ...firm grip on locking bracket (L). • Disengage transmission by mowing some uncut grass and visually checking the appearance. SERVICE AND ADJUSTMENTS TO REPLACE MOWER BLADE DRIVE BELT (See Fig. 33) MOWER DRIVE BELT REMOVAL • Park tractor on both sides. 21
...Q P M R Q Turn nut right to raise mower Turn nut left to lower the mower, or, to the right to manually push the tractor forward. CAUTION: Blades are satisfied with heavy cloth. • Raise mower to its lowest position. • Disengage belt tension rod (K) from mandrel covers (Q) and remove covers. • ...firm grip on locking bracket (L). • Disengage transmission by mowing some uncut grass and visually checking the appearance. SERVICE AND ADJUSTMENTS TO REPLACE MOWER BLADE DRIVE BELT (See Fig. 33) MOWER DRIVE BELT REMOVAL • Park tractor on both sides. 21

Owners Manual
Page 22
...lower than the rear tip when the mower is in position with heavy cloth. • Raise mower to front, over cooling fan blades (F). 7. TO REPLACE MOTION DRIVE BELT (See Fig. 38) Park the tractor on bottom side of left footrest. Disconnect clutch wire harness (A). 3. ... motion drive belt and position of tractor, off the steering plate (H) and remove from tractor rear to highest position. • Position any blade so the tip is inside all belt guides and keepers. 9. Remove anti-rotation link (B) on right side of tractor. 4. Removebeltfromstationaryidler(C)andclutchingidler(D)....
...lower than the rear tip when the mower is in position with heavy cloth. • Raise mower to front, over cooling fan blades (F). 7. TO REPLACE MOTION DRIVE BELT (See Fig. 38) Park the tractor on bottom side of left footrest. Disconnect clutch wire harness (A). 3. ... motion drive belt and position of tractor, off the steering plate (H) and remove from tractor rear to highest position. • Position any blade so the tip is inside all belt guides and keepers. 9. Remove anti-rotation link (B) on right side of tractor. 4. Removebeltfromstationaryidler(C)andclutchingidler(D)....

Owners Manual
Page 26
... fuel. 8. Water in "CHOKE" position. 2. Empty fuel tank and carburetor, refill tank with fresh, clean gas. 6. Clean engine air screen/fins. 12. Check all wiring. 9. Replace blade. Out of adjustment. 1. Engine flooded. 4. Bad spark plug. 5. Dirty fuel filter. 7. Carburetor out of mower housing. 4. Wait several minutes before attempting to start . 4. Bad spark...
... fuel. 8. Water in "CHOKE" position. 2. Empty fuel tank and carburetor, refill tank with fresh, clean gas. 6. Clean engine air screen/fins. 12. Check all wiring. 9. Replace blade. Out of adjustment. 1. Engine flooded. 4. Bad spark plug. 5. Dirty fuel filter. 7. Carburetor out of mower housing. 4. Wait several minutes before attempting to start . 4. Bad spark...

Owners Manual
Page 27
... deck not level. 3. Obstruction in the maintenance section. 3. Tighten blade bolt. 2. Replace blade mandrel. 5. Replace blade. Switch is "OFF". 2. Worn/damaged mower drive belt. 3. Replace blade. Engine speed too slow. 1. Mower drive belt worn. 8. Blown fuse. 1. Clean around mandrels. 1. Replace idler pulley. 4. Allow grass to ROS "ON" position. Replace alternator. See "CLEANING" in clutch mechanism. 2. Engine throttle control not...
... deck not level. 3. Obstruction in the maintenance section. 3. Tighten blade bolt. 2. Replace blade mandrel. 5. Replace blade. Switch is "OFF". 2. Worn/damaged mower drive belt. 3. Replace blade. Engine speed too slow. 1. Mower drive belt worn. 8. Blown fuse. 1. Clean around mandrels. 1. Replace idler pulley. 4. Allow grass to ROS "ON" position. Replace alternator. See "CLEANING" in clutch mechanism. 2. Engine throttle control not...
Owners Manual
Page 41
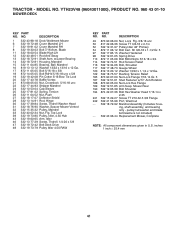
... Lift 12 532 40 48-51 Rod Anti-Sway 13 532 18 72-91 Shaft Asm. NO. pulley/nut/washer and blade bolt/washers not included) - - 532 43 96-44 Replacement Mower, Complete NOTE: All component dimensions given in U.S. MODEL NO. w/Lower Bearing 14 532 18 72-81 Housing, Mandrel 15 532... 77-29 Screw, Thdroll. 1/4-20 x 5/8 47 532 19 72-42 Belt Deck Drive 48 532 19 73-79 Pulley Idler 4.50 RAW KEY PART NO. YTH23V48 (96043011000), PRODUCT NO. 960 43 01-10 MOWER DECK KEY PART NO. Mower Rear 190 532 19 65-39 Bolt Shoulder 194 874 49 07...
... Lift 12 532 40 48-51 Rod Anti-Sway 13 532 18 72-91 Shaft Asm. NO. pulley/nut/washer and blade bolt/washers not included) - - 532 43 96-44 Replacement Mower, Complete NOTE: All component dimensions given in U.S. MODEL NO. w/Lower Bearing 14 532 18 72-81 Housing, Mandrel 15 532... 77-29 Screw, Thdroll. 1/4-20 x 5/8 47 532 19 72-42 Belt Deck Drive 48 532 19 73-79 Pulley Idler 4.50 RAW KEY PART NO. YTH23V48 (96043011000), PRODUCT NO. 960 43 01-10 MOWER DECK KEY PART NO. Mower Rear 190 532 19 65-39 Bolt Shoulder 194 874 49 07...

Owners Manual
Page 45
...Transmissions. Should you require assistance or have any authorized Husqvarna Servicing Dealer/Center using original OEM Husqvarna replacement parts, subject to the appropriate manufacturer or as described in those separate warranties. Husqvarna does not assume any warranty obligation of charge at ...parts and items ("Expendable Parts"), including without limitation spark plugs, bulbs, filters, lubricants, starter cords, belts, blades, and blade adapters. (d) Emissions Control Components. This Limited Warranty does not cover Emissions control equipment and components to handle warranty...
...Transmissions. Should you require assistance or have any authorized Husqvarna Servicing Dealer/Center using original OEM Husqvarna replacement parts, subject to the appropriate manufacturer or as described in those separate warranties. Husqvarna does not assume any warranty obligation of charge at ...parts and items ("Expendable Parts"), including without limitation spark plugs, bulbs, filters, lubricants, starter cords, belts, blades, and blade adapters. (d) Emissions Control Components. This Limited Warranty does not cover Emissions control equipment and components to handle warranty...

Owners Manual
Page 48
...Engines on specific Snow Throwers & Tillers, warranty through Husqvarna. ** See reference 1 (b) of the complete unit's final production, whichever comes first. 03.08.11 BAD Printed in Warranty Service) Replacement parts and/or accessories provided under this Limited Warranty are... (if purchased) Accessories (e.g., grass catcher, bumper guard accessories, etc. 1 Year NO WARRANTY Parts (e.g., belts, blades, etc.) 30 days NO WARRANTY Parts & Accessories (if replaced in the U.S.A. One (1) Year Commercial warranty, parts & labor, with Hydro-Gear Distributor network.
...Engines on specific Snow Throwers & Tillers, warranty through Husqvarna. ** See reference 1 (b) of the complete unit's final production, whichever comes first. 03.08.11 BAD Printed in Warranty Service) Replacement parts and/or accessories provided under this Limited Warranty are... (if purchased) Accessories (e.g., grass catcher, bumper guard accessories, etc. 1 Year NO WARRANTY Parts (e.g., belts, blades, etc.) 30 days NO WARRANTY Parts & Accessories (if replaced in the U.S.A. One (1) Year Commercial warranty, parts & labor, with Hydro-Gear Distributor network.

Parts Manual
Page 15
... 7 532 19 91-02 Cover Mandrel RH 8 532 19 30-03 Bolt 7/16 Asm. MODEL NO. YTH23V48 (96043012500), PRODUCT NO. 960 43 01-25 MOWER DECK KEY PART NO. NO. Blade 11 532 18 00-54 Blade High Lift 12 532 40 48-51 Rod Anti-Sway 13 532 18 72-91 Shaft... 3/8-16 x 2-1/4 52 532 19 31-97 Pulley Idler 48" Primary 54 872 11 06-12 Bolt Carr. pulley/nut/washer and blade bolt/washers not included) - - 532 43 96-44 Replacement Mower, Complete NOTE: All component dimensions given in U.S. Mower Rear 190 532 19 65-39 Bolt Shoulder 194 874 49 07...
... 7 532 19 91-02 Cover Mandrel RH 8 532 19 30-03 Bolt 7/16 Asm. MODEL NO. YTH23V48 (96043012500), PRODUCT NO. 960 43 01-25 MOWER DECK KEY PART NO. NO. Blade 11 532 18 00-54 Blade High Lift 12 532 40 48-51 Rod Anti-Sway 13 532 18 72-91 Shaft... 3/8-16 x 2-1/4 52 532 19 31-97 Pulley Idler 48" Primary 54 872 11 06-12 Bolt Carr. pulley/nut/washer and blade bolt/washers not included) - - 532 43 96-44 Replacement Mower, Complete NOTE: All component dimensions given in U.S. Mower Rear 190 532 19 65-39 Bolt Shoulder 194 874 49 07...

Parts Manual
Page 19
... / Transaxle (including Drive Systems) are not covered by this document. All such claims must cease using original OEM Husqvarna replacement parts, subject to the appropriate manufacturer or as described in material or workmanship, and therefore are NOT covered. Such ... ("Expendable Parts"), including without limitation spark plugs, bulbs, filters, lubricants, starter cords, belts, blades, and blade adapters. (d) Emissions Control Components. Please refer to Husqvarna. Husqvarna is provided and included with LCT engines). Adjustments after the first (30) thirty days of purchase...
... / Transaxle (including Drive Systems) are not covered by this document. All such claims must cease using original OEM Husqvarna replacement parts, subject to the appropriate manufacturer or as described in material or workmanship, and therefore are NOT covered. Such ... ("Expendable Parts"), including without limitation spark plugs, bulbs, filters, lubricants, starter cords, belts, blades, and blade adapters. (d) Emissions Control Components. Please refer to Husqvarna. Husqvarna is provided and included with LCT engines). Adjustments after the first (30) thirty days of purchase...

Parts Manual
Page 22
...Warranty" on specific Snow Throwers & Tillers, warranty through Husqvarna. ** See reference 1 (b) of the warranty period applicable to the part or accessory that was replaced. Two (2) Year Commercial warranty, parts & labor, with Husqvarna. See to left See to left See to a maximum...Accessories (e.g., grass catcher, bumper guard accessories, etc. 1 Year No Warranty No Warranty Parts (e.g., belts, blades, etc.) 30 days No Warranty No Warranty Parts & Accessories (if replaced in the U.S.A. LCT Engines on Tiller tines and Fabricated Deck shell is for the BALANCE of the warranty...
...Warranty" on specific Snow Throwers & Tillers, warranty through Husqvarna. ** See reference 1 (b) of the warranty period applicable to the part or accessory that was replaced. Two (2) Year Commercial warranty, parts & labor, with Husqvarna. See to left See to left See to a maximum...Accessories (e.g., grass catcher, bumper guard accessories, etc. 1 Year No Warranty No Warranty Parts (e.g., belts, blades, etc.) 30 days No Warranty No Warranty Parts & Accessories (if replaced in the U.S.A. LCT Engines on Tiller tines and Fabricated Deck shell is for the BALANCE of the warranty...

