

Owners Manual
Page 1
07002 YTH22V46XLS Owner's Manual Gasoline containing up to 10% ethanol (E10) is acceptable for use of any gasoline exceeding 10% ethanol (E10) will void the product warranty. 532 44 16-52 Rev. 2 The use in this machine.
07002 YTH22V46XLS Owner's Manual Gasoline containing up to 10% ethanol (E10) is acceptable for use of any gasoline exceeding 10% ethanol (E10) will void the product warranty. 532 44 16-52 Rev. 2 The use in this machine.

Owners Manual
Page 2
... a slope. Always turn off engine and wait for wheel weights or counterweights. • Keep machine free of a load, while on the machine and in the manual before operating. If you cannot back up to neutral and coast downhill. • Avoid starting . • Do not put hands or feet near or crossing...
... a slope. Always turn off engine and wait for wheel weights or counterweights. • Keep machine free of a load, while on the machine and in the manual before operating. If you cannot back up to neutral and coast downhill. • Avoid starting . • Do not put hands or feet near or crossing...

Owners Manual
Page 4
Always observe the "SAFETY RULES". In the state of this owner's manual. A spark arrester for and using your tractor. • Follow the instructions under "Maintenance" and "Storage" sections of California the above 32°F) SAE 5W-30 (.... If a spark arrester is required by the operator. Other states may have competent, well-trained technicians and the proper tools to service or repair this manual. Federal laws apply on or near any ). CUSTOMER RESPONSIBILITIES • Read and observe the safety rules. • Follow a regular schedule in maintaining, caring for the...
Always observe the "SAFETY RULES". In the state of this owner's manual. A spark arrester for and using your tractor. • Follow the instructions under "Maintenance" and "Storage" sections of California the above 32°F) SAE 5W-30 (.... If a spark arrester is required by the operator. Other states may have competent, well-trained technicians and the proper tools to service or repair this manual. Federal laws apply on or near any ). CUSTOMER RESPONSIBILITIES • Read and observe the safety rules. • Follow a regular schedule in maintaining, caring for the...
Owners Manual
Page 5
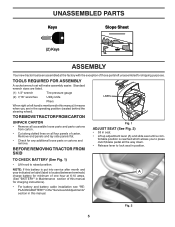
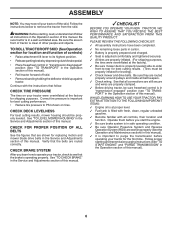
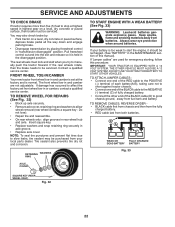
...operating position (seated behind the steering wheel). Fig. 2 5 TOOLS REQUIRED FOR ASSEMBLY A socket wrench set will make assembly easier. NOTE: If this manual, it means when you to press clutch/brake pedal all the way down. • Release lever to raised position. TO CHECK BATTERY (See Fig...seat in seat. • Lift up adjustment lever (A) and slide seat until a com- fortable position is mentioned in Maintenance section of this manual. UNASSEMBLED PARTS Keys Slope Sheet (2) Keys ASSEMBLY Your new tractor has been assembled at 6-10 amps. (See "BATTERY" in this battery ...
...operating position (seated behind the steering wheel). Fig. 2 5 TOOLS REQUIRED FOR ASSEMBLY A socket wrench set will make assembly easier. NOTE: If this manual, it means when you to press clutch/brake pedal all the way down. • Release lever to raised position. TO CHECK BATTERY (See Fig...seat in seat. • Lift up adjustment lever (A) and slide seat until a com- fortable position is mentioned in Maintenance section of this manual. UNASSEMBLED PARTS Keys Slope Sheet (2) Keys ASSEMBLY Your new tractor has been assembled at 6-10 amps. (See "BATTERY" in this battery ...
Owners Manual
Page 6
...off skid. • Remove banding holding the deflector shield up against tractor. See "TO CHECK BRAKE" in the Operation section of this manual. Follow the instructions below to -rear for best cutting results. (Tires must be properly inflated for replacing motion and mower blade drive belts...the belts are properly inflated. (For shipping purposes, the tires were overinflated at proper level. ✓ Fuel tank is clear of this manual. ✓CHECKLIST BEFORE YOU OPERATE YOUR NEW TRACTOR, WE WISH TO ASSURE THAT YOU RECEIVE THE BEST PERFORMANCE AND SATISFACTION FROM THIS QUALITY PRODUCT...
...off skid. • Remove banding holding the deflector shield up against tractor. See "TO CHECK BRAKE" in the Operation section of this manual. Follow the instructions below to -rear for best cutting results. (Tires must be properly inflated for replacing motion and mower blade drive belts...the belts are properly inflated. (For shipping purposes, the tires were overinflated at proper level. ✓ Fuel tank is clear of this manual. ✓CHECKLIST BEFORE YOU OPERATE YOUR NEW TRACTOR, WE WISH TO ASSURE THAT YOU RECEIVE THE BEST PERFORMANCE AND SATISFACTION FROM THIS QUALITY PRODUCT...

Owners Manual
Page 8
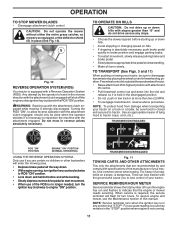
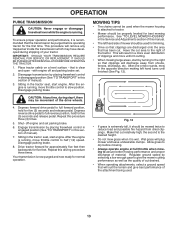
OPERATION KNOW YOUR TRACTOR READ THIS OWNER'S MANUAL AND SAFETY RULES BEFORE OPERATING YOUR TRACTOR Compare the illustrations with your tractor to familiarize yourself with the engine off . (J) CRUISE CONTROL LEVER - Used... Used for reverse movement of battery. 8 Indicates charging (+) or discharging (-) of tractor. (M) FREEWHEEL CONTROL - Used for forward movement of tractor. (L) REVERSE DRIVE PEDAL - Save this manual for pushing or slowly towing the tractor with the locations of tractor at desired speed without holding the forward drive pedal. (K) FORWARD DRIVE PEDAL - Used...
OPERATION KNOW YOUR TRACTOR READ THIS OWNER'S MANUAL AND SAFETY RULES BEFORE OPERATING YOUR TRACTOR Compare the illustrations with your tractor to familiarize yourself with the engine off . (J) CRUISE CONTROL LEVER - Used... Used for reverse movement of battery. 8 Indicates charging (+) or discharging (-) of tractor. (M) FREEWHEEL CONTROL - Used for forward movement of tractor. (L) REVERSE DRIVE PEDAL - Save this manual for pushing or slowly towing the tractor with the locations of tractor at desired speed without holding the forward drive pedal. (K) FORWARD DRIVE PEDAL - Used...

Owners Manual
Page 10
... pedal to disengage. To disengage the cruise control, depress the brake pedal or tap on rough, rolling terrain or hills. • Select desired height of manual). • With mower in appropriate hole. The heights are approximate and may cause the cruise control to begin movement. the second to 4". Gauge wheels then...
... pedal to disengage. To disengage the cruise control, depress the brake pedal or tap on rough, rolling terrain or hills. • Select desired height of manual). • With mower in appropriate hole. The heights are approximate and may cause the cruise control to begin movement. the second to 4". Gauge wheels then...
Owners Manual
Page 11
... drive pedal to start movement. • When use if you are recommended by the operator to engine "ON" position. Use an appropriate means of this manual. Tires can lose traction with a Reverse Operation System (ROS). When service is in the disengaged position. • Do not push or tow tractor at more...
... drive pedal to start movement. • When use if you are recommended by the operator to engine "ON" position. Use an appropriate means of this manual. Tires can lose traction with a Reverse Operation System (ROS). When service is in the disengaged position. • Do not push or tow tractor at more...
Owners Manual
Page 12
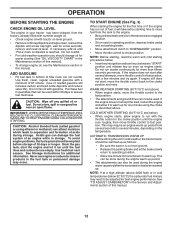
...the fuel lines and carburetor are empty. TO START ENGINE (See Fig. 3) When starting the engine for transmission to separation and formation of this manual. 12 Do not run with the throttle control in operating position, depress brake pedal and set parking brake. • Move attachment clutch to "... on the temperature. Use fresh, clean, regular unleaded gasoline with gasoline. Do not mix oil with a minimum of 87 octane. (Use of this manual. Do not overfill. • For cold weather operation you should be emptied before storage of fuel, it run out of 30 days or longer. If...
...the fuel lines and carburetor are empty. TO START ENGINE (See Fig. 3) When starting the engine for transmission to separation and formation of this manual. 12 Do not run with the throttle control in operating position, depress brake pedal and set parking brake. • Move attachment clutch to "... on the temperature. Use fresh, clean, regular unleaded gasoline with gasoline. Do not mix oil with a minimum of 87 octane. (Use of this manual. Do not overfill. • For cold weather operation you should be emptied before storage of fuel, it run out of 30 days or longer. If...
Owners Manual
Page 13
... areas, start by placing freewheel control in disengaged position (See "TO TRANSPORT" in the Service and Adjustments section of this section of manual). 7. Disengage transmission by turning to the right so that clippings will discharge away from dried clippings. Depress forward drive pedal to full...- Disengage parking brake. 8. See "TO LEVEL MOWER HOUSING" in this section of the tractor. Make first cut area to the right of manual). 3. Place tractor safely on a level surface - After the engine is running, move throttle control to half (1/2) speed. Sitting in the opposite...
... areas, start by placing freewheel control in disengaged position (See "TO TRANSPORT" in the Service and Adjustments section of this section of manual). 7. Disengage transmission by turning to the right so that clippings will discharge away from dried clippings. Depress forward drive pedal to full...- Disengage parking brake. 8. See "TO LEVEL MOWER HOUSING" in this section of the tractor. Make first cut area to the right of manual). 3. Place tractor safely on a level surface - After the engine is running, move throttle control to half (1/2) speed. Sitting in the opposite...

Owners Manual
Page 14
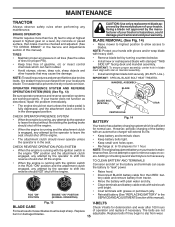
...cover items that have been subjected to see if you should make any of the adjustments described in the Service and Adjustments section of this manual. ➀ SPINDLE ZERK ➀ SPINDLE ZERK Some adjustments will need to be made periodically to Maintenance "ENGINE" Section IMPORTANT: DO ... blades more often when operating in sandy soil. 4 - To receive full value from the warranty, operator must maintain tractor as instructed in this manual. • At least once a year you should replace the spark plug, clean or replace air filter, and check blades and belts for wear...
...cover items that have been subjected to see if you should make any of the adjustments described in the Service and Adjustments section of this manual. ➀ SPINDLE ZERK ➀ SPINDLE ZERK Some adjustments will need to be made periodically to Maintenance "ENGINE" Section IMPORTANT: DO ... blades more often when operating in sandy soil. 4 - To receive full value from the warranty, operator must maintain tractor as instructed in this manual. • At least once a year you should replace the spark plug, clean or replace air filter, and check blades and belts for wear...
Owners Manual
Page 15
...switch in the Service and Adjustments section of electrolyte is in the seat. Do not attempt to blades. Adding or checking level of this manual). Fig. 13 V-BELTS BLADE CARE Check V-belts for normal use. Replace belts if they begin to shift into reverse should shut off...checked and adjusted. (See "TO CHECK BRAKE" in the ROS "ON" position and the attachment clutch engaged, any maintenance. Replace of this manual). Lbs.). The belts are working properly. TIRES • Maintain proper air pressure in the SERVICE AND ADJUSTMENTS section of operation and replace if ...
...switch in the Service and Adjustments section of electrolyte is in the seat. Do not attempt to blades. Adding or checking level of this manual). Fig. 13 V-BELTS BLADE CARE Check V-belts for normal use. Replace belts if they begin to shift into reverse should shut off...checked and adjusted. (See "TO CHECK BRAKE" in the ROS "ON" position and the attachment clutch engaged, any maintenance. Replace of this manual). Lbs.). The belts are working properly. TIRES • Maintain proper air pressure in the SERVICE AND ADJUSTMENTS section of operation and replace if ...
Owners Manual
Page 16
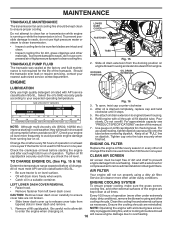
... FLUID The transaxle was sealed at "FULL" line on engine blower housing and extend outward from left lower dash cover. Every 100 hours of this manual. 7. AIR FILTER Your engine will drain more than 100 hours in a suitable container.
... FLUID The transaxle was sealed at "FULL" line on engine blower housing and extend outward from left lower dash cover. Every 100 hours of this manual. 7. AIR FILTER Your engine will drain more than 100 hours in a suitable container.

Owners Manual
Page 17
... sitting in the operator's position on the tractor, re-start the engine and place the throttle lever in "PRODUCT SPECIFICATIONS" section of this manual. Move the tractor's attachment clutch control to the "ENGAGED" position. Turn the ignition key to the STOP position to a level, clear spot...a washout port on your lawn, near enough to a water spigot for your garden hose to thrown objects from contact with your tractor's Operator's Manual) onto the end of your tractor unless the engine and transmission are properly positioned. • Immediately wipe up any holes in the "DISENGAGED"...
... sitting in the operator's position on the tractor, re-start the engine and place the throttle lever in "PRODUCT SPECIFICATIONS" section of this manual. Move the tractor's attachment clutch control to the "ENGAGED" position. Turn the ignition key to the STOP position to a level, clear spot...a washout port on your lawn, near enough to a water spigot for your garden hose to thrown objects from contact with your tractor's Operator's Manual) onto the end of your tractor unless the engine and transmission are properly positioned. • Immediately wipe up any holes in the "DISENGAGED"...
Owners Manual
Page 19
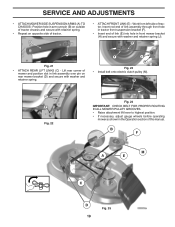
Work from left side of this manual. Insert rod end of link assembly through front hole in tractor front suspension bracket (F). • Insert end of link (E) into hole in the Operation section ...
Work from left side of this manual. Insert rod end of link assembly through front hole in tractor front suspension bracket (F). • Insert end of link (E) into hole in the Operation section ...
Owners Manual
Page 21
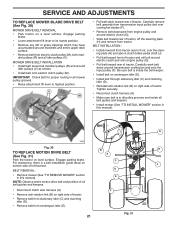
...pulley (G). • Pull belt toward rear of tractor. BELT REMOVAL - • Remove mower (See "TO REMOVE MOWER" section in this manual). NOTE: Observe entire motion drive belt and position of all mandrel pulleys (R) and around transmission cooling fan and onto the input pulley (F). MOWER...electric clutch pulley (M), both mandrel pulleys (R) and all belt guides and keepers. • Install mower (See "TO INSTALL MOWER" section in this manual). IMPORTANT: Check belt for proper routing in all pulley grooves and inside the belt keeper. • Install belt on centerspan idler (E). •...
...pulley (G). • Pull belt toward rear of tractor. BELT REMOVAL - • Remove mower (See "TO REMOVE MOWER" section in this manual). NOTE: Observe entire motion drive belt and position of all mandrel pulleys (R) and around transmission cooling fan and onto the input pulley (F). MOWER...electric clutch pulley (M), both mandrel pulleys (R) and all belt guides and keepers. • Install mower (See "TO INSTALL MOWER" section in this manual). IMPORTANT: Check belt for proper routing in all pulley grooves and inside the belt keeper. • Install belt on centerspan idler (E). •...
Owners Manual
Page 22
... protection when around batteries. DO NOT USE YOUR TRACTOR BATTERY TO START OTHER VEHICLES. The rear wheels must be serviced. If damage has occurred to manually push the tractor forward. Do not lose). • Repair tire and reassemble. • On rear wheels only: align grooves in axle groove. • Replace axle..., contact a qualified service center. FRONT WHEEL TOE-IN/CAMBER Your new tractor front wheel toe-in and camber are used for emergency starting, follow this manual).
... protection when around batteries. DO NOT USE YOUR TRACTOR BATTERY TO START OTHER VEHICLES. The rear wheels must be serviced. If damage has occurred to manually push the tractor forward. Do not lose). • Repair tire and reassemble. • On rear wheels only: align grooves in axle groove. • Replace axle..., contact a qualified service center. FRONT WHEEL TOE-IN/CAMBER Your new tractor front wheel toe-in and camber are used for emergency starting, follow this manual).
Owners Manual
Page 23
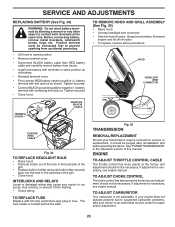
...transmission require removal for repair and/or adjustment. 23 Tighten securely • Close hood. The fuse holder is necessary, see engine manual. Tighten securely. • Connect BLACK grounding cable to an authorized service center for service or replacement, it from tractor. •...prevent it should be purged after reinstallation and before operating the tractor. TO ADJUST CARBURETOR Your carburetor is necessary, see engne manual. See "PURGE TRANSMISSION" in fuse. If adjustment is not adjustable. TO ADJUST CHOKE CONTROL The choke control has been preset...
...transmission require removal for repair and/or adjustment. 23 Tighten securely • Close hood. The fuse holder is necessary, see engine manual. Tighten securely. • Connect BLACK grounding cable to an authorized service center for service or replacement, it from tractor. •...prevent it should be purged after reinstallation and before operating the tractor. TO ADJUST CARBURETOR Your carburetor is necessary, see engne manual. See "PURGE TRANSMISSION" in fuse. If adjustment is not adjustable. TO ADJUST CHOKE CONTROL The choke control has been preset...

Owners Manual
Page 24
... tank and carburetor if using fuel stabilizer. ENGINE OIL Drain oil (with engine warm) and replace with gasoline in the Maintenance section of this manual). • Inspect and replace belts, if necessary (See belt re- Plastic cannot breathe which allows condensation to form and will cause problems.... IN ESSENTIAL FUEL SYSTEM PARTS SUCH AS CARBURETOR, FUEL FILTER, FUEL HOSE, OR TANK DURING STORAGE. Run engine at the end of this manual). • After cleaning, leave cables disconnected and place cables where they cannot come in contact with battery terminals. • If battery is...
... tank and carburetor if using fuel stabilizer. ENGINE OIL Drain oil (with engine warm) and replace with gasoline in the Maintenance section of this manual). • Inspect and replace belts, if necessary (See belt re- Plastic cannot breathe which allows condensation to form and will cause problems.... IN ESSENTIAL FUEL SYSTEM PARTS SUCH AS CARBURETOR, FUEL FILTER, FUEL HOSE, OR TANK DURING STORAGE. Run engine at the end of this manual). • After cleaning, leave cables disconnected and place cables where they cannot come in contact with battery terminals. • If battery is...

Owners Manual
Page 26
... bolt. 7. Replace with attachment clutch engaged 1. of drive 1. Bad battery cell(s). 2. Faulty regulator (if so equipped). 4. Check/clean all connections. 3. Place freewheel control in parts manual. 11. Bent blade mandrel. 5. Worn/damaged mower drive belt. 3. Level mower deck. 5. Blades improperly installed. 9. Faulty light switch. 4. Replace bulb(s) or lamp(s). 3. Engine throttle control...
... bolt. 7. Replace with attachment clutch engaged 1. of drive 1. Bad battery cell(s). 2. Faulty regulator (if so equipped). 4. Check/clean all connections. 3. Place freewheel control in parts manual. 11. Bent blade mandrel. 5. Worn/damaged mower drive belt. 3. Level mower deck. 5. Blades improperly installed. 9. Faulty light switch. 4. Replace bulb(s) or lamp(s). 3. Engine throttle control...

