

Owners Manual
Page 2
...when setting up to operate the machine. • Clear the area of the tractor. WARNING Engine exhaust, some of its constituents, and certain vehicle components contain or emit chemicals known to ...the State of your tractor. Clean any oil or fuel spillage before storage. Allow machine to protect themselves and others...caves in place and working. • Slow down slopes. Keep clear of your tractor. Do not allow responsible adults, who are involved in gear when going down before dismounting. • Disengage...
...when setting up to operate the machine. • Clear the area of the tractor. WARNING Engine exhaust, some of its constituents, and certain vehicle components contain or emit chemicals known to ...the State of your tractor. Clean any oil or fuel spillage before storage. Allow machine to protect themselves and others...caves in place and working. • Slow down slopes. Keep clear of your tractor. Do not allow responsible adults, who are involved in gear when going down before dismounting. • Disengage...

Owners Manual
Page 4
... possible dependability and performance. It has been designed, engineered and manufactured to assemble and maintain your purchase of a new tractor. Please read and retain this owner's manual. Always observe the "SAFETY RULES". Other states may have competent, well-trained... technicians and the proper tools to service or repair this tractor. TABLE OF CONTENTS SAFETY RULES 2-3 MAINTENANCE SCHEDULE 14 PRODUCT SPECIFICATIONS 4 MAINTENANCE 14-17 CUSTOMER RESPONSIBILITIES 4 SERVICE AND ADJUSTMENTS 18-...
... possible dependability and performance. It has been designed, engineered and manufactured to assemble and maintain your purchase of a new tractor. Please read and retain this owner's manual. Always observe the "SAFETY RULES". Other states may have competent, well-trained... technicians and the proper tools to service or repair this tractor. TABLE OF CONTENTS SAFETY RULES 2-3 MAINTENANCE SCHEDULE 14 PRODUCT SPECIFICATIONS 4 MAINTENANCE 14-17 CUSTOMER RESPONSIBILITIES 4 SERVICE AND ADJUSTMENTS 18-...
Owners Manual
Page 5
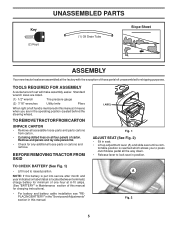
...installation see "REPLACING BATTERY" in the "Service and Adjustments" section in position. Key (2) Keys UNASSEMBLED PARTS (1) Oil Drain Tube Slope Sheet ASSEMBLY Your new tractor has been assembled at 6-10 amps. (See "BATTERY" in Maintenance section of carton. A Fig. 2 5 Standard wrench sizes are listed. (1) 1/2"... put into service after month and year indicated on all the way down. • Release lever to raised position. TO REMOVE TRACTOR FROM CARTON UNPACK CARTON • Remove all accessible loose parts and parts cartons from carton . • Cut along dotted lines ...
...installation see "REPLACING BATTERY" in the "Service and Adjustments" section in position. Key (2) Keys UNASSEMBLED PARTS (1) Oil Drain Tube Slope Sheet ASSEMBLY Your new tractor has been assembled at 6-10 amps. (See "BATTERY" in Maintenance section of carton. A Fig. 2 5 Standard wrench sizes are listed. (1) 1/2"... put into service after month and year indicated on all the way down. • Release lever to raised position. TO REMOVE TRACTOR FROM CARTON UNPACK CARTON • Remove all accessible loose parts and parts cartons from carton . • Cut along dotted lines ...

Owners Manual
Page 6
...starting , read, understand and follow . Correct tire pressure is important to purge the transmission before you learn how to operate your tractor off skid. Verify that follow all controls, their location and function. Be sure they are routed properly around pulleys and inside all ... instructions below to disengage transmission (See "TO TRANSPORT" in the Operation section of this manual). ASSEMBLY NOTE: You may now roll your tractor, check to see that the brake is in a well-ventilated area. WARNING: Before starting and transmission purging instructions (See "TO START ENGINE...
...starting , read, understand and follow . Correct tire pressure is important to purge the transmission before you learn how to operate your tractor off skid. Verify that follow all controls, their location and function. Be sure they are routed properly around pulleys and inside all ... instructions below to disengage transmission (See "TO TRANSPORT" in the Operation section of this manual). ASSEMBLY NOTE: You may now roll your tractor, check to see that the brake is in a well-ventilated area. WARNING: Before starting and transmission purging instructions (See "TO START ENGINE...

Owners Manual
Page 7
...indicates a hazard which , if not avoided, could result in death, serious injury and/or property damage. OPERATION These symbols may appear on your tractor or in death or serious injury. CAUTION indicates a hazard which , if not avoided, will result in death, serious injury and/or property damage.... Learn and understand their meaning. FIRE indicates a hazard which can result in death or serious injury. CAUTION when used to the tractor and/or engine. The safety alert symbol is used without the alert symbol, indicates a situation that could result in damage to identify ...
...indicates a hazard which , if not avoided, could result in death, serious injury and/or property damage. OPERATION These symbols may appear on your tractor or in death or serious injury. CAUTION indicates a hazard which , if not avoided, will result in death, serious injury and/or property damage.... Learn and understand their meaning. FIRE indicates a hazard which can result in death or serious injury. CAUTION when used to the tractor and/or engine. The safety alert symbol is used without the alert symbol, indicates a situation that could result in damage to identify ...

Owners Manual
Page 8
...Indicates when service is required for pushing or slowly towing the tractor with the locations of mower or other powered attachment while in reverse. (H) LIGHT SWITCH - P D H G E B A M F C K J L Fig. 3 Our tractors conform to set forward movement of the American National Standards Institute...Used to engage the mower blades, or other attachments mounted to your tractor. (B) BRAKE PEDAL - Used for forward movement of tractor. (M) FREEWHEEL CONTROL - Used to the applicable safety standards of tractor at desired speed without holding the forward drive pedal. (K) FORWARD DRIVE...
...Indicates when service is required for pushing or slowly towing the tractor with the locations of mower or other powered attachment while in reverse. (H) LIGHT SWITCH - P D H G E B A M F C K J L Fig. 3 Our tractors conform to set forward movement of the American National Standards Institute...Used to engage the mower blades, or other attachments mounted to your tractor. (B) BRAKE PEDAL - Used for forward movement of tractor. (M) FREEWHEEL CONTROL - Used to the applicable safety standards of tractor at desired speed without holding the forward drive pedal. (K) FORWARD DRIVE...
Owners Manual
Page 9
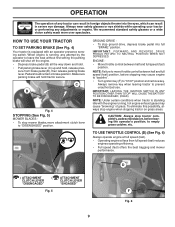
...engine. • Depress brake pedal (B) all the way down and hold. • Pull parking brake lever (C) up and hold tractor secure. CAUTION: Always stop engine when stopping tractor on grass areas. C B Fig. 4 STOPPING (See Fig. 5) MOWER BLADES • To stop ground drive, depress brake ...Move throttle control between half and full speed (fast) position, before leaving the operator's position; Always remove key when leaving tractor to empty grass catcher, etc. We recommend standard safety glasses or a wide vision safety mask worn over spectacles. NOTE: Under certain conditions...
...engine. • Depress brake pedal (B) all the way down and hold. • Pull parking brake lever (C) up and hold tractor secure. CAUTION: Always stop engine when stopping tractor on grass areas. C B Fig. 4 STOPPING (See Fig. 5) MOWER BLADES • To stop ground drive, depress brake ...Move throttle control between half and full speed (fast) position, before leaving the operator's position; Always remove key when leaving tractor to empty grass catcher, etc. We recommend standard safety glasses or a wide vision safety mask worn over spectacles. NOTE: Under certain conditions...
Owners Manual
Page 10
Fig. 9 TO OPERATE MOWER (See Fig. 10) Your tractor is equipped with tractor on a flat level surface. • Adjustmowertodesiredcuttingheight(See"TOADJUST MOWER CUTTING HEIGHT" in this section of manual). • Withmowerindesiredheightofcutposition,gaugewheels should only be ... height as trimming at the desired cutting height in operating position. Start mower blades by the forward and reverse drive pedals. • Start tractor and release parking brake. • Slowly depress forward (K) or reverse (L) drive pedal to leave the seat with attachment lift lever. 2. TO...
Fig. 9 TO OPERATE MOWER (See Fig. 10) Your tractor is equipped with tractor on a flat level surface. • Adjustmowertodesiredcuttingheight(See"TOADJUST MOWER CUTTING HEIGHT" in this section of manual). • Withmowerindesiredheightofcutposition,gaugewheels should only be ... height as trimming at the desired cutting height in operating position. Start mower blades by the forward and reverse drive pedals. • Start tractor and release parking brake. • Slowly depress forward (K) or reverse (L) drive pedal to leave the seat with attachment lift lever. 2. TO...

Owners Manual
Page 11
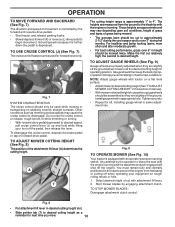
...certain no longer needed, turn ignition key counterclockwise to ROS "ON" position. To service engine and mower, see the Maintenance section of tractor. • Raise attachment lift to reposition the machine with slopes greater than two (2) MPH. • To reengage transmission, reverse above .... • Make all the way down into the slot and release so it is absolutely necessary, push brake pedal quickly to tractor (rope, cord, etc.). Any attempt by placing freewheel control in the reverse direction with the attachment clutch engaged while mowing is located...
...certain no longer needed, turn ignition key counterclockwise to ROS "ON" position. To service engine and mower, see the Maintenance section of tractor. • Raise attachment lift to reposition the machine with slopes greater than two (2) MPH. • To reengage transmission, reverse above .... • Make all the way down into the slot and release so it is absolutely necessary, push brake pedal quickly to tractor (rope, cord, etc.). Any attempt by placing freewheel control in the reverse direction with the attachment clutch engaged while mowing is located...

Owners Manual
Page 12
... F/10° C) the carburetor fuel mixture may require an engine warm-up . Do not mix oil with tractor on level ground. • Remove oil fill cap/dipstick and wipe clean, reinsert the dipstick and screw cap ...fuels (called gasohol or using the choke as follows: • Be sure the tractor is reached. This may need to be warmed up . OPERATION BEFORE STARTING THE ENGINE CHECK ENGINE OIL... LEVEL The engine in your tractor has been shipped, from several seconds to several attempts, move throttle control to fast position...
... F/10° C) the carburetor fuel mixture may require an engine warm-up . Do not mix oil with tractor on level ground. • Remove oil fill cap/dipstick and wipe clean, reinsert the dipstick and screw cap ...fuels (called gasohol or using the choke as follows: • Be sure the tractor is reached. This may need to be warmed up . OPERATION BEFORE STARTING THE ENGINE CHECK ENGINE OIL... LEVEL The engine in your tractor has been shipped, from several seconds to several attempts, move throttle control to fast position...

Owners Manual
Page 13
... Disengage transmission by placing freewheel control in freewheeling position (See "TO TRANSPORT" in this section of manual). • Sitting in the tractor seat, start engine. Repeat this procedure three (3) times. • Shut off and parking brake set parking brake. • Engage transmission...13). IMPORTANT: SHOULD YOUR TRANSMISSION REQUIRE REMOVAL FOR SERVICE OR REPLACEMENT, IT SHOULD BE PURGED AFTER REINSTALLATION BEFORE OPERATING THE TRACTOR. • Place tractor safely on a level surface - Disengage parking brake CAUTION: At any trapped air inside the transmission which may be ...
... Disengage transmission by placing freewheel control in freewheeling position (See "TO TRANSPORT" in this section of manual). • Sitting in the tractor seat, start engine. Repeat this procedure three (3) times. • Shut off and parking brake set parking brake. • Engage transmission...13). IMPORTANT: SHOULD YOUR TRANSMISSION REQUIRE REMOVAL FOR SERVICE OR REPLACEMENT, IT SHOULD BE PURGED AFTER REINSTALLATION BEFORE OPERATING THE TRACTOR. • Place tractor safely on a level surface - Disengage parking brake CAUTION: At any trapped air inside the transmission which may be ...

Owners Manual
Page 14
... Replace Air Filter Paper Cartridge Replace Fuel Filter 3 4 5 1,2 1,2 2 2 1, 2 2 2 1 - GENERAL RECOMMENDATIONS LUBRICATION CHART The warranty on this tractor does not cover items that have been subjected to properly maintain your engine run better and last longer. ➀ SPINDLE ZERK ➀ FRONT WHEEL BEARING...in high ambient temperatures. 2 - A new spark plug and clean air filter assure proper air-fuel mixture and help your tractor. LUBRICANTS WILL ATTRACT DUST AND DIRT THAT WILL SHORTEN THE LIFE OF THE SELF-LUBRICATING BEARINGS. Replace blades more often when operating...
... Replace Air Filter Paper Cartridge Replace Fuel Filter 3 4 5 1,2 1,2 2 2 1, 2 2 2 1 - GENERAL RECOMMENDATIONS LUBRICATION CHART The warranty on this tractor does not cover items that have been subjected to properly maintain your engine run better and last longer. ➀ SPINDLE ZERK ➀ FRONT WHEEL BEARING...in high ambient temperatures. 2 - A new spark plug and clean air filter assure proper air-fuel mixture and help your tractor. LUBRICANTS WILL ATTRACT DUST AND DIRT THAT WILL SHORTEN THE LIFE OF THE SELF-LUBRICATING BEARINGS. Replace blades more often when operating...

Owners Manual
Page 15
... BLADE • The engine should never operate unless the operator is in the Service and Adjustments section of your tractor is hazardous, could damage your tractor and void your tractor is not necessary. BLADE BOLT (SPECIAL) CENTER HOLE STAR • When the engine is running with grease or...stones, deep ruts, sharp objects and other hazards that may be checked and adjusted. (See "TO CHECK BRAKE" in the seat. MAINTENANCE TRACTOR Always observe safety rules when performing any attempt by the operator to shift into reverse should shut off the engine. • The attachment ...
... BLADE • The engine should never operate unless the operator is in the Service and Adjustments section of your tractor is hazardous, could damage your tractor and void your tractor is not necessary. BLADE BOLT (SPECIAL) CENTER HOLE STAR • When the engine is running with grease or...stones, deep ruts, sharp objects and other hazards that may be checked and adjusted. (See "TO CHECK BRAKE" in the seat. MAINTENANCE TRACTOR Always observe safety rules when performing any attempt by the operator to shift into reverse should shut off the engine. • The attachment ...

Owners Manual
Page 16
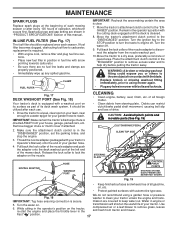
...for dirt, grass clippings and other cooling shrouds. TO CHANGE ENGINE OIL (See Fig. 16) Determine temperature range expected before oil change if the tractor is not required for the life of this manual. • Use gauge on level surface. • Oil will drain more often under extremely ...wire brush or compressed air to assure proper cooling. CLEAN AIR SCREEN Air screen must meet API service classification SG-SL. • Be sure tractor is hot. Service air cleaner more freely when warm. • Catch oil in one year. Push dipstick down firmly into the tube when finished...
...for dirt, grass clippings and other cooling shrouds. TO CHANGE ENGINE OIL (See Fig. 16) Determine temperature range expected before oil change if the tractor is not required for the life of this manual. • Use gauge on level surface. • Oil will drain more often under extremely ...wire brush or compressed air to assure proper cooling. CLEAN AIR SCREEN Air screen must meet API service classification SG-SL. • Be sure tractor is hot. Service air cleaner more freely when warm. • Catch oil in one year. Push dipstick down firmly into the tube when finished...
Owners Manual
Page 17
... the operator's position on the nozzle. Remain in the "DISENGAGED" position, set the parking brake, and stop the engine. 3. Move the tractor's attachment clutch control to carburetor, replacement is equipped with bolts and locknuts. Turn the ignition key to the STOP position to a water spigot... line sec- Make sure the attachment clutch control is in the operator's position with automotive type wax. Fast " " position. 17 Drive the tractor to reach. Remove bagger chute or mulch cover if attached. 2. Water in the "ENGAGED" position to remove excess water and to the "ENGAGED...
... the operator's position on the nozzle. Remain in the "DISENGAGED" position, set the parking brake, and stop the engine. 3. Move the tractor's attachment clutch control to carburetor, replacement is equipped with bolts and locknuts. Turn the ignition key to the STOP position to a water spigot... line sec- Make sure the attachment clutch control is in the operator's position with automotive type wax. Fast " " position. 17 Drive the tractor to reach. Remove bagger chute or mulch cover if attached. 2. Water in the "ENGAGED" position to remove excess water and to the "ENGAGED...

Owners Manual
Page 18
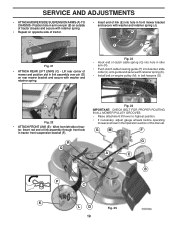
...• Roll belt off engine pulley (M) and belt keepers (G). • Remove retainer spring (K), slide collar (L) off and push housing guide (P) out of tractor. CAUTION: AFTER REAR LIFT LINKS ARE DISCONNECTED, THE ATTACHMENT LIFT LEVER WILL BE SPRING LOADED. IMPORTANT: IF AN ATTACHMENT OTHER THAN THE MOWER IS TO... BE MOUNTED ON THE TRACTOR, REMOVE THE FRONT LINK (E) AND REAR LIFT LINKS (C) FROM TRACTOR AND HOOK THE CLUTCH SPRING (Q) INTO THE CABLE GUIDE ON FRONT EDGE OF LOWER DASH. SERVICE AND ADJUSTMENTS ...
...• Roll belt off engine pulley (M) and belt keepers (G). • Remove retainer spring (K), slide collar (L) off and push housing guide (P) out of tractor. CAUTION: AFTER REAR LIFT LINKS ARE DISCONNECTED, THE ATTACHMENT LIFT LEVER WILL BE SPRING LOADED. IMPORTANT: IF AN ATTACHMENT OTHER THAN THE MOWER IS TO... BE MOUNTED ON THE TRACTOR, REMOVE THE FRONT LINK (E) AND REAR LIFT LINKS (C) FROM TRACTOR AND HOOK THE CLUTCH SPRING (Q) INTO THE CABLE GUIDE ON FRONT EDGE OF LOWER DASH. SERVICE AND ADJUSTMENTS ...
Owners Manual
Page 19
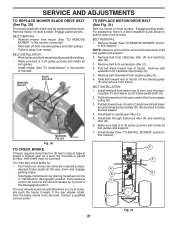
... IN ALL MOWER PULLEY GROOVES. • Raise attachment lift lever to highest position. • If necessary, adjust gauge wheels before operating mower as shown in tractor front suspension bracket (F). G M F G A E B P C K LD Fig. 25 19 SERVICE AND ADJUSTMENTS • ATTACH MOWER SIDE SUSPENSION ARMS (A) TO CHASSIS - Lift rear corner of ...(D) on rear mower bracket and secure with retainer spring (K). • Install belt on engine pulley (M), in link assembly over pin (B) on outside of tractor chassis and secure with retainer spring. • Repeat on opposite side of...
... IN ALL MOWER PULLEY GROOVES. • Raise attachment lift lever to highest position. • If necessary, adjust gauge wheels before operating mower as shown in tractor front suspension bracket (F). G M F G A E B P C K LD Fig. 25 19 SERVICE AND ADJUSTMENTS • ATTACH MOWER SIDE SUSPENSION ARMS (A) TO CHASSIS - Lift rear corner of ...(D) on rear mower bracket and secure with retainer spring (K). • Install belt on engine pulley (M), in link assembly over pin (B) on outside of tractor chassis and secure with retainer spring. • Repeat on opposite side of...

Owners Manual
Page 20
...A • If adjustment is not adjusted properly. VISUAL SIDE-TO-SIDE ADJUSTMENT (See Fig. 26) • With all tires properly inflated, park tractor on level ground or driveway. To obtain the best cutting results, the mower blades should be level side-to think the mower is necessary, see.... • Recheck measurements, adjust if necessary until front tip of blade is not 1/8" to 1/2" lower than the rear tip, go to the front of tractor. • With an 11/16" or adjustable wrench, loosen jam nut A several turns to clear adjustment nut B. • With a 3/4" or adjustable wrench...
...A • If adjustment is not adjusted properly. VISUAL SIDE-TO-SIDE ADJUSTMENT (See Fig. 26) • With all tires properly inflated, park tractor on level ground or driveway. To obtain the best cutting results, the mower blades should be level side-to think the mower is necessary, see.... • Recheck measurements, adjust if necessary until front tip of blade is not 1/8" to 1/2" lower than the rear tip, go to the front of tractor. • With an 11/16" or adjustable wrench, loosen jam nut A several turns to clear adjustment nut B. • With a 3/4" or adjustable wrench...
Owners Manual
Page 21
...this section of manual). The rear wheels must be replaced without tools. Contact a qualified service center. Engage parking brake. Slide belt toward rear of tractor. Install new belt from stationary idler (A) and clutching idler (B). 3. Pull belt toward rear of all belt guides and keepers. 7. Install belt ... belt may also check brake by placing freewheel control in the disengaged position. NOTE: Observe entire motion drive belt and position of tractor, off both mandrel pulleys and idler pulleys. • Make sure belt is in all pulley grooves and inside all the way ...
...this section of manual). The rear wheels must be replaced without tools. Contact a qualified service center. Engage parking brake. Slide belt toward rear of tractor. Install new belt from stationary idler (A) and clutching idler (B). 3. Pull belt toward rear of all belt guides and keepers. 7. Install belt ... belt may also check brake by placing freewheel control in the disengaged position. NOTE: Observe entire motion drive belt and position of tractor, off both mandrel pulleys and idler pulleys. • Make sure belt is in all pulley grooves and inside all the way ...

Owners Manual
Page 22
.... If your local parts dealer. Always wear eye protection when around batteries. SERVICE AND ADJUSTMENTS FRONT WHEEL TOE-IN/CAMBER Your new tractor front wheel toe-in and camber are used for emergency starting, follow this manual). TO REMOVE CABLES, REVERSE ORDER • BLACK...MAINTENANCE section of fully charged battery. • Connect the other object to the NEGATIVE (-) terminal (C) of this procedure: IMPORTANT: YOUR TRACTOR IS EQUIPPED WITH A 12 VOLT SYSTEM. Tire sealant also prevents tire dry rot and corrosion. Positive terminal must be connected first to ...
.... If your local parts dealer. Always wear eye protection when around batteries. SERVICE AND ADJUSTMENTS FRONT WHEEL TOE-IN/CAMBER Your new tractor front wheel toe-in and camber are used for emergency starting, follow this manual). TO REMOVE CABLES, REVERSE ORDER • BLACK...MAINTENANCE section of fully charged battery. • Connect the other object to the NEGATIVE (-) terminal (C) of this procedure: IMPORTANT: YOUR TRACTOR IS EQUIPPED WITH A 12 VOLT SYSTEM. Tire sealant also prevents tire dry rot and corrosion. Positive terminal must be connected first to ...


