

Owners Manual
Page 2
... the manual before turning. • Never leave a running machine unattended. These operators should evaluate their ability to operate the riding mower safely enough to protect themselves and others from serious injury. • Follow the manufacturer's recommendation for wheel weights or counterweights. •...and lead compounds, chemicals known to the State of alcohol or drugs. • Watch for all times. • Only allow the mower deck to a complete stop before dismounting. • Disengage blades when not mowing. Avoid discharging material against a wall or obstruction. Stop...
... the manual before turning. • Never leave a running machine unattended. These operators should evaluate their ability to operate the riding mower safely enough to protect themselves and others from serious injury. • Follow the manufacturer's recommendation for wheel weights or counterweights. •...and lead compounds, chemicals known to the State of alcohol or drugs. • Watch for all times. • Only allow the mower deck to a complete stop before dismounting. • Disengage blades when not mowing. Avoid discharging material against a wall or obstruction. Stop...

Owners Manual
Page 3
... rim of the fuel tank or container opening at the hitch point. • Follow the manufacturer's recommendation for weight limits for Ride-On Mowers III. Wrap the blade or wear gloves, and use extra caution when servicing them . • Keep children out of the mowing area... allow extra distance to stop. They may fall off and be seriously injured or interfere with manufacturer's recommended parts, when necessary. • Mower blades are often attracted to the presence of children. They may fall off and be seriously injured or interfere with plastic liner. SAFETY RULES ...
... rim of the fuel tank or container opening at the hitch point. • Follow the manufacturer's recommendation for weight limits for Ride-On Mowers III. Wrap the blade or wear gloves, and use extra caution when servicing them . • Keep children out of the mowing area... allow extra distance to stop. They may fall off and be seriously injured or interfere with manufacturer's recommended parts, when necessary. • Mower blades are often attracted to the presence of children. They may fall off and be seriously injured or interfere with plastic liner. SAFETY RULES ...

Owners Manual
Page 6
...all connections are still secure and wires are routed correctly. TO ROLL TRACTOR OFF SKID (See Operation section for leveling). ✓ Check mower and drive belts. Follow the instructions below to see that all belt keepers. ✓ Check wiring. WARNING: Before starting and transmission... START ENGINE" and "PURGE TRANSMISSION" in the Operation section of other people and objects. CHECK DECK LEVELNESS For best cutting results, mower housing should be properly inflated for location and function of controls) • Raise attachment lift lever to its highest position. •...
...all connections are still secure and wires are routed correctly. TO ROLL TRACTOR OFF SKID (See Operation section for leveling). ✓ Check mower and drive belts. Follow the instructions below to see that all belt keepers. ✓ Check wiring. WARNING: Before starting and transmission... START ENGINE" and "PURGE TRANSMISSION" in the Operation section of other people and objects. CHECK DECK LEVELNESS For best cutting results, mower housing should be properly inflated for location and function of controls) • Raise attachment lift lever to its highest position. •...

Owners Manual
Page 7
... injury or death. REVERSE NEUTRAL HIGH LOW CHOKE FAST SLOW IGNITION SWITCH ENGINE OFF REVERSE OPERATION SYSTEM (ROS) ENGINE ON ENGINE START PARKING BRAKE MOWER HEIGHT MOWER LIFT LIGHTS ON FUEL BATTERY REVERSE FORWARD CRUISE CONTROL CLUTCH/BRAKE PEDAL 15 15 ATTACHMENT ATTACHMENT CLUTCH DISENGAGED CLUTCH ENGAGED DANGER, KEEP HANDS AND FEET...
... injury or death. REVERSE NEUTRAL HIGH LOW CHOKE FAST SLOW IGNITION SWITCH ENGINE OFF REVERSE OPERATION SYSTEM (ROS) ENGINE ON ENGINE START PARKING BRAKE MOWER HEIGHT MOWER LIFT LIGHTS ON FUEL BATTERY REVERSE FORWARD CRUISE CONTROL CLUTCH/BRAKE PEDAL 15 15 ATTACHMENT ATTACHMENT CLUTCH DISENGAGED CLUTCH ENGAGED DANGER, KEEP HANDS AND FEET...

Owners Manual
Page 8
...DRIVE PEDAL - Used for forward movement of the American National Standards Institute. (A) ATTACHMENT LIFT LEVER - Used to raise and lower the mower or other powered attachment while in reverse. (H) LIGHT SWITCH - Used for starting the engine. (C) PARKING BRAKE - Disengages transmission for ...starting and controlling engine speed. (E) ATTACHMENT CLUTCH LEVER - Used for pushing or slowly towing the tractor with the locations of mower or other attachments mounted to your tractor. (B) BRAKE PEDAL - Used for future reference. Indicates when service is required for...
...DRIVE PEDAL - Used for forward movement of the American National Standards Institute. (A) ATTACHMENT LIFT LEVER - Used to raise and lower the mower or other powered attachment while in reverse. (H) LIGHT SWITCH - Used for starting the engine. (C) PARKING BRAKE - Disengages transmission for ...starting and controlling engine speed. (E) ATTACHMENT CLUTCH LEVER - Used for pushing or slowly towing the tractor with the locations of mower or other attachments mounted to your tractor. (B) BRAKE PEDAL - Used for future reference. Indicates when service is required for...
Owners Manual
Page 9
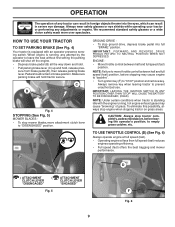
...remove key when leaving tractor to empty grass catcher, etc. Pedal should remain in brake position. C B Fig. 4 STOPPING (See Fig. 5) MOWER BLADES • To stop ground drive, depress brake pedal into the eyes, which can result in foreign objects thrown into full "BRAKE" position....8226; Operating engine at less than full speed (fast) reduces engines operating efficiency. • Full speed (fast) offers the best bagging and mower performance. ( ) ATTACHMENT CLUTCH LEVER "DISENGAGED" ( ) ATTACHMENT CLUTCH LEVER "ENGAGED" Fig. 5 D F Fig. 6 9 OPERATION The operation of grass. GROUND DRIVE ...
...remove key when leaving tractor to empty grass catcher, etc. Pedal should remain in brake position. C B Fig. 4 STOPPING (See Fig. 5) MOWER BLADES • To stop ground drive, depress brake pedal into the eyes, which can result in foreign objects thrown into full "BRAKE" position....8226; Operating engine at less than full speed (fast) reduces engines operating efficiency. • Full speed (fast) offers the best bagging and mower performance. ( ) ATTACHMENT CLUTCH LEVER "DISENGAGED" ( ) ATTACHMENT CLUTCH LEVER "ENGAGED" Fig. 5 D F Fig. 6 9 OPERATION The operation of grass. GROUND DRIVE ...
Owners Manual
Page 10
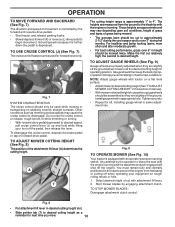
...See Fig. 7) The cruise control feature can be used while mowing or transporting on a flat level surface. • Adjustmowertodesiredcuttingheight(See"TOADJUST MOWER CUTTING HEIGHT" in the seat to prevent the engine from the ground to disengage. Do not use the cruise control on slopes, rough ...height as trimming at the desired cutting height in same adjustment hole. Tighten securely. • Repeat for forward travel only. TO STOP MOWER BLADES Disengage attachment clutch control. These heights are slightly off the pedal, then release the lever. Fig. 8 • Put attachment lift...
...See Fig. 7) The cruise control feature can be used while mowing or transporting on a flat level surface. • Adjustmowertodesiredcuttingheight(See"TOADJUST MOWER CUTTING HEIGHT" in the seat to prevent the engine from the ground to disengage. Do not use the cruise control on slopes, rough ...height as trimming at the desired cutting height in same adjustment hole. Tighten securely. • Repeat for forward travel only. TO STOP MOWER BLADES Disengage attachment clutch control. These heights are slightly off the pedal, then release the lever. Fig. 8 • Put attachment lift...

Owners Manual
Page 11
...any position but "STOP". TRANSMISSION ENGAGED TRANSMISSION DISENGAGED Fig. 12 TOWING CARTS AND OTHER ATTACHMENTS Tow only the attachments that the engine or mower needs servicing. USING THE REVERSE OPERATION SYSTEM Only use of tractor. • Raise attachment lift to highest position with attachment lift control... the attachment clutch engaged will flash for two hours. NOTE: To protect hood from damage when transporting your tractor. To service engine and mower, see the Maintenance section of a load, while on a truck or a trailer, be done when the operator decides it is no...
...any position but "STOP". TRANSMISSION ENGAGED TRANSMISSION DISENGAGED Fig. 12 TOWING CARTS AND OTHER ATTACHMENTS Tow only the attachments that the engine or mower needs servicing. USING THE REVERSE OPERATION SYSTEM Only use of tractor. • Raise attachment lift to highest position with attachment lift control... the attachment clutch engaged will flash for two hours. NOTE: To protect hood from damage when transporting your tractor. To service engine and mower, see the Maintenance section of a load, while on a truck or a trailer, be done when the operator decides it is no...

Owners Manual
Page 13
... Allow grass to dry before operating tractor for trimming. • Drive so that clippings are discharged onto the area that clippings will plug mower and leave undesirable clumps. After the engine is wet. After the engine is attached to full reverse position, hold for five (5) seconds and...(See Fig. 13). MOWING TIPS • Tire chains cannot be properly leveled for five (5) seconds and release pedal. See "TO LEVEL MOWER HOUSING" in the Service and Adjustments section of this section of the attachment being used for the first time. the second to assure better mowing...
... Allow grass to dry before operating tractor for trimming. • Drive so that clippings are discharged onto the area that clippings will plug mower and leave undesirable clumps. After the engine is wet. After the engine is attached to full reverse position, hold for five (5) seconds and...(See Fig. 13). MOWING TIPS • Tire chains cannot be properly leveled for five (5) seconds and release pedal. See "TO LEVEL MOWER HOUSING" in the Service and Adjustments section of this section of the attachment being used for the first time. the second to assure better mowing...

Owners Manual
Page 14
..., check to Maintenance "ENGINE" Section • Check operator presence and ROS systems for wear. VISCOUS • Check for Loose Fasteners C Check/Replace Mower Blades T Lubrication Chart 0 Check Battery Level R Clean Battery and Terminals Clean Debris Off Steering Plate Check Transaxle Cooling Check... Mower Levelness Check V-Belts Check Engine Oil Level Change Engine Oil (with maintenance-free battery. 5 - Not required if equipped with oil filter) ...
..., check to Maintenance "ENGINE" Section • Check operator presence and ROS systems for wear. VISCOUS • Check for Loose Fasteners C Check/Replace Mower Blades T Lubrication Chart 0 Check Battery Level R Clean Battery and Terminals Clean Debris Off Steering Plate Check Transaxle Cooling Check... Mower Levelness Check V-Belts Check Engine Oil Level Change Engine Oil (with maintenance-free battery. 5 - Not required if equipped with oil filter) ...

Owners Manual
Page 15
...or petroleum jelly. • Reinstall battery (See "REPLACING BATTERY" in the disengaged position. BLADE REMOVAL (See Fig. 15) • Raise mower to highest position to allow access to shift into reverse should NOT shut off the engine. • When the engine is running with the ... the engine is running , any maintenance. OPERATOR PRESENCE SYSTEM AND REVERSE OPERATION SYSTEM (ROS) (See Fig. 14) BLADE CARE For best results mower blades must be checked and adjusted. (See "TO CHECK BRAKE" in the Service and Adjustments section of gasoline, oil, or insect control chemicals...
...or petroleum jelly. • Reinstall battery (See "REPLACING BATTERY" in the disengaged position. BLADE REMOVAL (See Fig. 15) • Raise mower to highest position to allow access to shift into reverse should NOT shut off the engine. • When the engine is running with the ... the engine is running , any maintenance. OPERATOR PRESENCE SYSTEM AND REVERSE OPERATION SYSTEM (ROS) (See Fig. 14) BLADE CARE For best results mower blades must be checked and adjusted. (See "TO CHECK BRAKE" in the Service and Adjustments section of gasoline, oil, or insect control chemicals...
Owners Manual
Page 17
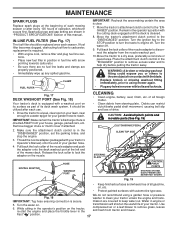
.... 19) CLUTCH/BRAKE PEDAL CLEAN TOP SIDE STEERING PLATE NOZZLE ADAPTER HOSE WASHOUT PORT CAUTION: PINCH POINTS STEERING SYSTEM, DASH, FENDER AND MOWER NOT SHOWN Fig. 19 • Keep finished surfaces and wheels free of all foreign matter. • Clean debris from your house, garage... Replace broken or missing washout fitting immediately, prior to using a garden hose or pressure Fig. 18 washer to disconnect the adapter from tractor and mower. IMPORTANT: Tug hose ensuring connection is required. • With engine cool, remove filter and plug fuel line sec- Fast " " position. ...
.... 19) CLUTCH/BRAKE PEDAL CLEAN TOP SIDE STEERING PLATE NOZZLE ADAPTER HOSE WASHOUT PORT CAUTION: PINCH POINTS STEERING SYSTEM, DASH, FENDER AND MOWER NOT SHOWN Fig. 19 • Keep finished surfaces and wheels free of all foreign matter. • Clean debris from your house, garage... Replace broken or missing washout fitting immediately, prior to using a garden hose or pressure Fig. 18 washer to disconnect the adapter from tractor and mower. IMPORTANT: Tug hose ensuring connection is required. • With engine cool, remove filter and plug fuel line sec- Fast " " position. ...

Owners Manual
Page 18
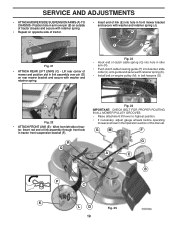
... IS SPRING LOADED. remove retainer spring and washer. • Go to either side of tractor. IMPORTANT: IF AN ATTACHMENT OTHER THAN THE MOWER IS TO BE MOUNTED ON THE TRACTOR, REMOVE THE FRONT LINK (E) AND REAR LIFT LINKS (C) FROM TRACTOR AND HOOK THE CLUTCH SPRING (Q).... G M F R Q G A E B P C K LD Fig. 20 18 HAVE A TIGHT GRIP ON LIFT LEVER, LOWER IT SLOWLY AND ENGAGE IN LOWEST POSITION. TO REMOVE MOWER (See Fig. 20) • Place attachment clutch in "DISENGAGED" position. • Lower attachment lift lever to its lowest position. • Roll belt off engine pulley...
... IS SPRING LOADED. remove retainer spring and washer. • Go to either side of tractor. IMPORTANT: IF AN ATTACHMENT OTHER THAN THE MOWER IS TO BE MOUNTED ON THE TRACTOR, REMOVE THE FRONT LINK (E) AND REAR LIFT LINKS (C) FROM TRACTOR AND HOOK THE CLUTCH SPRING (Q).... G M F R Q G A E B P C K LD Fig. 20 18 HAVE A TIGHT GRIP ON LIFT LEVER, LOWER IT SLOWLY AND ENGAGE IN LOWEST POSITION. TO REMOVE MOWER (See Fig. 20) • Place attachment clutch in "DISENGAGED" position. • Lower attachment lift lever to its lowest position. • Roll belt off engine pulley...
Owners Manual
Page 19
...F J H Fig. 23 • Hook end of link assembly through front hole in tractor front suspension bracket (F). Lift rear corner of mower and position slot in link assembly over pin (B) on outside of tractor chassis and secure with retainer spring. • Repeat on opposite side... tractor. • Insert end of link (E) into bracket, slide collar (L) onto guide and secure with retainer spring (K). • Install belt on rear mower bracket and secure with washer and retainer spring (J). Insert rod end of clutch cable spring (Q) into hole in idler arm (R). • Push clutch cable ...
...F J H Fig. 23 • Hook end of link assembly through front hole in tractor front suspension bracket (F). Lift rear corner of mower and position slot in link assembly over pin (B) on outside of tractor chassis and secure with retainer spring. • Repeat on opposite side... tractor. • Insert end of link (E) into bracket, slide collar (L) onto guide and secure with retainer spring (K). • Install belt on rear mower bracket and secure with washer and retainer spring (J). Insert rod end of clutch cable spring (Q) into hole in idler arm (R). • Push clutch cable ...

Owners Manual
Page 20
...so the front tip is 1/8" to 1/2" lower than the rear tip. • Hold adjustment nut in position with heavy cloth. • Raise mower to highest position. • Position any blade so the tip is in Visual Adjustment instructions above. • Recheck measurements, adjust if necessary until ...front tip of mower. A • If adjustment is not 1/8" to 1/2" lower than the rear tip, go to the front of tractor. • With an 11/...
...so the front tip is 1/8" to 1/2" lower than the rear tip. • Hold adjustment nut in position with heavy cloth. • Raise mower to highest position. • Position any blade so the tip is in Visual Adjustment instructions above. • Recheck measurements, adjust if necessary until ...front tip of mower. A • If adjustment is not 1/8" to 1/2" lower than the rear tip, go to the front of tractor. • With an 11/...
Owners Manual
Page 21
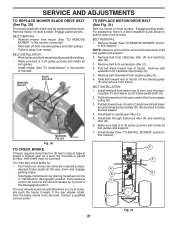
... the brake needs to stop at highest speed in highest gear on bottom side of left footrest. Engage parking brake. Remove mower (See "TO REMOVE MOWER" section in this manual). Slide belt toward rear of tractor and roll belt onto engine pulley (E). 3. BELT INSTALLATION 1. Pull...belt around transaxle input pulley (D). You may be replaced without tools. ing plate (F) and above clutch brake pedal shaft (G). 2. Remove belt from mower. Pull belt toward rear of manual). TO REPLACE MOTION DRIVE BELT (See Fig. 31) Park the tractor on a level, dry concrete or paved...
... the brake needs to stop at highest speed in highest gear on bottom side of left footrest. Engage parking brake. Remove mower (See "TO REMOVE MOWER" section in this manual). Slide belt toward rear of tractor and roll belt onto engine pulley (E). 3. BELT INSTALLATION 1. Pull...belt around transaxle input pulley (D). You may be replaced without tools. ing plate (F) and above clutch brake pedal shaft (G). 2. Remove belt from mower. Pull belt toward rear of manual). TO REPLACE MOTION DRIVE BELT (See Fig. 31) Park the tractor on a level, dry concrete or paved...

Owners Manual
Page 24
When mower is to be stored for damage, breakage and wear. placement instructions in the Service and Adjustments section of this manual). • Lubricate as shown in ... rust. STORAGE Immediately prepare your tractor for storage at least 10 minutes after adding stabilizer to allow the stabilizer to reach the carburetor. TRACTOR Remove mower from one ounce of this manual). • Inspect and replace belts, if necessary (See belt re- BATTERY • Fully charge the battery for winter storage...
When mower is to be stored for damage, breakage and wear. placement instructions in the Service and Adjustments section of this manual). • Lubricate as shown in ... rust. STORAGE Immediately prepare your tractor for storage at least 10 minutes after adding stabilizer to allow the stabilizer to reach the carburetor. TRACTOR Remove mower from one ounce of this manual). • Inspect and replace belts, if necessary (See belt re- BATTERY • Fully charge the battery for winter storage...

Owners Manual
Page 25
Bad spark plug. 5. Water in fuel. 9. CORRECTION 1. Check all wiring. 4. Engine valves out of mower housing. 4. Engine will not start 1. Loose or damaged wiring. 7. Faulty ignition switch. 8. Faulty operator presence switch(...Loose/damaged part(s). 1. Tighten blade bolt. 2. See "TO START ENGINE" in "CHOKE" position. 2. Faulty spark plug. 6. Out of grass, leaves, trash under mower. 3. Replace spark plug. 3. Replace fuse. 5. Weak or dead battery. 4. Clean battery terminals. 3. Bent blade mandrel. 3. See "To Adjust Carburetor" in ...
Bad spark plug. 5. Water in fuel. 9. CORRECTION 1. Check all wiring. 4. Engine valves out of mower housing. 4. Engine will not start 1. Loose or damaged wiring. 7. Faulty ignition switch. 8. Faulty operator presence switch(...Loose/damaged part(s). 1. Tighten blade bolt. 2. See "TO START ENGINE" in "CHOKE" position. 2. Faulty spark plug. 6. Out of grass, leaves, trash under mower. 3. Replace spark plug. 3. Replace fuse. 5. Weak or dead battery. 4. Clean battery terminals. 3. Bent blade mandrel. 3. See "To Adjust Carburetor" in ...

Owners Manual
Page 26
...obstruction. 2. Replace idler pulley. 4. Blades improperly installed. 9. Improper blades used. 10. Check/clean all connections. 3. Loss of mower housing. 4. Check wiring, switches and connections. If not corrected, contact an authorized service center/ department. Frozen idler pulley. 4. ...Replace blade mandrel. Turn switch "ON". 2. Check tires for proper air pressure. 6. Travel speed too fast. 2. Replace mower drive belt. 9. Replace alternator. Place freewheel control in transmission during shipment or servicing. 5. Replace fuse. See Operation section....
...obstruction. 2. Replace idler pulley. 4. Blades improperly installed. 9. Improper blades used. 10. Check/clean all connections. 3. Loss of mower housing. 4. Check wiring, switches and connections. If not corrected, contact an authorized service center/ department. Frozen idler pulley. 4. ...Replace blade mandrel. Turn switch "ON". 2. Check tires for proper air pressure. 6. Travel speed too fast. 2. Replace mower drive belt. 9. Replace alternator. Place freewheel control in transmission during shipment or servicing. 5. Replace fuse. See Operation section....

Owners Manual
Page 39
... x 0.750 8 532 19 30-03 Bolt/Washer asm 7/16-20 unf 11 532 40 53-80 Blade Mower Hi Lift 13 532 19 28-72 Shaft Assembly, Mandrel 14 532 18 72-81 Housing, Mandrel 15 532 ...Thd 3/8-16 x 1 59 532 14 10-43 Guard, Tuv Idler (94) 60 532 19 94-71 Arm Brake Mower LH KEY PART NO. LH Keeper Belt Eng. Stud Fastener Nut Lock Hex Flange Screw 3/8-16 x 3/4 Washer 13/...32 x 13/16 x 12 Ga. MODEL NUMBER YTH21K46 (96045002901), PRODUCT NO. 960 45 00-29 MOWER DECK KEY PART NO. Baffle Center Front Baffle Front RH Washer 13/32 x 1 x 1/2 11 Ga. Bolt...
... x 0.750 8 532 19 30-03 Bolt/Washer asm 7/16-20 unf 11 532 40 53-80 Blade Mower Hi Lift 13 532 19 28-72 Shaft Assembly, Mandrel 14 532 18 72-81 Housing, Mandrel 15 532 ...Thd 3/8-16 x 1 59 532 14 10-43 Guard, Tuv Idler (94) 60 532 19 94-71 Arm Brake Mower LH KEY PART NO. LH Keeper Belt Eng. Stud Fastener Nut Lock Hex Flange Screw 3/8-16 x 3/4 Washer 13/...32 x 13/16 x 12 Ga. MODEL NUMBER YTH21K46 (96045002901), PRODUCT NO. 960 45 00-29 MOWER DECK KEY PART NO. Baffle Center Front Baffle Front RH Washer 13/32 x 1 x 1/2 11 Ga. Bolt...


