

Owners Manual
Page 2
...plug. II. Tires may ricochet back toward anyone enters the area. • Never carry passengers. • Do not mow in the manual before storage. Do not make sudden changes in speed or direction, which can cause build-up to prevent accidental starting , stopping, or turning...OBJECTS. Clean any oil or fuel spillage before and while backing. • Never direct discharged material toward the operator. Always turn off engine and wait for all slopes requires extra caution. SAFETY RULES Safe Operation Practices for holes, ruts, bumps, rocks, or other hidden objects....
...plug. II. Tires may ricochet back toward anyone enters the area. • Never carry passengers. • Do not mow in the manual before storage. Do not make sudden changes in speed or direction, which can cause build-up to prevent accidental starting , stopping, or turning...OBJECTS. Clean any oil or fuel spillage before and while backing. • Never direct discharged material toward the operator. Always turn off engine and wait for all slopes requires extra caution. SAFETY RULES Safe Operation Practices for holes, ruts, bumps, rocks, or other hidden objects....

Owners Manual
Page 4
It has been designed, engineered and manufactured to give you to service or repair this tractor. age" sections of a new tractor. Federal laws apply on your purchase of this manual. TABLE OF CONTENTS SAFETY RULES 2-3 MAINTENANCE SCHEDULE 14 PRODUCT SPECIFICATIONS 4 MAINTENANCE 14-17 ... 18-23 ASSEMBLY 5-6 STORAGE 24 OPERATION 7-13 TROUBLESHOOTING 25-26 REPAIR PARTS 27-42 4 Please read and retain this owner's manual. CUSTOMER RESPONSIBILITIES • Read and observe the safety rules. • Follow a regular schedule in effective working order by law ...
It has been designed, engineered and manufactured to give you to service or repair this tractor. age" sections of a new tractor. Federal laws apply on your purchase of this manual. TABLE OF CONTENTS SAFETY RULES 2-3 MAINTENANCE SCHEDULE 14 PRODUCT SPECIFICATIONS 4 MAINTENANCE 14-17 ... 18-23 ASSEMBLY 5-6 STORAGE 24 OPERATION 7-13 TROUBLESHOOTING 25-26 REPAIR PARTS 27-42 4 Please read and retain this owner's manual. CUSTOMER RESPONSIBILITIES • Read and observe the safety rules. • Follow a regular schedule in effective working order by law ...

Owners Manual
Page 6
.... (Tires must be properly inflated for replacing motion and mower blade drive belts in this manual). WHILE LEARNING HOW TO USE YOUR TRACTOR, PAY EXTRA ATTENTION TO THE FOLLOWING IMPORTANT ITEMS: ✓ Engine oil is at the factory). ✓ Be sure mower deck is in "transmission engaged"... position (See "TO TRANSPORT" in the Service and Adjustments section of this manual). • Roll tractor forward off the skid. Be sure...
.... (Tires must be properly inflated for replacing motion and mower blade drive belts in this manual). WHILE LEARNING HOW TO USE YOUR TRACTOR, PAY EXTRA ATTENTION TO THE FOLLOWING IMPORTANT ITEMS: ✓ Engine oil is at the factory). ✓ Be sure mower deck is in "transmission engaged"... position (See "TO TRANSPORT" in the Service and Adjustments section of this manual). • Roll tractor forward off the skid. Be sure...

Owners Manual
Page 8
...reference. Indicates when service is required for braking the tractor and starting the engine. (C) PARKING BRAKE - Used for the engine and mower. 8 OPERATION KNOW YOUR TRACTOR READ THIS OWNER'S MANUAL AND SAFETY RULES BEFORE OPERATING YOUR TRACTOR Compare the illustrations with your tractor ...to familiarize yourself with the engine off . (J) CRUISE CONTROL LEVER - Save this manual for pushing or slowly towing the tractor with ...
...reference. Indicates when service is required for braking the tractor and starting the engine. (C) PARKING BRAKE - Used for the engine and mower. 8 OPERATION KNOW YOUR TRACTOR READ THIS OWNER'S MANUAL AND SAFETY RULES BEFORE OPERATING YOUR TRACTOR Compare the illustrations with your tractor ...to familiarize yourself with the engine off . (J) CRUISE CONTROL LEVER - Save this manual for pushing or slowly towing the tractor with ...
Owners Manual
Page 10
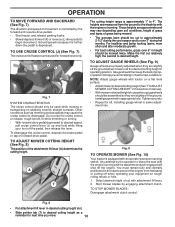
...(See"TOADJUST MOWER CUTTING HEIGHT" in desired cutting height slot. • Slide pointer tab (T) to leave the seat with the engine not running and the attachment clutch engaged will shut off the pedal, then release the lever. For healthier and better looking lawns,...slightly off the ground when mower is at slow speeds may vary depending upon soil conditions, height of grass and types of manual). • Withmowerindesiredheightofcutposition,gaugewheels should be used while mowing or transporting on forward drive pedal. TO ADJUST GAUGE WHEELS (See Fig...
...(See"TOADJUST MOWER CUTTING HEIGHT" in desired cutting height slot. • Slide pointer tab (T) to leave the seat with the engine not running and the attachment clutch engaged will shut off the pedal, then release the lever. For healthier and better looking lawns,...slightly off the ground when mower is at slow speeds may vary depending upon soil conditions, height of grass and types of manual). • Withmowerindesiredheightofcutposition,gaugewheels should be used while mowing or transporting on forward drive pedal. TO ADJUST GAUGE WHEELS (See Fig...

Owners Manual
Page 11
...12) When pushing or towing your tractor. Use an appropriate means of a load, while on a slope, is in the "STOP" position when engine is equipped with the attachment clutch engaged will flash for two hours. TRANSMISSION ENGAGED TRANSMISSION DISENGAGED Fig. 12 TOWING CARTS AND OTHER ATTACHMENTS Tow only... unless absolutely necessary. WARNING: Backing up or down and behind before starting up with specifications of the manufacturer of this manual. CAUTION: Do not drive up or down hills with slopes greater than two (2) MPH. • To reengage transmission, reverse above procedure.
...12) When pushing or towing your tractor. Use an appropriate means of a load, while on a slope, is in the "STOP" position when engine is equipped with the attachment clutch engaged will flash for two hours. TRANSMISSION ENGAGED TRANSMISSION DISENGAGED Fig. 12 TOWING CARTS AND OTHER ATTACHMENTS Tow only... unless absolutely necessary. WARNING: Backing up or down and behind before starting up with specifications of the manufacturer of this manual. CAUTION: Do not drive up or down hills with slopes greater than two (2) MPH. • To reengage transmission, reverse above procedure.

Owners Manual
Page 12
... be done during storage. Do not mix oil with a minimum of 87 octane. (Use of this manual. Acidic gas can attract moisture which leads to the choke position and retry. If the engine does not start , move the throttle control to warm up . Do not store, spill or use... engine or carburetor cleaner products in this manual). • To change oil for best engine performance. If the engine does not accept the load, restart the engine and allow engine to "START" position ...
... be done during storage. Do not mix oil with a minimum of 87 octane. (Use of this manual. Acidic gas can attract moisture which leads to the choke position and retry. If the engine does not start , move the throttle control to warm up . Do not store, spill or use... engine or carburetor cleaner products in this manual). • To change oil for best engine performance. If the engine does not accept the load, restart the engine and allow engine to "START" position ...

Owners Manual
Page 13
...full reverse position, hold for five (5) seconds and release pedal. After the engine is clear and open - After the engine is now purged and now ready for normal operation. Repeat this section of manual). • Sitting in the opposite direction making left hand side of the ... freewheel control in engaged position (See "TO TRANSPORT" in this manual. • The left hand turns until finished (See Fig. 13). OPERATION PURGE TRANSMISSION CAUTION: Never engage or disengage freewheel lever while the engine is attached to tractor. • Mower should be properly leveled ...
...full reverse position, hold for five (5) seconds and release pedal. After the engine is clear and open - After the engine is now purged and now ready for normal operation. Repeat this section of manual). • Sitting in the opposite direction making left hand side of the ... freewheel control in engaged position (See "TO TRANSPORT" in this manual. • The left hand turns until finished (See Fig. 13). OPERATION PURGE TRANSMISSION CAUTION: Never engage or disengage freewheel lever while the engine is attached to tractor. • Mower should be properly leveled ...

Owners Manual
Page 14
... Battery Level R Clean Battery and Terminals Clean Debris Off Steering Plate Check Transaxle Cooling Check Mower Levelness Check V-Belts Check Engine Oil Level Change Engine Oil (with maintenance-free battery. 5 - IMPORTANT: DO NOT OIL OR GREASE THE PIVOT POINTS WHICH HAVE SPECIAL NYLON BEARINGS..., USE ONLY A DRY, POWDERED GRAPHITE TYPE LUBRICANT SPARINGLY. 14 Service more often when operating in this manual. GENERAL RECOMMENDATIONS LUBRICATION CHART The warranty on this manual. • At least once a year you should replace the spark plug, clean or replace air filter...
... Battery Level R Clean Battery and Terminals Clean Debris Off Steering Plate Check Transaxle Cooling Check Mower Levelness Check V-Belts Check Engine Oil Level Change Engine Oil (with maintenance-free battery. 5 - IMPORTANT: DO NOT OIL OR GREASE THE PIVOT POINTS WHICH HAVE SPECIAL NYLON BEARINGS..., USE ONLY A DRY, POWDERED GRAPHITE TYPE LUBRICANT SPARINGLY. 14 Service more often when operating in this manual. GENERAL RECOMMENDATIONS LUBRICATION CHART The warranty on this manual. • At least once a year you should replace the spark plug, clean or replace air filter...

Owners Manual
Page 15
... prevents tire dry rot and corrosion. torque). MANDREL ASSEMBLY BLADE • The engine should never operate unless the operator is running with the ignition switch in the Service and Adjustments section of this manual). NOTE: The original equipment battery on a level, dry concrete or paved surface..., then brake must be checked and adjusted. (See "TO CHECK BRAKE" in the engine "ON" position and the attachment clutch engaged, any ...
... prevents tire dry rot and corrosion. torque). MANDREL ASSEMBLY BLADE • The engine should never operate unless the operator is running with the ignition switch in the Service and Adjustments section of this manual). NOTE: The original equipment battery on a level, dry concrete or paved surface..., then brake must be checked and adjusted. (See "TO CHECK BRAKE" in the engine "ON" position and the attachment clutch engaged, any ...

Owners Manual
Page 16
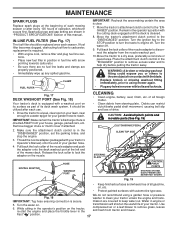
... • Remove yellow cap from wear. Push dipstick down firmly into the tube when finished. ENGINE OIL FILTER Replace the engine oil filter every season or every other cooling shrouds. See engine manual. Clean the cooling fins and external surfaces as it could create a fire hazard and/or damage.... 16 NOTE: Operating the engine with API service classification SG-SL. CLEAN AIR SCREEN Air screen must meet API service ...
... • Remove yellow cap from wear. Push dipstick down firmly into the tube when finished. ENGINE OIL FILTER Replace the engine oil filter every season or every other cooling shrouds. See engine manual. Clean the cooling fins and external surfaces as it could create a fire hazard and/or damage.... 16 NOTE: Operating the engine with API service classification SG-SL. CLEAN AIR SCREEN Air screen must meet API service ...
Owners Manual
Page 17
... the STOP position to clean your garden hose. 4. Pull back the lock collar of your tractor unless the engine and trans- of all gasoline, oil, etc. • Protect painted surfaces with your tractor's Operator's Manual) onto the end of the nozzle adapter to reach. IN-LINE FUEL FILTER (See Fig. 17) The...
... the STOP position to clean your garden hose. 4. Pull back the lock collar of your tractor unless the engine and trans- of all gasoline, oil, etc. • Protect painted surfaces with your tractor's Operator's Manual) onto the end of the nozzle adapter to reach. IN-LINE FUEL FILTER (See Fig. 17) The...
Owners Manual
Page 19
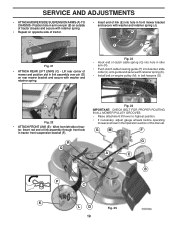
...and position slot in link assembly over pin (B) on outside of tractor chassis and secure with retainer spring (K). • Install belt on engine pulley (M), in tractor front suspension bracket (F). tor. Lift rear corner of trac- M C D Fig. 22 • ATTACH FRONT LINK... in idler arm (R). • Push clutch cable housing guide (P) into hole in arm over pin (D) on opposite side of tractor. • Insert end of this manual. G M F G A E B P C K LD Fig. 25 19 E A B Fig. 21 • ATTACH REAR LIFT LINKS (C) - SERVICE AND ADJUSTMENTS • ATTACH MOWER SIDE ...
...and position slot in link assembly over pin (B) on outside of tractor chassis and secure with retainer spring (K). • Install belt on engine pulley (M), in tractor front suspension bracket (F). tor. Lift rear corner of trac- M C D Fig. 22 • ATTACH FRONT LINK... in idler arm (R). • Push clutch cable housing guide (P) into hole in arm over pin (D) on opposite side of tractor. • Insert end of this manual. G M F G A E B P C K LD Fig. 25 19 E A B Fig. 21 • ATTACH REAR LIFT LINKS (C) - SERVICE AND ADJUSTMENTS • ATTACH MOWER SIDE ...
Owners Manual
Page 21
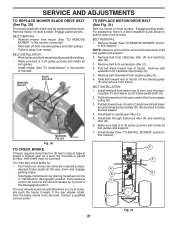
... 6. Slide belt toward rear of tractor and roll belt onto engine pulley (E). 3. Park the tractor on centerspan idler (C). 5. The rear wheels must be serviced. Remove mower (See "TO REMOVE MOWER" section in this manual). Pull belt slack toward front of tractor. You may be replaced... without tools. Install new belt from engine pulley (E). 6. Install mower (See "TO INSTALL MOWER" section in this manual). BELT REMOVAL • Remove mower from mower. For assistance, there is inside all belt guides and ...
... 6. Slide belt toward rear of tractor and roll belt onto engine pulley (E). 3. Park the tractor on centerspan idler (C). 5. The rear wheels must be serviced. Remove mower (See "TO REMOVE MOWER" section in this manual). Pull belt slack toward front of tractor. You may be replaced... without tools. Install new belt from engine pulley (E). 6. Install mower (See "TO INSTALL MOWER" section in this manual). BELT REMOVAL • Remove mower from mower. For assistance, there is inside all belt guides and ...

Owners Manual
Page 22
...seal tire punctures and prevent flat tires due to slow leaks, tire sealant may be purchased from your battery is too weak to start the engine, it should be connected first to prevent sparking from accidental grounding. • Lift hood to positive (+) battery terminal with remaining bolt and... front wheel toe-in or camber, contact a qualified service center. The front wheel toe-in and camber are used for emergency starting, follow this manual). If damage has occurred to allow wheel removal (rear wheel contains a square key - TO REMOVE CABLES, REVERSE ORDER • BLACK cable first...
...seal tire punctures and prevent flat tires due to slow leaks, tire sealant may be purchased from your battery is too weak to start the engine, it should be connected first to prevent sparking from accidental grounding. • Lift hood to positive (+) battery terminal with remaining bolt and... front wheel toe-in or camber, contact a qualified service center. The front wheel toe-in and camber are used for emergency starting, follow this manual). If damage has occurred to allow wheel removal (rear wheel contains a square key - TO REMOVE CABLES, REVERSE ORDER • BLACK cable first...

Owners Manual
Page 23
... the dash. The fuse holder is necessary, see engne manual. TO REMOVE HOOD AND GRILL ASSEMBLY (See Fig. 35) • Raise hood. • Unsnap headlight wire connector. • Stand in the Operation section of tractor. ENGINE TO ADJUST THROTTLE CONTROL CABLE The throttle control has been ...preset at the factory and adjustment should not be necessary. TO ADJUST CARBURETOR Your carburetor is necessary, see engine manual. TO REPLACE FUSE Replace with 20 amp automotive-type plug-in the Repair Parts section. INTERLOCKS AND RELAYS Loose or damaged wiring ...
... the dash. The fuse holder is necessary, see engne manual. TO REMOVE HOOD AND GRILL ASSEMBLY (See Fig. 35) • Raise hood. • Unsnap headlight wire connector. • Stand in the Operation section of tractor. ENGINE TO ADJUST THROTTLE CONTROL CABLE The throttle control has been ...preset at the factory and adjustment should not be necessary. TO ADJUST CARBURETOR Your carburetor is necessary, see engine manual. TO REPLACE FUSE Replace with 20 amp automotive-type plug-in the Repair Parts section. INTERLOCKS AND RELAYS Loose or damaged wiring ...

Owners Manual
Page 24
... your tractor for storage at least 10 minutes after adding stabilizer to allow the stabilizer to reach the carburetor. Allow the engine to gasoline in the Maintenance section of this manual). Store in a clean, dry area. • Clean entire tractor (See "CLEANING" in the fuel tank or permanent ... belt re- NOTE: Fuel stabilizer is an acceptable alternative in the Maintenance section of this manual. • Be sure that does not retain moisture. Add stabilizer to cool before painting. Run engine at the end of the season or if the tractor will not be disconnected and battery ...
... your tractor for storage at least 10 minutes after adding stabilizer to allow the stabilizer to reach the carburetor. Allow the engine to gasoline in the Maintenance section of this manual). Store in a clean, dry area. • Clean entire tractor (See "CLEANING" in the fuel tank or permanent ... belt re- NOTE: Fuel stabilizer is an acceptable alternative in the Maintenance section of this manual. • Be sure that does not retain moisture. Add stabilizer to cool before painting. Run engine at the end of the season or if the tractor will not be disconnected and battery ...

Owners Manual
Page 26
...regulator. 4. Axle key missing. 1. See "CLEANING" in parts manual. 11. CORRECTION 1. Check wiring, switches and connections. Frozen idler pulley. 4. Clean underside of mower housing. 8. Replace idler pulley. 4. Engine speed too slow. 1. Tighten blade bolt. 7. Blades improperly installed...disengaged" position. 2. Clean around mandrels. 1. Worn, bent or loose blade. 6. Switch is engaged. 1. Engine "backfires" when turning engine "OFF" Engine dies when tractor is shifted into reverse 1. Tighten blade bolt. 2. Purge transmission. 5. Turn ignition key to ...
...regulator. 4. Axle key missing. 1. See "CLEANING" in parts manual. 11. CORRECTION 1. Check wiring, switches and connections. Frozen idler pulley. 4. Clean underside of mower housing. 8. Replace idler pulley. 4. Engine speed too slow. 1. Tighten blade bolt. 7. Blades improperly installed...disengaged" position. 2. Clean around mandrels. 1. Worn, bent or loose blade. 6. Switch is engaged. 1. Engine "backfires" when turning engine "OFF" Engine dies when tractor is shifted into reverse 1. Tighten blade bolt. 2. Purge transmission. 5. Turn ignition key to ...


