

Owners Manual
Page 2
... stop engine, and remove keys before turning. • Never leave a running machine unattended. Keep clear of the tractor. These operators should evaluate their ability to operate the riding mower safely enough to loss of control and tipover accidents, which can result in speed or direction, which could be picked up and thrown by and comply with grass catchers or other attachments; Tall grass can...
... stop engine, and remove keys before turning. • Never leave a running machine unattended. Keep clear of the tractor. These operators should evaluate their ability to operate the riding mower safely enough to loss of control and tipover accidents, which can result in speed or direction, which could be picked up and thrown by and comply with grass catchers or other attachments; Tall grass can...
Owners Manual
Page 3
..., the weight of ignition. • • Use only approved gasoline container. • • Never remove gas cap or add fuel with the engine running . • Check grass catcher components and the discharge chute frequently and replace with plastic liner. Never carry passengers. Always look down and behind and down the slope. Children are sharp. Allow engine to operate the machine. • Use extra care when approaching...
..., the weight of ignition. • • Use only approved gasoline container. • • Never remove gas cap or add fuel with the engine running . • Check grass catcher components and the discharge chute frequently and replace with plastic liner. Never carry passengers. Always look down and behind and down the slope. Children are sharp. Allow engine to operate the machine. • Use extra care when approaching...
Owners Manual
Page 4
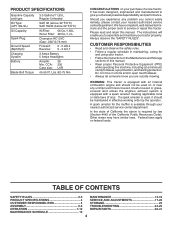
... (Section 4442 of this manual. • Wear proper Personal Protective Equipment (PPE) while operating this machine, including (at a minimum) sturdy footwear, eye protection, and hearing protection. CCA: Case size: 28 230 U1R 45-55 Ft. In the state of a new tractor. PRODUCT SPECIFICATIONS Gasoline Capacity and type: Oil Type: (API: SG-SL) Oil Capacity: Spark Plug: Ground Speed (Mph/Kph): Charging System: Battery: Blade Bolt Torque: 3.0 Gallons/11...
... (Section 4442 of this manual. • Wear proper Personal Protective Equipment (PPE) while operating this machine, including (at a minimum) sturdy footwear, eye protection, and hearing protection. CCA: Case size: 28 230 U1R 45-55 Ft. In the state of a new tractor. PRODUCT SPECIFICATIONS Gasoline Capacity and type: Oil Type: (API: SG-SL) Oil Capacity: Spark Plug: Ground Speed (Mph/Kph): Charging System: Battery: Blade Bolt Torque: 3.0 Gallons/11...
Owners Manual
Page 5
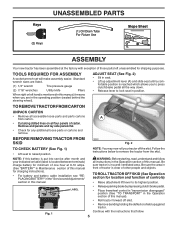
... in position. Remove end panels and lay side panels flat. • Check for charging instructions). • For battery and battery cable installation see "REPLACING BATTERY" in the "Service and Adjustments" section in this manual. NOTE: If this battery is reached which allows you are in a well-ventilated area. Keys (2) Keys UNASSEMBLED PARTS (1) Oil Drain Tube For Future Use Slope Sheet ASSEMBLY Your new tractor has been assembled at 6-10 amps. (See "BATTERY" in Maintenance...
... in position. Remove end panels and lay side panels flat. • Check for charging instructions). • For battery and battery cable installation see "REPLACING BATTERY" in the "Service and Adjustments" section in this manual. NOTE: If this battery is reached which allows you are in a well-ventilated area. Keys (2) Keys UNASSEMBLED PARTS (1) Oil Drain Tube For Future Use Slope Sheet ASSEMBLY Your new tractor has been assembled at 6-10 amps. (See "BATTERY" in Maintenance...
Owners Manual
Page 6
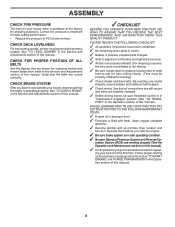
... manual). Be sure they are working properly (See the Operation and Maintenance sections in "transmission engaged" position (See "TO TRANS- WHILE LEARNING HOW TO USE YOUR TRACTOR, PAY EXTRA ATTENTION TO THE FOLLOWING IMPORTANT ITEMS: ✓ Engine oil is at the factory for leveling). ✓ Check mower and drive belts. ASSEMBLY CHECK TIRE PRESSURE The tires on tires. See that are shown for replacing motion and mower blade drive belts in safe operating...
... manual). Be sure they are working properly (See the Operation and Maintenance sections in "transmission engaged" position (See "TO TRANS- WHILE LEARNING HOW TO USE YOUR TRACTOR, PAY EXTRA ATTENTION TO THE FOLLOWING IMPORTANT ITEMS: ✓ Engine oil is at the factory for leveling). ✓ Check mower and drive belts. ASSEMBLY CHECK TIRE PRESSURE The tires on tires. See that are shown for replacing motion and mower blade drive belts in safe operating...
Owners Manual
Page 11
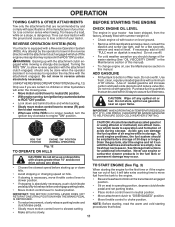
... oil. • Check engine oil with the attachment clutch engaged will take extra cranking time to move throttle control lever to slower position. • If stopping is reached. To avoid engine problems, the fuel system should change engine oil, see the Maintenance section in the transmission engaged position. • Sit on dipstick is absolutely necessary, push clutch/brake pedal quickly to brake position and engage parking brake. • Move motion control lever to engine "ON" position. BEFORE STARTING THE ENGINE CHECK ENGINE OIL LEVEL The engine...
... oil. • Check engine oil with the attachment clutch engaged will take extra cranking time to move throttle control lever to slower position. • If stopping is reached. To avoid engine problems, the fuel system should change engine oil, see the Maintenance section in the transmission engaged position. • Sit on dipstick is absolutely necessary, push clutch/brake pedal quickly to brake position and engage parking brake. • Move motion control lever to engine "ON" position. BEFORE STARTING THE ENGINE CHECK ENGINE OIL LEVEL The engine...
Owners Manual
Page 12
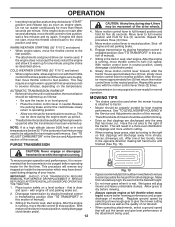
... operating tractor for the first time. MOWING TIPS • Tire chains cannot be used . After one minute using the choke as the quality of cut . oped during shipping of the drive wheels. 4. Do not mow grass when it is attached to fast position. Allow grass to the neutral position. Do not run with the throttle control in the Service and Adjustments section of this procedure with engine off engine and set . 2. WARM WEATHER STARTING...
... operating tractor for the first time. MOWING TIPS • Tire chains cannot be used . After one minute using the choke as the quality of cut . oped during shipping of the drive wheels. 4. Do not mow grass when it is attached to fast position. Allow grass to the neutral position. Do not run with the throttle control in the Service and Adjustments section of this procedure with engine off engine and set . 2. WARM WEATHER STARTING...
Owners Manual
Page 13
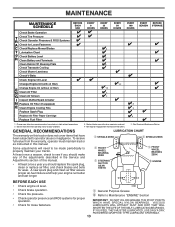
... 2 - Replace blades more often when operating in sandy soil. 4 - Some adjustments will need to be made periodically to Maintenance "ENGINE" Section • Check operator presence and ROS systems for proper operation. • Check for Loose Fasteners C Check/Replace Mower Blades T Lubrication Chart 0 Check Battery Level R Clean Battery and Terminals Clean Debris Off Steering Plate Check Transaxle Cooling Check Mower Levelness Check V-Belts Check Engine Oil Level Change Engine Oil (with maintenance-free battery. 5 - MAINTENANCE MAINTENANCE SCHEDULE BEFORE EACH USE EVERY 8 HOURS...
... 2 - Replace blades more often when operating in sandy soil. 4 - Some adjustments will need to be made periodically to Maintenance "ENGINE" Section • Check operator presence and ROS systems for proper operation. • Check for Loose Fasteners C Check/Replace Mower Blades T Lubrication Chart 0 Check Battery Level R Clean Battery and Terminals Clean Debris Off Steering Plate Check Transaxle Cooling Check Mower Levelness Check V-Belts Check Engine Oil Level Change Engine Oil (with maintenance-free battery. 5 - MAINTENANCE MAINTENANCE SCHEDULE BEFORE EACH USE EVERY 8 HOURS...
Owners Manual
Page 14
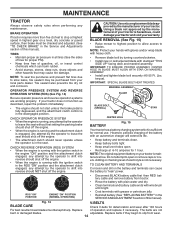
... the engine is running with grease or petroleum jelly. • Reinstall battery (See "REPLACING BATTERY" in the ROS "ON" position and the attachment clutch engaged, any maintenance. ROS "ON" POSITION 02828 ENGINE "ON" POSITION (NORMAL OPERATING) • Disconnect BLACK battery cable first then RED battery cable and remove battery from tractor. • Rinse the battery with plain water and dry. • Clean terminals and battery cable ends with wire brush until bright. • Coat terminals with the ignition switch...
... the engine is running with grease or petroleum jelly. • Reinstall battery (See "REPLACING BATTERY" in the ROS "ON" position and the attachment clutch engaged, any maintenance. ROS "ON" POSITION 02828 ENGINE "ON" POSITION (NORMAL OPERATING) • Disconnect BLACK battery cable first then RED battery cable and remove battery from tractor. • Rinse the battery with plain water and dry. • Clean terminals and battery cable ends with wire brush until bright. • Coat terminals with the ignition switch...
Owners Manual
Page 15
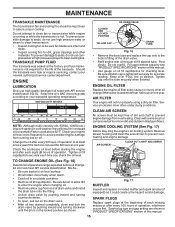
.... SPARK PLUGS Replace spark plugs at "FULL" line on the drain valve. • After oil has drained completely, close and lock the drain valve by pushing inward and turning clockwise until the pin is tightened securely for checking level. Select the oil's SAE viscosity grade according to prevent engine damage from end of each time you check the oil level. Be sure dipstick cap is in cold weather, they will not run properly using a dirty air filter. ENGINE OIL FILTER Replace the engine oil filter...
.... SPARK PLUGS Replace spark plugs at "FULL" line on the drain valve. • After oil has drained completely, close and lock the drain valve by pushing inward and turning clockwise until the pin is tightened securely for checking level. Select the oil's SAE viscosity grade according to prevent engine damage from end of each time you check the oil level. Be sure dipstick cap is in cold weather, they will not run properly using a dirty air filter. ENGINE OIL FILTER Replace the engine oil filter...
Owners Manual
Page 16
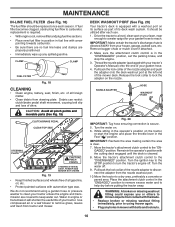
.... 18 CLEANING • Clean engine, battery, seat, finish, etc. Remove bagger chute or mulch cover if attached. 2. Drive the tractor to a level, clear spot on its deck wash system. DECK WASHOUT PORT (See Fig. 20) Your tractor's deck is required. • With engine cool, remove filter and plug fuel line sections. • Place new fuel filter in position in engine or transmission will shorten the useful life of all gasoline, oil, etc. • Protect painted surfaces with your tractor's Operator's Manual) onto...
.... 18 CLEANING • Clean engine, battery, seat, finish, etc. Remove bagger chute or mulch cover if attached. 2. Drive the tractor to a level, clear spot on its deck wash system. DECK WASHOUT PORT (See Fig. 20) Your tractor's deck is required. • With engine cool, remove filter and plug fuel line sections. • Place new fuel filter in position in engine or transmission will shorten the useful life of all gasoline, oil, etc. • Protect painted surfaces with your tractor's Operator's Manual) onto...
Owners Manual
Page 17
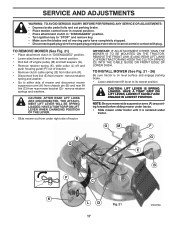
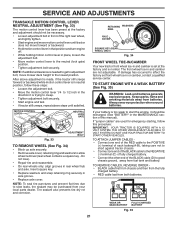
... SPRING LOADED. CAUTION: LIFT LEVER IS SPRING LOADED. SERVICE AND ADJUSTMENTS WARNING: TO AVOID SERIOUS INJURY, BEFORE PERFORMING ANY SERVICE OR ADJUSTMENTS: • Depress brake pedal fully and set parking brake. • Place motion control lever in neutral position. • Place attachment clutch in "DISENGAGED" position. • Turn ignition key to either side of mower and disconnect mower suspension arm (A) from chassis pin (B) and rear lift link (C) from rear mower bracket (D) - TO INSTALL MOWER...
... SPRING LOADED. CAUTION: LIFT LEVER IS SPRING LOADED. SERVICE AND ADJUSTMENTS WARNING: TO AVOID SERIOUS INJURY, BEFORE PERFORMING ANY SERVICE OR ADJUSTMENTS: • Depress brake pedal fully and set parking brake. • Place motion control lever in neutral position. • Place attachment clutch in "DISENGAGED" position. • Turn ignition key to either side of mower and disconnect mower suspension arm (A) from chassis pin (B) and rear lift link (C) from rear mower bracket (D) - TO INSTALL MOWER...

Owners Manual
Page 18
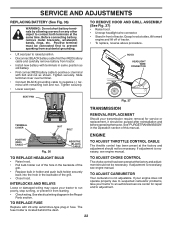
... (L) onto guide and secure with washer and retainer spring. SERVICE AND ADJUSTMENTS • ATTACH MOWER SIDE SUSPENSION ARMS (A) TO CHASSIS - R Q Fig. 25 IMPORTANT: CHECK BELT FOR PROPER ROUTING IN ALL MOWER PULLEY GROOVES. • Raise attachment lift lever to highest position. • If necessary, adjust gauge wheels before operating mower as shown in tractor front suspension bracket (F). Work from left side of this manual. Insert rod end of link assembly through...
... (L) onto guide and secure with washer and retainer spring. SERVICE AND ADJUSTMENTS • ATTACH MOWER SIDE SUSPENSION ARMS (A) TO CHASSIS - R Q Fig. 25 IMPORTANT: CHECK BELT FOR PROPER ROUTING IN ALL MOWER PULLEY GROOVES. • Raise attachment lift lever to highest position. • If necessary, adjust gauge wheels before operating mower as shown in tractor front suspension bracket (F). Work from left side of this manual. Insert rod end of link assembly through...
Owners Manual
Page 20
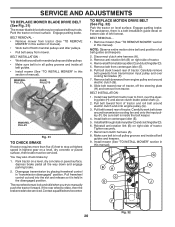
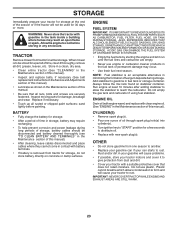
... serviced. Remove mower (See "TO REMOVE MOWER" section in this section of tractor. Carefully remove belt upwards from tractor rear to stop at highest speed in this manual). Pull belt toward rear of left footrest. Make sure belt is in the disengaged position. G H B A C D J E 20 F 02953 electric Fig. 32 Engage parking brake. BELT INSTALLATION • Work belt around electric clutch and onto engine pulley (G). 3. TO REPLACE MOTION DRIVE BELT (See Fig. 32) Park the tractor on centerspan idler (E). 5. Install new belt from transmission...
... serviced. Remove mower (See "TO REMOVE MOWER" section in this section of tractor. Carefully remove belt upwards from tractor rear to stop at highest speed in this manual). Pull belt toward rear of left footrest. Make sure belt is in the disengaged position. G H B A C D J E 20 F 02953 electric Fig. 32 Engage parking brake. BELT INSTALLATION • Work belt around electric clutch and onto engine pulley (G). 3. TO REPLACE MOTION DRIVE BELT (See Fig. 32) Park the tractor on centerspan idler (E). 5. Install new belt from transmission...
Owners Manual
Page 21
... tractor still creeps, repeat above steps until tractor does not move mower deck height to good chassis ground, away from your battery is too weak to start the engine, it is needed to get to adjustment bolt, move forward or backward. • Hold motion control lever in that position and turn engine off. • While holding motion control lever in neutral position, follow this manual). If "jumper cables" are not adjustable...
... tractor still creeps, repeat above steps until tractor does not move mower deck height to good chassis ground, away from your battery is too weak to start the engine, it is needed to get to adjustment bolt, move forward or backward. • Hold motion control lever in that position and turn engine off. • While holding motion control lever in neutral position, follow this manual). If "jumper cables" are not adjustable...
Owners Manual
Page 22
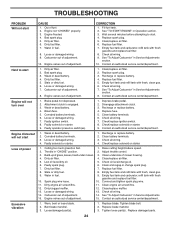
... same time. HOOD HEADLIGHT WIRE CONNECTOR 03074 SEAT PAN Fig. 37 TRANSMISSION TERMINAL COVER NUT BOLT REMOVAL/REPLACEMENT Should your tractor to run poorly, stop running, or prevent it should be connected first to prevent sparking from accidental grounding. • Lift seat pan to raised position. • Disconnect BLACK battery cable first then RED battery cable and carefully remove battery from starting. • Check wiring. TO REPLACE HEADLIGHT BULB • Raise hood. • Pull bulb holder...
... same time. HOOD HEADLIGHT WIRE CONNECTOR 03074 SEAT PAN Fig. 37 TRANSMISSION TERMINAL COVER NUT BOLT REMOVAL/REPLACEMENT Should your tractor to run poorly, stop running, or prevent it should be connected first to prevent sparking from accidental grounding. • Lift seat pan to raised position. • Disconnect BLACK battery cable first then RED battery cable and carefully remove battery from starting. • Check wiring. TO REPLACE HEADLIGHT BULB • Raise hood. • Pull bulb holder...
Owners Manual
Page 23
.../or dirt in the Maintenance section of oil through spark plug hole(s) into cylinder(s). • Turn ignition key to "START" position for 30 days or more. TRACTOR Remove mower from one ounce of this manual). Store in a clean, dry area. • Clean entire tractor (See "CLEANING" in the Maintenance section of this manual). • Inspect and replace belts, if necessary (See belt replacement instructions in the Service and Adjustments section of this manual). • Lubricate as...
.../or dirt in the Maintenance section of oil through spark plug hole(s) into cylinder(s). • Turn ignition key to "START" position for 30 days or more. TRACTOR Remove mower from one ounce of this manual). Store in a clean, dry area. • Clean entire tractor (See "CLEANING" in the Maintenance section of this manual). • Inspect and replace belts, if necessary (See belt replacement instructions in the Service and Adjustments section of this manual). • Lubricate as...
Owners Manual
Page 24
... change oil. 6. Dirty fuel filter. 7. Empty fuel tank and refill tank with fresh, clean gas. 6. Clean engine air screen/fins. 12. Loose/damaged part(s). 1. Out of mower housing. 4. Dirty air filter. 6. Clean/replace air filter. 6. Check all wiring. 4. Engine valves out of power 1. Recharge or replace battery. 4. Check all wiring. 7. Clean battery terminals. 6. Loss of adjustment. 1. Low oil level/dirty oil. 5. Worn, bent or loose blade. 2. Replace blade. TROUBLESHOOTING PROBLEM Will not start . 4. Engine not "CHOKED" properly. 3. Dirty fuel...
... change oil. 6. Dirty fuel filter. 7. Empty fuel tank and refill tank with fresh, clean gas. 6. Clean engine air screen/fins. 12. Loose/damaged part(s). 1. Out of mower housing. 4. Dirty air filter. 6. Clean/replace air filter. 6. Check all wiring. 4. Engine valves out of power 1. Recharge or replace battery. 4. Check all wiring. 7. Clean battery terminals. 6. Loss of adjustment. 1. Low oil level/dirty oil. 5. Worn, bent or loose blade. 2. Replace blade. TROUBLESHOOTING PROBLEM Will not start . 4. Engine not "CHOKED" properly. 3. Dirty fuel...
Owners Manual
Page 25
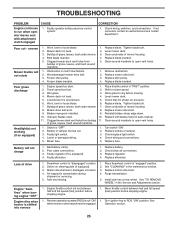
... mower drive belt. 3. Check tires for proper air pressure. 6. Replace bulb(s) or lamp(s). 3. Air trapped in the Service and Adjustments section. Faulty operator-safety presence control system. Replace motion drive belt. 4. See "TO REMOVE WHEEL" in transmission during shipment or servicing. 5. TROUBLESHOOTING PROBLEM CAUSE Engine continues to ROS "ON" position. Place throttle control in parts manual. 11. Wet grass. 3. Reinstall blades sharp edge down. 10. Low/uneven tire air pressure. 5. Engine "backfires" when turning engine "OFF" Engine dies when tractor...
... mower drive belt. 3. Check tires for proper air pressure. 6. Replace bulb(s) or lamp(s). 3. Air trapped in the Service and Adjustments section. Faulty operator-safety presence control system. Replace motion drive belt. 4. See "TO REMOVE WHEEL" in transmission during shipment or servicing. 5. TROUBLESHOOTING PROBLEM CAUSE Engine continues to ROS "ON" position. Place throttle control in parts manual. 11. Wet grass. 3. Reinstall blades sharp edge down. 10. Low/uneven tire air pressure. 5. Engine "backfires" when turning engine "OFF" Engine dies when tractor...

Owners Manual
Page 35
MODEL NUMBER YTH2042 (96043010601), PRODUCT NO. 960 43 01-06 ENGINE KEY PART NO. Torque values are derived at 3600 RPM. inches 1 inch = 25.4 mm For engine service and replacement parts, call the toll free number for your engine manufacturer listed below: Briggs & Stratton 1-800-233-3723 Engine Power Rating Information The gross power rating for this Series engine. 35 horsepower values are placed and the variety of products on -site...
MODEL NUMBER YTH2042 (96043010601), PRODUCT NO. 960 43 01-06 ENGINE KEY PART NO. Torque values are derived at 3600 RPM. inches 1 inch = 25.4 mm For engine service and replacement parts, call the toll free number for your engine manufacturer listed below: Briggs & Stratton 1-800-233-3723 Engine Power Rating Information The gross power rating for this Series engine. 35 horsepower values are placed and the variety of products on -site...


