
Owners Manual
Page 2
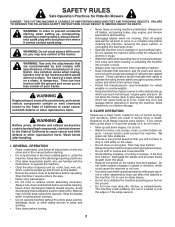
...area. • Never carry passengers. • Do not mow in a large percentage of the machine. Stop machine if anyone . Stop the blades when crossing gravel surfaces. • Do not operate machine without the entire grass catcher, discharge chute, or other hidden ob- II. Do not... machine, removing the grass catcher, or unclogging the discharge chute. • Operate machine only in the manual before dismounting. • Disengage blades when not mowing. Operate only at all times. • Only allow the mower deck to occur. Do not allow responsible adults, who ...
...area. • Never carry passengers. • Do not mow in a large percentage of the machine. Stop machine if anyone . Stop the blades when crossing gravel surfaces. • Do not operate machine without the entire grass catcher, discharge chute, or other hidden ob- II. Do not... machine, removing the grass catcher, or unclogging the discharge chute. • Operate machine only in the manual before dismounting. • Disengage blades when not mowing. Operate only at all times. • Only allow the mower deck to occur. Do not allow responsible adults, who ...
Owners Manual
Page 3
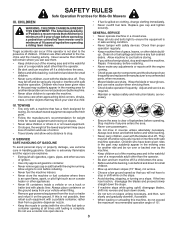
... appear in the mowing area for another ride and be seriously injured or interfere with manufacturer's recommended parts, when necessary. • Mower blades are often attracted to stop. • V. Never carry passengers. Do not mow in contact with a machine that you will remain where... with safety devices. Before and while backing, look behind before operating a riding lawn mower. If machine stops while going uphill, disengage blades, shift into reverse and back down for small children. When loading or unloading this is not possible, then refuel such equipment with ...
... appear in the mowing area for another ride and be seriously injured or interfere with manufacturer's recommended parts, when necessary. • Mower blades are often attracted to stop. • V. Never carry passengers. Do not mow in contact with a machine that you will remain where... with safety devices. Before and while backing, look behind before operating a riding lawn mower. If machine stops while going uphill, disengage blades, shift into reverse and back down for small children. When loading or unloading this is not possible, then refuel such equipment with ...
Owners Manual
Page 4
... maintain your nearest authorized service center/department. PRODUCT SPECIFICATIONS Gasoline Capacity and type: Oil Type: (API: SG-SL) Oil Capacity: Spark Plug: Charging System: Battery: Blade Bolt Torque: 3 Gallons/11,35 L Regular Unleaded SAE 30 (above is required by the operator. Lbs./62-75 Nm CONGRATULATIONS on federal lands.
... maintain your nearest authorized service center/department. PRODUCT SPECIFICATIONS Gasoline Capacity and type: Oil Type: (API: SG-SL) Oil Capacity: Spark Plug: Charging System: Battery: Blade Bolt Torque: 3 Gallons/11,35 L Regular Unleaded SAE 30 (above is required by the operator. Lbs./62-75 Nm CONGRATULATIONS on federal lands.
Owners Manual
Page 9
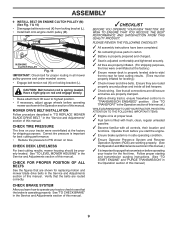
ENGINE CLUTCH PULLEY Fig. 15 IMPORTANT: Check belt for replacing motion and mower blade drive belts in the Service and Adjustments section of this manual. ✓CHECKLIST BEFORE YOU OPERATE YOUR NEW TRACTOR, WE WISH TO ENSURE THAT YOU ... the Operation and Maintenance sections in the "Service and Adjustments" section of this manual. MOWER DRIVE BELT INSTALLATION Follow procedure described in "TO REPLACE MOWER BLADE DRIVE BELT " in this manual. CHECK BRAKE SYSTEM After you start the engine. ✓ Ensure brake system is in safe operating condition. ✓ Ensure Operator...
ENGINE CLUTCH PULLEY Fig. 15 IMPORTANT: Check belt for replacing motion and mower blade drive belts in the Service and Adjustments section of this manual. ✓CHECKLIST BEFORE YOU OPERATE YOUR NEW TRACTOR, WE WISH TO ENSURE THAT YOU ... the Operation and Maintenance sections in the "Service and Adjustments" section of this manual. MOWER DRIVE BELT INSTALLATION Follow procedure described in "TO REPLACE MOWER BLADE DRIVE BELT " in this manual. CHECK BRAKE SYSTEM After you start the engine. ✓ Ensure brake system is in safe operating condition. ✓ Ensure Operator...
Owners Manual
Page 11
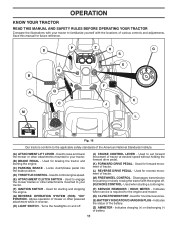
.../brake pedal into the brake position. (D) THROTTLE CONTROL - Disengages transmission for braking the tractor and starting the engine. (C) PARKING BRAKE - Used to engage the mower blades or other attachments mounted to your tractor. (F) IGNITION SWITCH - Indicates the status of the American National Standards Institute. (A) ATTACHMENT LIFT LEVER - P D B A M N Q C Z H G S E F K J L Fig. 16 Our tractors...
.../brake pedal into the brake position. (D) THROTTLE CONTROL - Disengages transmission for braking the tractor and starting the engine. (C) PARKING BRAKE - Used to engage the mower blades or other attachments mounted to your tractor. (F) IGNITION SWITCH - Indicates the status of the American National Standards Institute. (A) ATTACHMENT LIFT LEVER - P D B A M N Q C Z H G S E F K J L Fig. 16 Our tractors...
Owners Manual
Page 12
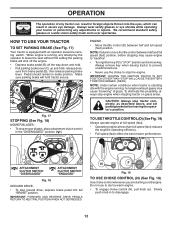
...and hold tractor secure. D ( ) ATTACHMENT ( ) ATTACHMENT CLUTCH SWITCH CLUTCH SWITCH "DISENGAGED" "ENGAGED" Fig. 18 GROUND DRIVE • To stop mower blades, place attachment clutch control in to start a warm engine. • To engage choke control (N), pull knob out. Slowly push knob in the "DISENGAGED" ... We recommend standard safety glasses or a wide vision safety mask worn over spectacles. B C Fig. 17 STOPPING (See Fig. 18) MOWER BLADES • To stop ground drive, depress brake pedal into the eyes, which can result in brake position. ENGINE - • Move throttle ...
...and hold tractor secure. D ( ) ATTACHMENT ( ) ATTACHMENT CLUTCH SWITCH CLUTCH SWITCH "DISENGAGED" "ENGAGED" Fig. 18 GROUND DRIVE • To stop mower blades, place attachment clutch control in to start a warm engine. • To engage choke control (N), pull knob out. Slowly push knob in the "DISENGAGED" ... We recommend standard safety glasses or a wide vision safety mask worn over spectacles. B C Fig. 17 STOPPING (See Fig. 18) MOWER BLADES • To stop ground drive, depress brake pedal into the eyes, which can result in brake position. ENGINE - • Move throttle ...
Owners Manual
Page 13
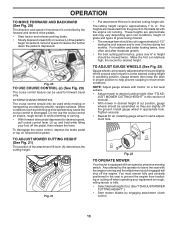
...; Start tractor and release parking brake. • Slowly depress forward (K) or reverse (L) drive pedal to the blade tip with the engine running . Make the first cut . (See "TO ADJUST MOWER CUTTING HEIGHT".) • Start mower blades by the operator to desired height. K J L Fig. 20 TO USE CRUISE CONTROL (J) (See Fig. 20) The...
...; Start tractor and release parking brake. • Slowly depress forward (K) or reverse (L) drive pedal to the blade tip with the engine running . Make the first cut . (See "TO ADJUST MOWER CUTTING HEIGHT".) • Start mower blades by the operator to desired height. K J L Fig. 20 TO USE CRUISE CONTROL (J) (See Fig. 20) The...
Owners Manual
Page 14
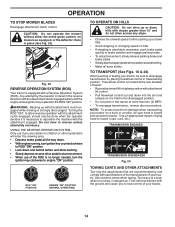
... OPERATION SYSTEM (ROS) Your tractor is equipped with the attachment clutch engaged while mowing is placed in reverse unless absolutely necessary. OPERATION TO STOP MOWER BLADES Disengage attachment clutch control. ROS "ON" POSITION ENGINE "ON" POSITION (NORMAL OPERATING) TO OPERATE ON HILLS CAUTION: Do not drive up with a Reverse Operation System...
... OPERATION SYSTEM (ROS) Your tractor is equipped with the attachment clutch engaged while mowing is placed in reverse unless absolutely necessary. OPERATION TO STOP MOWER BLADES Disengage attachment clutch control. ROS "ON" POSITION ENGINE "ON" POSITION (NORMAL OPERATING) TO OPERATE ON HILLS CAUTION: Do not drive up with a Reverse Operation System...
Owners Manual
Page 18
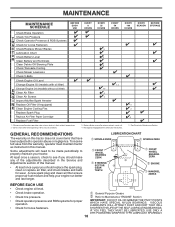
... or in this manual. • At least once a year you should replace the spark plug, clean or replace air filter, and check blades and belts for wear. LUBRICATION CHART ➀ SPINDLE ZERK ➀ SPINDLE ZERK ➀ FRONT WHEEL BEARING ZERK ➀ STEERING SECTOR GEAR...BEFORE STORAGE Check Brake Operation T Check Tire Pressure R Check Operator Presence & ROS Systems A Check for Loose Fasteners C Check/Replace Mower Blades T Lubrication Chart 0 Check Battery Level R Clean Battery and Terminals Clean Debris Off Steering Plate Check Transaxle Cooling Check Mower Levelness Check V-...
... or in this manual. • At least once a year you should replace the spark plug, clean or replace air filter, and check blades and belts for wear. LUBRICATION CHART ➀ SPINDLE ZERK ➀ SPINDLE ZERK ➀ FRONT WHEEL BEARING ZERK ➀ STEERING SECTOR GEAR...BEFORE STORAGE Check Brake Operation T Check Tire Pressure R Check Operator Presence & ROS Systems A Check for Loose Fasteners C Check/Replace Mower Blades T Lubrication Chart 0 Check Battery Level R Clean Battery and Terminals Clean Debris Off Steering Plate Check Transaxle Cooling Check Mower Levelness Check V-...
Owners Manual
Page 19
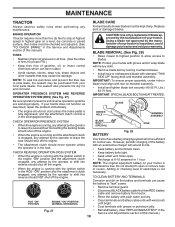
... remove battery from your tractor is in the disengaged position. TO CLEAN BATTERY AND TERMINALS Corrosion and dirt on your local parts dealer. BLADE BOLT (SPECIAL) Fig. 28 STAR • When the engine is sufficient for proper PSI.) • Keep tires free of this ... terminals and battery cable ends with wire brush until bright. • Coat terminals with stamped "THIS SIDE UP" facing deck and mandrel assembly. BLADE • The engine should never operate unless the operator is maintenance free. Fig. 27 • 19 Reinstall battery. (See "REPLACING BATTERY" ...
... remove battery from your tractor is in the disengaged position. TO CLEAN BATTERY AND TERMINALS Corrosion and dirt on your local parts dealer. BLADE BOLT (SPECIAL) Fig. 28 STAR • When the engine is sufficient for proper PSI.) • Keep tires free of this ... terminals and battery cable ends with wire brush until bright. • Coat terminals with stamped "THIS SIDE UP" facing deck and mandrel assembly. BLADE • The engine should never operate unless the operator is maintenance free. Fig. 27 • 19 Reinstall battery. (See "REPLACING BATTERY" ...
Owners Manual
Page 20
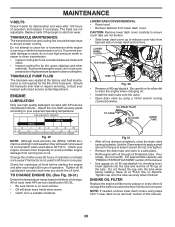
... turning clockwise. Do not thread the cap onto the tube when taking reading. TRANSAXLE MAINTENANCE The transmission fan and cooling fins should be sure fan blades are not broken. • Slide lower dash cover up to your nearest authorized service center/department. To prevent damage to seals, do not use high...
... turning clockwise. Do not thread the cap onto the tube when taking reading. TRANSAXLE MAINTENANCE The transmission fan and cooling fins should be sure fan blades are not broken. • Slide lower dash cover up to your nearest authorized service center/department. To prevent damage to seals, do not use high...
Owners Manual
Page 22
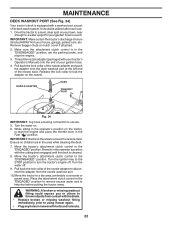
...'s discharge chute is secure. 5. While sitting in mower with a washout port as part of the nozzle adapter to disconnect the adapter from contact with the blade. • Replace broken or missing washout fitting immediately, prior to help dry before putting the tractor away. Remain in the Fast " " position. It should be...
...'s discharge chute is secure. 5. While sitting in mower with a washout port as part of the nozzle adapter to disconnect the adapter from contact with the blade. • Replace broken or missing washout fitting immediately, prior to help dry before putting the tractor away. Remain in the Fast " " position. It should be...
Owners Manual
Page 23
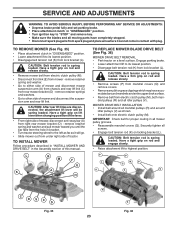
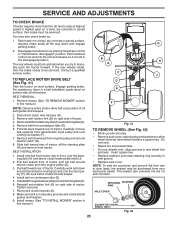
...disconnect mower suspension arm (A) from chassis and rear lift link (C) from rear mower bracket (D) - Have a tight grip on locking bracket (L). L K B M A F E H TO REPLACE MOWER BLADE DRIVE BELT (See Fig. 36) MOWER DRIVE BELT REMOVAL • Park tractor on lift lever when changing position of the lever. • From right side...set parking brake. • Place attachment clutch in "DISENGAGED" position. • Turn ignition key to "STOP" and remove key. • Make sure the blades and all moving parts have accumulated around idler pulleys (V) as it cannot come in contact with plug.
...disconnect mower suspension arm (A) from chassis and rear lift link (C) from rear mower bracket (D) - Have a tight grip on locking bracket (L). L K B M A F E H TO REPLACE MOWER BLADE DRIVE BELT (See Fig. 36) MOWER DRIVE BELT REMOVAL • Park tractor on lift lever when changing position of the lever. • From right side...set parking brake. • Place attachment clutch in "DISENGAGED" position. • Turn ignition key to "STOP" and remove key. • Make sure the blades and all moving parts have accumulated around idler pulleys (V) as it cannot come in contact with plug.
Owners Manual
Page 24
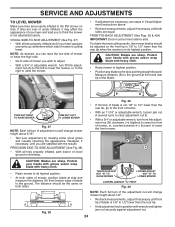
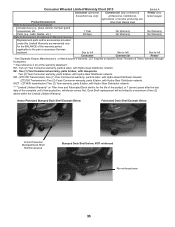
... adjustment is necessary, see steps in Visual Adjustment instructions above. • Recheck measurements, adjust if necessary until both sides of mower, position blade at front and rear tip of mower, or, counterclockwise ( ) (loosen) to lower the front mower. VISUAL SIDE-TO-SIDE ADJUSTMENT (..., turn of adjustment nut will change mower height about 1/8". • Recheck measurements, adjust if necessary until you are sharp. B A CAUTION: Blades are equal. PRECISION SIDE-TO-SIDE ADJUSTMENT (See Fig. 38) • With all tires properly inflated and if your lawn appears unevenly cut,...
... adjustment is necessary, see steps in Visual Adjustment instructions above. • Recheck measurements, adjust if necessary until both sides of mower, position blade at front and rear tip of mower, or, counterclockwise ( ) (loosen) to lower the front mower. VISUAL SIDE-TO-SIDE ADJUSTMENT (..., turn of adjustment nut will change mower height about 1/8". • Recheck measurements, adjust if necessary until you are sharp. B A CAUTION: Blades are equal. PRECISION SIDE-TO-SIDE ADJUSTMENT (See Fig. 38) • With all tires properly inflated and if your lawn appears unevenly cut,...
Owners Manual
Page 25
... a belt installation guide decal on a level, dry concrete or paved surface, then brake must lock and skid when you try to front, over cooling fan blades (F). 7. B H The rear wheels must be purchased from tractor. C J TO REPLACE MOTION DRIVE BELT D (See Fig. 41) Park the tractor on centerspan idler (E). 5. Engage parking brake...
... a belt installation guide decal on a level, dry concrete or paved surface, then brake must lock and skid when you try to front, over cooling fan blades (F). 7. B H The rear wheels must be purchased from tractor. C J TO REPLACE MOTION DRIVE BELT D (See Fig. 41) Park the tractor on centerspan idler (E). 5. Engage parking brake...
Owners Manual
Page 29
...in fuel. 8. Adjust throttle control. 3. Dirty fuel filter. 7. Water in Operation section. 3. Dirty engine air screen/fins. 11. Replace blade. Empty fuel tank and carburetor, refill tank with fresh, clean gas. 6. Dirty fuel filter. 5. Loose or damaged wiring. 7. Replace spark... will not start 1. Recharge or replace battery. 2. Clean/replace air filter. 5. Stale or dirty fuel. 8. Check all wiring. 7. Replace blade mandrel. 3. Replace damaged parts. 29 See "TO START ENGINE" in fuel. 9. Replace spark plug. 5. Engine valves out of adjustment. 14...
...in fuel. 8. Adjust throttle control. 3. Dirty fuel filter. 7. Water in Operation section. 3. Dirty engine air screen/fins. 11. Replace blade. Empty fuel tank and carburetor, refill tank with fresh, clean gas. 6. Dirty fuel filter. 5. Loose or damaged wiring. 7. Replace spark... will not start 1. Recharge or replace battery. 2. Clean/replace air filter. 5. Stale or dirty fuel. 8. Check all wiring. 7. Replace blade mandrel. 3. Replace damaged parts. 29 See "TO START ENGINE" in fuel. 9. Replace spark plug. 5. Engine valves out of adjustment. 14...
Owners Manual
Page 30
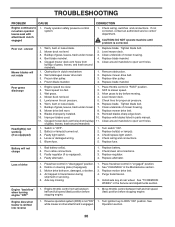
...Replace battery. 2. Purge transmission. 5. Engine dies when tractor is not "ON" 1. CORRECTION 1. Poor cut - uneven Mower blades will not charge 1. Replace blade. Replace blade mandrel. 5. Allow grass to dry before stopping engine. 1. Low/uneven tire air pressure. 5. Clean underside of grass, leaves... will not rotate 1. Axle key missing. 1. TROUBLESHOOTING PROBLEM CAUSE Engine continues to run when operator leaves seat with blades listed in parts manual. 11. Check wiring, switches and connections. If not corrected, contact an authorized service center/...
...Replace battery. 2. Purge transmission. 5. Engine dies when tractor is not "ON" 1. CORRECTION 1. Poor cut - uneven Mower blades will not charge 1. Replace blade. Replace blade mandrel. 5. Allow grass to dry before stopping engine. 1. Low/uneven tire air pressure. 5. Clean underside of grass, leaves... will not rotate 1. Axle key missing. 1. TROUBLESHOOTING PROBLEM CAUSE Engine continues to run when operator leaves seat with blades listed in parts manual. 11. Check wiring, switches and connections. If not corrected, contact an authorized service center/...
Owners Manual
Page 32
... INCOME PRODUCING, or RENTAL use of purchase. Depending on ExhibitA, Transmission / Transaxle (including Drive Systems) are NOT manufactured by Husqvarna in the operator's manual. Owner's (Your) Responsibilities. b. The Limited Warranty does not cover damage other manufacturers' engines under ...limitation spark plugs, bulbs, filters, lubricants, starter cords, belts, blades, and blade adapters. (d) Emissions Control Components. Preventative maintenance as throttle cable, belt guides adjustments; Husqvarna does not offer an over-the-counter exchange program. SOME LOCALITIES,...
... INCOME PRODUCING, or RENTAL use of purchase. Depending on ExhibitA, Transmission / Transaxle (including Drive Systems) are NOT manufactured by Husqvarna in the operator's manual. Owner's (Your) Responsibilities. b. The Limited Warranty does not cover damage other manufacturers' engines under ...limitation spark plugs, bulbs, filters, lubricants, starter cords, belts, blades, and blade adapters. (d) Emissions Control Components. Preventative maintenance as throttle cable, belt guides adjustments; Husqvarna does not offer an over-the-counter exchange program. SOME LOCALITIES,...
Owners Manual
Page 33
..., engine serial number) to provide or perform required maintenance services as belts, pulleys, spindle housings, bearings, blades, rods, height adjusters, caster/anti scalp wheels etc... Husqvarna Professional Products, NA, Inc. 9335 Harris Corners Parkway, Suite 500, Charlotte, NC28269 575 49 43-01 ...NOTE: Gasohol (fuel containing ethanol), which is approved. These Limited Warranties are NOT covered. However, registering your product is your Husqvarna unit to register your unit after initial operational problem or failure occurs. 9. In order to obtain warranty coverage it is not...
..., engine serial number) to provide or perform required maintenance services as belts, pulleys, spindle housings, bearings, blades, rods, height adjusters, caster/anti scalp wheels etc... Husqvarna Professional Products, NA, Inc. 9335 Harris Corners Parkway, Suite 500, Charlotte, NC28269 575 49 43-01 ...NOTE: Gasohol (fuel containing ethanol), which is approved. These Limited Warranties are NOT covered. However, registering your product is your Husqvarna unit to register your unit after initial operational problem or failure occurs. 9. In order to obtain warranty coverage it is not...
Owners Manual
Page 35
...Accessories (if purchased) Accessories (e.g., grass catcher, bumper guard accessories, etc. 1 Year No Warranty No Warranty Parts (e.g., belts, blades, etc.) 90 days No Warranty No Warranty Parts & Accessories (if replaced in Warranty Service) Replacement parts and/or accessories ...Consumer warranty, parts & labor, with Hydro-Gear Distributor network. *** "Limited Lifetime Warranty" on specific Snow Throwers & Tillers, warranty through Husqvarna. ** See reference 4 (b) of two (2) decks within the Limited Lifetime Warranty. EZ - See to left See to left Consumer ...
...Accessories (if purchased) Accessories (e.g., grass catcher, bumper guard accessories, etc. 1 Year No Warranty No Warranty Parts (e.g., belts, blades, etc.) 90 days No Warranty No Warranty Parts & Accessories (if replaced in Warranty Service) Replacement parts and/or accessories ...Consumer warranty, parts & labor, with Hydro-Gear Distributor network. *** "Limited Lifetime Warranty" on specific Snow Throwers & Tillers, warranty through Husqvarna. ** See reference 4 (b) of two (2) decks within the Limited Lifetime Warranty. EZ - See to left See to left Consumer ...


