

Owners Manual
Page 6
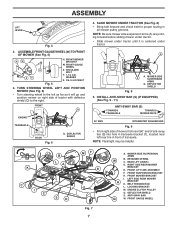
... minimum of your tractor off skid. Fig. 1 ADJUST SEAT (See Fig. 2) • Sit in brake position. NOTE: If this manual. TO INSTALL MOWER AND DRIVE BELT (See Figs. 3 - 15) 1. Have a tight grip on label (label is clear of this battery is put into service after month and year indicated on lift...
... minimum of your tractor off skid. Fig. 1 ADJUST SEAT (See Fig. 2) • Sit in brake position. NOTE: If this manual. TO INSTALL MOWER AND DRIVE BELT (See Figs. 3 - 15) 1. Have a tight grip on label (label is clear of this battery is put into service after month and year indicated on lift...
Owners Manual
Page 7
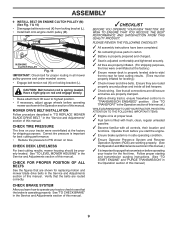
...as far as it is centered under tractor until it will go and position mower on right side of transaxle. FRONT LIFT LINK ASSEMBLY F. BELT TENSION ROD L. FRONT SUSPENSION BRACKET H. DEFLECTOR SHIELD S. ASSEMBLY LIFT LEVER Fig. 4 2. ASSEMBLE FRONT GAUGE WHEEL (W) TO FRONT OF ...ZY H. DEFLECTOR 02965 SHIELD Fig. 8 5. FRONT GAUGE WHEEL Fig. 7 7 SLIDE MOWER UNDER TRACTOR (See Fig. 8) • Bring belt forward and check belt for proper routing in front of tractor with deflector shield (Q) to the left rear tire in all mower pulley grooves. ANTI-SWAY BAR W....
...as far as it is centered under tractor until it will go and position mower on right side of transaxle. FRONT LIFT LINK ASSEMBLY F. BELT TENSION ROD L. FRONT SUSPENSION BRACKET H. DEFLECTOR SHIELD S. ASSEMBLY LIFT LEVER Fig. 4 2. ASSEMBLE FRONT GAUGE WHEEL (W) TO FRONT OF ...ZY H. DEFLECTOR 02965 SHIELD Fig. 8 5. FRONT GAUGE WHEEL Fig. 7 7 SLIDE MOWER UNDER TRACTOR (See Fig. 8) • Bring belt forward and check belt for proper routing in front of tractor with deflector shield (Q) to the left rear tire in all mower pulley grooves. ANTI-SWAY BAR W....
Owners Manual
Page 9
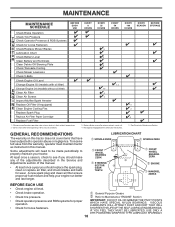
... them before operating your tractor, check to PSI shown on your tractor were overinflated at the factory for replacing motion and mower blade drive belts in this manual. M M. CHECK TIRE PRESSURE The tires on tires. Correct tire pressure is spring loaded. Ensure they are shown for ...shipping purposes. CHECK FOR PROPER POSITION OF ALL BELTS See the figures that the belts are working properly. (See the Operation and Maintenance sections in the Service and Adjustments section of this manual. Follow ...
... them before operating your tractor, check to PSI shown on your tractor were overinflated at the factory for replacing motion and mower blade drive belts in this manual. M M. CHECK TIRE PRESSURE The tires on tires. Correct tire pressure is spring loaded. Ensure they are shown for ...shipping purposes. CHECK FOR PROPER POSITION OF ALL BELTS See the figures that the belts are working properly. (See the Operation and Maintenance sections in the Service and Adjustments section of this manual. Follow ...
Owners Manual
Page 18
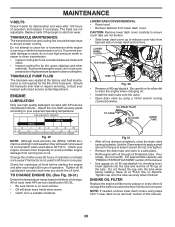
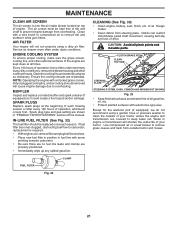
...Mower Blades T Lubrication Chart 0 Check Battery Level R Clean Battery and Terminals Clean Debris Off Steering Plate Check Transaxle Cooling Check Mower Levelness Check V-Belts Check Engine Oil Level Change Engine Oil (models with maintenance-free battery. 5 - To receive full value from the warranty, operator must maintain ...need to be made periodically to see if you should replace the spark plug, clean or replace air filter, and check blades and belts for proper operation. A new spark plug and clean air filter ensure proper air-fuel mixture and help your tractor. Replace blades ...
...Mower Blades T Lubrication Chart 0 Check Battery Level R Clean Battery and Terminals Clean Debris Off Steering Plate Check Transaxle Cooling Check Mower Levelness Check V-Belts Check Engine Oil Level Change Engine Oil (models with maintenance-free battery. 5 - To receive full value from the warranty, operator must maintain ...need to be made periodically to see if you should replace the spark plug, clean or replace air filter, and check blades and belts for proper operation. A new spark plug and clean air filter ensure proper air-fuel mixture and help your tractor. Replace blades ...
Owners Manual
Page 20
... surface. • Oil will result in increased oil consumption when used more freely when warm. • Catch oil in lower dash and remove. Replace belts if they will drain more than 100 hours in one year. Do not attempt to assure proper cooling. CAUTION: Remove lower dash cover carefully to...if the tractor is not used for 50 hours in one year. Do not thread the cap onto the tube when taking reading. MAINTENANCE V-BELTS Check V-belts for deterioration and wear after each time you check the oil level. To prevent possible damage to seals, do not use high pressure water or...
... surface. • Oil will result in increased oil consumption when used more freely when warm. • Catch oil in lower dash and remove. Replace belts if they will drain more than 100 hours in one year. Do not attempt to assure proper cooling. CAUTION: Remove lower dash cover carefully to...if the tractor is not used for 50 hours in one year. Do not thread the cap onto the tube when taking reading. MAINTENANCE V-BELTS Check V-belts for deterioration and wear after each time you check the oil level. To prevent possible damage to seals, do not use high pressure water or...
Owners Manual
Page 21
... any spilled gasoline. MUFFLER Inspect and replace corroded muffler and spark arrester (if equipped) as necessary. Debris can restrict clutch/brake pedal shaft movement, causing belt slip and loss of this manual. Spark plug type and gap setting are shown in "PRODUCT SPECIFICATIONS" section of drive. CLUTCH/BRAKE PEDAL CLEAN TOP...
... any spilled gasoline. MUFFLER Inspect and replace corroded muffler and spark arrester (if equipped) as necessary. Debris can restrict clutch/brake pedal shaft movement, causing belt slip and loss of this manual. Spark plug type and gap setting are shown in "PRODUCT SPECIFICATIONS" section of drive. CLUTCH/BRAKE PEDAL CLEAN TOP...
Owners Manual
Page 23
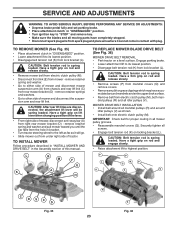
... 35) • Place attachment clutch in bracket. • Turn tractor steering wheel to the left as far as shown. • Install belt onto electric clutch pulley (M). CAUTION: After rear lift links are disconnected, the attachment lift lever will go. • Slide mower out from under ...right side of tractor. CAUTION: Belt tension rod is spring loaded. Have a tight grip on rod and engage slowly. • Raise attachment lift to highest position. remove retainer spring...
... 35) • Place attachment clutch in bracket. • Turn tractor steering wheel to the left as far as shown. • Install belt onto electric clutch pulley (M). CAUTION: After rear lift links are disconnected, the attachment lift lever will go. • Slide mower out from under ...right side of tractor. CAUTION: Belt tension rod is spring loaded. Have a tight grip on rod and engage slowly. • Raise attachment lift to highest position. remove retainer spring...
Owners Manual
Page 25
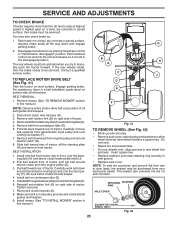
...position. SERVICE AND ADJUSTMENTS TO CHECK BRAKE If tractor requires more than five (5) feet to be serviced. Disengage transmission by : 1. Slide belt toward rear of left footrest. Do not lose). • Repair tire and reassemble. • On rear wheels only: align grooves in ...stop at highest speed in all pulley grooves and inside the belt keeper. 4. BELT REMOVAL - 1. BELT INSTALLATION - 1. Pull belt toward rear of tractor and roll belt around transmission cooling fan and onto the input pulley (F). Install belt on level surface. NOTE: To seal tire punctures and ...
...position. SERVICE AND ADJUSTMENTS TO CHECK BRAKE If tractor requires more than five (5) feet to be serviced. Disengage transmission by : 1. Slide belt toward rear of left footrest. Do not lose). • Repair tire and reassemble. • On rear wheels only: align grooves in ...stop at highest speed in all pulley grooves and inside the belt keeper. 4. BELT REMOVAL - 1. BELT INSTALLATION - 1. Pull belt toward rear of tractor and roll belt around transmission cooling fan and onto the input pulley (F). Install belt on level surface. NOTE: To seal tire punctures and ...

Owners Manual
Page 28
... moisture. Store in a clean, dry area. • Clean entire tractor (See "CLEANING" in the Maintenance section of this manual). • Inspect and replace belts, if necessary (See belt replacement instructions in the Service and Adjustments section of this manual). • Lubricate as shown in the Maintenance section of this manual). NOTE: Fuel...
... moisture. Store in a clean, dry area. • Clean entire tractor (See "CLEANING" in the Maintenance section of this manual). • Inspect and replace belts, if necessary (See belt replacement instructions in the Service and Adjustments section of this manual). • Lubricate as shown in the Maintenance section of this manual). NOTE: Fuel...
Owners Manual
Page 30
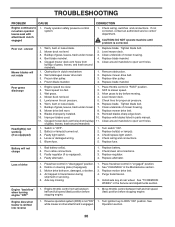
...Freewheel control in "FAST" position. 2. Debris on steering plate (if equipped). 3. Motion drive belt worn, damaged, or broken. 4. Axle key missing. 1. Replace motion drive belt. 4. Reverse operation system (ROS) is shifted into reverse 1. If not corrected, contact an authorized... to dry before mowing. 4. Allow grass to slower speed. 3. Level mower deck. 5. Buildup of drive 1. Mower drive belt worn. 8. Replace mower drive belt. 9. Faulty alternator. 1. Loss of grass, leaves, trash under mower. 4. Replace blade mandrel. Tighten blade bolt. 7. Air...
...Freewheel control in "FAST" position. 2. Debris on steering plate (if equipped). 3. Motion drive belt worn, damaged, or broken. 4. Axle key missing. 1. Replace motion drive belt. 4. Reverse operation system (ROS) is shifted into reverse 1. If not corrected, contact an authorized... to dry before mowing. 4. Allow grass to slower speed. 3. Level mower deck. 5. Buildup of drive 1. Mower drive belt worn. 8. Replace mower drive belt. 9. Faulty alternator. 1. Loss of grass, leaves, trash under mower. 4. Replace blade mandrel. Tighten blade bolt. 7. Air...
Owners Manual
Page 32
...warranty adjustments or repairs on engines manufactured by this Limited Warranty for the above listed manufacturers (for Non-Commercial Use. Husqvarna does not assume any warranty obligation of retail purchase for commercial, institutional, agricultural, industrial, income producing, or rental... not cover general maintenance parts and items ("Expendable Parts"), including without limitation spark plugs, bulbs, filters, lubricants, starter cords, belts, blades, and blade adapters. (d) Emissions Control Components. Such equipment and components are NOT covered. 32 ANY WARRANTY THAT MAY ...
...warranty adjustments or repairs on engines manufactured by this Limited Warranty for the above listed manufacturers (for Non-Commercial Use. Husqvarna does not assume any warranty obligation of retail purchase for commercial, institutional, agricultural, industrial, income producing, or rental... not cover general maintenance parts and items ("Expendable Parts"), including without limitation spark plugs, bulbs, filters, lubricants, starter cords, belts, blades, and blade adapters. (d) Emissions Control Components. Such equipment and components are NOT covered. 32 ANY WARRANTY THAT MAY ...
Owners Manual
Page 33
...'s manual; (k) Tampering with engine speed governor or emission components, or running engines above specified and recommended engine speeds as belts, pulleys, spindle housings, bearings, blades, rods, height adjusters, caster/anti scalp wheels etc... Documentation Required. The Limited ...Lifetime Warranty does not cover damage other non-approved materials and/or structures; (c) Rust and corrosion; Authorized Husqvarna Servicing Dealer/Center. Reinforced Stamped (Armor Protected) 10 Year Limited & Fabricated Limited Lifetime, Deck Warranties. Should you require ...
...'s manual; (k) Tampering with engine speed governor or emission components, or running engines above specified and recommended engine speeds as belts, pulleys, spindle housings, bearings, blades, rods, height adjusters, caster/anti scalp wheels etc... Documentation Required. The Limited ...Lifetime Warranty does not cover damage other non-approved materials and/or structures; (c) Rust and corrosion; Authorized Husqvarna Servicing Dealer/Center. Reinforced Stamped (Armor Protected) 10 Year Limited & Fabricated Limited Lifetime, Deck Warranties. Should you require ...
Owners Manual
Page 35
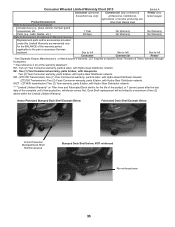
... warranty, parts & labor, with Hydro-Gear Distributor network. *** "Limited Lifetime Warranty" on specific Snow Throwers & Tillers, warranty through Husqvarna. ** See reference 4 (b) of the complete unit's final production, whichever comes first. EZ - Deck Shell replacement will be limited to...Parts & Accessories (if purchased) Accessories (e.g., grass catcher, bumper guard accessories, etc. 1 Year No Warranty No Warranty Parts (e.g., belts, blades, etc.) 90 days No Warranty No Warranty Parts & Accessories (if replaced in Warranty Service) Replacement parts and/or ...
... warranty, parts & labor, with Hydro-Gear Distributor network. *** "Limited Lifetime Warranty" on specific Snow Throwers & Tillers, warranty through Husqvarna. ** See reference 4 (b) of the complete unit's final production, whichever comes first. EZ - Deck Shell replacement will be limited to...Parts & Accessories (if purchased) Accessories (e.g., grass catcher, bumper guard accessories, etc. 1 Year No Warranty No Warranty Parts (e.g., belts, blades, etc.) 90 days No Warranty No Warranty Parts & Accessories (if replaced in Warranty Service) Replacement parts and/or ...


