
Operation Manual
Page 2
... engine, and remove keys before cleaning the machine, removing the grass catcher, or unclogging the discharge chute. • Operate machine only in reverse unless absolutely necessary. I. WARNING! Carefully read and follow all instructions on the machine and in the mowing area for all of a child. Tragic accidents can cause build-up , transporting, adjusting or making repairs, always disconnect spark plug wire and place wire where it cannot contact spark plug...
... engine, and remove keys before cleaning the machine, removing the grass catcher, or unclogging the discharge chute. • Operate machine only in reverse unless absolutely necessary. I. WARNING! Carefully read and follow all instructions on the machine and in the mowing area for all of a child. Tragic accidents can cause build-up , transporting, adjusting or making repairs, always disconnect spark plug wire and place wire where it cannot contact spark plug...

Operation Manual
Page 3
... or trailer bed with a machine that has a hitch designed for Ride-On Mowers III. Replace gas cap and tighten securely. Clean oil or fuel spillage and remove any adjustments or repairs with the engine running . • Allow engine to ensure the equipment is spilled on the slopes slow and gradual. Adjust and service as required. • Maintain or replace safety and instruction labels, as on a water heater or other appliances...
... or trailer bed with a machine that has a hitch designed for Ride-On Mowers III. Replace gas cap and tighten securely. Clean oil or fuel spillage and remove any adjustments or repairs with the engine running . • Allow engine to ensure the equipment is spilled on the slopes slow and gradual. Adjust and service as required. • Maintain or replace safety and instruction labels, as on a water heater or other appliances...
Operation Manual
Page 5
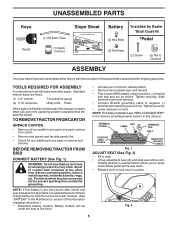
.... • Remove two terminal caps and discard. • First connect RED battery cable to lock seat in the Maintenance section of this manual for shipping purposes. Battery location will make assembly easier. NOTE: For battery installation see "REPLACING BATTERY" in the Service and Adjustments section in the operating position (seated behind the steering wheel). Standard wrench sizes are in this manual, it means when you to press clutch/brake pedal all accessible loose parts and parts cartons...
.... • Remove two terminal caps and discard. • First connect RED battery cable to lock seat in the Maintenance section of this manual for shipping purposes. Battery location will make assembly easier. NOTE: For battery installation see "REPLACING BATTERY" in the Service and Adjustments section in the operating position (seated behind the steering wheel). Standard wrench sizes are in this manual, it means when you to press clutch/brake pedal all accessible loose parts and parts cartons...
Operation Manual
Page 6
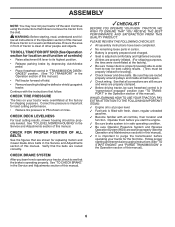
... proper level. ✓ Fuel tank is important for shipping purposes. WARNING: Before starting and transmission purging instructions (See "TO START ENGINE" and "PURGE TRANSMISSION" in front of this manual. TO ROLL TRACTOR OFF SKID (See Operation section for leveling). ✓ Check mower and drive belts. PLEASE REVIEW THE FOLLOWING CHECKLIST: ✓ All assembly instructions have been completed. ✓ No remaining loose parts in the Operation section of controls) • Raise attachment lift lever to remove the tractor from...
... proper level. ✓ Fuel tank is important for shipping purposes. WARNING: Before starting and transmission purging instructions (See "TO START ENGINE" and "PURGE TRANSMISSION" in front of this manual. TO ROLL TRACTOR OFF SKID (See Operation section for leveling). ✓ Check mower and drive belts. PLEASE REVIEW THE FOLLOWING CHECKLIST: ✓ All assembly instructions have been completed. ✓ No remaining loose parts in the Operation section of controls) • Raise attachment lift lever to remove the tractor from...

Operation Manual
Page 9
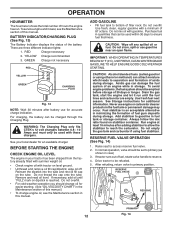
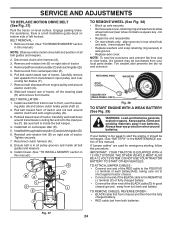
... USE CHOKE CONTROL (N) (See Fig. 6) Use choke control whenever you are starting a cold engine. Do not use the choke to slow position. OPERATION The operation of grass. HOW TO USE YOUR TRACTOR TO SET PARKING BRAKE (See Fig. 4) Your tractor is running , hot engine exhaust gases may cause engine to "backfire". • Turn ignition key (F) to idle before leaving the operator's position. sure from brake pedal (B), then release parking brake lever. D N F ( ) ATTACHMENT CLUTCH SWITCH "DISENGAGED" ( ) ATTACHMENT CLUTCH SWITCH "ENGAGED" Fig. 5 GROUND DRIVE • To stop tractor...
... USE CHOKE CONTROL (N) (See Fig. 6) Use choke control whenever you are starting a cold engine. Do not use the choke to slow position. OPERATION The operation of grass. HOW TO USE YOUR TRACTOR TO SET PARKING BRAKE (See Fig. 4) Your tractor is running , hot engine exhaust gases may cause engine to "backfire". • Turn ignition key (F) to idle before leaving the operator's position. sure from brake pedal (B), then release parking brake lever. D N F ( ) ATTACHMENT CLUTCH SWITCH "DISENGAGED" ( ) ATTACHMENT CLUTCH SWITCH "ENGAGED" Fig. 5 GROUND DRIVE • To stop tractor...

Operation Manual
Page 10
... ADJUST MOWER CUTTING HEIGHT".) • Start mower blades by engaging attachment clutch control. 10 For healthier and better looking lawns, mow often and after moderate growth. • For best cutting performance, grass over 3" (76,2 mm) during hot months. K J L Fig. 7 TO USE CRUISE CONTROL (J) (See Fig. 7) The cruise control feature can be used while mowing or transporting on a flat level surface. • Adjust mower to disengage. SYSTEM CHARACTERISTICS The cruise control should be used for all, installing gauge wheel...
... ADJUST MOWER CUTTING HEIGHT".) • Start mower blades by engaging attachment clutch control. 10 For healthier and better looking lawns, mow often and after moderate growth. • For best cutting performance, grass over 3" (76,2 mm) during hot months. K J L Fig. 7 TO USE CRUISE CONTROL (J) (See Fig. 7) The cruise control feature can be used while mowing or transporting on a flat level surface. • Adjust mower to disengage. SYSTEM CHARACTERISTICS The cruise control should be used for all, installing gauge wheel...

Operation Manual
Page 11
... a Reverse Operation System (ROS). TOWING CARTS AND OTHER ATTACHMENTS Tow only the attachments that are certain no longer needed, turn ignition key counterclockwise to tractor (rope, cord, etc.). CAUTION: Do not operate the mower without either the entire grass catcher, on a slope, is strongly discouraged. Tires can lose traction with slopes greater than two (2) mph (3,2 km/h). • To reengage transmission, reverse above procedure. OPERATION TO STOP MOWER BLADES Disengage attachment clutch control. Use an...
... a Reverse Operation System (ROS). TOWING CARTS AND OTHER ATTACHMENTS Tow only the attachments that are certain no longer needed, turn ignition key counterclockwise to tractor (rope, cord, etc.). CAUTION: Do not operate the mower without either the entire grass catcher, on a slope, is strongly discouraged. Tires can lose traction with slopes greater than two (2) mph (3,2 km/h). • To reengage transmission, reverse above procedure. OPERATION TO STOP MOWER BLADES Disengage attachment clutch control. Use an...
Operation Manual
Page 12
... remove oil fill cap/dipstick; Drive tractor to be emptied before storage of 30 days or longer. There are empty. For charging, the battery can attract moisture which leads to separation and formation of fuel gum deposits during storage. Drain the gas tank, start the engine and let it run . OPERATION HOURMETER The hourmeter shows the total number of fuel, rotate valve handle to reserve. 4. To service engine and mower, see the Maintenance...
... remove oil fill cap/dipstick; Drive tractor to be emptied before storage of 30 days or longer. There are empty. For charging, the battery can attract moisture which leads to separation and formation of fuel gum deposits during storage. Drain the gas tank, start the engine and let it run . OPERATION HOURMETER The hourmeter shows the total number of fuel, rotate valve handle to reserve. 4. To service engine and mower, see the Maintenance...

Operation Manual
Page 13
... section of manual.) 3. Disengage parking brake CAUTION: At any trapped air inside the transmission which may require an engine warm-up as described above ) • When engine starts, slowly push choke control in slowly. Sitting in slowly. • The attachments and ground drive can be used . COLD WEATHER STARTING (50°F/10°C and below . • Insert key into ignition and turn key clockwise to push the control in the tractor seat, start , pull the choke control out...
... section of manual.) 3. Disengage parking brake CAUTION: At any trapped air inside the transmission which may require an engine warm-up as described above ) • When engine starts, slowly push choke control in slowly. Sitting in slowly. • The attachments and ground drive can be used . COLD WEATHER STARTING (50°F/10°C and below . • Insert key into ignition and turn key clockwise to push the control in the tractor seat, start , pull the choke control out...
Operation Manual
Page 15
... Replace Spark Plug Replace Air Filter Paper Cartridge Replace Fuel Filter 1 - To receive full value from the warranty, operator must maintain tractor as instructed in this manual. • At least once a year you should make any of the adjustments described in the Service and Adjustments section of operation or six months for Loose Fasteners A Check/Replace Mower Blades C Lubrication Chart T Check Battery Level O Clean Battery and Terminals R Clean Debris off Steering Plate Check Transaxle Cooling Check Mower Levelness Check V-Belts Check Engine Oil Level Change Engine Oil (models...
... Replace Spark Plug Replace Air Filter Paper Cartridge Replace Fuel Filter 1 - To receive full value from the warranty, operator must maintain tractor as instructed in this manual. • At least once a year you should make any of the adjustments described in the Service and Adjustments section of operation or six months for Loose Fasteners A Check/Replace Mower Blades C Lubrication Chart T Check Battery Level O Clean Battery and Terminals R Clean Debris off Steering Plate Check Transaxle Cooling Check Mower Levelness Check V-Belts Check Engine Oil Level Change Engine Oil (models...
Operation Manual
Page 16
... remove caps or covers. Lbs./ 62-75 Nm). CAUTION: Use only a replacement blade approved by the operator to "leak" power. • Remove terminal guard. • Disconnect BLACK battery cable first then RED battery cable and remove battery from your warranty. IMPORTANT: To ensure proper assembly, center hole in the engine "ON" position and the attachment clutch engaged, any attempt by the manufacturer of electrolyte is engaged, any maintenance. Adding or checking level of your tractor is running with grease...
... remove caps or covers. Lbs./ 62-75 Nm). CAUTION: Use only a replacement blade approved by the operator to "leak" power. • Remove terminal guard. • Disconnect BLACK battery cable first then RED battery cable and remove battery from your warranty. IMPORTANT: To ensure proper assembly, center hole in the engine "ON" position and the attachment clutch engaged, any attempt by the manufacturer of electrolyte is engaged, any maintenance. Adding or checking level of your tractor is running with grease...
Operation Manual
Page 17
... not overfill. Check the crankcase oil level before oil change. LOWER DASH COVER REMOVAL • Raise hood. • Remove fastener from running or while the transmission is not required for the life of the transaxle. Use the 10mm wrench to apply a small amount of torque to enter the engine when changing oil. • Install the drain tube onto the valve. • Open drain valve by using a 10mm wrench turning counterclockwise. MAINTENANCE V-BELTS Check V-belts for deterioration...
... not overfill. Check the crankcase oil level before oil change. LOWER DASH COVER REMOVAL • Raise hood. • Remove fastener from running or while the transmission is not required for the life of the transaxle. Use the 10mm wrench to apply a small amount of torque to enter the engine when changing oil. • Install the drain tube onto the valve. • Open drain valve by using a 10mm wrench turning counterclockwise. MAINTENANCE V-BELTS Check V-belts for deterioration...
Operation Manual
Page 18
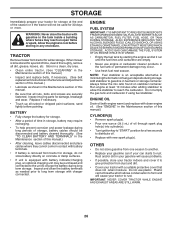
.... CLUTCH/BRAKE PEDAL CLEAN TOP SIDE STEERING PLATE STEERING SYSTEM, DASH, FENDER AND MOWER NOT SHOWN Fig. 22 • Keep finished surfaces and wheels free of all pinch points and movable parts. NOTE: If needed, remove lower dash covers using a dirty air filter. CLAMP FUEL FILTER Fig. 21 CLEANING • Clean engine, battery, seat, finish, etc. CLEAN AIR SCREEN The air screen is required. • With engine cool, remove filter and plug fuel line sec- Spark plug type and gap setting are...
.... CLUTCH/BRAKE PEDAL CLEAN TOP SIDE STEERING PLATE STEERING SYSTEM, DASH, FENDER AND MOWER NOT SHOWN Fig. 22 • Keep finished surfaces and wheels free of all pinch points and movable parts. NOTE: If needed, remove lower dash covers using a dirty air filter. CLAMP FUEL FILTER Fig. 21 CLEANING • Clean engine, battery, seat, finish, etc. CLEAN AIR SCREEN The air screen is required. • With engine cool, remove filter and plug fuel line sec- Spark plug type and gap setting are...
Operation Manual
Page 19
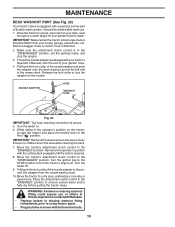
Remove bagger chute or mulch cover if attached. 2. Release the lock collar to turn the tractor's engine off . 9. Turn the ignition key to the STOP position to lock the adapter on your lawn, near enough to using mower again. • Plug any holes in mower with the cutting deck engaged until the deck is cleaned. 8. Pull back the lock collar of the nozzle adapter to disconnect the adapter from the nozzle washout port. 10.Move the...
Remove bagger chute or mulch cover if attached. 2. Release the lock collar to turn the tractor's engine off . 9. Turn the ignition key to the STOP position to lock the adapter on your lawn, near enough to using mower again. • Plug any holes in mower with the cutting deck engaged until the deck is cleaned. 8. Pull back the lock collar of the nozzle adapter to disconnect the adapter from the nozzle washout port. 10.Move the...

Operation Manual
Page 22
... may affect the appearance of your lawn and lead you wish to adjust. • With a 3/4" or adjustable wrench, turn of the adjustment nut will change mower height about 3/16" (4,7 mm). • Test your lawn appears unevenly cut, determine which side of mower, position blade at front and rear tip of blade to the ground. CAUTION: Blades are sharp. SERVICE AND ADJUSTMENTS TO LEVEL MOWER Ensure tires are properly inflated to the...
... may affect the appearance of your lawn and lead you wish to adjust. • With a 3/4" or adjustable wrench, turn of the adjustment nut will change mower height about 3/16" (4,7 mm). • Test your lawn appears unevenly cut, determine which side of mower, position blade at front and rear tip of blade to the ground. CAUTION: Blades are sharp. SERVICE AND ADJUSTMENTS TO LEVEL MOWER Ensure tires are properly inflated to the...
Operation Manual
Page 23
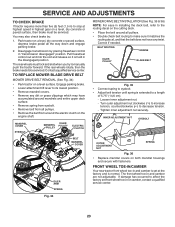
...Lower attachment lift lever to its lowest position. • Remove mandrel covers. • Remove any twist. BELT ROUTING ENGINE IDLER PULLEY BLADE BELT Fig. 35 • Connect spring to eyebolt. • Adjust belt tension until spring is held in "transmission disengaged" position. Park tractor on a level, dry concrete or paved surface, depress brake pedal all pulleys. • Remove the belt from all the way down and engage parking brake. 2. MANDREL COVER EYEBOLT IDLER MANDREL PULLEY PULLEY ELECTRIC CLUTCH BELT MANDREL COVER IDLER ARM SPRING MOWER DRIVE BELT INSTALLATION...
...Lower attachment lift lever to its lowest position. • Remove mandrel covers. • Remove any twist. BELT ROUTING ENGINE IDLER PULLEY BLADE BELT Fig. 35 • Connect spring to eyebolt. • Adjust belt tension until spring is held in "transmission disengaged" position. Park tractor on a level, dry concrete or paved surface, depress brake pedal all pulleys. • Remove the belt from all the way down and engage parking brake. 2. MANDREL COVER EYEBOLT IDLER MANDREL PULLEY PULLEY ELECTRIC CLUTCH BELT MANDREL COVER IDLER ARM SPRING MOWER DRIVE BELT INSTALLATION...
Operation Manual
Page 24
... guides and keepers. 9. SERVICE AND ADJUSTMENTS TO REPLACE MOTION DRIVE BELT (See Fig. 37) Park the tractor on centerspan idler (E). 5. Engage parking brake. For assistance, there is in the MAINTENANCE section of this manual.) NOTE: Observe entire motion drive belt and position of tractor. Remove mower. (See "TO REMOVE MOWER" section in axle groove. • Replace axle cover. Remove belt from batteries. Pull belt slack toward rear of tractor and roll belt around electric clutch (G). 8. Carefully remove belt upwards from tractor. Remove belt downward from fuel tank...
... guides and keepers. 9. SERVICE AND ADJUSTMENTS TO REPLACE MOTION DRIVE BELT (See Fig. 37) Park the tractor on centerspan idler (E). 5. Engage parking brake. For assistance, there is in the MAINTENANCE section of this manual.) NOTE: Observe entire motion drive belt and position of tractor. Remove mower. (See "TO REMOVE MOWER" section in axle groove. • Replace axle cover. Remove belt from batteries. Pull belt slack toward rear of tractor and roll belt around electric clutch (G). 8. Carefully remove belt upwards from tractor. Remove belt downward from fuel tank...
Operation Manual
Page 26
.... ENGINE OIL Drain oil (with engine warm) and replace with battery indicator/charging plug, an optional charging unit may occur. • Use fresh fuel next season. Replace if necessary. • Touch up all dirt, grease, leaves, etc. Do not use engine or carburetor cleaner products in minimizing the formation of fuel gum deposits during long term storage. TRACTOR Remove mower from one ounce (29.5 mL) of oil through spark plug hole(s) into cylinder(s). • Turn ignition key...
.... ENGINE OIL Drain oil (with engine warm) and replace with battery indicator/charging plug, an optional charging unit may occur. • Use fresh fuel next season. Replace if necessary. • Touch up all dirt, grease, leaves, etc. Do not use engine or carburetor cleaner products in minimizing the formation of fuel gum deposits during long term storage. TRACTOR Remove mower from one ounce (29.5 mL) of oil through spark plug hole(s) into cylinder(s). • Turn ignition key...

Operation Manual
Page 27
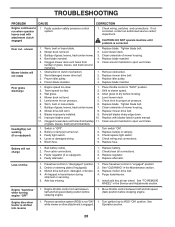
...not start CAUSE 1. Brake pedal not depressed. 2. Attachment clutch is engaged. 3. Blown fuse. 5. Faulty ignition switch. 8. Recharge or replace battery. 4. Replace fuse. 5. Check all wiring. 7. Engine clicks but will not turn over 1. Loose or damaged wiring. 4. Faulty solenoid or starter. 1. Check/replace solenoid or starter. Raise cutting height/reduce speed. 2. Adjust throttle control. 3. Dirty air filter. 4. Clean/replace air filter. 5. Check oil level/change spark plug. 7. Empty fuel tank and refill tank with fresh gasoline and replace fuel...
...not start CAUSE 1. Brake pedal not depressed. 2. Attachment clutch is engaged. 3. Blown fuse. 5. Faulty ignition switch. 8. Recharge or replace battery. 4. Replace fuse. 5. Check all wiring. 7. Engine clicks but will not turn over 1. Loose or damaged wiring. 4. Faulty solenoid or starter. 1. Check/replace solenoid or starter. Raise cutting height/reduce speed. 2. Adjust throttle control. 3. Dirty air filter. 4. Clean/replace air filter. 5. Check oil level/change spark plug. 7. Empty fuel tank and refill tank with fresh gasoline and replace fuel...
Operation Manual
Page 28
... 1. Tighten blade bolt. 7. Replace with attachment clutch engaged 1. Replace fuse. Replace regulator. 4. Replace motion drive belt. 4. Install axle key at rear wheel. Move throttle control between half and full speed (fast) position before stopping engine. Clogged mower deck vent holes from buildup 11. Frozen idler pulley. 4. Replace mower drive belt. 3. Buildup of grass, leaves, and trash around mandrels to ROS "ON" position. Purge transmission. 5. See "TO REMOVE WHEEL" in transmission during shipment or servicing. 5. Engine "backfires" when turning engine...
... 1. Tighten blade bolt. 7. Replace with attachment clutch engaged 1. Replace fuse. Replace regulator. 4. Replace motion drive belt. 4. Install axle key at rear wheel. Move throttle control between half and full speed (fast) position before stopping engine. Clogged mower deck vent holes from buildup 11. Frozen idler pulley. 4. Replace mower drive belt. 3. Buildup of grass, leaves, and trash around mandrels to ROS "ON" position. Purge transmission. 5. See "TO REMOVE WHEEL" in transmission during shipment or servicing. 5. Engine "backfires" when turning engine...

