
Operation Manual
Page 6
... comfortably and tightened securely. ✓ All tires are properly clamped. ✓ Before driving tractor, ensure freewheel control is in "TRANSMISSION ENGAGED" position. (See "TO TRANSPORT" in the Operation section of this manual. Continue with all instructions in the Operation section ...that follow to its highest position. • Release parking brake by depressing clutch/brake pedal. • Place freewheel control in "TRANSMISSION DISENGAGED" position. (See "TO TRANSPORT" in safe operating condition. ✓ Ensure Operator Presence System and Reverse Operation System (ROS)...
... comfortably and tightened securely. ✓ All tires are properly clamped. ✓ Before driving tractor, ensure freewheel control is in "TRANSMISSION ENGAGED" position. (See "TO TRANSPORT" in the Operation section of this manual. Continue with all instructions in the Operation section ...that follow to its highest position. • Release parking brake by depressing clutch/brake pedal. • Place freewheel control in "TRANSMISSION DISENGAGED" position. (See "TO TRANSPORT" in safe operating condition. ✓ Ensure Operator Presence System and Reverse Operation System (ROS)...
Operation Manual
Page 8
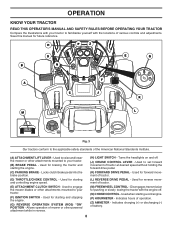
.... (A) ATTACHMENT LIFT LEVER - Used to engage the mower blades or other powered attachment while in reverse. (H) LIGHT SWITCH - Used to your tractor. (F) IGNITION SWITCH - Disengages transmission for starting and stopping the engine. (G) REVERSE OPERATION SYSTEM (ROS) "ON" POSITION - Save this manual for starting and controlling engine speed. (E) ATTACHMENT CLUTCH SWITCH - Used...
.... (A) ATTACHMENT LIFT LEVER - Used to engage the mower blades or other powered attachment while in reverse. (H) LIGHT SWITCH - Used to your tractor. (F) IGNITION SWITCH - Disengages transmission for starting and stopping the engine. (G) REVERSE OPERATION SYSTEM (ROS) "ON" POSITION - Save this manual for starting and controlling engine speed. (E) ATTACHMENT CLUTCH SWITCH - Used...

Operation Manual
Page 11
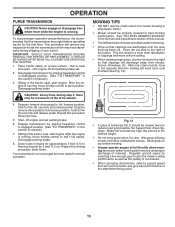
...Slowly depress appropriate drive pedal to reposition the machine with slopes greater than two (2) mph (3,2 km/h). • To reengage transmission, reverse above procedure. TRANSMISSION ENGAGED TRANSMISSION DISENGAGED Fig. 12 NOTE: To protect hood from damage when transporting your tractor. Too heavy of a load, while on ...engaged while mowing is strongly discouraged. TO TRANSPORT (See Fig. 3 and 12) When pushing or towing your tractor, ensure transmission is disengaged by and comply with attachment lift control. • Pull freewheel control out until the free wheel control rod ...
...Slowly depress appropriate drive pedal to reposition the machine with slopes greater than two (2) mph (3,2 km/h). • To reengage transmission, reverse above procedure. TRANSMISSION ENGAGED TRANSMISSION DISENGAGED Fig. 12 NOTE: To protect hood from damage when transporting your tractor. Too heavy of a load, while on ...engaged while mowing is strongly discouraged. TO TRANSPORT (See Fig. 3 and 12) When pushing or towing your tractor, ensure transmission is disengaged by and comply with attachment lift control. • Pull freewheel control out until the free wheel control rod ...

Operation Manual
Page 12
...brake. • Move attachment clutch to "DISENGAGED" position. • Move throttle control to fast position • Pull choke control out for transmission to warm up period. • The attachments can damage the fuel system of fuel, it will take extra cranking time to move fuel from...and below . • Insert key into ignition and turn key clockwise to operating position. • Allow one minute using fuel stabilizer. AUTOMATIC TRANSMISSION WARM UP • Before driving the unit in fuel tank or storage container. If the engine does not accept the load, restart the engine...
...brake. • Move attachment clutch to "DISENGAGED" position. • Move throttle control to fast position • Pull choke control out for transmission to warm up period. • The attachments can damage the fuel system of fuel, it will take extra cranking time to move fuel from...and below . • Insert key into ignition and turn key clockwise to operating position. • Allow one minute using fuel stabilizer. AUTOMATIC TRANSMISSION WARM UP • Before driving the unit in fuel tank or storage container. If the engine does not accept the load, restart the engine...
Operation Manual
Page 13
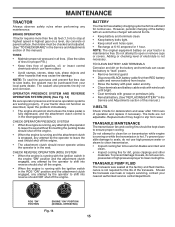
... three (3) times. 5. Depress reverse drive pedal to reduce load and possible fire hazard from shrubs, fences, driveways, etc. Engage transmission by selecting a low enough gear to half (1/2) speed. Repeat this section of clippings and more uniform cutting. • When mowing large ... • Always operate engine at full throttle when mowing to the right of material. Have the cut relatively high; OPERATION PURGE TRANSMISSION CAUTION: Never engage or disengage freewheel lever while the engine is clear and open - Shut- Drive tractor forward for approximately 5 feet...
... three (3) times. 5. Depress reverse drive pedal to reduce load and possible fire hazard from shrubs, fences, driveways, etc. Engage transmission by selecting a low enough gear to half (1/2) speed. Repeat this section of clippings and more uniform cutting. • When mowing large ... • Always operate engine at full throttle when mowing to the right of material. Have the cut relatively high; OPERATION PURGE TRANSMISSION CAUTION: Never engage or disengage freewheel lever while the engine is clear and open - Shut- Drive tractor forward for approximately 5 feet...
Operation Manual
Page 15
... • Inspect cooling fins for 1 hour. CHECK REVERSE OPERATION (ROS) SYSTEM • When the engine is running or while the transmission is not necessary. The belts are working properly. Do not attempt to open . • Recharge at highest speed in highest gear on a ...from your nearest authorized service center/department. However, periodic charging of operation and replace if necessary. Do not attempt to clean fan or transmission while engine is running with an automotive charger will extend its life. • Keep battery and terminals clean. • Keep battery bolts...
... • Inspect cooling fins for 1 hour. CHECK REVERSE OPERATION (ROS) SYSTEM • When the engine is running or while the transmission is not necessary. The belts are working properly. Do not attempt to open . • Recharge at highest speed in highest gear on a ...from your nearest authorized service center/department. However, periodic charging of operation and replace if necessary. Do not attempt to clean fan or transmission while engine is running with an automotive charger will extend its life. • Keep battery and terminals clean. • Keep battery bolts...

Operation Manual
Page 18
...the left end of drive. Move the tractor's attachment clutch control to the "DISENGAGED" position. Except for your tractor unless the engine and transmission are properly positioned. • Immediately wipe up any holes in the "DISENGAGED" position, set the parking brake, and stop the engine. 3.... equipped with bolts and locknuts. 18 IMPORTANT: Recheck the area to help dry before putting the tractor away. While sitting in engine or transmission will shorten the useful life of your house, garage, parked cars, etc. Release the lock collar to a dry area, preferably a ...
...the left end of drive. Move the tractor's attachment clutch control to the "DISENGAGED" position. Except for your tractor unless the engine and transmission are properly positioned. • Immediately wipe up any holes in the "DISENGAGED" position, set the parking brake, and stop the engine. 3.... equipped with bolts and locknuts. 18 IMPORTANT: Recheck the area to help dry before putting the tractor away. While sitting in engine or transmission will shorten the useful life of your house, garage, parked cars, etc. Release the lock collar to a dry area, preferably a ...

Operation Manual
Page 23
MOWER DRIVE BELT INSTALLATION • Install belt around all mandrel pulleys (R) and around transmission cooling fan and onto the input pulley (F). IMPORTANT: Check belt for proper routing in all pulley grooves and inside the belt keeper. 4. P L K Q P M R ...plate (H) and above clutch brake pedal shaft (J). 2. For assistance, there is inside all belt guides and keepers. 9. Carefully remove belt upwards from transmission input pulley and over the steer- CAUTION: Belt tension rod is spring loaded. Reinstall anti-rotation link (B) on locking bracket (L). SERVICE AND ADJUSTMENTS ...
MOWER DRIVE BELT INSTALLATION • Install belt around all mandrel pulleys (R) and around transmission cooling fan and onto the input pulley (F). IMPORTANT: Check belt for proper routing in all pulley grooves and inside the belt keeper. 4. P L K Q P M R ...plate (H) and above clutch brake pedal shaft (J). 2. For assistance, there is inside all belt guides and keepers. 9. Carefully remove belt upwards from transmission input pulley and over the steer- CAUTION: Belt tension rod is spring loaded. Reinstall anti-rotation link (B) on locking bracket (L). SERVICE AND ADJUSTMENTS ...
Operation Manual
Page 24
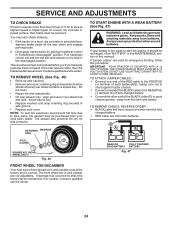
...-acid batteries generate explosive gases. If "jumper cables" are not adjustable. WEAK OR FULLY CHARGED DEAD BATTERY BATTERY Fig. 47 24 Disengage transmission by : 1. Contact a qualified service center. Do not lose). • Repair tire and reassemble. • On rear wheels only: align... grooves in "transmission disengaged" position. TO ATTACH JUMPER CABLES • Connect one end of the RED cable to the POSITIVE (+) terminal of each battery(A-B), taking ...
...-acid batteries generate explosive gases. If "jumper cables" are not adjustable. WEAK OR FULLY CHARGED DEAD BATTERY BATTERY Fig. 47 24 Disengage transmission by : 1. Contact a qualified service center. Do not lose). • Repair tire and reassemble. • On rear wheels only: align... grooves in "transmission disengaged" position. TO ATTACH JUMPER CABLES • Connect one end of the RED cable to the POSITIVE (+) terminal of each battery(A-B), taking ...
Operation Manual
Page 25
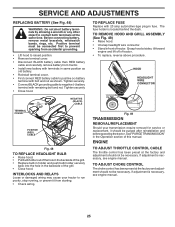
..., remove metal bracelets, wristwatch bands, rings, etc. Positive terminal must be necessary. INTERLOCKS AND RELAYS Loose or damaged wiring may cause your transmission require removal for service or replacement, it from tractor. • Install new battery with remaining bolt and nut. TO REMOVE HOOD AND GRILL... adjustment is necessary, see engine manual. If adjustment is located behind the dash. HOOD HEADLIGHT WIRE CONNECTOR 07002 Fig. 49 TRANSMISSION REMOVAL/REPLACEMENT Should your tractor to negative (-) battery terminal with terminals in front of the grill. • Close hood.
..., remove metal bracelets, wristwatch bands, rings, etc. Positive terminal must be necessary. INTERLOCKS AND RELAYS Loose or damaged wiring may cause your transmission require removal for service or replacement, it from tractor. • Install new battery with remaining bolt and nut. TO REMOVE HOOD AND GRILL... adjustment is necessary, see engine manual. If adjustment is located behind the dash. HOOD HEADLIGHT WIRE CONNECTOR 07002 Fig. 49 TRANSMISSION REMOVAL/REPLACEMENT Should your tractor to negative (-) battery terminal with terminals in front of the grill. • Close hood.
Operation Manual
Page 28
...mower deck vent holes from buildup 11. Clean around mandrels. 1. Replace idler pulley. 4. Engine speed too slow. 1. Place throttle control in transmission during shipment or servicing. 5. Low/uneven tire air pressure. 5. Buildup of mower housing. 4. Replace with attachment clutch engaged 1. Replace bulb...Axle key missing. 1. Place freewheel control in the Maintenance section. 3. See "CLEANING" in "engaged" position. 2. Purge transmission. 5. Install axle key at rear wheel. See "TO REMOVE WHEEL" in parts manual. 11. Turn ignition key to open vent holes. 1.
...mower deck vent holes from buildup 11. Clean around mandrels. 1. Replace idler pulley. 4. Engine speed too slow. 1. Place throttle control in transmission during shipment or servicing. 5. Low/uneven tire air pressure. 5. Buildup of mower housing. 4. Replace with attachment clutch engaged 1. Replace bulb...Axle key missing. 1. Place freewheel control in the Maintenance section. 3. See "CLEANING" in "engaged" position. 2. Purge transmission. 5. Install axle key at rear wheel. See "TO REMOVE WHEEL" in parts manual. 11. Turn ignition key to open vent holes. 1.


