Parts Catalog
Page 9
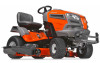
...51 873 90 06-00 Lock Nut 3/8-16 52 532 19 43-26 Idler V-Groove 56 532 13 09-69 V-Belt, Drive 64 532 19 78-65 Shaft Asm. DESCRIPTION 183 532 13 70-57 Spacer Split 184 532 44 14-55... 167 532 40 52-57 Latch Brake Parking 170 532 19 43-22 Keeper Belt Centerspan 171 872 11 06-16 Bolt 3/8-16 unc KEY PART NO. TRACTOR - MODEL NO. YT46LS (96043015100), PRODUCT NO. 960 43 01-51 DRIVE KEY PART NO. NO....Retainer Spring Clip Handle 222 879 21 20-10 Washer 21/32 x 1-1/4 x 10 Ga. 225 532 40 33-19 Keeper Belt Trans. 226 532 40 15-64 Bracket Mount Torque 227 817 49 05-12 Screw 5/16-18 x 3/4 230 532 18 89...
...51 873 90 06-00 Lock Nut 3/8-16 52 532 19 43-26 Idler V-Groove 56 532 13 09-69 V-Belt, Drive 64 532 19 78-65 Shaft Asm. DESCRIPTION 183 532 13 70-57 Spacer Split 184 532 44 14-55... 167 532 40 52-57 Latch Brake Parking 170 532 19 43-22 Keeper Belt Centerspan 171 872 11 06-16 Bolt 3/8-16 unc KEY PART NO. TRACTOR - MODEL NO. YT46LS (96043015100), PRODUCT NO. 960 43 01-51 DRIVE KEY PART NO. NO....Retainer Spring Clip Handle 222 879 21 20-10 Washer 21/32 x 1-1/4 x 10 Ga. 225 532 40 33-19 Keeper Belt Trans. 226 532 40 15-64 Bracket Mount Torque 227 817 49 05-12 Screw 5/16-18 x 3/4 230 532 18 89...
Parts Catalog
Page 11
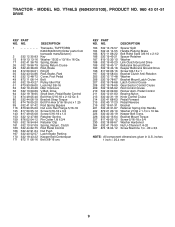
...532 41 41-27 116 539 13 26-24 DESCRIPTION Engine KAWA Model No.FR651V-AS28 (581411101)(Order parts from engine manufacturer.) Muffler Keeper Belt Engine Clutch Electric Pulley Engine Tank Fuel Cap Control Throttle Screw #10 x .750 BOS Thread Choke Control Fuel Line Spark Arrester Kit Clamp... component dimensions given in accordance with SAE J1995 (Revision 2002-05). horsepower values are derived at 3600 RPM. Torque values are derived at 3060 RPM; YT46LS (96043015100), PRODUCT NO. 960 43 01-51 ENGINE KEY PART NO. inches 1 inch = 25.4 mm For engine service and replacement parts, call...
...532 41 41-27 116 539 13 26-24 DESCRIPTION Engine KAWA Model No.FR651V-AS28 (581411101)(Order parts from engine manufacturer.) Muffler Keeper Belt Engine Clutch Electric Pulley Engine Tank Fuel Cap Control Throttle Screw #10 x .750 BOS Thread Choke Control Fuel Line Spark Arrester Kit Clamp... component dimensions given in accordance with SAE J1995 (Revision 2002-05). horsepower values are derived at 3600 RPM. Torque values are derived at 3060 RPM; YT46LS (96043015100), PRODUCT NO. 960 43 01-51 ENGINE KEY PART NO. inches 1 inch = 25.4 mm For engine service and replacement parts, call...
Parts Catalog
Page 15
...-24 241 532 15 29-27 242 532 41 55-98 - - 532 41 64-05 - - 532 19 28-70 - - 532 41 82-26 DESCRIPTION V-Belt Bolt Bolt, Shoulder Wheel, Gauge Nut Centerlock 3/8-16 unc Washer 13/32 x 1-1/2 x 11 Ga. YT46LS (96043015100), PRODUCT NO. 960 43 01-51 MOWER DECK KEY PART NO.
...-24 241 532 15 29-27 242 532 41 55-98 - - 532 41 64-05 - - 532 19 28-70 - - 532 41 82-26 DESCRIPTION V-Belt Bolt Bolt, Shoulder Wheel, Gauge Nut Centerlock 3/8-16 unc Washer 13/32 x 1-1/2 x 11 Ga. YT46LS (96043015100), PRODUCT NO. 960 43 01-51 MOWER DECK KEY PART NO.
Parts Catalog
Page 18
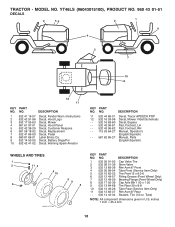
YT46LS (96043015100), PRODUCT NO. 960 43 01-51 DECALS 2 56 2 1 9 4 3 7 10 8 12 11 KEY PART NO. Tube) NOTE: All component dimensions given in U.S. MODEL NO. NO. NO. DESCRIPTION 11 532 44 66-01 Decal, Tracor APDECK POP 12 532 16 03-96 Decal, Mower V-Belt Schematic - - 532 16 69-60 Decal, Bypass - - 532...
YT46LS (96043015100), PRODUCT NO. 960 43 01-51 DECALS 2 56 2 1 9 4 3 7 10 8 12 11 KEY PART NO. Tube) NOTE: All component dimensions given in U.S. MODEL NO. NO. NO. DESCRIPTION 11 532 44 66-01 Decal, Tracor APDECK POP 12 532 16 03-96 Decal, Mower V-Belt Schematic - - 532 16 69-60 Decal, Bypass - - 532...
Operation Manual
Page 6
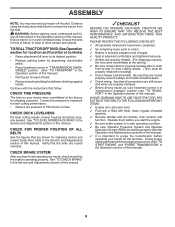
..., mower housing should be properly inflated for best cutting results. (Tires must be properly leveled. CHECK FOR PROPER POSITION OF ALL BELTS See the figures that follow all controls, their location and function. Ensure tractor is in this manual. Operate them before operating your...sure brake system is important for best cutting performance. • Reduce tire pressure to -rear for leveling). ✓ Check mower and drive belts. TO ROLL TRACTOR OFF SKID (See Operation section for the first time. Correct tire pressure is in safe operating condition. ✓ Be ...
..., mower housing should be properly inflated for best cutting results. (Tires must be properly leveled. CHECK FOR PROPER POSITION OF ALL BELTS See the figures that follow all controls, their location and function. Ensure tractor is in this manual. Operate them before operating your...sure brake system is important for best cutting performance. • Reduce tire pressure to -rear for leveling). ✓ Check mower and drive belts. TO ROLL TRACTOR OFF SKID (See Operation section for the first time. Correct tire pressure is in safe operating condition. ✓ Be ...
Operation Manual
Page 15
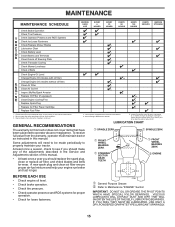
... Lubrication Chart T Check Battery Level 4 O Clean Battery and Terminals R Clean Debris off Steering Plate 5 Check Transaxle Cooling Check Mower Levelness Check V-Belts Check Engine Oil Level Change Engine Oil (models with maintenance-free battery 5 - Replace blades more often when operating in high ambient temperatures 2 -...8226; At least once a year you should replace the spark plug, clean or replace air filter, and check blades and belts for signs of the adjustments described in this tractor does not cover items that have been subjected to Maintenance "ENGINE" Section ...
... Lubrication Chart T Check Battery Level 4 O Clean Battery and Terminals R Clean Debris off Steering Plate 5 Check Transaxle Cooling Check Mower Levelness Check V-Belts Check Engine Oil Level Change Engine Oil (models with maintenance-free battery 5 - Replace blades more often when operating in high ambient temperatures 2 -...8226; At least once a year you should replace the spark plug, clean or replace air filter, and check blades and belts for signs of the adjustments described in this tractor does not cover items that have been subjected to Maintenance "ENGINE" Section ...
Operation Manual
Page 17
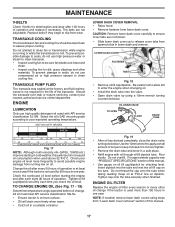
...tube. To prevent possible damage to release cover tabs from "Lower dash cover removal" section of this manual. 17 Do not overfill. Replace belts if they will drain more freely when warm. • Catch oil in one year. Tighten oil fill cap/dipstick securely each eight (8) ...clockwise. Check the crankcase oil level before oil change if the tractor is not required for the life of the transaxle. MAINTENANCE V-BELTS Check V-belts for deterioration and wear after 100 hours of operation. Change the oil after every 50 hours of torque to avoid possible engine damage...
...tube. To prevent possible damage to release cover tabs from "Lower dash cover removal" section of this manual. 17 Do not overfill. Replace belts if they will drain more freely when warm. • Catch oil in one year. Tighten oil fill cap/dipstick securely each eight (8) ...clockwise. Check the crankcase oil level before oil change if the tractor is not required for the life of the transaxle. MAINTENANCE V-BELTS Check V-belts for deterioration and wear after 100 hours of operation. Change the oil after every 50 hours of torque to avoid possible engine damage...
Operation Manual
Page 18
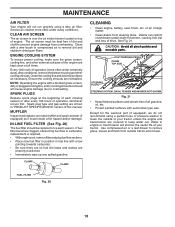
... cooling shrouds. If fuel filter becomes clogged, obstructing fuel flow to prevent engine damage from overheating. Debris can restrict clutch/brake pedal shaft movement, causing belt slip and loss of operation (more often under extremely dusty, dirty conditions), remove the blower housing and other external surfaces of the engine are properly...
... cooling shrouds. If fuel filter becomes clogged, obstructing fuel flow to prevent engine damage from overheating. Debris can restrict clutch/brake pedal shaft movement, causing belt slip and loss of operation (more often under extremely dusty, dirty conditions), remove the blower housing and other external surfaces of the engine are properly...
Operation Manual
Page 20
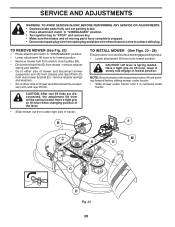
... in lowest position. Have a tight grip on level surface and engage parking brake. • Lower attachment lift lever to its lowest position. • Remove mower belt from electric clutch pulley (M). • Disconnect front link (E) from mower - TO REMOVE MOWER (See Fig. 23) • Place attachment clutch in contact with plug. Have...
... in lowest position. Have a tight grip on level surface and engage parking brake. • Lower attachment lift lever to its lowest position. • Remove mower belt from electric clutch pulley (M). • Disconnect front link (E) from mower - TO REMOVE MOWER (See Fig. 23) • Place attachment clutch in contact with plug. Have...
Operation Manual
Page 21
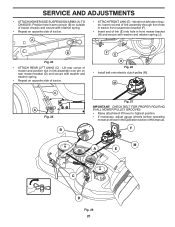
...outside of tractor chassis and secure with retainer spring. • Repeat on opposite side of tractor. J F E H Fig. 26 • Install belt onto electric clutch pulley (M). Lift rear corner of mower and position slot in tractor front suspension bracket (F). • Insert end of this manual. M ...C D Fig. 25 B Fig. 27 IMPORTANT: CHECK BELT FOR PROPER ROUTING IN ALL MOWER PULLEY GROOVES. • Raise attachment lift lever to highest position. • If necessary, adjust gauge wheels before...
...outside of tractor chassis and secure with retainer spring. • Repeat on opposite side of tractor. J F E H Fig. 26 • Install belt onto electric clutch pulley (M). Lift rear corner of mower and position slot in tractor front suspension bracket (F). • Insert end of this manual. M ...C D Fig. 25 B Fig. 27 IMPORTANT: CHECK BELT FOR PROPER ROUTING IN ALL MOWER PULLEY GROOVES. • Raise attachment lift lever to highest position. • If necessary, adjust gauge wheels before...
Operation Manual
Page 23
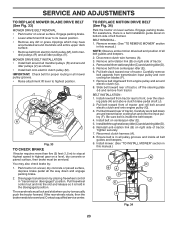
... fan blades (F). 7. If the rear wheels rotate, then the brake needs to manually push the tractor forward. Engage parking brake. Slide belt toward rear of tractor. 4. ing plate (H) and above clutch brake pedal shaft (J). 2. Reconnect clutch harness (A). 8. Disengage transmission by... mower. (See "TO REMOVE MOWER" section in all pulley grooves and inside the belt keeper. 4. Removebeltfromstationaryidler(C)andclutchingidler(D). 5. Pull belt toward rear of tractor and roll belt around transmission cooling fan and onto the input pulley (F). Engage parking brake. •...
... fan blades (F). 7. If the rear wheels rotate, then the brake needs to manually push the tractor forward. Engage parking brake. Slide belt toward rear of tractor. 4. ing plate (H) and above clutch brake pedal shaft (J). 2. Reconnect clutch harness (A). 8. Disengage transmission by... mower. (See "TO REMOVE MOWER" section in all pulley grooves and inside the belt keeper. 4. Removebeltfromstationaryidler(C)andclutchingidler(D). 5. Pull belt toward rear of tractor and roll belt around transmission cooling fan and onto the input pulley (F). Engage parking brake. •...

Operation Manual
Page 26
... "START" position for a few seconds to distribute oil. • Replace with gasoline in the Maintenance section of this manual.) • Inspect and replace belts, if necessary. (See belt replacement instructions in contact with battery indicator/charging plug, an optional charging unit may require recharging. • To help prevent corrosion and power leakage...
... "START" position for a few seconds to distribute oil. • Replace with gasoline in the Maintenance section of this manual.) • Inspect and replace belts, if necessary. (See belt replacement instructions in contact with battery indicator/charging plug, an optional charging unit may require recharging. • To help prevent corrosion and power leakage...
Operation Manual
Page 28
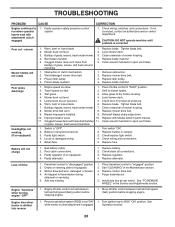
...Frozen blade mandrel. 1. Level mower deck. 3. Replace blade mandrel. Level mower deck. 5. Tighten blade bolt. 7. Replace mower drive belt. 9. Check wiring and connections. 5. Check/clean all connections. 3. Freewheel control in the Service and Adjustments section. See "TO REMOVE...Remove obstruction. 2. Poor grass discharge Headlight(s) not working (if so equipped) 1. Allow grass to open vent holes. 1. Mower drive belt worn. 8. Blades improperly installed. 9. Faulty light switch. 4. Loose or damaged wiring. 5. Check/replace light switch. 4. Axle key...
...Frozen blade mandrel. 1. Level mower deck. 3. Replace blade mandrel. Level mower deck. 5. Tighten blade bolt. 7. Replace mower drive belt. 9. Check wiring and connections. 5. Check/clean all connections. 3. Freewheel control in the Service and Adjustments section. See "TO REMOVE...Remove obstruction. 2. Poor grass discharge Headlight(s) not working (if so equipped) 1. Allow grass to open vent holes. 1. Mower drive belt worn. 8. Blades improperly installed. 9. Faulty light switch. 4. Loose or damaged wiring. 5. Check/replace light switch. 4. Axle key...


