
Parts Catalog
Page 3
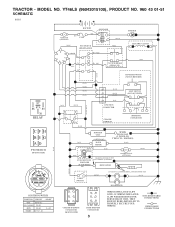
... CONNECTOR IGNITION UNIT (OPTIONAL) SPARK PLUGS GAP (2 PLUGS ON TWIN CYL. ENGINES) BLUE HOUR METER BLACK FUEL BLUE LINE BLUE FUEL SHUT-OFF SOLENOID (IF EQUIPPED) RED CHARGING SYSTEM OUTPUT 9-15 AMP DC @ 3600 RPM REGULATOR 12V POWER OUTLET (OPTIONAL) STATOR BLACK LIGHT SWITCH BROWN 28 VOLTS AC @ 3600 RPM (REGULATOR DISCONNECTED) BLACK HEADLIGHTS IGNITION SWITCH POSITION CIRCUIT "MAKE" OFF M+G+A1 RUN/OVERRIDE B+A1 RUN B+A1 START...
... CONNECTOR IGNITION UNIT (OPTIONAL) SPARK PLUGS GAP (2 PLUGS ON TWIN CYL. ENGINES) BLUE HOUR METER BLACK FUEL BLUE LINE BLUE FUEL SHUT-OFF SOLENOID (IF EQUIPPED) RED CHARGING SYSTEM OUTPUT 9-15 AMP DC @ 3600 RPM REGULATOR 12V POWER OUTLET (OPTIONAL) STATOR BLACK LIGHT SWITCH BROWN 28 VOLTS AC @ 3600 RPM (REGULATOR DISCONNECTED) BLACK HEADLIGHTS IGNITION SWITCH POSITION CIRCUIT "MAKE" OFF M+G+A1 RUN/OVERRIDE B+A1 RUN B+A1 START...
Parts Catalog
Page 11
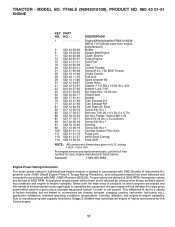
... 539 13 26-24 DESCRIPTION Engine KAWA Model No.FR651V-AS28 (581411101)(Order parts from engine manufacturer.) Muffler Keeper Belt Engine Clutch Electric Pulley Engine Tank Fuel Cap Control Throttle Screw #10 x .750 BOS Thread Choke Control Fuel Line Spark Arrester Kit Clamp Hose Washer 1-1/2 OD x 15/32 ID x .250 Washer Lock 7/16 Nut Keps Hex 1/4-20 unc Shield Heat Gasket Tube Exhaust LH Tube Exhaust RH Tube Drain Oil Easy Screw 3/8-16 x 1 Bolt Hex 7/16-20 x 4 x Gr. 5-1.5 Thr...
... 539 13 26-24 DESCRIPTION Engine KAWA Model No.FR651V-AS28 (581411101)(Order parts from engine manufacturer.) Muffler Keeper Belt Engine Clutch Electric Pulley Engine Tank Fuel Cap Control Throttle Screw #10 x .750 BOS Thread Choke Control Fuel Line Spark Arrester Kit Clamp Hose Washer 1-1/2 OD x 15/32 ID x .250 Washer Lock 7/16 Nut Keps Hex 1/4-20 unc Shield Heat Gasket Tube Exhaust LH Tube Exhaust RH Tube Drain Oil Easy Screw 3/8-16 x 1 Bolt Hex 7/16-20 x 4 x Gr. 5-1.5 Thr...
Operation Manual
Page 2
... the manual before operating a pedestrian controlled lawn mower and a minimum of 16 years of your tractor. Avoid discharging material against a wall or obstruction. Do not allow responsible adults, who have been given rides in the mowing area for another ride and be seriously injured or interfere with the blades shut off blades, set parking brake, stop before cleaning the machine, removing the grass catcher...
... the manual before operating a pedestrian controlled lawn mower and a minimum of 16 years of your tractor. Avoid discharging material against a wall or obstruction. Do not allow responsible adults, who have been given rides in the mowing area for another ride and be seriously injured or interfere with the blades shut off blades, set parking brake, stop before cleaning the machine, removing the grass catcher...
Operation Manual
Page 3
...'s recommended parts, when necessary. • Mower blades are explosive. • Extinguish all times until fueling is spilled on wet grass. Do not make any fuel-soaked debris. SERVICE SAFE HANDLING OF GASOLINE To avoid personal injury or property damage, use a nozzle lock-open flame, spark, or pilot light such as necessary. Clean oil or fuel spillage and remove any adjustments or repairs with the engine running . • Allow engine to stop...
...'s recommended parts, when necessary. • Mower blades are explosive. • Extinguish all times until fueling is spilled on wet grass. Do not make any fuel-soaked debris. SERVICE SAFE HANDLING OF GASOLINE To avoid personal injury or property damage, use a nozzle lock-open flame, spark, or pilot light such as necessary. Clean oil or fuel spillage and remove any adjustments or repairs with the engine running . • Allow engine to stop...
Operation Manual
Page 4
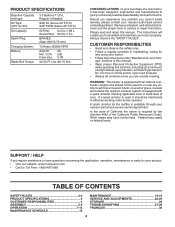
...) Oil Capacity: Spark Plug: Charging System: Battery: Blade Bolt Torque: 3.0 Gallons/11.35 L Regular Unleaded SAE 30 (above is required by the operator. Should you cannot easily remedy, please contact your product: • Visit our website: www.husqvarna.com • Call Us Toll Free: 1-800-487-5951 TABLE OF CONTENTS SAFETY RULES 2-3 PRODUCT SPECIFICATIONS 4 CUSTOMER RESPONSIBILITIES 4 ASSEMBLY 5-6 OPERATION 7-14 MAINTENANCE SCHEDULE 15 MAINTENANCE 15-19 SERVICE...
...) Oil Capacity: Spark Plug: Charging System: Battery: Blade Bolt Torque: 3.0 Gallons/11.35 L Regular Unleaded SAE 30 (above is required by the operator. Should you cannot easily remedy, please contact your product: • Visit our website: www.husqvarna.com • Call Us Toll Free: 1-800-487-5951 TABLE OF CONTENTS SAFETY RULES 2-3 PRODUCT SPECIFICATIONS 4 CUSTOMER RESPONSIBILITIES 4 ASSEMBLY 5-6 OPERATION 7-14 MAINTENANCE SCHEDULE 15 MAINTENANCE 15-19 SERVICE...
Operation Manual
Page 5
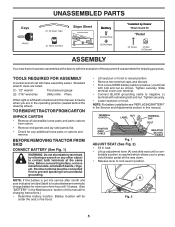
... short battery terminals by Dealer *Brush Guard Kit *Pedal (2) Screw (2) Nut U-Channel ASSEMBLY Your new tractor has been assembled at the factory with remaining bolt and nut. A Fig. 2 5 TERMINAL COVER NUT LABEL TERMINAL CAP BOLT POSITIVE (RED) CABLE 02605 NEGATIVE (BLACK) CABLE Fig. 1 ADJUST SEAT (See Fig. 2) • Sit in seat. • Lift up adjustment lever (A) and slide seat until a comfortable position is mentioned in this manual for shipping purposes. Standard wrench sizes are in position...
... short battery terminals by Dealer *Brush Guard Kit *Pedal (2) Screw (2) Nut U-Channel ASSEMBLY Your new tractor has been assembled at the factory with remaining bolt and nut. A Fig. 2 5 TERMINAL COVER NUT LABEL TERMINAL CAP BOLT POSITIVE (RED) CABLE 02605 NEGATIVE (BLACK) CABLE Fig. 1 ADJUST SEAT (See Fig. 2) • Sit in seat. • Lift up adjustment lever (A) and slide seat until a comfortable position is mentioned in this manual for shipping purposes. Standard wrench sizes are in position...
Operation Manual
Page 6
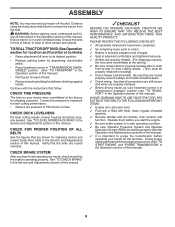
... remove the tractor from the skid. CHECK TIRE PRESSURE The tires on tires. CHECK DECK LEVELNESS For best cutting results, mower housing should be properly inflated for replacing motion and mower blade drive belts in front of tractor is filled with fresh, clean, regular unleaded gasoline. ✓ Become familiar with the instructions that all controls, their location and function. Verify that follow . See "TO LEVEL MOWER HOUSING" in the Service and Adjustments section of this manual. ASSEMBLY...
... remove the tractor from the skid. CHECK TIRE PRESSURE The tires on tires. CHECK DECK LEVELNESS For best cutting results, mower housing should be properly inflated for replacing motion and mower blade drive belts in front of tractor is filled with fresh, clean, regular unleaded gasoline. ✓ Become familiar with the instructions that all controls, their location and function. Verify that follow . See "TO LEVEL MOWER HOUSING" in the Service and Adjustments section of this manual. ASSEMBLY...
Operation Manual
Page 8
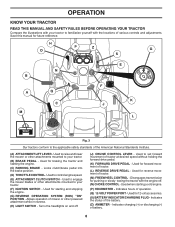
... your tractor to familiarize yourself with the engine off . (J) CRUISE CONTROL LEVER - Used to engage the mower blades or other attachments mounted to your tractor. (B) BRAKE PEDAL - Indicates hours of the battery. (Z) AMMETER - Used to raise and lower the mower or other attachments mounted to control engine speed. (E) ATTACHMENT CLUTCH SWITCH - Disengages transmission for braking the tractor and starting a cold engine. (P) HOURMETER - Used for 12 volt accessories. (S) BATTERY INDICATOR/CHARGING PLUG - Indicates the status of operation. (Q) 12-VOLT POWER PORT...
... your tractor to familiarize yourself with the engine off . (J) CRUISE CONTROL LEVER - Used to engage the mower blades or other attachments mounted to your tractor. (B) BRAKE PEDAL - Indicates hours of the battery. (Z) AMMETER - Used to raise and lower the mower or other attachments mounted to control engine speed. (E) ATTACHMENT CLUTCH SWITCH - Disengages transmission for braking the tractor and starting a cold engine. (P) HOURMETER - Used for 12 volt accessories. (S) BATTERY INDICATOR/CHARGING PLUG - Indicates the status of operation. (Q) 12-VOLT POWER PORT...
Operation Manual
Page 13
... trapped air inside the transmission which may have developed during shipping of the drive wheels. 4. Shut- Repeat this procedure three (3) times. 5. This can now be used during step 4, there may be needed. Sitting in the tractor seat, start engine. After the engine is running , move throttle control to push the control in operating position, depress brake pedal and set parking brake. • Move attachment clutch to "DISENGAGED" position. • Move throttle control to full reverse position...
... trapped air inside the transmission which may have developed during shipping of the drive wheels. 4. Shut- Repeat this procedure three (3) times. 5. This can now be used during step 4, there may be needed. Sitting in the tractor seat, start engine. After the engine is running , move throttle control to push the control in operating position, depress brake pedal and set parking brake. • Move attachment clutch to "DISENGAGED" position. • Move throttle control to full reverse position...
Operation Manual
Page 15
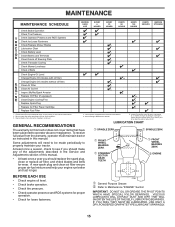
...; At least once a year you should replace the spark plug, clean or replace air filter, and check blades and belts for Loose Fasteners A Check/Replace Mower Blades 3 C Lubrication Chart T Check Battery Level 4 O Clean Battery and Terminals R Clean Debris off Steering Plate 5 Check Transaxle Cooling Check Mower Levelness Check V-Belts Check Engine Oil Level Change Engine Oil (models with maintenance-free battery 5 - IF YOU FEEL THEY MUST BE LUBRICATED, USE ONLY A DRY, POWDERED GRAPHITE TYPE LUBRICANT SPARINGLY. 15 Some adjustments will need to be made periodically to...
...; At least once a year you should replace the spark plug, clean or replace air filter, and check blades and belts for Loose Fasteners A Check/Replace Mower Blades 3 C Lubrication Chart T Check Battery Level 4 O Clean Battery and Terminals R Clean Debris off Steering Plate 5 Check Transaxle Cooling Check Mower Levelness Check V-Belts Check Engine Oil Level Change Engine Oil (models with maintenance-free battery 5 - IF YOU FEEL THEY MUST BE LUBRICATED, USE ONLY A DRY, POWDERED GRAPHITE TYPE LUBRICANT SPARINGLY. 15 Some adjustments will need to be made periodically to...

Operation Manual
Page 16
... as described, repair the problem immediately. • The engine should not start unless the brake pedal is fully depressed, and the attachment clutch control is in the ROS "ON" position and the attachment clutch engaged, any maintenance. BLADE REMOVAL (See Fig. 16) • Raise mower to highest position to allow access to "leak" power. • Remove terminal guard. • Disconnect BLACK battery cable first then RED battery cable and remove battery from your tractor. Lbs./ 62...
... as described, repair the problem immediately. • The engine should not start unless the brake pedal is fully depressed, and the attachment clutch control is in the ROS "ON" position and the attachment clutch engaged, any maintenance. BLADE REMOVAL (See Fig. 16) • Raise mower to highest position to allow access to "leak" power. • Remove terminal guard. • Disconnect BLACK battery cable first then RED battery cable and remove battery from your tractor. Lbs./ 62...
Operation Manual
Page 17
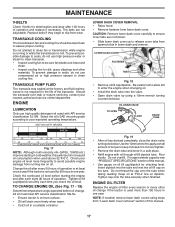
... the engine when changing oil. • Install the drain tube onto the valve. • Open drain valve by using steps from lower dash cover. Do not overfill. Keep oil at "FULL" line on level surface. • Oil will result in increased oil consumption when used more than 100 hours in a suitable container. TRANSAXLE COOLING The transmission fan and cooling fins should be sure fan blades are intact and clean...
... the engine when changing oil. • Install the drain tube onto the valve. • Open drain valve by using steps from lower dash cover. Do not overfill. Keep oil at "FULL" line on level surface. • Oil will result in increased oil consumption when used more than 100 hours in a suitable container. TRANSAXLE COOLING The transmission fan and cooling fins should be sure fan blades are intact and clean...
Operation Manual
Page 18
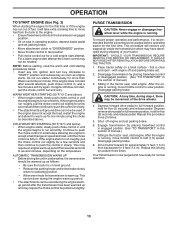
...; Place new fuel filter in position in fuel line with arrow pointing towards carburetor. • Be sure there are no fuel line leaks and clamps are properly positioned. • Immediately wipe up any spilled gasoline. NOTE: Operating the engine with a blocked grass screen, dirty or plugged cooling fins, and/or cooling shrouds removed will cause engine damage due to carburetor, replacement is over the air intake blower located on top of drive. SPARK PLUGS Replace spark plugs at...
...; Place new fuel filter in position in fuel line with arrow pointing towards carburetor. • Be sure there are no fuel line leaks and clamps are properly positioned. • Immediately wipe up any spilled gasoline. NOTE: Operating the engine with a blocked grass screen, dirty or plugged cooling fins, and/or cooling shrouds removed will cause engine damage due to carburetor, replacement is over the air intake blower located on top of drive. SPARK PLUGS Replace spark plugs at...
Operation Manual
Page 19
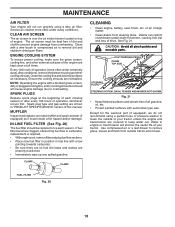
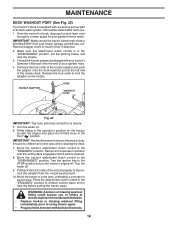
... garden hose. 4. It should be utilized after each use. 1. Remain in mower with bolts and locknuts. 19 Pull back the lock collar of the mower deck. Drive the tractor to a level, clear spot on the nozzle. Place the attachment clutch control in the "DISENGAGED" position, set the parking brake, and stop the engine. 3. IMPORTANT: Make certain the tractor's discharge chute is directed AWAY from the nozzle washout port. 10...
... garden hose. 4. It should be utilized after each use. 1. Remain in mower with bolts and locknuts. 19 Pull back the lock collar of the mower deck. Drive the tractor to a level, clear spot on the nozzle. Place the attachment clutch control in the "DISENGAGED" position, set the parking brake, and stop the engine. 3. IMPORTANT: Make certain the tractor's discharge chute is directed AWAY from the nozzle washout port. 10...
Operation Manual
Page 20
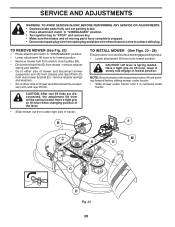
TO INSTALL MOWER (See Figs. 23 - 28) Ensure tractor is spring loaded. B F M A E C D Fig. 23 20 SERVICE AND ADJUSTMENTS WARNING: TO AVOID SERIOUS INJURY, BEFORE PERFORMING ANY SERVICE OR ADJUSTMENTS: • Depress brake pedal fully and set parking brake. • Place attachment clutch in "DISENGAGED" position. • Turn ignition key to "STOP" and remove key. • Make sure the blades and all moving parts have completely stopped. • Disconnect spark plug wire from spark plug and...
TO INSTALL MOWER (See Figs. 23 - 28) Ensure tractor is spring loaded. B F M A E C D Fig. 23 20 SERVICE AND ADJUSTMENTS WARNING: TO AVOID SERIOUS INJURY, BEFORE PERFORMING ANY SERVICE OR ADJUSTMENTS: • Depress brake pedal fully and set parking brake. • Place attachment clutch in "DISENGAGED" position. • Turn ignition key to "STOP" and remove key. • Make sure the blades and all moving parts have completely stopped. • Disconnect spark plug wire from spark plug and...
Operation Manual
Page 21
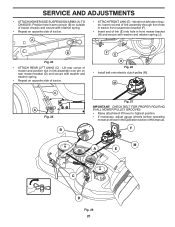
... spring. • Repeat on opposite side of tractor. M C D Fig. 25 B Fig. 27 IMPORTANT: CHECK BELT FOR PROPER ROUTING IN ALL MOWER PULLEY GROOVES. • Raise attachment lift lever to highest position. • If necessary, adjust gauge wheels before operating mower as shown in link assembly over pin (B) on outside of tractor. B Fig. 24 • ATTACH REAR LIFT LINKS (C) - Work from left side of this manual. J F E H Fig. 26 • Install belt onto electric clutch pulley...
... spring. • Repeat on opposite side of tractor. M C D Fig. 25 B Fig. 27 IMPORTANT: CHECK BELT FOR PROPER ROUTING IN ALL MOWER PULLEY GROOVES. • Raise attachment lift lever to highest position. • If necessary, adjust gauge wheels before operating mower as shown in link assembly over pin (B) on outside of tractor. B Fig. 24 • ATTACH REAR LIFT LINKS (C) - Work from left side of this manual. J F E H Fig. 26 • Install belt onto electric clutch pulley...
Operation Manual
Page 23
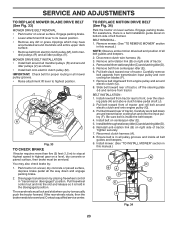
... speed in highest gear on a level, dry concrete or paved surface, depress brake pedal all mower pulley grooves. • Raise attachment lift lever to its lowest position. • Remove any dirt or grass clippings which may also check brake by placing freewheel control in the disengaged position. TO REPLACE MOTION DRIVE BELT (See Fig. 34) Park the tractor on centerspan idler (E). 5. BELT REMOVAL 1. Disconnect clutch wire harness (A). 3. Removebeltfromstationaryidler(C)andclutchingidler(D). 5. Remove belt from engine pulley and around idler pulleys...
... speed in highest gear on a level, dry concrete or paved surface, depress brake pedal all mower pulley grooves. • Raise attachment lift lever to its lowest position. • Remove any dirt or grass clippings which may also check brake by placing freewheel control in the disengaged position. TO REPLACE MOTION DRIVE BELT (See Fig. 34) Park the tractor on centerspan idler (E). 5. BELT REMOVAL 1. Disconnect clutch wire harness (A). 3. Removebeltfromstationaryidler(C)andclutchingidler(D). 5. Remove belt from engine pulley and around idler pulleys...

Operation Manual
Page 26
...: Fuel stabilizer is equipped with clean engine oil. (See "ENGINE" in the Maintenance section of this manual.) • After cleaning, leave cables disconnected and place cables where they cannot come in contact with battery terminals. • If battery is removed from dust and dirt. • Cover your tractor indoors and cover it run until the fuel lines and carburetor are securely fastened. Do not empty the gas tank and carburetor if using fuel stabilizer. Replace if...
...: Fuel stabilizer is equipped with clean engine oil. (See "ENGINE" in the Maintenance section of this manual.) • After cleaning, leave cables disconnected and place cables where they cannot come in contact with battery terminals. • If battery is removed from dust and dirt. • Cover your tractor indoors and cover it run until the fuel lines and carburetor are securely fastened. Do not empty the gas tank and carburetor if using fuel stabilizer. Replace if...
Operation Manual
Page 27
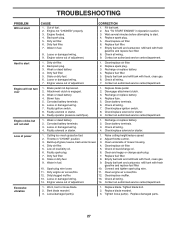
.... 14. Check oil level/change spark plug. 7. Dirty engine air screen/fins. 11. Bent blade mandrel. 3. Replace blade mandrel. 3. Loose or damaged wiring. 9. Wait several minutes before attempting to start . 4. Dirty air filter. 2. Faulty operator presence switch(es). 1. Loose or damaged wiring. 4. Cutting too much grass/too fast. 1. Low oil level/dirty oil. 5. Replace fuel filter. 8. Clean engine air screen/fins. 12. Engine valves out of grass, leaves, trash under mower. 3. Loose/damaged part(s). 1. Engine valves out of adjustment. Empty fuel tank and...
.... 14. Check oil level/change spark plug. 7. Dirty engine air screen/fins. 11. Bent blade mandrel. 3. Replace blade mandrel. 3. Loose or damaged wiring. 9. Wait several minutes before attempting to start . 4. Dirty air filter. 2. Faulty operator presence switch(es). 1. Loose or damaged wiring. 4. Cutting too much grass/too fast. 1. Low oil level/dirty oil. 5. Replace fuel filter. 8. Clean engine air screen/fins. 12. Engine valves out of grass, leaves, trash under mower. 3. Loose/damaged part(s). 1. Engine valves out of adjustment. Empty fuel tank and...
Operation Manual
Page 28
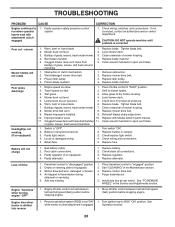
...Replace blade. Turn switch "ON". 2. Replace mower drive belt. 3. Worn, bent or loose blade. 6. Loss of mower housing. 8. Operation section. 28 Poor cut - Check/replace light switch. 4. TROUBLESHOOTING PROBLEM CAUSE Engine continues to run when operator leaves seat with blades listed in the Maintenance section. 3. Replace blade. Mower deck not level. 4. Clean underside of drive 1. Replace with attachment clutch engaged 1. Check wiring and connections. 5. Faulty regulator (if so equipped). 4. Replace battery. 2. See "CLEANING" in parts manual...
...Replace blade. Turn switch "ON". 2. Replace mower drive belt. 3. Worn, bent or loose blade. 6. Loss of mower housing. 8. Operation section. 28 Poor cut - Check/replace light switch. 4. TROUBLESHOOTING PROBLEM CAUSE Engine continues to run when operator leaves seat with blades listed in the Maintenance section. 3. Replace blade. Mower deck not level. 4. Clean underside of drive 1. Replace with attachment clutch engaged 1. Check wiring and connections. 5. Faulty regulator (if so equipped). 4. Replace battery. 2. See "CLEANING" in parts manual...


