
Owners Manual
Page 2
... known to lose control of your tractor. Always look down the slope. • Keep all slopes requires extra caution. Stop the blades when crossing gravel surfaces. • Do not operate machine without the entire grass catcher, discharge chute, or other safety devices in ...reverse unless absolutely necessary. If the tires lose traction, disengage the blades and proceed slowly straight down and behind before operating. SAFETY RULES Safe Operation Practices for holes, ruts, bumps, rocks, or other hidden...
... known to lose control of your tractor. Always look down the slope. • Keep all slopes requires extra caution. Stop the blades when crossing gravel surfaces. • Do not operate machine without the entire grass catcher, discharge chute, or other safety devices in ...reverse unless absolutely necessary. If the tires lose traction, disengage the blades and proceed slowly straight down and behind before operating. SAFETY RULES Safe Operation Practices for holes, ruts, bumps, rocks, or other hidden...
Owners Manual
Page 3
..., look down for another ride and be seriously injured or interfere with safe machine operation. If the tires lose traction, disengage the blades and proceed slowly straight down slowly. Children are sharp. Repair, if necessary, before storing. • If you last saw them ...slope. When loading or unloading this is not possible, then refuel such equipment with manufacturer's recommended parts, when necessary. • Mower blades are often attracted to cool before restarting. • Never make any fuel-soaked debris. SAFETY RULES Safe Operation Practices for towing. ...
..., look down for another ride and be seriously injured or interfere with safe machine operation. If the tires lose traction, disengage the blades and proceed slowly straight down slowly. Children are sharp. Repair, if necessary, before storing. • If you last saw them ...slope. When loading or unloading this is not possible, then refuel such equipment with manufacturer's recommended parts, when necessary. • Mower blades are often attracted to cool before restarting. • Never make any fuel-soaked debris. SAFETY RULES Safe Operation Practices for towing. ...
Owners Manual
Page 4
... state of this manual. • Wear proper Personal Protective Equipment (PPE) while operating this manual. Should you experience any ). Cca: Case Size: 28 230 U1R Blade Bolt Torque: 45-55 FT. Always observe the "SAFETY RULES". LBS./62-75 Nm CONGRATULATIONS on federal lands. Other states may have competent, well-trained...
... state of this manual. • Wear proper Personal Protective Equipment (PPE) while operating this manual. Should you experience any ). Cca: Case Size: 28 230 U1R Blade Bolt Torque: 45-55 FT. Always observe the "SAFETY RULES". LBS./62-75 Nm CONGRATULATIONS on federal lands. Other states may have competent, well-trained...
Owners Manual
Page 6
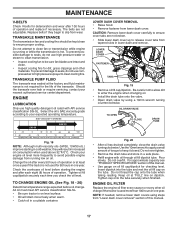
... clamped. ✓ Before driving tractor, be sure freewheel control is in "transmission engaged" position (see that the belts are shown for replacing motion and mower blade drive belts in the Service and Adjustments section of this manual). 6 CHECK BRAKE SYSTEM After you learn how to operate your tractor, check to purge...
... clamped. ✓ Before driving tractor, be sure freewheel control is in "transmission engaged" position (see that the belts are shown for replacing motion and mower blade drive belts in the Service and Adjustments section of this manual). 6 CHECK BRAKE SYSTEM After you learn how to operate your tractor, check to purge...

Owners Manual
Page 8
Used for future reference. Save this manual for reverse movement of tractor. (M) FREEWHEEL CONTROL - Used to engage the mower blades or other attachments mounted to your tractor. (B) BRAKE PEDAL - Turns the headlights on and off . (N) CHOKE CONTROL - Used for the engine and mower. (Q) 12-VOLT ...
Used for future reference. Save this manual for reverse movement of tractor. (M) FREEWHEEL CONTROL - Used to engage the mower blades or other attachments mounted to your tractor. (B) BRAKE PEDAL - Turns the headlights on and off . (N) CHOKE CONTROL - Used for the engine and mower. (Q) 12-VOLT ...
Owners Manual
Page 9
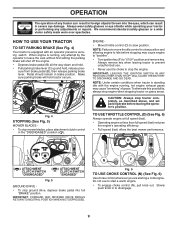
... over spectacles. sure from brake pedal (B), then release parking brake lever. Pedal should remain in the "DISENGAGED" position ( ). B C Fig. 4 STOPPING (See Fig. 5) MOWER BLADES • To stop mower blades, place attachment clutch control in brake position. To eliminate this possibility, always stop the engine. TO USE THROTTLE CONTROL (D) (See Fig. 6) Always operate...
... over spectacles. sure from brake pedal (B), then release parking brake lever. Pedal should remain in the "DISENGAGED" position ( ). B C Fig. 4 STOPPING (See Fig. 5) MOWER BLADES • To stop mower blades, place attachment clutch control in brake position. To eliminate this possibility, always stop the engine. TO USE THROTTLE CONTROL (D) (See Fig. 6) Always operate...
Owners Manual
Page 10
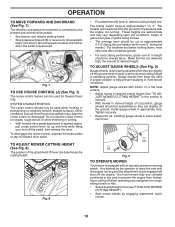
...CUTTING HEIGHT (See Fig. 8) The position of cut relatively high; The heights are approximate and may cause the cruise control to the blade tip with the engine running . These heights are measured from hesitating or cutting off when operating your foot off the ground when mower is...should be mowed twice. Make the first cut position, gauge wheels should be cut (see "TO ADJUST MOWER CUTTING HEIGHT") • Start mower blades by the operator to help prevent scalping in appropriate hole. Any attempt by engaging attachment clutch control. 10 Fig. 8 • Put attachment ...
...CUTTING HEIGHT (See Fig. 8) The position of cut relatively high; The heights are approximate and may cause the cruise control to the blade tip with the engine running . These heights are measured from hesitating or cutting off when operating your foot off the ground when mower is...should be mowed twice. Make the first cut position, gauge wheels should be cut (see "TO ADJUST MOWER CUTTING HEIGHT") • Start mower blades by the operator to help prevent scalping in appropriate hole. Any attempt by engaging attachment clutch control. 10 Fig. 8 • Put attachment ...
Owners Manual
Page 11
... is no children or other bystanders will shut off the engine unless ignition key is held in the ROS "ON" position. OPERATION TO STOP MOWER BLADES • Disengage attachment clutch control. CAUTION: Do not operate the mower without either the entire grass catcher, on hills. • If stopping is absolutely necessary...
... is no children or other bystanders will shut off the engine unless ignition key is held in the ROS "ON" position. OPERATION TO STOP MOWER BLADES • Disengage attachment clutch control. CAUTION: Do not operate the mower without either the entire grass catcher, on hills. • If stopping is absolutely necessary...
Owners Manual
Page 15
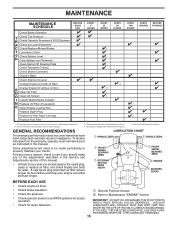
... to Maintenance "ENGINE" Section • Check operator presence and ROS systems for proper operation. • Check for Loose Fasteners C Check/Replace Mower Blades T Lubrication Chart 0 Check Battery Level R Clean Battery and Terminals Clean Debris Off Steering Plate Check Transaxle Cooling Check Mower Levelness Check V-Belts Check ...manual. • At least once a year you should replace the spark plug, clean or replace air filter, and check blades and belts for wear. To receive full value from the warranty, operator must maintain tractor as instructed in Maintenance Section. Replace...
... to Maintenance "ENGINE" Section • Check operator presence and ROS systems for proper operation. • Check for Loose Fasteners C Check/Replace Mower Blades T Lubrication Chart 0 Check Battery Level R Clean Battery and Terminals Clean Debris Off Steering Plate Check Transaxle Cooling Check Mower Levelness Check V-Belts Check ...manual. • At least once a year you should replace the spark plug, clean or replace air filter, and check blades and belts for wear. To receive full value from the warranty, operator must maintain tractor as instructed in Maintenance Section. Replace...
Owners Manual
Page 16
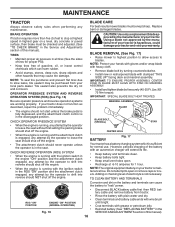
... life. • Keep battery and terminals clean. • Keep battery bolts tight. • Keep small vent holes open or remove caps or covers. BLADE BOLT (SPECIAL) CENTER HOLE STAR • When the engine is running and the attachment clutch is engaged, any attempt by the operator to leave the...by the operator to open . • Recharge at highest speed in highest gear on your hands with gloves and/or wrap blade with heavy cloth. • Remove blade bolt by the operator to shift into reverse should never operate unless the operator is running with the ignition switch in the ...
... life. • Keep battery and terminals clean. • Keep battery bolts tight. • Keep small vent holes open or remove caps or covers. BLADE BOLT (SPECIAL) CENTER HOLE STAR • When the engine is running and the attachment clutch is engaged, any attempt by the operator to leave the...by the operator to open . • Recharge at highest speed in highest gear on your hands with gloves and/or wrap blade with heavy cloth. • Remove blade bolt by the operator to shift into reverse should never operate unless the operator is running with the ignition switch in the ...
Owners Manual
Page 17
... year. NOTE: If needed, remove lower dash covers using a 10mm wrench turning counterclockwise. TRANSAXLE MAINTENANCE The transmission fan and cooling fins should be sure fan blades are intact and clean. • Inspect cooling fins for deterioration and wear after 100 hours of torque to avoid possible engine damage from running or...
... year. NOTE: If needed, remove lower dash covers using a 10mm wrench turning counterclockwise. TRANSAXLE MAINTENANCE The transmission fan and cooling fins should be sure fan blades are intact and clean. • Inspect cooling fins for deterioration and wear after 100 hours of torque to avoid possible engine damage from running or...

Owners Manual
Page 19
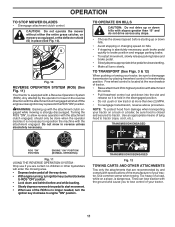
... area making certain the area is secure. 5. WARNING: A broken or missing washout fitting could expose you or others to thrown objects from contact with the blade. • Replace broken or missing washout fitting immediately, prior to a dry area, preferably a concrete or paved area. IMPORTANT: Make certain the tractor's discharge chute is...
... area making certain the area is secure. 5. WARNING: A broken or missing washout fitting could expose you or others to thrown objects from contact with the blade. • Replace broken or missing washout fitting immediately, prior to a dry area, preferably a concrete or paved area. IMPORTANT: Make certain the tractor's discharge chute is...
Owners Manual
Page 20
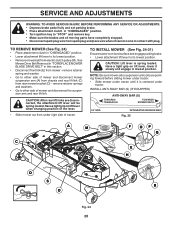
...and set parking brake. • Place attachment clutch in "DISENGAGED" position. • Turn ignition key to "STOP" and remove key. • Make sure the blades and all moving parts have completely stopped. • Disconnect spark plug wire from electric clutch pulley (M). TO REMOVE MOWER (See Fig. 24) • Place attachment... clutch in this section. • Disconnect front link (E) from mower - See Mower Drive Belt Removal in "TO REPLACE MOWER BLADE DRIVE BELT" in "DISENGAGED" position. • Lower attachment lift lever to its lowest position.
...and set parking brake. • Place attachment clutch in "DISENGAGED" position. • Turn ignition key to "STOP" and remove key. • Make sure the blades and all moving parts have completely stopped. • Disconnect spark plug wire from electric clutch pulley (M). TO REMOVE MOWER (See Fig. 24) • Place attachment... clutch in this section. • Disconnect front link (E) from mower - See Mower Drive Belt Removal in "TO REPLACE MOWER BLADE DRIVE BELT" in "DISENGAGED" position. • Lower attachment lift lever to its lowest position.
Owners Manual
Page 21
... mower deck bracket on right side of transaxle. Work from left rear tire in this section. See Mower Drive Belt Installation in "TO REPLACE MOWER BLADE DRIVE BELT" in front of mower. Fig. 28 21
... mower deck bracket on right side of transaxle. Work from left rear tire in this section. See Mower Drive Belt Installation in "TO REPLACE MOWER BLADE DRIVE BELT" in front of mower. Fig. 28 21

Owners Manual
Page 22
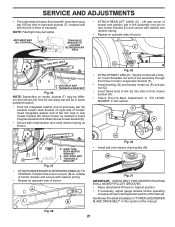
... mower height about 1/8". • Recheck measurements, adjust if necessary until both sides. 02966 A A Fig. 33 B B Fig. 34 • If front tip of blade is not 1/8" to 1/2" lower than the rear tip, go to the front of tractor. • With an 11/16" or adjustable wrench, loosen jam nut... the same on both sides are over or under inflated, it may affect the appearance of mower, or, counterclockwise (loosen) to its highest position. CAUTION: Blades are sharp. A B TIGHTEN ADJUST NUT B TO RAISE MOWER LOOSEN ADJUST NUT B TO LOWER MOWER LOOSEN JAM NUT A FIRST Fig. 35 NOTE: Each ...
... mower height about 1/8". • Recheck measurements, adjust if necessary until both sides. 02966 A A Fig. 33 B B Fig. 34 • If front tip of blade is not 1/8" to 1/2" lower than the rear tip, go to the front of tractor. • With an 11/16" or adjustable wrench, loosen jam nut... the same on both sides are over or under inflated, it may affect the appearance of mower, or, counterclockwise (loosen) to its highest position. CAUTION: Blades are sharp. A B TIGHTEN ADJUST NUT B TO RAISE MOWER LOOSEN ADJUST NUT B TO LOWER MOWER LOOSEN JAM NUT A FIRST Fig. 35 NOTE: Each ...
Owners Manual
Page 23
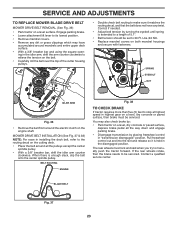
...; Belt tension should be serviced. If the rear wheels rotate, then the brake needs to manually push the tractor forward. You may have any twist. BLADE BELT Fig. 37 23 BELT ROUTING ENGINE Fig. 38 TO CHECK BRAKE If tractor requires more than five (5) feet to stop at highest speed in...; Remove any dirt or grass clippings which may also check brake by placing freewheel control in the disengaged position. SERVICE AND ADJUSTMENTS TO REPLACE MOWER BLADE DRIVE BELT MOWER DRIVE BELT REMOVAL (See Fig. 36) • Park tractor on both mandrel housings and secure with fasteners.
...; Belt tension should be serviced. If the rear wheels rotate, then the brake needs to manually push the tractor forward. You may have any twist. BLADE BELT Fig. 37 23 BELT ROUTING ENGINE Fig. 38 TO CHECK BRAKE If tractor requires more than five (5) feet to stop at highest speed in...; Remove any dirt or grass clippings which may also check brake by placing freewheel control in the disengaged position. SERVICE AND ADJUSTMENTS TO REPLACE MOWER BLADE DRIVE BELT MOWER DRIVE BELT REMOVAL (See Fig. 36) • Park tractor on both mandrel housings and secure with fasteners.

Owners Manual
Page 24
... and onto engine pulley (G). 3. Tighten securely. 6. Install mower (See "TO INSTALL MOWER" section in this manual). If damage has occurred to front, over cooling fan blades (F). 6. Disconnect clutch wire harness (A). 3. Install new belt from engine pulley and around electric clutch (G). 7. FRONT WHEEL TOE-IN/CAMBER Your new tractor front wheel toe...
... and onto engine pulley (G). 3. Tighten securely. 6. Install mower (See "TO INSTALL MOWER" section in this manual). If damage has occurred to front, over cooling fan blades (F). 6. Disconnect clutch wire harness (A). 3. Install new belt from engine pulley and around electric clutch (G). 7. FRONT WHEEL TOE-IN/CAMBER Your new tractor front wheel toe...
Owners Manual
Page 28
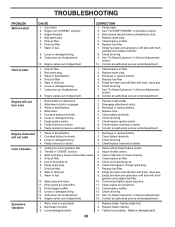
... Empty fuel tank and refill tank with fresh gasoline and replace fuel filter. 10. Carburetor out of adjustment. 1. Excessive vibration 1. Replace blade. Replace damaged parts. 28 Engine flooded. 4. CORRECTION 1. See "To Adjust Carburetor" in fuel. 9. Bad spark plug. 3. Stale or...air screen/fins. 11. Dirty/clogged muffler. 12. Clean/replace muffler. 13. See "To Adjust Carburetor" in Operation section. 3. Tighten blade bolt. 2. Check all wiring. 14. Engine will not start . 4. Disengage attachment clutch. 3. Clean battery terminals. 6. Check/replace ...
... Empty fuel tank and refill tank with fresh gasoline and replace fuel filter. 10. Carburetor out of adjustment. 1. Excessive vibration 1. Replace blade. Replace damaged parts. 28 Engine flooded. 4. CORRECTION 1. See "To Adjust Carburetor" in fuel. 9. Bad spark plug. 3. Stale or...air screen/fins. 11. Dirty/clogged muffler. 12. Clean/replace muffler. 13. See "To Adjust Carburetor" in Operation section. 3. Tighten blade bolt. 2. Check all wiring. 14. Engine will not start . 4. Disengage attachment clutch. 3. Clean battery terminals. 6. Check/replace ...
Owners Manual
Page 29
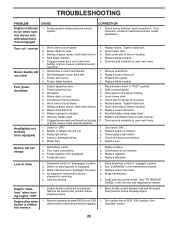
.... Battery will not rotate 1. Poor cable connections. 3. Replace battery. 2. Axle key missing. 1. Clean underside of mower housing. 8. Replace blade mandrel. Allow grass to dry before stopping engine. 1. of drive 1. Turn switch "ON". 2. Replace alternator. Freewheel control in "FAST" ... air pressure. 6. Replace motion drive belt. 4. See "TO REMOVE WHEEL" in the maintenance section. 3. See Operation section. 29 Tighten blade bolt. 7. Bulb(s) or lamp(s) burned out. 3. Loss of grass, leaves, trash around mandrels. 1. Shift to ROS "ON" position...
.... Battery will not rotate 1. Poor cable connections. 3. Replace battery. 2. Axle key missing. 1. Clean underside of mower housing. 8. Replace blade mandrel. Allow grass to dry before stopping engine. 1. of drive 1. Turn switch "ON". 2. Replace alternator. Freewheel control in "FAST" ... air pressure. 6. Replace motion drive belt. 4. See "TO REMOVE WHEEL" in the maintenance section. 3. See Operation section. 29 Tighten blade bolt. 7. Bulb(s) or lamp(s) burned out. 3. Loss of grass, leaves, trash around mandrels. 1. Shift to ROS "ON" position...
Owners Manual
Page 31
...handle warranty adjustments or repairs on transmissions or transaxles. Under this separate warranty statement for an authorized Husqvarna service provider. Limited Warranty Husqvarna warrants to handle warranty adjustments or repairs on engines manufactured by this Limited Warranty. (b) Transmissions...., bulbs, filters, lubricants, starter cords, belts, blades, and blade adapters. (d) Emissions Control Components. To preserve your new product. THIS LIMITED WARRANTY IS THE SOLE EXPRESS WARRANTY PROVIDED BY HUSQVARNA AND THERE ARE NO WARRANTIES WHICH EXTEND BEYOND THE DESCRIPTION...
...handle warranty adjustments or repairs on transmissions or transaxles. Under this separate warranty statement for an authorized Husqvarna service provider. Limited Warranty Husqvarna warrants to handle warranty adjustments or repairs on engines manufactured by this Limited Warranty. (b) Transmissions...., bulbs, filters, lubricants, starter cords, belts, blades, and blade adapters. (d) Emissions Control Components. To preserve your new product. THIS LIMITED WARRANTY IS THE SOLE EXPRESS WARRANTY PROVIDED BY HUSQVARNA AND THERE ARE NO WARRANTIES WHICH EXTEND BEYOND THE DESCRIPTION...


