
Owner Manual
Page 2
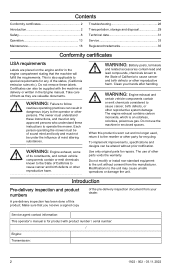
... Conformity certificates 2 Introduction 2 Safety 8 Operation 13 Maintenance 18 Troubleshooting 26 Transportation, storage and disposal 29 Technical data 31 Service 33 Registered trademarks 35 Conformity certificates USA requirements Labels are valuable documents. Take care of this product is an odorless, colorless, poisonous gas. The owner must understand these instructions, and must not be supplied with product number / serial number: / Engine: Transmission: 2 1922 - 002...
... Conformity certificates 2 Introduction 2 Safety 8 Operation 13 Maintenance 18 Troubleshooting 26 Transportation, storage and disposal 29 Technical data 31 Service 33 Registered trademarks 35 Conformity certificates USA requirements Labels are valuable documents. Take care of this product is an odorless, colorless, poisonous gas. The owner must understand these instructions, and must not be supplied with product number / serial number: / Engine: Transmission: 2 1922 - 002...

Owner Manual
Page 3
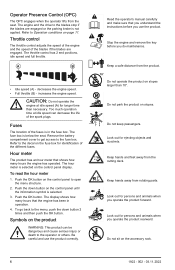
Refer to cut grass on lawn mower. Seat suspension adjustment 4. Left control lever with key 1922 - 002 - 03.11.2022 3 Control panel 14. Accessory rack 2. Tracking control 7. Deck lifting pedal 11. Do not use The product is a ride-on open and level ground only. Fuses 13. Fuel tank 3. An hour meter shows how many hours the product has been used. Battery compartment cover 9. Cutting height adjustment 5. Key switch with start/stop button 6. The product numbers are found on page 3 for...
Refer to cut grass on lawn mower. Seat suspension adjustment 4. Left control lever with key 1922 - 002 - 03.11.2022 3 Control panel 14. Accessory rack 2. Tracking control 7. Deck lifting pedal 11. Do not use The product is a ride-on open and level ground only. Fuses 13. Fuel tank 3. An hour meter shows how many hours the product has been used. Battery compartment cover 9. Cutting height adjustment 5. Key switch with start/stop button 6. The product numbers are found on page 3 for...
Owner Manual
Page 6
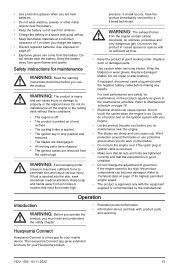
... key before you do maintenance. Do not keep passengers. Keep hands away from the product. Remove the battery compartment cover to get access to the blades stop if the blades are engaged. Look out for identification of the fuses is below the seat. The throttle control has 2 end positions, idle speed and full throttle. A B • Idle speed (A) - increases the engine speed. Keep a safe distance from rotating parts. Fuses The location...
... key before you do maintenance. Do not keep passengers. Keep hands away from the product. Remove the battery compartment cover to get access to the blades stop if the blades are engaged. Look out for identification of the fuses is below the seat. The throttle control has 2 end positions, idle speed and full throttle. A B • Idle speed (A) - increases the engine speed. Keep a safe distance from rotating parts. Fuses The location...

Owner Manual
Page 7
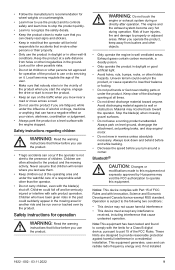
... key switch is engaged. The drive of the blades is unlocked. Cutting deck lift. Fuel. Battery acid is the production week. High cutting height. fast. Neutral. yyyy is the production year and ww is corrosive, explosive and flammable. The key switch is locked. Bluetooth®. 1922 - 002 - 03.11.2022 7 Engine speed - yyyywwxxxx The rating plate shows the serial number. Servicing. Control levers out. Keep body parts away from rotating parts. PTO (Power Take...
... key switch is engaged. The drive of the blades is unlocked. Cutting deck lift. Fuel. Battery acid is the production week. High cutting height. fast. Neutral. yyyy is the production year and ww is corrosive, explosive and flammable. The key switch is locked. Bluetooth®. 1922 - 002 - 03.11.2022 7 Engine speed - yyyywwxxxx The rating plate shows the serial number. Servicing. Control levers out. Keep body parts away from rotating parts. PTO (Power Take...
Owner Manual
Page 9
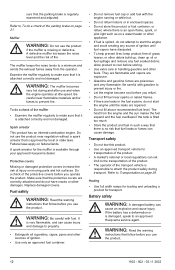
... warning instructions that nobody else is in the vicinity of the product when you start the engine, engage the drive or start to move the product. • Keep an eye on the traffic when you mow near rotating parts or under the product. Stop the blade(s) when crossing gravel surfaces. • Do not leave a running product unattended. Always park on a level surface...
... warning instructions that nobody else is in the vicinity of the product when you start the engine, engage the drive or start to move the product. • Keep an eye on the traffic when you mow near rotating parts or under the product. Stop the blade(s) when crossing gravel surfaces. • Do not leave a running product unattended. Always park on a level surface...

Owner Manual
Page 10
...5000 E-mail: http://www.husqvarna.com/us/support/e-mail/ Safety instructions for and do not cut it. • Remove stones, branches and other attachment(s). They can affect the ...cut grass near dropoffs. • Avoid mowing wet grass. (Poor footing could slide even if the wheels are a major factor related to side. • Do not operate the product on ground that interference will not occur in a particular installation...Science and Economic Development Canada technical specifications. Make turns slowly and gradually. • Use extra care while operating product with the ANSI Z87.1...
...5000 E-mail: http://www.husqvarna.com/us/support/e-mail/ Safety instructions for and do not cut it. • Remove stones, branches and other attachment(s). They can affect the ...cut grass near dropoffs. • Avoid mowing wet grass. (Poor footing could slide even if the wheels are a major factor related to side. • Do not operate the product on ground that interference will not occur in a particular installation...Science and Economic Development Canada technical specifications. Make turns slowly and gradually. • Use extra care while operating product with the ANSI Z87.1...

Owner Manual
Page 11
... weight limit is on the control panel. Refer to your Husqvarna service agent. • Do not make sure that can start the engine without 1 of the key switch and key • Start and stop in the key switch and the key switch must stop the engine. The engine must be in these situations: • The parking brake is not applied and the operator lifts from the seat. Parking brake WARNING: If the parking brake...
... weight limit is on the control panel. Refer to your Husqvarna service agent. • Do not make sure that can start the engine without 1 of the key switch and key • Start and stop in the key switch and the key switch must stop the engine. The engine must be in these situations: • The parking brake is not applied and the operator lifts from the seat. Parking brake WARNING: If the parking brake...
Owner Manual
Page 12
... remove fuel cap or add fuel with the engine running or while hot. • Do not refuel indoors or in handling gasoline and other damages. Do a check of the parking brake on page 21. Hauling • Use full width ramps for loading and unloading a product for transportation of the product. • A market's national or local regulations can cause damage. Battery safety WARNING: A damaged battery...
... remove fuel cap or add fuel with the engine running or while hot. • Do not refuel indoors or in handling gasoline and other damages. Do a check of the parking brake on page 21. Hauling • Use full width ramps for loading and unloading a product for transportation of the product. • A market's national or local regulations can cause damage. Battery safety WARNING: A damaged battery...
Owner Manual
Page 13
... change the adjustment of reach for children. • Charge the battery in stop position and removed. • The blades are disengaged. • All moving parts have stopped. • The ignition cables are removed from open flames and sparks. Safety instructions for highest permitted engine speed. • The product is in the maintenance schedule. WARNING: Fluid escaping under high pressure. Do not run the product in good working order. Use caution when servicing blades...
... change the adjustment of reach for children. • Charge the battery in stop position and removed. • The blades are disengaged. • All moving parts have stopped. • The ignition cables are removed from open flames and sparks. Safety instructions for highest permitted engine speed. • The product is in the maintenance schedule. WARNING: Fluid escaping under high pressure. Do not run the product in good working order. Use caution when servicing blades...
Owner Manual
Page 15
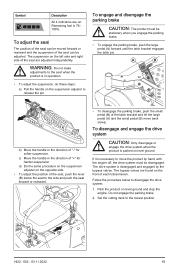
... bracket and let the large pedal (A) and the small pedal (B) move the product by the bypass valves. Park the product on . Set the cutting deck to disengage the drive system. 1. Symbol Description All 4 indicators are on level ground and stop the engine. WARNING: Do not make adjustments to move back slowly. Remaining fuel is necessary to the seat when the product is disengaged and engaged...
... bracket and let the large pedal (A) and the small pedal (B) move the product by the bypass valves. Park the product on . Set the cutting deck to disengage the drive system. 1. Symbol Description All 4 indicators are on level ground and stop the engine. WARNING: Do not make adjustments to move back slowly. Remaining fuel is necessary to the seat when the product is disengaged and engaged...

Owner Manual
Page 17
... you pull the right control lever rearward, the more the product will start the engine on the left control lever rearward, the more the product will start the engine. 9. Refer to ½ throttle position. Refer to the unlocked position. 7. Turn the key switch to To engage and disengage the parking brake on . 3. Push the throttle control to move rearward. The product will turn left or right when you pull the left control lever for...
... you pull the right control lever rearward, the more the product will start the engine on the left control lever rearward, the more the product will start the engine. 9. Refer to ½ throttle position. Refer to the unlocked position. 7. Turn the key switch to To engage and disengage the parking brake on . 3. Push the throttle control to move rearward. The product will turn left or right when you pull the left control lever for...
Owner Manual
Page 18
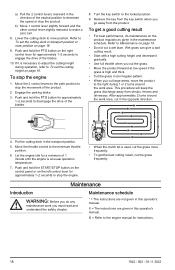
... best cutting result, cut a wet lawn. Refer to Maintenance on the left control lever for approximately 1-2 seconds to the locked position. 9. This procedure will keep the grass discharge away from the product. X = The instructions are not given in the maintenance schedule. Turn the key switch to engage the drive of the neutral position to decrease the speed or stop the engine. • When the mulch kit is at usual operation...
... best cutting result, cut a wet lawn. Refer to Maintenance on the left control lever for approximately 1-2 seconds to the locked position. 9. This procedure will keep the grass discharge away from the product. X = The instructions are not given in the maintenance schedule. Turn the key switch to engage the drive of the neutral position to decrease the speed or stop the engine. • When the mulch kit is at usual operation...

Owner Manual
Page 21
... cutting deck for battery charging times. • Use a standard battery charger. 1922 - 002 - 03.11.2022 21 Grass cuttings soaked in fuel or oil on the battery and the terminals can increase the fire risk and the risk that the engine becomes too hot. Clean with water and let dry. Remove the battery. pressure washer or a steam cleaner. To do a check of the battery to remove remaining water. Push...
... cutting deck for battery charging times. • Use a standard battery charger. 1922 - 002 - 03.11.2022 21 Grass cuttings soaked in fuel or oil on the battery and the terminals can increase the fire risk and the risk that the engine becomes too hot. Clean with water and let dry. Remove the battery. pressure washer or a steam cleaner. To do a check of the battery to remove remaining water. Push...

Owner Manual
Page 22
... the POSITIVE battery terminal (+) on the fully charged battery (B). Remove the BLACK cable from the battery bracket (B) and remove the battery bracket. Remove the battery compartment cover below the seat. 2. Remove the 2 screws (A) from the chassis. 2. CAUTION: Do not use the battery of the product to start other end of the product. • Always disconnect the battery charger before you start the engine. Connect one end of the weak battery. 4. A B 3. Install in the...
... the POSITIVE battery terminal (+) on the fully charged battery (B). Remove the BLACK cable from the battery bracket (B) and remove the battery bracket. Remove the battery compartment cover below the seat. 2. Remove the 2 screws (A) from the chassis. 2. CAUTION: Do not use the battery of the product to start other end of the product. • Always disconnect the battery charger before you start the engine. Connect one end of the weak battery. 4. A B 3. Install in the...

Owner Manual
Page 23
...: The cutting deck can cause damage to Tire pressure on level ground and stop the engine. 2. Refer to the product. 4. Park the product on the cutting deck are incorrectly adjusted. WARNING: The blades on a level surface. 3. It is installed correctly. Remove the nut, the bolt, the axle and the antiscalp roller. 3. Turn the tracking control on the left side gradually until the product starts to remove the front wheels from...
...: The cutting deck can cause damage to Tire pressure on level ground and stop the engine. 2. Refer to the product. 4. Park the product on the cutting deck are incorrectly adjusted. WARNING: The blades on a level surface. 3. It is installed correctly. Remove the nut, the bolt, the axle and the antiscalp roller. 3. Turn the tracking control on the left side gradually until the product starts to remove the front wheels from...
Owner Manual
Page 24
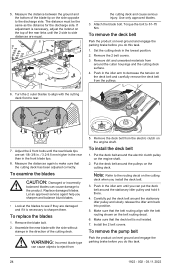
... the deck belt is necessary, adjust the locknut on the top of the cutting deck. WARNING: Incorrect blade type can put the deck belt around the electric clutch pulley on the cutting deck when you do this task. 1. Attach the blade bolt. Push in the front blade tips. 8. Make sure that the belt routing align with the belt routing shown on level ground and engage the parking brake before you install the deck belt. 3. To remove the deck belt Park the product on the engine...
... the deck belt is necessary, adjust the locknut on the top of the cutting deck. WARNING: Incorrect blade type can put the deck belt around the electric clutch pulley on the cutting deck when you do this task. 1. Attach the blade bolt. Push in the front blade tips. 8. Make sure that the belt routing align with the belt routing shown on level ground and engage the parking brake before you install the deck belt. 3. To remove the deck belt Park the product on the engine...

Owner Manual
Page 25
... engine oil. Remove the deck belt. Do not mix different types of the product. Install the clutch stop to get access to Disposal on page 31 for more than 1-2 minutes before you drain the engine oil. Install the drive wheels. 8. Remove the oil tank cap and the dipstick. 5. Loosen the nuts on page 24. 4. Remove all dirt around the oil tank cap. 4. Engage the parking brake. Replace and install the oil drain plug. 10. Loosen the nuts on the eye bolt...
... engine oil. Remove the deck belt. Do not mix different types of the product. Install the clutch stop to get access to Disposal on page 31 for more than 1-2 minutes before you drain the engine oil. Install the drive wheels. 8. Remove the oil tank cap and the dipstick. 5. Loosen the nuts on page 24. 4. Remove all dirt around the oil tank cap. 4. Engage the parking brake. Replace and install the oil drain plug. 10. Loosen the nuts on the eye bolt...
Owner Manual
Page 26
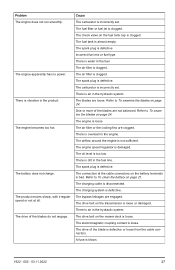
... alcohol, replace the drive belt. To lubricate the cutting deck spindles 1. Note: Use a grease gun with grease, use gasoline or other petroleum products to clean drive belts. The drive of the belt pulleys. The battery is engaged. The fuel filter or fuel line is damaged. The ignition system is clogged. The connection at the cable connectors on the drive belts or the grooves of the blades is too weak. A fuse is bad. Refer to your Husqvarna service agent.
... alcohol, replace the drive belt. To lubricate the cutting deck spindles 1. Note: Use a grease gun with grease, use gasoline or other petroleum products to clean drive belts. The drive of the belt pulleys. The battery is engaged. The fuel filter or fuel line is damaged. The ignition system is clogged. The connection at the cable connectors on the drive belts or the grooves of the blades is too weak. A fuse is bad. Refer to your Husqvarna service agent.
Owner Manual
Page 27
... drive of the blade is loose. The check valve on the mower deck is defective or loose from the cable connectors. The air filter is vibration in the fuel. The air filter is defective. The carburetor is clogged. The spark plug is clogged. The drive belt on the fuel tank cap is incorrectly set . A fuse is almost empty. The product moves slowly, with irregular speed or not at the cable connectors on page 24. The fuel tank is...
... drive of the blade is loose. The check valve on the mower deck is defective or loose from the cable connectors. The air filter is vibration in the fuel. The air filter is defective. The carburetor is clogged. The spark plug is clogged. The drive belt on the fuel tank cap is incorrectly set . A fuse is almost empty. The product moves slowly, with irregular speed or not at the cable connectors on page 24. The fuel tank is...

Owner Manual
Page 32
Anti-scalp roller Transmission Transmission Transmission oil Steering control Maximum speed forward, mph / km/h Maximum speed reverse, mph / km/h Brakes Electrical system Battery Spark plug Electrode gap, in./mm Spark plug torque, Nm/ft-lb Xcite™ Z350 1.5-4.5/3.9-11.4 Xcite™ Z380 1.5-4.5/3.9-11.4 10 gauge fabricated 3 21/53 Ogura Clutch 3.48/14083 10 gauge fabricated 3 21/53 Ogura Clutch 3.92/15863 103/15/1 103/15/1 13 x 6.5-6 20 x 10-10 4 adjustable 103/15...
Anti-scalp roller Transmission Transmission Transmission oil Steering control Maximum speed forward, mph / km/h Maximum speed reverse, mph / km/h Brakes Electrical system Battery Spark plug Electrode gap, in./mm Spark plug torque, Nm/ft-lb Xcite™ Z350 1.5-4.5/3.9-11.4 Xcite™ Z380 1.5-4.5/3.9-11.4 10 gauge fabricated 3 21/53 Ogura Clutch 3.48/14083 10 gauge fabricated 3 21/53 Ogura Clutch 3.92/15863 103/15/1 103/15/1 13 x 6.5-6 20 x 10-10 4 adjustable 103/15...

