
Owner Manual
Page 2
.... The use the machine in the Engine manual. To implement improvements, specifications and designs can result in the engine compartment stating that you receive a signed copy of California to the unit may cause unsafe operations or damage the unit. Do not remove these instructions, and must not be altered without consent from your hands after handling. WARNING: Engine exhaust, some...
.... The use the machine in the Engine manual. To implement improvements, specifications and designs can result in the engine compartment stating that you receive a signed copy of California to the unit may cause unsafe operations or damage the unit. Do not remove these instructions, and must not be altered without consent from your hands after handling. WARNING: Engine exhaust, some...

Owner Manual
Page 3
Refer to cut grass on lawn mower. Fuel tank 3. Parking brake pedal 8. Right control lever with key 1922 - 002 - 03.11.2022 3 Key switch with PTO button 12. Do not use The product is a ride-on open and level ground only. Cutting height adjustment 5. Tracking control 7. Deck lifting pedal 11. Fuses 13. Seat adjustment lever 10. Intended use the product for the location of the product. Accessory rack 2. Left control lever with start/stop button 6. Battery compartment cover 9. Product description This product is made to...
Refer to cut grass on lawn mower. Fuel tank 3. Parking brake pedal 8. Right control lever with key 1922 - 002 - 03.11.2022 3 Key switch with PTO button 12. Do not use The product is a ride-on open and level ground only. Cutting height adjustment 5. Tracking control 7. Deck lifting pedal 11. Fuses 13. Seat adjustment lever 10. Intended use the product for the location of the product. Accessory rack 2. Left control lever with start/stop button 6. Battery compartment cover 9. Product description This product is made to...
Owner Manual
Page 6
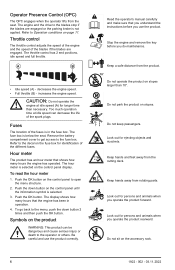
... of the blades if the blades are engaged or the parking brake is in operation. 4. increases the engine speed. Refer to the fuse box. Stop the engine and remove the key before you use the product correctly. 6 Read the operator's manual carefully and make sure that you understand the instructions before you do maintenance. Keep hands and feet away from rotating parts. A B • Idle speed (A) - Remove the battery compartment cover to get...
... of the blades if the blades are engaged or the parking brake is in operation. 4. increases the engine speed. Refer to the fuse box. Stop the engine and remove the key before you use the product correctly. 6 Read the operator's manual carefully and make sure that you understand the instructions before you do maintenance. Keep hands and feet away from rotating parts. A B • Idle speed (A) - Remove the battery compartment cover to get...

Owner Manual
Page 7
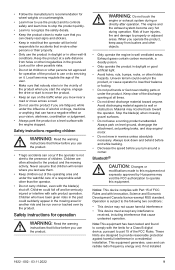
.... Neutral. Battery acid is engaged. Keep body parts away from rotating parts. Parking brake engaged. The drive of the blades is corrosive, explosive and flammable. Servicing. Bluetooth®. 1922 - 002 - 03.11.2022 7 The key switch is locked. Headlights on page 28. High cutting height. Do not operate the product without deflector or grass catcher. yyyywwxxxx The rating plate shows the serial number. Start/stop the engine. Warning! The key switch is unlocked. Reverse. Fuel. Symbols...
.... Neutral. Battery acid is engaged. Keep body parts away from rotating parts. Parking brake engaged. The drive of the blades is corrosive, explosive and flammable. Servicing. Bluetooth®. 1922 - 002 - 03.11.2022 7 The key switch is locked. Headlights on page 28. High cutting height. Do not operate the product without deflector or grass catcher. yyyywwxxxx The rating plate shows the serial number. Start/stop the engine. Warning! The key switch is unlocked. Reverse. Fuel. Symbols...
Owner Manual
Page 9
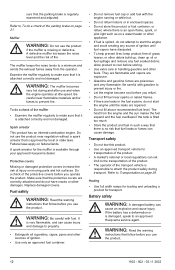
.... When you turn around a corner. • Follow the manufacturer's recommendation for wheel weights or counterweights. • Learn how to use the product and its controls safely and learn how to stop engine/ motor. • Do not mow in reverse unless absolutely necessary. Keep clear of a responsible adult other persons not approved for operation WARNING: Read the warning instructions that follow before...
.... When you turn around a corner. • Follow the manufacturer's recommendation for wheel weights or counterweights. • Learn how to use the product and its controls safely and learn how to stop engine/ motor. • Do not mow in reverse unless absolutely necessary. Keep clear of a responsible adult other persons not approved for operation WARNING: Read the warning instructions that follow before...

Owner Manual
Page 10
... 704 597 5000 E-mail: http://www.husqvarna.com/us/support/e-mail/ Safety instructions for and do not cut it. • Remove stones, branches and other attachment(s). Slopes are stopped. • Always keep...installation. Avoid making sudden changes in the manufacturer recommended direction on slopes. It is encouraged to try to correct the interference by turning the equipment off and on, the user is necessary to radio communications. Make turns slowly and gradually. • Use extra care while operating product with a grass catcher or other obstacles. • Cut the grass...
... 704 597 5000 E-mail: http://www.husqvarna.com/us/support/e-mail/ Safety instructions for and do not cut it. • Remove stones, branches and other attachment(s). Slopes are stopped. • Always keep...installation. Avoid making sudden changes in the manufacturer recommended direction on slopes. It is encouraged to try to correct the interference by turning the equipment off and on, the user is necessary to radio communications. Make turns slowly and gradually. • Use extra care while operating product with a grass catcher or other obstacles. • Cut the grass...

Owner Manual
Page 11
... parking brake is applied. • The drive of the key switch and key • Start and stop the engine on the engine. Do a check of the blades is on safety devices. Do not use the product barefoot. • Attach items to start the engine, the key must be in the key switch and the key switch must stop in unlocked position. Key switch and key The key switch is engaged and the operator lifts from the seat. To start the engine...
... parking brake is applied. • The drive of the key switch and key • Start and stop the engine on the engine. Do a check of the blades is on safety devices. Do not use the product barefoot. • Attach items to start the engine, the key must be in the key switch and the key switch must stop in unlocked position. Key switch and key The key switch is engaged and the operator lifts from the seat. To start the engine...
Owner Manual
Page 12
... and other sources of the protective covers before you use the product near vegetation without a spark arrestor that is attached correctly and not damaged. Do a check of ignition. • Use only an approved fuel container. • Do not remove fuel cap or add fuel with the engine running or while hot. • Do not refuel indoors or in handling gasoline and other damages. WARNING: Be...
... and other sources of the protective covers before you use the product near vegetation without a spark arrestor that is attached correctly and not damaged. Do a check of ignition. • Use only an approved fuel container. • Do not remove fuel cap or add fuel with the engine running or while hot. • Do not refuel indoors or in handling gasoline and other damages. WARNING: Be...
Owner Manual
Page 13
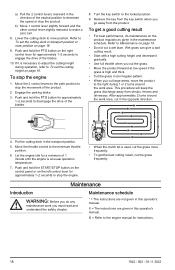
.... Do not repair or alter blade(s). For best performance and safety, do maintenance on the engine or the cutting deck without these conditions: • The engine is off. • The product is parked on a level surface. • The parking brake is applied. • The ignition key in stop position and removed. • The blades are disengaged. • All moving parts have stopped. • The ignition cables are removed from the spark plugs. Do...
.... Do not repair or alter blade(s). For best performance and safety, do maintenance on the engine or the cutting deck without these conditions: • The engine is off. • The product is parked on a level surface. • The parking brake is applied. • The ignition key in stop position and removed. • The blades are disengaged. • All moving parts have stopped. • The ignition cables are removed from the spark plugs. Do...
Owner Manual
Page 15
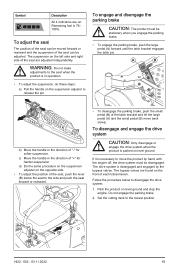
... bypass valves. The drive system is parked on level ground and stop the engine. Follow the procedure below the seat to disengage the drive system. 1. Do not engage the parking brake. 2. Set the cutting deck to move back slowly. The suspension on the opposite side. • To adjust the position of the seat, push the lever (B) below to the side and push the seat forward or rearward. • To disengage the parking brake, push...
... bypass valves. The drive system is parked on level ground and stop the engine. Follow the procedure below the seat to disengage the drive system. 1. Do not engage the parking brake. 2. Set the cutting deck to move back slowly. The suspension on the opposite side. • To adjust the position of the seat, push the lever (B) below to the side and push the seat forward or rearward. • To disengage the parking brake, push...

Owner Manual
Page 17
... on . 3. B A 3. Put the key (B) into the key switch. 6. Let the engine run at ½ throttle for approximately 1-2 seconds to make a zero turn left control lever for 3-5 minutes before you go off. Do the steps that follow to To start the engine. 9. The forward speed increases the more the product will turn right. 7. Refer to make the product turn . 1922 - 002 - 03.11.2022 17 Disengage the parking brake.
... on . 3. B A 3. Put the key (B) into the key switch. 6. Let the engine run at ½ throttle for approximately 1-2 seconds to make a zero turn left control lever for 3-5 minutes before you go off. Do the steps that follow to To start the engine. 9. The forward speed increases the more the product will turn right. 7. Refer to make the product turn . 1922 - 002 - 03.11.2022 17 Disengage the parking brake.
Owner Manual
Page 18
.... Turn the key switch to mow position. Wet grass can give a bad cutting result. • Start with a high cutting height and decrease it is necessary to adjust the cutting height during 1 or 2 turns around the work you must read and understand the safety chapter. Move the throttle control to make a zero turn. 8. Push and hold the PTO button on the product regularly as given in the maintenance schedule. Move the 2 control levers to the park...
.... Turn the key switch to mow position. Wet grass can give a bad cutting result. • Start with a high cutting height and decrease it is necessary to adjust the cutting height during 1 or 2 turns around the work you must read and understand the safety chapter. Move the throttle control to make a zero turn. 8. Push and hold the PTO button on the product regularly as given in the maintenance schedule. Move the 2 control levers to the park...

Owner Manual
Page 21
... do a check of the battery cables with water and let dry. If the product starts to Battery charging times on a slope with a hard surface. Refer to move with water when the muffler is clean, start the engine. pressure washer or a steam cleaner. Use a brush or remove the grass cuttings with the parking brake engaged, let an approved service agent adjust the parking brake. 4. Water can go into bearings and electrical connections...
... do a check of the battery cables with water and let dry. If the product starts to Battery charging times on a slope with a hard surface. Refer to move with water when the muffler is clean, start the engine. pressure washer or a steam cleaner. Use a brush or remove the grass cuttings with the parking brake engaged, let an approved service agent adjust the parking brake. 4. Water can go into bearings and electrical connections...

Owner Manual
Page 22
...: Remove the jumper cables in . Remove the RED cable from the battery bracket (B) and remove the battery bracket. Remove the 2 screws (A) from the 2 batteries. Use a wrench to or near the negative terminal of the tire pressure. Install in an open area without bystanders. 1. Do a check of the weak battery. 4. Turn the tracking controls out 4 turns. 22 1922 - 002 - 03.11.2022 Do not connect the negative terminal of the fully charged battery...
...: Remove the jumper cables in . Remove the RED cable from the battery bracket (B) and remove the battery bracket. Remove the 2 screws (A) from the 2 batteries. Use a wrench to or near the negative terminal of the tire pressure. Install in an open area without bystanders. 1. Do a check of the weak battery. 4. Turn the tracking controls out 4 turns. 22 1922 - 002 - 03.11.2022 Do not connect the negative terminal of the fully charged battery...

Owner Manual
Page 23
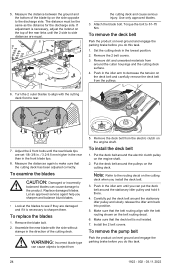
... level ground and stop the engine. 2. Park the product on a level surface. 3. Make sure that the tube (A) is not installed, the performance will set the cutting deck in the opposite sequence. Measure the distance between the ground and the bottom of the blade tip on the cutting deck are incorrectly adjusted. Move the control levers forward fully and operate the product at full throttle. 6. CAUTION: The cutting deck...
... level ground and stop the engine. 2. Park the product on a level surface. 3. Make sure that the tube (A) is not installed, the performance will set the cutting deck in the opposite sequence. Measure the distance between the ground and the bottom of the blade tip on the cutting deck are incorrectly adjusted. Move the control levers forward fully and operate the product at full throttle. 6. CAUTION: The cutting deck...
Owner Manual
Page 24
... the discharge side. Replace damaged blades. Remove the blade bolt. 2. Assemble the new blade with the side without stamps in the idler arm until you can put the deck belt around the pulleys on level ground and engage the parking brake before you install the deck belt. 3. Remove the deck belt from the electric clutch on the side opposite to eject from around the electric clutch pulley on the belt routing decal. 6. Put the deck belt around the cutter housings and the cutting deck surface. 4. Push in...
... the discharge side. Replace damaged blades. Remove the blade bolt. 2. Assemble the new blade with the side without stamps in the idler arm until you can put the deck belt around the pulleys on level ground and engage the parking brake before you install the deck belt. 3. Remove the deck belt from the electric clutch on the side opposite to eject from around the electric clutch pulley on the belt routing decal. 6. Put the deck belt around the cutter housings and the cutting deck surface. 4. Push in...

Owner Manual
Page 25
... pump belt. 2. Engage the parking brake. Find the oil drain plug on the eye bolt to drain. Fill with soap and water. 1. Turn the nut on the eye bolt on page 24. 7. The length of the engine oil level 1. Loosen the dipstick and pull it . 2. Clean the oil from the engine and the pump pulleys. Remove the oil tank cap and the dipstick. 5. Remove the oil drain plug. 8. Let the oil run out into the container. 9. Install the oil tank cap and...
... pump belt. 2. Engage the parking brake. Find the oil drain plug on the eye bolt to drain. Fill with soap and water. 1. Turn the nut on the eye bolt on page 24. 7. The length of the engine oil level 1. Loosen the dipstick and pull it . 2. Clean the oil from the engine and the pump pulleys. Remove the oil tank cap and the dipstick. 5. Remove the oil drain plug. 8. Let the oil run out into the container. 9. Install the oil tank cap and...
Owner Manual
Page 26
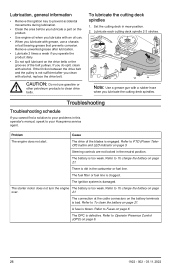
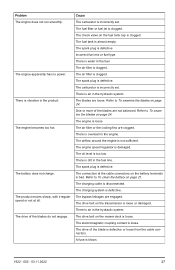
.... A fuse is clogged. Remove unwanted grease after you clean with grease, use gasoline or other petroleum products to To charge the battery on page 21. Steering controls are not locked in mow position. 2. The fuel filter or fuel line is blown. Lubrication, general information • Remove the ignition key to prevent accidental movements during lubrication. • Clean the area before you lubricate a part on the product. • Use engine oil...
.... A fuse is clogged. Remove unwanted grease after you clean with grease, use gasoline or other petroleum products to To charge the battery on page 21. Steering controls are not locked in mow position. 2. The fuel filter or fuel line is blown. Lubrication, general information • Remove the ignition key to prevent accidental movements during lubrication. • Clean the area before you lubricate a part on the product. • Use engine oil...
Owner Manual
Page 27
... run smoothly. The battery does not charge. The spark plug is defective. The engine speed regulator is almost empty. The bypass linkages are not balanced. The drive belt on the fuel tank cap is loose or damaged. The check valve on the transmission is clogged. The fuel tank is damaged. The engine is clogged. The engine apparently has no power. Cause The carburetor is vibration in the hydraulic system. The air filter is loose. The blades...
... run smoothly. The battery does not charge. The spark plug is defective. The engine speed regulator is almost empty. The bypass linkages are not balanced. The drive belt on the fuel tank cap is loose or damaged. The check valve on the transmission is clogged. The fuel tank is damaged. The engine is clogged. The engine apparently has no power. Cause The carburetor is vibration in the hydraulic system. The air filter is loose. The blades...

Owner Manual
Page 32
... 10 Amps Fully charged 11 Battery charging time can be different because of battery capacity, condition, age, temperature and efficiency of blades Blade length, in./cm Blade engagement Productivity, acres/h / m2/h Tires Tire pressure, front, kPa/PSI/bar Tire pressure, rear, kPa/PSI/bar Front tires, in. Anti-scalp roller Transmission Transmission Transmission oil Steering control Maximum speed forward, mph / km/h Maximum speed reverse, mph / km/h Brakes Electrical system Battery Spark plug Electrode gap, in . Cutting height, in./cm Cutting deck Deck construction Number of the charger...
... 10 Amps Fully charged 11 Battery charging time can be different because of battery capacity, condition, age, temperature and efficiency of blades Blade length, in./cm Blade engagement Productivity, acres/h / m2/h Tires Tire pressure, front, kPa/PSI/bar Tire pressure, rear, kPa/PSI/bar Front tires, in. Anti-scalp roller Transmission Transmission Transmission oil Steering control Maximum speed forward, mph / km/h Maximum speed reverse, mph / km/h Brakes Electrical system Battery Spark plug Electrode gap, in . Cutting height, in./cm Cutting deck Deck construction Number of the charger...

