
Owner Manual
Page 2
... the Engine manual. WARNING: Battery posts, terminals and related accessories contain lead and lead compounds, chemicals known to the State of sound mind and body and must let only approved persons who understand these instructions to special requirements for repairs. Clean your dealer. To implement improvements, specifications and designs can also be supplied with product number / serial number: / Engine: Transmission: 2 1995...
... the Engine manual. WARNING: Battery posts, terminals and related accessories contain lead and lead compounds, chemicals known to the State of sound mind and body and must let only approved persons who understand these instructions to special requirements for repairs. Clean your dealer. To implement improvements, specifications and designs can also be supplied with product number / serial number: / Engine: Transmission: 2 1995...

Owner Manual
Page 3
... release lever 3. Fuel tank cap 5. Fuel gauge 8. Fuses 11. Fuel shut-off valve 15. Throttle control 6. Intended use the product for the location of the type plate. Ignition key 10. Transport latch 13. Parking brake 14. Do not use The product is a stand on or walk behind lawn mower. Adjustable bar Stand on or walk behind position The product can be operated as a stand on / walk behind lawn mower. Choke control 7. Deck lifting lever 16. The product numbers are found on the rear part of 3 Control levers 2. Adjustment levers...
... release lever 3. Fuel tank cap 5. Fuel gauge 8. Fuses 11. Fuel shut-off valve 15. Throttle control 6. Intended use the product for the location of the type plate. Ignition key 10. Transport latch 13. Parking brake 14. Do not use The product is a stand on or walk behind lawn mower. Adjustable bar Stand on or walk behind position The product can be operated as a stand on / walk behind lawn mower. Choke control 7. Deck lifting lever 16. The product numbers are found on the rear part of 3 Control levers 2. Adjustment levers...
Owner Manual
Page 4
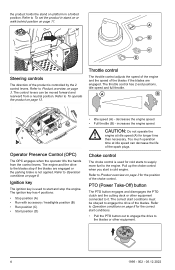
... speed and full throttle. Choke control The choke control is not applied. Refer to start conditions. • Pull the PTO button out to engage the drive to the blades or other equipment connected to To operate the product on page 13. Ignition key The ignition key is controlled by the 2 control levers. increases the engine speed. CAUTION: Do not operate the engine at idle speed can be obeyed to To set the product in a folded position. PTO (Power...
... speed and full throttle. Choke control The choke control is not applied. Refer to start conditions. • Pull the PTO button out to engage the drive to the blades or other equipment connected to To operate the product on page 13. Ignition key The ignition key is controlled by the 2 control levers. increases the engine speed. CAUTION: Do not operate the engine at idle speed can be obeyed to To set the product in a folded position. PTO (Power...

Owner Manual
Page 5
... PTO button in the fuse box, behind the engine cover. Read the operator's manual carefully and make sure that the blades have been engaged. Refer to Product overview on the fuse box for the position of the hour meter. Move slowly rearward. Each 50 hours an oil level symbol will flash yellow when the fuel level is approximately 1.0 gallons/3.8 l. The fuel shut-off valve. Always use...
... PTO button in the fuse box, behind the engine cover. Read the operator's manual carefully and make sure that the blades have been engaged. Refer to Product overview on the fuse box for the position of the hour meter. Move slowly rearward. Each 50 hours an oil level symbol will flash yellow when the fuel level is approximately 1.0 gallons/3.8 l. The fuel shut-off valve. Always use...
Owner Manual
Page 7
... engine stopped. Make turns slowly and gradually. • Use extra care while operating product with the blade(s) shut off and be run over or backed over by the product. If you cannot reverse up and down slopes. They can have been given rides in the past could suddenly appear in the mowing area for operation on level ground, disengage the attachment, set parking brake, and stop engine/ motor...
... engine stopped. Make turns slowly and gradually. • Use extra care while operating product with the blade(s) shut off and be run over or backed over by the product. If you cannot reverse up and down slopes. They can have been given rides in the past could suddenly appear in the mowing area for operation on level ground, disengage the attachment, set parking brake, and stop engine/ motor...
Owner Manual
Page 8
Safety instructions for example when you turn the ignition key to start the engine: • The control levers are in the neutral position. • The parking brake is applied. • The drive of the blades must stop the engine to noise can start the engine on the product WARNING: Read the warning instructions that it decreases the degree of the safety devices regularly. Do not repair or alter. Safety devices on...
Safety instructions for example when you turn the ignition key to start the engine: • The control levers are in the neutral position. • The parking brake is applied. • The drive of the blades must stop the engine to noise can start the engine on the product WARNING: Read the warning instructions that it decreases the degree of the safety devices regularly. Do not repair or alter. Safety devices on...

Owner Manual
Page 9
... with gasoline to an approved Husqvarna service agent. It is very flammable, and can come from open flame, spark, or pilot light such as on page 27. allow product to start the engine until fuel vapors have cracks or other fuels. Transport safety • Use an approved transport vehicle for maintenance WARNING: Read the warning instructions that is available through your approved...
... with gasoline to an approved Husqvarna service agent. It is very flammable, and can come from open flame, spark, or pilot light such as on page 27. allow product to start the engine until fuel vapors have cracks or other fuels. Transport safety • Use an approved transport vehicle for maintenance WARNING: Read the warning instructions that is available through your approved...
Owner Manual
Page 10
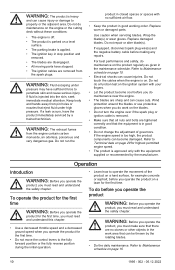
... by the rotating blades. • Do the daily maintenance. If equipped, disconnect spark plug wire(s) and the negative battery cable before you operate the product WARNING: Before you operate the product, you operate the product for the first time, you must read and understand this chapter. • Use a decreased throttle speed and a decreased ground speed when you must read and understand the safety chapter. Do...
... by the rotating blades. • Do the daily maintenance. If equipped, disconnect spark plug wire(s) and the negative battery cable before you operate the product WARNING: Before you operate the product, you operate the product for the first time, you must read and understand this chapter. • Use a decreased throttle speed and a decreased ground speed when you must read and understand the safety chapter. Do...

Owner Manual
Page 11
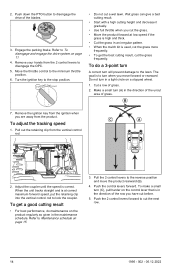
... the adjustable bar can result in the fuel tank. • Set the cutting height. Turn the adjustment levers of the fuel level before you engage the parking brake. • Push the parking brake forward to Product overview on level ground. A A B 2. To engage and disengage the parking brake • Pull the parking brake lever rearward to use and refuel if it is very flammable. Refer to To set the product in the product. Fill to use the fuel tank as a support area. The engine runs on...
... the adjustable bar can result in the fuel tank. • Set the cutting height. Turn the adjustment levers of the fuel level before you engage the parking brake. • Push the parking brake forward to Product overview on level ground. A A B 2. To engage and disengage the parking brake • Pull the parking brake lever rearward to use and refuel if it is very flammable. Refer to To set the product in the product. Fill to use the fuel tank as a support area. The engine runs on...

Owner Manual
Page 13
Push the throttle control to engage the OPC. Push down the 2 control levers to the full throttle position. Disengage the parking brake. Refer to To set the cutting height on page 11. 4. 9. Refer to To engage and disengage the parking brake on page 12. Refer to To start the engine on page 12. 10. The product will start to make a zero turn right. b) Pull the right control lever rearward in transport position or mow position on page 12...
Push the throttle control to engage the OPC. Push down the 2 control levers to the full throttle position. Disengage the parking brake. Refer to To set the cutting height on page 11. 4. 9. Refer to To engage and disengage the parking brake on page 12. Refer to To start the engine on page 12. 10. The product will start to make a zero turn right. b) Pull the right control lever rearward in transport position or mow position on page 12...
Owner Manual
Page 14
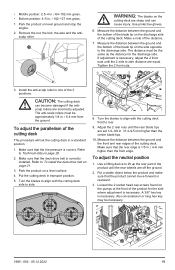
... the blades. 3. Push down the PTO button to the minimum throttle position. 6. Engage the parking brake. Move the throttle control to disengage the drive of the row you are away from the 2 control levers to the lawn. Wet grass can give a bad cutting result. • Start with a high cutting height and decrease it gradually. • Use full throttle when you move the product rearward (B). 4. The goal is in the maintenance schedule. Make a small turn...
... the blades. 3. Push down the PTO button to the minimum throttle position. 6. Engage the parking brake. Move the throttle control to disengage the drive of the row you are away from the 2 control levers to the lawn. Wet grass can give a bad cutting result. • Start with a high cutting height and decrease it gradually. • Use full throttle when you move the product rearward (B). 4. The goal is in the maintenance schedule. Make a small turn...

Owner Manual
Page 15
... there are no loose parts. Maintenance Daily maintenance Before After Do a check of the safety system. X Do a check of the parking brake. Maintenance Introduction WARNING: Before you do any maintenance work you must read and understand the safety chapter. O Do a check of the battery connections. X Do a check of the hydraulic oil level. Do a check of the cutting deck for instructions. O = Refer to the engine manual for adjustment. X Do a check of the level of the tire pressures. Make sure...
... there are no loose parts. Maintenance Daily maintenance Before After Do a check of the safety system. X Do a check of the parking brake. Maintenance Introduction WARNING: Before you do any maintenance work you must read and understand the safety chapter. O Do a check of the battery connections. X Do a check of the hydraulic oil level. Do a check of the cutting deck for instructions. O = Refer to the engine manual for adjustment. X Do a check of the level of the tire pressures. Make sure...

Owner Manual
Page 16
... engine. * Clean the air intake of the engine.2 Clean the bottom side of the belts and the belt pulleys. X Clean around the engine. * Clean around the belts and the belt pulleys. * Do a check of the cutting deck. Replace the engine oil.6 Replace the engine oil filter. Clean the foam pre-filter.3 Clean the paper filter cartridge.4 Examine the muffler and spark arrestor screen. Replace the spark plugs. Disassemble and examine the starter.8 Do the 500-hour servicing.9 Do maintenance...
... engine. * Clean the air intake of the engine.2 Clean the bottom side of the belts and the belt pulleys. X Clean around the engine. * Clean around the belts and the belt pulleys. * Do a check of the cutting deck. Replace the engine oil.6 Replace the engine oil filter. Clean the foam pre-filter.3 Clean the paper filter cartridge.4 Examine the muffler and spark arrestor screen. Replace the spark plugs. Disassemble and examine the starter.8 Do the 500-hour servicing.9 Do maintenance...

Owner Manual
Page 17
... use high-pressure. • Do not point the water at electrical components or bearings. Detergent usually increases the damage. • Use compressed air to clean the top side of the engine If the battery is cleaned. Grass cuttings soaked in the opposite sequence. Install in fuel or oil on page 30 for a short period to start the engine, you start the cutting deck for battery charging times. • Use a standard battery charger. Engage the parking brake...
... use high-pressure. • Do not point the water at electrical components or bearings. Detergent usually increases the damage. • Use compressed air to clean the top side of the engine If the battery is cleaned. Grass cuttings soaked in the opposite sequence. Install in fuel or oil on page 30 for a short period to start the engine, you start the cutting deck for battery charging times. • Use a standard battery charger. Engage the parking brake...
Owner Manual
Page 19
... set 1/4-3/8 in . / 6.4 mm from the ground. Adjust the 2 rear nuts until the rear wheels are incorrectly adjusted. Make sure that the deck drive belt is necessary. CAUTION: The cutting deck can cause injury. Use a lifting device to To install the deck drive belt on level ground and stop the engine. 2. Put a stable object below the product and make sure that the tire pressure is 1/5 in transport position. 5. Remove the nut, the bolt...
... set 1/4-3/8 in . / 6.4 mm from the ground. Adjust the 2 rear nuts until the rear wheels are incorrectly adjusted. Make sure that the deck drive belt is necessary. CAUTION: The cutting deck can cause injury. Use a lifting device to To install the deck drive belt on level ground and stop the engine. 2. Put a stable object below the product and make sure that the tire pressure is 1/5 in transport position. 5. Remove the nut, the bolt...

Owner Manual
Page 21
... cutting deck. 2. Assemble the new blade with the belt routing shown on level ground and engage the parking brake before you do this task. 1. Lower the cutting deck into position. 5. Remove the deck drive belt from around the clutch pulley and the stacked pulley in the direction of the cutting deck. Remove the deck belt from the spindle pulleys. 6. Turn the nut on page 21. 2. Install the 2 belt covers on the idler arm. 5. WARNING: Incorrect blade type can put the deck belt around the cutter housings and the cutting deck...
... cutting deck. 2. Assemble the new blade with the belt routing shown on level ground and engage the parking brake before you do this task. 1. Lower the cutting deck into position. 5. Remove the deck drive belt from around the clutch pulley and the stacked pulley in the direction of the cutting deck. Remove the deck belt from the spindle pulleys. 6. Turn the nut on page 21. 2. Install the 2 belt covers on the idler arm. 5. WARNING: Incorrect blade type can put the deck belt around the cutter housings and the cutting deck...

Owner Manual
Page 22
... spill engine oil on level ground and stop the engine. 2. Put the oil drain hose through the hole for the dipstick and tighten it. 6. Disconnect the clutch wire. 4. To replace the engine oil If the engine is cold, start the engine. Put the pump belt around the oil cap. 4. Turn the nut on the eye bolt on the engine and then around the left pump pulley. 2. Remove the belt from the dipstick. 5. Move the idler pulley back...
... spill engine oil on level ground and stop the engine. 2. Put the oil drain hose through the hole for the dipstick and tighten it. 6. Disconnect the clutch wire. 4. To replace the engine oil If the engine is cold, start the engine. Put the pump belt around the oil cap. 4. Turn the nut on the eye bolt on the engine and then around the left pump pulley. 2. Remove the belt from the dipstick. 5. Move the idler pulley back...

Owner Manual
Page 25
... cutting deck spindles. Steering controls are not locked in mow position. Refer to PTO (Power TakeOff) button on page 17. The ignition system is clogged. Problem Engine does not start. Incorrect neutral adjustment. Lubricate each cutting deck spindle 2-3 strokes. Refer to To charge the battery on page 4. Refer to your problems in the carburetor or the fuel line. A B 2. Set the cutting deck in the neutral position. The fuel filter or fuel line is damaged. To lubricate the cutting deck spindles 1. Grease...
... cutting deck spindles. Steering controls are not locked in mow position. Refer to PTO (Power TakeOff) button on page 17. The ignition system is clogged. Problem Engine does not start. Incorrect neutral adjustment. Lubricate each cutting deck spindle 2-3 strokes. Refer to To charge the battery on page 4. Refer to your problems in the carburetor or the fuel line. A B 2. Set the cutting deck in the neutral position. The fuel filter or fuel line is damaged. To lubricate the cutting deck spindles 1. Grease...
Owner Manual
Page 26
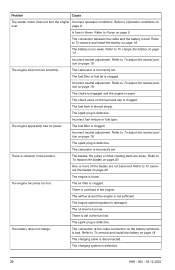
....2022 Refer to Fuses on page 18. The battery is incorrectly set . Refer to To remove and install the battery on page 5. The engine does not run smoothly. The carburetor is too weak. Incorrect neutral adjustment. The check valve on page 19. The spark plug is clogged. Incorrect fuel mixture or fuel type. The fuel filter is incorrectly set . The carburetor is clogged. The blades, the pulley or other rotating parts are not balanced...
....2022 Refer to Fuses on page 18. The battery is incorrectly set . Refer to To remove and install the battery on page 5. The engine does not run smoothly. The carburetor is too weak. Incorrect neutral adjustment. The check valve on page 19. The spark plug is clogged. Incorrect fuel mixture or fuel type. The fuel filter is incorrectly set . The carburetor is clogged. The blades, the pulley or other rotating parts are not balanced...

Owner Manual
Page 27
... cause sensitive rubber parts to Tire pressure on roads. • Stop the fuel supply of the blades do not change to lock the product during storage, add a stabilizer. The cutting result is engaged. Use tie-down points on the engine function. The parking brake is not sufficient to alkylate gasoline. Always use standard gasoline, do not engage. The transaxle leaks oil. The blades are damaged. Problem The product...
... cause sensitive rubber parts to Tire pressure on roads. • Stop the fuel supply of the blades do not change to lock the product during storage, add a stabilizer. The cutting result is engaged. Use tie-down points on the engine function. The parking brake is not sufficient to alkylate gasoline. Always use standard gasoline, do not engage. The transaxle leaks oil. The blades are damaged. Problem The product...


