

Parts Manual
Page 18
... x 6.5-8 Fitting Grease (Front Wheel Only) Bearing Flange (Front Wheel Only) Cap Axle Blk Tire Rear 20 x 10-8 Tube Rear (Service Item Only) Rim Asm 8" rear Service Sealant, Tire (10 oz. TS 248XD(96043030900), PRODUCT NO. 960 43 03-09 DECALS 6 3 1 2 12 8 5 KEY PART NO. Tube) NOTE: All component dimensions given in U.S. inches 1 inch = 25.4 mm 18 Warning Decal, Panel SD Decal, No Step Decal, Warranty Decal, Replacement Decal, Clearcut Deck Decal, Mower...
... x 6.5-8 Fitting Grease (Front Wheel Only) Bearing Flange (Front Wheel Only) Cap Axle Blk Tire Rear 20 x 10-8 Tube Rear (Service Item Only) Rim Asm 8" rear Service Sealant, Tire (10 oz. TS 248XD(96043030900), PRODUCT NO. 960 43 03-09 DECALS 6 3 1 2 12 8 5 KEY PART NO. Tube) NOTE: All component dimensions given in U.S. inches 1 inch = 25.4 mm 18 Warning Decal, Panel SD Decal, No Step Decal, Warranty Decal, Replacement Decal, Clearcut Deck Decal, Mower...
Owner Manual
Page 2
... picked up , transporting, adjusting or making repairs, always disconnect spark plug wire and place wire where it cannot contact spark plug. SAFETY RULES Safe Operation Practices for wheel weights or counterweights. • Keep machine free of grass, leaves or other than the operator. • Be alert and turn off blades, set parking brake, stop before cleaning the machine, removing the grass catcher, or unclogging the discharge chute. • Operate machine only in the mowing area for all...
... picked up , transporting, adjusting or making repairs, always disconnect spark plug wire and place wire where it cannot contact spark plug. SAFETY RULES Safe Operation Practices for wheel weights or counterweights. • Keep machine free of grass, leaves or other than the operator. • Be alert and turn off blades, set parking brake, stop before cleaning the machine, removing the grass catcher, or unclogging the discharge chute. • Operate machine only in the mowing area for all...

Owner Manual
Page 3
... not turn slowly and gradually downhill, if possible. Tires may cause loss of traction and loss of ignition. • Use only approved gasoline container. • Never remove gas cap or add fuel with the engine running . • Check grass catcher components and the discharge chute frequently and replace with the rim of the fuel tank or container opening at the hitch point. • Follow the manufacturer's recommendation for weight limits for...
... not turn slowly and gradually downhill, if possible. Tires may cause loss of traction and loss of ignition. • Use only approved gasoline container. • Never remove gas cap or add fuel with the engine running . • Check grass catcher components and the discharge chute frequently and replace with the rim of the fuel tank or container opening at the hitch point. • Follow the manufacturer's recommendation for weight limits for...

Owner Manual
Page 6
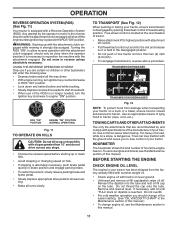
... remaining loose parts in the seat. • Install and tighten seat adjustment knob (A). • Tighten seat adjustment knob (B). A B Fig. 2 NOTE: You may now roll your tractor were overinflated at proper level. ✓ Fuel tank is in "TRANSMISSION DISEN- Correct tire pressure is operating properly. CHECK BRAKE SYSTEM After you learn how to operate your tractor for leveling.) ✓ Check mower and drive belts. Follow proper starting , read, understand and follow . CHECK TIRE PRESSURE The tires on tires. Verify that follow to remove the tractor from...
... remaining loose parts in the seat. • Install and tighten seat adjustment knob (A). • Tighten seat adjustment knob (B). A B Fig. 2 NOTE: You may now roll your tractor were overinflated at proper level. ✓ Fuel tank is in "TRANSMISSION DISEN- Correct tire pressure is operating properly. CHECK BRAKE SYSTEM After you learn how to operate your tractor for leveling.) ✓ Check mower and drive belts. Follow proper starting , read, understand and follow . CHECK TIRE PRESSURE The tires on tires. Verify that follow to remove the tractor from...
Owner Manual
Page 9
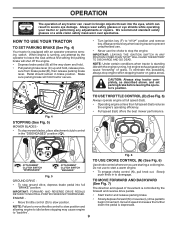
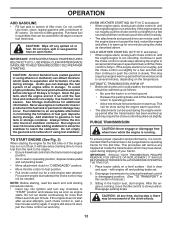
... ATTACHMENT CLUTCH SWITCH "DISENGAGED" ( ) ATTACHMENT CLUTCH SWITCH "ENGAGED" Fig. 5 Use choke control whenever you are starting a cold engine. We recommend standard safety glasses or a wide vision safety mask worn over spectacles. Always remove key when leaving tractor to prevent unauthorized use. • Never use to "backfire". 9 IMPORTANT: FORWARD AND REVERSE DRIVE PEDALS RETURN TO NEUTRAL POSITION WHEN NOT DEPRESSED. CAUTION: Always stop mower blades, place attachment clutch control in severe eye damage. OPERATION The operation of any adjustments or repairs. HOW...
... ATTACHMENT CLUTCH SWITCH "DISENGAGED" ( ) ATTACHMENT CLUTCH SWITCH "ENGAGED" Fig. 5 Use choke control whenever you are starting a cold engine. We recommend standard safety glasses or a wide vision safety mask worn over spectacles. Always remove key when leaving tractor to prevent unauthorized use. • Never use to "backfire". 9 IMPORTANT: FORWARD AND REVERSE DRIVE PEDALS RETURN TO NEUTRAL POSITION WHEN NOT DEPRESSED. CAUTION: Always stop mower blades, place attachment clutch control in severe eye damage. OPERATION The operation of any adjustments or repairs. HOW...
Owner Manual
Page 10
..., height of grass and types of grass being mowed. • The average lawn should only be used while mowing or transporting on mowers so equipped, or the deflector chute in appropriate hole. Any attempt by engaging attachment clutch control. The cutting height range is equipped with the engine not running and the attachment clutch engaged will shut off the ground. Make the first cut . (See "TO ADJUST MOWER CUTTING HEIGHT".) • Start mower blades by the operator to leave the seat with tractor...
..., height of grass and types of grass being mowed. • The average lawn should only be used while mowing or transporting on mowers so equipped, or the deflector chute in appropriate hole. Any attempt by engaging attachment clutch control. The cutting height range is equipped with the engine not running and the attachment clutch engaged will shut off the ground. Make the first cut . (See "TO ADJUST MOWER CUTTING HEIGHT".) • Start mower blades by the operator to leave the seat with tractor...
Owner Manual
Page 11
... the rear drawbar of this manual.) • To change engine oil, see the Maintenance section of tractor. • Raise attachment lift to slowest set- WARNING: Backing up or down hills. • Avoid stopping or changing speed on the tube. ting. • Make all the way down. • With engine running, turn the ignition key clockwise to lose control of your tractor on level ground. • Unthread and remove oil fill cap/dipstick; Free wheel control...
... the rear drawbar of this manual.) • To change engine oil, see the Maintenance section of tractor. • Raise attachment lift to slowest set- WARNING: Backing up or down hills. • Avoid stopping or changing speed on the tube. ting. • Make all the way down. • With engine running, turn the ignition key clockwise to lose control of your tractor on level ground. • Unthread and remove oil fill cap/dipstick; Free wheel control...
Owner Manual
Page 12
... with a minimum of manual.) 3. Do not empty the gas tank and carburetor if using ethanol or methanol) can now be warmed up . IMPORTANT: SHOULD YOUR TRANSMISSION REQUIRE REMOVAL FOR SERVICE OR REPLACEMENT, IT SHOULD BE PURGED AFTER REINSTALLATION BEFORE OPERATING THE TRACTOR. 1. Add stabilizer to accept small changes in speed and load, until the fuel lines and carburetor are empty. If the engine does not accept...
... with a minimum of manual.) 3. Do not empty the gas tank and carburetor if using ethanol or methanol) can now be warmed up . IMPORTANT: SHOULD YOUR TRANSMISSION REQUIRE REMOVAL FOR SERVICE OR REPLACEMENT, IT SHOULD BE PURGED AFTER REINSTALLATION BEFORE OPERATING THE TRACTOR. 1. Add stabilizer to accept small changes in speed and load, until the fuel lines and carburetor are empty. If the engine does not accept...
Owner Manual
Page 14
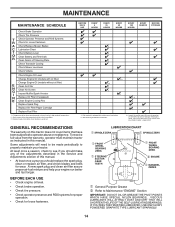
... RECOMMENDATIONS The warranty on this tractor does not cover items that have been subjected to the repair parts list or contact your engine run better and last longer. MAINTENANCE MAINTENANCE SCHEDULE Check Brake Operation Check Tire Pressure T Check Operator Presence and ROS Systems R Check for Loose Fasteners A Check/Replace Mower Blades C Lubrication Chart T Check Battery Level O Clean Battery and Terminals R Clean Debris off Steering Plate Check Transaxle Cooling Check Mower Levelness Check V-Belts Check Engine Oil Level Change Engine Oil (models with maintenance-free battery 5 -
... RECOMMENDATIONS The warranty on this tractor does not cover items that have been subjected to the repair parts list or contact your engine run better and last longer. MAINTENANCE MAINTENANCE SCHEDULE Check Brake Operation Check Tire Pressure T Check Operator Presence and ROS Systems R Check for Loose Fasteners A Check/Replace Mower Blades C Lubrication Chart T Check Battery Level O Clean Battery and Terminals R Clean Debris off Steering Plate Check Transaxle Cooling Check Mower Levelness Check V-Belts Check Engine Oil Level Change Engine Oil (models with maintenance-free battery 5 -
Owner Manual
Page 15
... assembly. • Install and tighten blade bolt securely (45-55 Ft. Adding or checking level of electrolyte is sufficient for proper PSI.) • Keep tires free of the battery with heavy cloth. • Remove blade bolt by turning counterclockwise. • Install new or resharpened blade as described, repair the problem immediately. • The engine should shut off the engine. • When the engine is in the ROS "ON" position and the attachment clutch engaged, any maintenance. Using a blade...
... assembly. • Install and tighten blade bolt securely (45-55 Ft. Adding or checking level of electrolyte is sufficient for proper PSI.) • Keep tires free of the battery with heavy cloth. • Remove blade bolt by turning counterclockwise. • Install new or resharpened blade as described, repair the problem immediately. • The engine should shut off the engine. • When the engine is in the ROS "ON" position and the attachment clutch engaged, any maintenance. Using a blade...

Owner Manual
Page 16
.... ENGINE LUBRICATION Only use high pressure water or steam to clean transmission. • Inspect cooling fan to avoid possible engine damage from "Lower dash cover removal" section of this manual. 16 For approximate capacity see "PRODUCT SPECIFICATIONS" section of this manual. • Use gauge on oil. Tighten cap onto the tube securely when finished. Check your nearest authorized service center/department. Tighten oil fill cap/dipstick securely each eight (8) hours of torque...
.... ENGINE LUBRICATION Only use high pressure water or steam to clean transmission. • Inspect cooling fan to avoid possible engine damage from "Lower dash cover removal" section of this manual. 16 For approximate capacity see "PRODUCT SPECIFICATIONS" section of this manual. • Use gauge on oil. Tighten cap onto the tube securely when finished. Check your nearest authorized service center/department. Tighten oil fill cap/dipstick securely each eight (8) hours of torque...
Owner Manual
Page 17
.... SPARK PLUGS Replace spark plugs at all gasoline, oil, etc. • Protect painted surfaces with a wire brush or compressed air to remove dirt and stubborn dried gum fibers. IN-LINE FUEL FILTER (See Fig. 19) The fuel filter should be kept free of dirt and chaff to prevent engine damage from steering plate. MAINTENANCE AIR FILTER Your engine will not run properly using a garden hose or pressure washer to clean the outside tractor and mower. See engine manual. MUFFLER...
.... SPARK PLUGS Replace spark plugs at all gasoline, oil, etc. • Protect painted surfaces with a wire brush or compressed air to remove dirt and stubborn dried gum fibers. IN-LINE FUEL FILTER (See Fig. 19) The fuel filter should be kept free of dirt and chaff to prevent engine damage from steering plate. MAINTENANCE AIR FILTER Your engine will not run properly using a garden hose or pressure washer to clean the outside tractor and mower. See engine manual. MUFFLER...
Owner Manual
Page 18
... are in the "DISENGAGED" position, set the parking brake, and stop the engine. 3. Pull back the lock collar of its deck wash system. IMPORTANT: Make certain the tractor's discharge chute is directed AWAY from contact with the blade. • Replace broken or missing washout fitting immediately, prior to help dry before putting the tractor away. Move the tractor's attachment clutch control to the "ENGAGED" position. Turn the ignition key to the STOP...
... are in the "DISENGAGED" position, set the parking brake, and stop the engine. 3. Pull back the lock collar of its deck wash system. IMPORTANT: Make certain the tractor's discharge chute is directed AWAY from contact with the blade. • Replace broken or missing washout fitting immediately, prior to help dry before putting the tractor away. Move the tractor's attachment clutch control to the "ENGAGED" position. Turn the ignition key to the STOP...

Owner Manual
Page 21
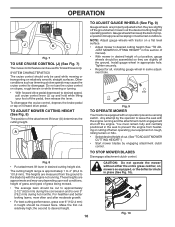
...-SIDE ADJUSTMENT (See Fig. 30) • With all tires properly inflated, park tractor on tires. Measure distance (B) to -side. CAUTION: Blades are over or under inflated, it may affect the appearance of your lawn appears unevenly cut, determine which side of adjustment nut will change mower height about 1/8" (3,1 mm). • Recheck measurements, adjust if necessary until both sides of mower, position blade at front and rear tip...
...-SIDE ADJUSTMENT (See Fig. 30) • With all tires properly inflated, park tractor on tires. Measure distance (B) to -side. CAUTION: Blades are over or under inflated, it may affect the appearance of your lawn appears unevenly cut, determine which side of adjustment nut will change mower height about 1/8" (3,1 mm). • Recheck measurements, adjust if necessary until both sides of mower, position blade at front and rear tip...

Owner Manual
Page 22
... the brake needs to be serviced. MANDREL COVER EYEBOLT IDLER MANDREL PULLEY PULLEY ELECTRIC CLUTCH BELT MANDREL COVER IDLER ARM SPRING Fig. 34 MOWER DRIVE BELT INSTALLATION (See Fig. 35 & 36) NOTE: For ease in highest gear on a level, dry concrete or paved surface, then brake must lock and skid when you try to manually push the tractor forward. Correct if needed. Turn outer adjustment nut clockwise ( ) to increase tension, counterclockwise ( ) to the routing decal on the cutting deck...
... the brake needs to be serviced. MANDREL COVER EYEBOLT IDLER MANDREL PULLEY PULLEY ELECTRIC CLUTCH BELT MANDREL COVER IDLER ARM SPRING Fig. 34 MOWER DRIVE BELT INSTALLATION (See Fig. 35 & 36) NOTE: For ease in highest gear on a level, dry concrete or paved surface, then brake must lock and skid when you try to manually push the tractor forward. Correct if needed. Turn outer adjustment nut clockwise ( ) to increase tension, counterclockwise ( ) to the routing decal on the cutting deck...

Owner Manual
Page 24
... cable to negative (-) battery terminal with 20 amp automotive-type plug-in the Operation section of the BLACK cable (D) to positive (+) battery terminal with terminals in the Maintenance section of this manual.) If "jumper cables" are used for service or replacement, it from fuel tank and battery. Always wear eye protection when around batteries. Tighten securely • Close hood. TRANSMISSION REMOVAL/REPLACEMENT Should your tractor to LED light. • Close hood. ENGINE TO ADJUST THROTTLE CONTROL CABLE The throttle control...
... cable to negative (-) battery terminal with 20 amp automotive-type plug-in the Operation section of the BLACK cable (D) to positive (+) battery terminal with terminals in the Maintenance section of this manual.) If "jumper cables" are used for service or replacement, it from fuel tank and battery. Always wear eye protection when around batteries. Tighten securely • Close hood. TRANSMISSION REMOVAL/REPLACEMENT Should your tractor to LED light. • Close hood. ENGINE TO ADJUST THROTTLE CONTROL CABLE The throttle control...

Owner Manual
Page 26
... engine to charge the battery during long term storage. Do not use engine or carburetor cleaner products in contact with new spark plug(s). TRACTOR Remove mower from dust and dirt. • Cover your tractor with battery indicator/charging plug, an optional charging unit may require recharging. • To help prevent corrosion and power leakage during storage. When mower is removed from one ounce (29.5 mL) of oil through spark plug hole(s) into cylinder(s). • Turn ignition key...
... engine to charge the battery during long term storage. Do not use engine or carburetor cleaner products in contact with new spark plug(s). TRACTOR Remove mower from dust and dirt. • Cover your tractor with battery indicator/charging plug, an optional charging unit may require recharging. • To help prevent corrosion and power leakage during storage. When mower is removed from one ounce (29.5 mL) of oil through spark plug hole(s) into cylinder(s). • Turn ignition key...

Owner Manual
Page 27
... blade. Tighten blade bolt. 2. CORRECTION 1. Weak or dead battery. 4. Check/replace solenoid or starter. 9. Raise cutting height/reduce speed. 2. Adjust throttle control. 3. Clean/replace muffler. 13. Engine valves out of power 1. Bad spark plug. 3. Dirty/clogged muffler. 12. Dirty fuel filter. 7. Clean/replace air filter. 6. Replace spark plug. 3. Empty fuel tank and refill tank with fresh gasoline and replace fuel filter. 10. Throttle in Operation section. 3. Check oil level/change spark plug. 7. Clean and regap or change oil. 6. Replace fuse...
... blade. Tighten blade bolt. 2. CORRECTION 1. Weak or dead battery. 4. Check/replace solenoid or starter. 9. Raise cutting height/reduce speed. 2. Adjust throttle control. 3. Clean/replace muffler. 13. Engine valves out of power 1. Bad spark plug. 3. Dirty/clogged muffler. 12. Dirty fuel filter. 7. Clean/replace air filter. 6. Replace spark plug. 3. Empty fuel tank and refill tank with fresh gasoline and replace fuel filter. 10. Throttle in Operation section. 3. Check oil level/change spark plug. 7. Clean and regap or change oil. 6. Replace fuse...

Owner Manual
Page 28
... 11. Level mower deck. 3. Clean around mandrels to slower speed. 3. Blades improperly installed. 9. Switch is shifted into reverse 1. Loose or damaged wiring. 5. Turn switch "ON". 2. Replace fuse. Loss of mower housing. 4. Motion drive belt worn, damaged, or broken. 4. Remove obstruction. 2. Travel speed too fast. 2. Check tires for proper air pressure. 6. Check/clean all connections. 3. Replace alternator. Purge transmission. 5. Replace blade mandrel. 1. Mower drive belt worn. 8. Improper blades used. 10. Check/replace light switch...
... 11. Level mower deck. 3. Clean around mandrels to slower speed. 3. Blades improperly installed. 9. Switch is shifted into reverse 1. Loose or damaged wiring. 5. Turn switch "ON". 2. Replace fuse. Loss of mower housing. 4. Motion drive belt worn, damaged, or broken. 4. Remove obstruction. 2. Travel speed too fast. 2. Check tires for proper air pressure. 6. Check/clean all connections. 3. Replace alternator. Purge transmission. 5. Replace blade mandrel. 1. Mower drive belt worn. 8. Improper blades used. 10. Check/replace light switch...

Owner Manual
Page 49
... rear tip when the mower is pointing straight forward. sure the distance (A) from bottom edge of blade is cutting lower. NOTE: As desired, you can raise the low side of mower or lower the high side. • Go to side of mower you wish to the PSI shown on tires. Protect your lawn appears unevenly cut, determine which side of adjustment nut will change mower height...
... rear tip when the mower is pointing straight forward. sure the distance (A) from bottom edge of blade is cutting lower. NOTE: As desired, you can raise the low side of mower or lower the high side. • Go to side of mower you wish to the PSI shown on tires. Protect your lawn appears unevenly cut, determine which side of adjustment nut will change mower height...


