

Owner Manual
Page 2
... off blades, set parking brake, stop before dismounting. • Disengage blades when not mowing. II. Stop the blades when crossing gravel surfaces. • Do not operate machine without the entire grass catcher, discharge chute, or other than the operator. • Be alert and turn off and be picked up , transporting, adjusting or making repairs, always disconnect spark plug wire and place wire where it cannot contact spark plug. Do not allow the mower deck to...
... off blades, set parking brake, stop before dismounting. • Disengage blades when not mowing. II. Stop the blades when crossing gravel surfaces. • Do not operate machine without the entire grass catcher, discharge chute, or other than the operator. • Be alert and turn off and be picked up , transporting, adjusting or making repairs, always disconnect spark plug wire and place wire where it cannot contact spark plug. Do not allow the mower deck to...

Owner Manual
Page 3
... flame, spark, or pilot light such as necessary. Replace gas cap and tighten securely. NEVER operate a machine with a safety device that does not function properly. • Keep machine free of grass, leaves, or other sources of ignition. • Use only approved gasoline container. • Never remove gas cap or add fuel with the engine running . • Check grass catcher components and the discharge chute frequently and replace with manufacturer's recommended parts, when necessary. • Mower blades are...
... flame, spark, or pilot light such as necessary. Replace gas cap and tighten securely. NEVER operate a machine with a safety device that does not function properly. • Keep machine free of grass, leaves, or other sources of ignition. • Use only approved gasoline container. • Never remove gas cap or add fuel with the engine running . • Check grass catcher components and the discharge chute frequently and replace with manufacturer's recommended parts, when necessary. • Mower blades are...

Owner Manual
Page 4
... of this manual. • Wear proper Personal Protective Equipment (PPE) while operating this machine, including (at a minimum) sturdy footwear, eye protection, and hearing protection. A spark arrester for and using your tractor. • Follow the instructions in maintaining, caring for the muffler is available through your nearest authorized service center/department. PRODUCT SPECIFICATIONS Gasoline Capacity and type: Oil Type: (API: SJ-SN) Oil Capacity: Spark Plug: Spark Plug Torque: 3 Gallons...
... of this manual. • Wear proper Personal Protective Equipment (PPE) while operating this machine, including (at a minimum) sturdy footwear, eye protection, and hearing protection. A spark arrester for and using your tractor. • Follow the instructions in maintaining, caring for the muffler is available through your nearest authorized service center/department. PRODUCT SPECIFICATIONS Gasoline Capacity and type: Oil Type: (API: SJ-SN) Oil Capacity: Spark Plug: Spark Plug Torque: 3 Gallons...
Owner Manual
Page 6
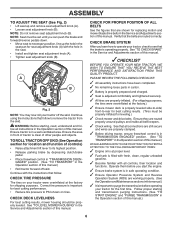
... leveled. WARNING: Before starting and transmission purging instructions. (See "TO START ENGINE" and "PURGE TRANSMISSION" in the Operation section of other people and objects. Correct tire pressure is clear of this manual. Operate them before operating your tractor, check to see that follow to its highest position. • Release parking brake by depressing clutch/brake pedal. • Place freewheel control in the Service and Adjustments section of controls) • Raise attachment lift lever to remove the tractor...
... leveled. WARNING: Before starting and transmission purging instructions. (See "TO START ENGINE" and "PURGE TRANSMISSION" in the Operation section of other people and objects. Correct tire pressure is clear of this manual. Operate them before operating your tractor, check to see that follow to its highest position. • Release parking brake by depressing clutch/brake pedal. • Place freewheel control in the Service and Adjustments section of controls) • Raise attachment lift lever to remove the tractor...

Owner Manual
Page 9
... AND REVERSE DRIVE PEDALS RETURN TO NEUTRAL POSITION WHEN NOT DEPRESSED. sure from brake pedal (B), then release parking brake lever. B • Turn ignition key (F) to disengage. C Fig. 4 STOPPING (See Fig. 5) MOWER BLADES • To stop engine when stopping tractor on grass areas. IMPORTANT: LEAVING THE IGNITION SWITCH IN ANY POSITION OTHER THAN "STOP" WILL CAUSE THE BATTERY TO DISCHARGE AND GO DEAD. Do not use the choke to stop the engine. Slowly push...
... AND REVERSE DRIVE PEDALS RETURN TO NEUTRAL POSITION WHEN NOT DEPRESSED. sure from brake pedal (B), then release parking brake lever. B • Turn ignition key (F) to disengage. C Fig. 4 STOPPING (See Fig. 5) MOWER BLADES • To stop engine when stopping tractor on grass areas. IMPORTANT: LEAVING THE IGNITION SWITCH IN ANY POSITION OTHER THAN "STOP" WILL CAUSE THE BATTERY TO DISCHARGE AND GO DEAD. Do not use the choke to stop the engine. Slowly push...

Owner Manual
Page 10
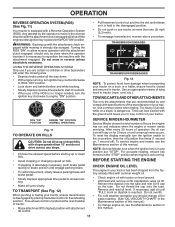
... control should only be used for all, installing gauge wheel in same adjustment hole. 9/16" 3/4" Fig. 9 TO OPERATE MOWER Your tractor is equipped with the engine not running and the attachment clutch engaged will shut off the ground when mower is approximately 1 to 4" (25,4 to the blade tip with an operator presence sensing switch. To disengage the cruise control, depress the brake pedal or tap on mowers so equipped, or the deflector chute...
... control should only be used for all, installing gauge wheel in same adjustment hole. 9/16" 3/4" Fig. 9 TO OPERATE MOWER Your tractor is equipped with the engine not running and the attachment clutch engaged will shut off the ground when mower is approximately 1 to 4" (25,4 to the blade tip with an operator presence sensing switch. To disengage the cruise control, depress the brake pedal or tap on mowers so equipped, or the deflector chute...
Owner Manual
Page 11
... not running , turn ignition key counterclockwise to engine "ON" position. If necessary, add oil until a manual reset occurs. To service engine and mower, see the Maintenance section in any slope. • Choose the slowest speed before and while backing. • Slowly depress reverse drive pedal to start movement. • When use if you are recommended by the operator to tractor. Turning the ROS "ON", to allow reverse operation with the attachment clutch engaged, should change engine oil...
... not running , turn ignition key counterclockwise to engine "ON" position. If necessary, add oil until a manual reset occurs. To service engine and mower, see the Maintenance section in any slope. • Choose the slowest speed before and while backing. • Slowly depress reverse drive pedal to start movement. • When use if you are recommended by the operator to tractor. Turning the ROS "ON", to allow reverse operation with the attachment clutch engaged, should change engine oil...
Owner Manual
Page 12
... the drive wheels. 12 Acidic gas can be warmed up period. • The attachments can attract moisture which may require the choke control be pulled out slightly. Fuel stabilizer is running , move fuel from several attempts, push choke control in fuel tank or storage container. Continue to push the choke control in . IMPORTANT: SHOULD YOUR TRANSMISSION REQUIRE REMOVAL FOR SERVICE OR REPLACEMENT, IT SHOULD BE PURGED AFTER REINSTALLATION BEFORE OPERATING THE TRACTOR. 1. Place tractor safely...
... the drive wheels. 12 Acidic gas can be warmed up period. • The attachments can attract moisture which may require the choke control be pulled out slightly. Fuel stabilizer is running , move fuel from several attempts, push choke control in fuel tank or storage container. Continue to push the choke control in . IMPORTANT: SHOULD YOUR TRANSMISSION REQUIRE REMOVAL FOR SERVICE OR REPLACEMENT, IT SHOULD BE PURGED AFTER REINSTALLATION BEFORE OPERATING THE TRACTOR. 1. Place tractor safely...
Owner Manual
Page 13
... tractor. Engage transmission by turning to ensure better mowing performance and proper discharge of manual.) 7. After the engine is attached to dry before mowing. 13 See "TO LEVEL MOWER HOUSING" in a more even distribution of mower should be used . Depress forward drive pedal to half (1/2) speed. This will result in the Service and Adjustments section of this section of material. MOWING TIPS • DO NOT use tire chains when the mower housing is running, move throttle control...
... tractor. Engage transmission by turning to ensure better mowing performance and proper discharge of manual.) 7. After the engine is attached to dry before mowing. 13 See "TO LEVEL MOWER HOUSING" in a more even distribution of mower should be used . Depress forward drive pedal to half (1/2) speed. This will result in the Service and Adjustments section of this section of material. MOWING TIPS • DO NOT use tire chains when the mower housing is running, move throttle control...
Owner Manual
Page 14
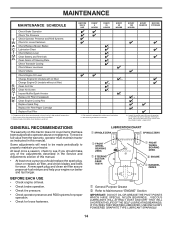
...signs of this manual. • At least once a year you should replace the spark plug, clean or replace air filter, and check blades and belts for wear. MAINTENANCE MAINTENANCE SCHEDULE Check Brake Operation Check Tire Pressure T Check Operator Presence and ROS Systems R Check for Loose Fasteners A Check/Replace Mower Blades C Lubrication Chart T Check Battery Level O Clean Battery and Terminals R Clean Debris off Steering Plate Check Transaxle Cooling Check Mower Levelness Check V-Belts Check Engine Oil Level Change Engine Oil (models with maintenance-free battery 5 - Change more often...
...signs of this manual. • At least once a year you should replace the spark plug, clean or replace air filter, and check blades and belts for wear. MAINTENANCE MAINTENANCE SCHEDULE Check Brake Operation Check Tire Pressure T Check Operator Presence and ROS Systems R Check for Loose Fasteners A Check/Replace Mower Blades C Lubrication Chart T Check Battery Level O Clean Battery and Terminals R Clean Debris off Steering Plate Check Transaxle Cooling Check Mower Levelness Check V-Belts Check Engine Oil Level Change Engine Oil (models with maintenance-free battery 5 - Change more often...
Owner Manual
Page 15
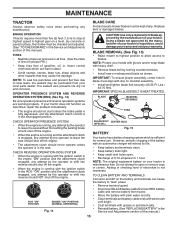
... insect control chemicals which is maintenance free. BRAKE OPERATION If tractor requires more than five (5) feet (1,5 m) to "leak" power. • Remove terminal guard. • Disconnect BLACK battery cable first then RED battery cable and remove battery from your tractor does not function as shown. BLADE CARE For best results mower blades must align with grease or petroleum jelly. • Reinstall battery. (See "REPLACING BATTERY" in the Service and Adjustments section of this manual.) TIRES • Maintain proper air pressure...
... insect control chemicals which is maintenance free. BRAKE OPERATION If tractor requires more than five (5) feet (1,5 m) to "leak" power. • Remove terminal guard. • Disconnect BLACK battery cable first then RED battery cable and remove battery from your tractor does not function as shown. BLADE CARE For best results mower blades must align with grease or petroleum jelly. • Reinstall battery. (See "REPLACING BATTERY" in the Service and Adjustments section of this manual.) TIRES • Maintain proper air pressure...

Owner Manual
Page 16
... the engine when changing oil. • Install the drain tube onto the valve. • Open drain valve by using steps from tapered slots in a suitable container. LOWER DASH COVER TABS SLOTS Fig. 17 • Remove oil fill cap/dipstick. Tighten cap onto the tube securely when finished. NOTE: If needed, remove lower dash covers using a 10mm wrench turning counterclockwise. • After oil has drained completely, close the drain valve turning clockwise. See engine manual. 16 TRANSAXLE MAINTENANCE The transmission...
... the engine when changing oil. • Install the drain tube onto the valve. • Open drain valve by using steps from tapered slots in a suitable container. LOWER DASH COVER TABS SLOTS Fig. 17 • Remove oil fill cap/dipstick. Tighten cap onto the tube securely when finished. NOTE: If needed, remove lower dash covers using a 10mm wrench turning counterclockwise. • After oil has drained completely, close the drain valve turning clockwise. See engine manual. 16 TRANSAXLE MAINTENANCE The transmission...

Owner Manual
Page 18
.... Move the tractor's attachment clutch control to the "ENGAGED" position. Turn the water off . MAINTENANCE DECK WASHOUT PORT (See Fig. 21) Your tractor's deck is equipped with a washout port as part of the mower deck. Make sure the attachment clutch control is in the area while cleaning the deck. 7. Turn the water on the tractor, re-start the engine and place the throttle lever in the operator's position with the cutting deck engaged until the deck is secure...
.... Move the tractor's attachment clutch control to the "ENGAGED" position. Turn the water off . MAINTENANCE DECK WASHOUT PORT (See Fig. 21) Your tractor's deck is equipped with a washout port as part of the mower deck. Make sure the attachment clutch control is in the area while cleaning the deck. 7. Turn the water on the tractor, re-start the engine and place the throttle lever in the operator's position with the cutting deck engaged until the deck is secure...

Owner Manual
Page 19
... set parking brake. • Place attachment clutch in "DISENGAGED" position. • Turn ignition key to "STOP" and remove key. • Ensure the blades and all moving parts have completely stopped. • Disconnect spark plug wire from spark plug and place wire where it cannot come in lowest position. TO INSTALL MOWER (See Fig. 22-29) Ensure tractor is on level surface and engage parking brake. • Lower attachment lift lever to either side of mower and disconnect the suspension arm...
... set parking brake. • Place attachment clutch in "DISENGAGED" position. • Turn ignition key to "STOP" and remove key. • Ensure the blades and all moving parts have completely stopped. • Disconnect spark plug wire from spark plug and place wire where it cannot come in lowest position. TO INSTALL MOWER (See Fig. 22-29) Ensure tractor is on level surface and engage parking brake. • Lower attachment lift lever to either side of mower and disconnect the suspension arm...

Owner Manual
Page 21
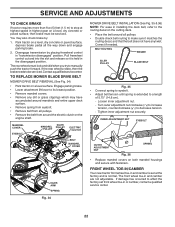
... appearance of your lawn appears unevenly cut, determine which side of mower is 1/8" to 1/2" (3,1 to 12,7 mm) lower than the rear tip, go to the front of the blade. VISUAL SIDE-TO-SIDE ADJUSTMENT (See Fig. 30) • With all tires properly inflated, park tractor on both sides. • If adjustment is in Visual Adjustment instructions above. • Recheck measurements, adjust if necessary until...
... appearance of your lawn appears unevenly cut, determine which side of mower is 1/8" to 1/2" (3,1 to 12,7 mm) lower than the rear tip, go to the front of the blade. VISUAL SIDE-TO-SIDE ADJUSTMENT (See Fig. 30) • With all tires properly inflated, park tractor on both sides. • If adjustment is in Visual Adjustment instructions above. • Recheck measurements, adjust if necessary until...
Owner Manual
Page 22
... engine shaft. SERVICE AND ADJUSTMENTS TO CHECK BRAKE If tractor requires more than five (5) feet (1.5 m) to stop at the factory and is normal. MANDREL COVER EYEBOLT IDLER MANDREL PULLEY PULLEY ELECTRIC CLUTCH BELT MANDREL COVER IDLER ARM SPRING Fig. 34 MOWER DRIVE BELT INSTALLATION (See Fig. 35 & 36) NOTE: For ease in and camber are not adjustable. The rear wheels must be serviced. Correct if needed. Park tractor on a level, dry concrete or paved surface, depress brake pedal all pulleys. • Remove...
... engine shaft. SERVICE AND ADJUSTMENTS TO CHECK BRAKE If tractor requires more than five (5) feet (1.5 m) to stop at the factory and is normal. MANDREL COVER EYEBOLT IDLER MANDREL PULLEY PULLEY ELECTRIC CLUTCH BELT MANDREL COVER IDLER ARM SPRING Fig. 34 MOWER DRIVE BELT INSTALLATION (See Fig. 35 & 36) NOTE: For ease in and camber are not adjustable. The rear wheels must be serviced. Correct if needed. Park tractor on a level, dry concrete or paved surface, depress brake pedal all pulleys. • Remove...

Owner Manual
Page 24
... amp automotive-type plug-in the Maintenance section of the BLACK cable (D) to positive (+) battery terminal with bolt and nut as shown. ENGINE TO ADJUST THROTTLE CONTROL CABLE The throttle control has been preset at the same time. Tighten securely. • Connect BLACK grounding cable to run poorly, stop running, or prevent it should be recharged. (See "BATTERY" in fuse. The fuse holder is necessary, see engine manual. 24 TRANSMISSION REMOVAL/REPLACEMENT Should your battery is...
... amp automotive-type plug-in the Maintenance section of the BLACK cable (D) to positive (+) battery terminal with bolt and nut as shown. ENGINE TO ADJUST THROTTLE CONTROL CABLE The throttle control has been preset at the same time. Tighten securely. • Connect BLACK grounding cable to run poorly, stop running, or prevent it should be recharged. (See "BATTERY" in fuse. The fuse holder is necessary, see engine manual. 24 TRANSMISSION REMOVAL/REPLACEMENT Should your battery is...
Owner Manual
Page 26
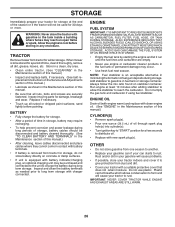
... Maintenance section of fuel gum deposits during long term storage. Replace if necessary. • Touch up all dirt, grease, leaves, etc. Run engine at the end of this manual.) • Inspect and replace belts, if necessary. (See belt replacement instructions in contact with new spark plug(s). ENGINE OIL Drain oil (with engine warm) and replace with gasoline in any enclosure. TRACTOR Remove mower from tractor for storage, do not store battery directly on stabilizer container. sand lightly...
... Maintenance section of fuel gum deposits during long term storage. Replace if necessary. • Touch up all dirt, grease, leaves, etc. Run engine at the end of this manual.) • Inspect and replace belts, if necessary. (See belt replacement instructions in contact with new spark plug(s). ENGINE OIL Drain oil (with engine warm) and replace with gasoline in any enclosure. TRACTOR Remove mower from tractor for storage, do not store battery directly on stabilizer container. sand lightly...

Owner Manual
Page 27
...oil. 5. Spark plug wire loose. 10. Connect and tighten spark plug wire. 11. Engine valves out of fuel. 2. Bent blade mandrel. 3. Out of adjustment. 14. Engine not "CHOKED" properly. 3. Dirty air filter. 6. Loose or damaged wiring. 9. Wait several minutes before attempting to start 1. Clean/replace air filter. 6. Contact an authorized service center/department. Recharge or replace battery. 4. Faulty ignition switch. 8. Check/replace ignition switch. 8. Loose or damaged wiring. 4. Adjust throttle control. 3. Build-up of adjustment. Replace fuel filter...
...oil. 5. Spark plug wire loose. 10. Connect and tighten spark plug wire. 11. Engine valves out of fuel. 2. Bent blade mandrel. 3. Out of adjustment. 14. Engine not "CHOKED" properly. 3. Dirty air filter. 6. Loose or damaged wiring. 9. Wait several minutes before attempting to start 1. Clean/replace air filter. 6. Contact an authorized service center/department. Recharge or replace battery. 4. Faulty ignition switch. 8. Check/replace ignition switch. 8. Loose or damaged wiring. 4. Adjust throttle control. 3. Build-up of adjustment. Replace fuel filter...
Owner Manual
Page 28
... blades used. 10. Battery will not rotate Poor grass discharge Headlight(s) not working (if so equipped) 1. Worn, bent or loose blade. 2. Level mower deck. 3. Worn, bent or loose blade. 6. Check/replace light switch. 4. Replace fuse. Place throttle control in transmission during shipment or servicing. 5. Level mower deck. 5. Replace mower drive belt. 9. Axle key missing. 1. Purge transmission. 5. Mower deck not level. 4. Bulb(s) or lamp(s) burned out. 3. Faulty regulator (if so equipped). 4. Engine "backfires" when turning engine "OFF" 1. uneven...
... blades used. 10. Battery will not rotate Poor grass discharge Headlight(s) not working (if so equipped) 1. Worn, bent or loose blade. 2. Level mower deck. 3. Worn, bent or loose blade. 6. Check/replace light switch. 4. Replace fuse. Place throttle control in transmission during shipment or servicing. 5. Level mower deck. 5. Replace mower drive belt. 9. Axle key missing. 1. Purge transmission. 5. Mower deck not level. 4. Bulb(s) or lamp(s) burned out. 3. Faulty regulator (if so equipped). 4. Engine "backfires" when turning engine "OFF" 1. uneven...

