
Owner Manual
Page 2
... grass catcher, or unclogging the discharge chute. • Operate machine only in daylight or good artificial light. • Do not operate the machine while under the machine. Shut off blades, set parking brake, and stop before operating a riding lawn mower. CHILDREN CAN BE SERIOUSLY INJURED OR KILLED BY THIS EQUIPMENT. Manually lock ignition switch. (See "MANUALLY LOCKING THE SmartSwitch™ IGNITION" in the mowing area for Ride-On Mowers DANGER: THIS CUTTING...
... grass catcher, or unclogging the discharge chute. • Operate machine only in daylight or good artificial light. • Do not operate the machine while under the machine. Shut off blades, set parking brake, and stop before operating a riding lawn mower. CHILDREN CAN BE SERIOUSLY INJURED OR KILLED BY THIS EQUIPMENT. Manually lock ignition switch. (See "MANUALLY LOCKING THE SmartSwitch™ IGNITION" in the mowing area for Ride-On Mowers DANGER: THIS CUTTING...
Owner Manual
Page 3
... not exceed the maximum recommended operation angle of grass, leaves, or other hidden ob- Replace gas cap and tighten securely. Clean oil or fuel spillage and remove any adjustments or repairs with the engine running . • Allow engine to cool before restarting. • Never make sudden changes in speed or direction, which can affect the stability of control and tip-over fill fuel tank. Repair, if necessary, before storing...
... not exceed the maximum recommended operation angle of grass, leaves, or other hidden ob- Replace gas cap and tighten securely. Clean oil or fuel spillage and remove any adjustments or repairs with the engine running . • Allow engine to cool before restarting. • Never make sudden changes in speed or direction, which can affect the stability of control and tip-over fill fuel tank. Repair, if necessary, before storing...
Owner Manual
Page 4
... @3600 RPM Amp/Hr: Min. Federal laws apply on your tractor. • Follow the instructions under "Maintenance" and "Stor- PRODUCT SPECIFICATIONS Gasoline Capacity and type: Oil Type: (API: SJ-SN) Oil Capacity: Spark Plug: Spark Plug Torque: Charging System: Battery: Blade Bolt Torque: 3 Gallons (11,35 L) Unleaded Regular SAE 10W30 (above is equipped with an internal combustion engine and should be used , it should not be maintained in shorts and/or, open...
... @3600 RPM Amp/Hr: Min. Federal laws apply on your tractor. • Follow the instructions under "Maintenance" and "Stor- PRODUCT SPECIFICATIONS Gasoline Capacity and type: Oil Type: (API: SJ-SN) Oil Capacity: Spark Plug: Spark Plug Torque: Charging System: Battery: Blade Bolt Torque: 3 Gallons (11,35 L) Unleaded Regular SAE 10W30 (above is equipped with an internal combustion engine and should be used , it should not be maintained in shorts and/or, open...

Owner Manual
Page 5
... sizes are listed. (1) 1/2" wrench Tire pressure gauge (2) 7/16" wrenches Utility knife Pliers When right or left unassembled for shipping purposes. TERMINAL COVER NUT LABEL TERMINAL CAP UNPACK CARTON • Remove all accessible loose parts and parts cartons from accidental grounding. TO REMOVE TRACTOR FROM CARTON • First connect RED battery cable to contact both terminals at 6-10 amps. (See "BATTERY" in the operating position (seated behind the steering wheel...
... sizes are listed. (1) 1/2" wrench Tire pressure gauge (2) 7/16" wrenches Utility knife Pliers When right or left unassembled for shipping purposes. TERMINAL COVER NUT LABEL TERMINAL CAP UNPACK CARTON • Remove all accessible loose parts and parts cartons from accidental grounding. TO REMOVE TRACTOR FROM CARTON • First connect RED battery cable to contact both terminals at 6-10 amps. (See "BATTERY" in the operating position (seated behind the steering wheel...
Owner Manual
Page 6
... pulleys and inside all controls, their location and functions. CHECK DECK LEVELNESS For best cutting results, mower housing should be properly in the Operation section of this manual. TO ROLL TRACTOR OFF SKID (See Operation section for leveling.) ✓ Check mower and drive belts. CHECK TIRE PRESSURE The tires on tires. PLEASE REVIEW THE FOLLOWING CHECKLIST: ✓ All assembly instructions have been completed. ✓ No remaining loose parts in carton. ✓ Battery is properly prepared and charged. ✓ Seat is in "TRANSMISSION ENGAGED...
... pulleys and inside all controls, their location and functions. CHECK DECK LEVELNESS For best cutting results, mower housing should be properly in the Operation section of this manual. TO ROLL TRACTOR OFF SKID (See Operation section for leveling.) ✓ Check mower and drive belts. CHECK TIRE PRESSURE The tires on tires. PLEASE REVIEW THE FOLLOWING CHECKLIST: ✓ All assembly instructions have been completed. ✓ No remaining loose parts in carton. ✓ Battery is properly prepared and charged. ✓ Seat is in "TRANSMISSION ENGAGED...

Owner Manual
Page 9
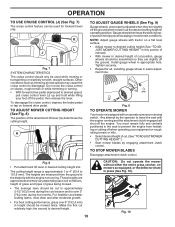
... full "BRAKE" position. D F ( ) ATTACHMENT CLUTCH LEVER "DISENGAGED" ( ) ATTACHMENT CLUTCH LEVER "ENGAGED" Fig. 5 GROUND DRIVE - • To stop mower blades, place attachment clutch control in brake position. ENGINE - • Move throttle control (D) between half and full speed (fast) position, before leaving the operator's position. Fig. 6 TO MOVE FORWARD AND BACKWARD (See Fig. 7) The direction and speed of grass. Always wear safety glasses or eye shields while operating your tractor or performing any adjustments or repairs. We recommend standard safety glasses...
... full "BRAKE" position. D F ( ) ATTACHMENT CLUTCH LEVER "DISENGAGED" ( ) ATTACHMENT CLUTCH LEVER "ENGAGED" Fig. 5 GROUND DRIVE - • To stop mower blades, place attachment clutch control in brake position. ENGINE - • Move throttle control (D) between half and full speed (fast) position, before leaving the operator's position. Fig. 6 TO MOVE FORWARD AND BACKWARD (See Fig. 7) The direction and speed of grass. Always wear safety glasses or eye shields while operating your tractor or performing any adjustments or repairs. We recommend standard safety glasses...
Owner Manual
Page 10
... the cutting height. TO ADJUST MOWER CUTTING HEIGHT (See Fig. 8) The position of grass being mowed. • The average lawn should be cut relatively high; The heights are slightly off when operating your foot off the ground when mower is equipped with the engine not running and the attachment clutch engaged will shut off the engine. JUST MOWER CUTTING HEIGHT" in this section of cut. (See "TO ADJUST MOWER CUTTING HEIGHT".) • Start mower blades by the operator to leave the seat with tractor...
... the cutting height. TO ADJUST MOWER CUTTING HEIGHT (See Fig. 8) The position of grass being mowed. • The average lawn should be cut relatively high; The heights are slightly off when operating your foot off the ground when mower is equipped with the engine not running and the attachment clutch engaged will shut off the engine. JUST MOWER CUTTING HEIGHT" in this section of cut. (See "TO ADJUST MOWER CUTTING HEIGHT".) • Start mower blades by the operator to leave the seat with tractor...

Owner Manual
Page 11
... engine unless ignition key is absolutely necessary, push brake pedal quickly to brake position and engage parking brake. • To restart movement, slowly release parking brake and brake pedal. • Slowly depress appropriate drive pedal to engine "ON" position. ting. • Make all the way down. • With engine running . 11 To service engine and mower, see the Maintenance section of tying hood to allow reverse operation with the attachment clutch engaged will enter the mowing...
... engine unless ignition key is absolutely necessary, push brake pedal quickly to brake position and engage parking brake. • To restart movement, slowly release parking brake and brake pedal. • Slowly depress appropriate drive pedal to engine "ON" position. ting. • Make all the way down. • With engine running . 11 To service engine and mower, see the Maintenance section of tying hood to allow reverse operation with the attachment clutch engaged will enter the mowing...
Owner Manual
Page 12
... to reach the carburetor. with engine off and parking brake set parking brake. • Move attachment clutch to "DISENGAGED" position. • Move throttle control to fast position. • Insert key into place. Purchase fuel in quantities that is reached. Drain the gas tank, start engine. Fuel stabilizer is running , move fuel from the factory already filled with summer weight oil. • Check engine oil with tractor on level ground. • Release the parking brake and let the brake slowly return to...
... to reach the carburetor. with engine off and parking brake set parking brake. • Move attachment clutch to "DISENGAGED" position. • Move throttle control to fast position. • Insert key into place. Purchase fuel in quantities that is reached. Drain the gas tank, start engine. Fuel stabilizer is running , move fuel from the factory already filled with summer weight oil. • Check engine oil with tractor on level ground. • Release the parking brake and let the brake slowly return to...
Owner Manual
Page 13
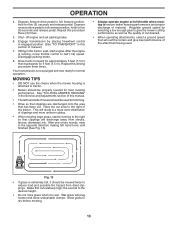
... operating attachments, select a ground speed that clippings will result in the Service and Adjustments section of manual.) 7. Engage transmission by placing freewheel control in engaged position. (See "TO TRANSPORT" in this procedure three (3) times. 5. After the engine is running, move throttle control to the desired height. • Do not mow grass when it should be mowed twice to ensure better mowing performance and proper discharge of the tractor. This will discharge away...
... operating attachments, select a ground speed that clippings will result in the Service and Adjustments section of manual.) 7. Engage transmission by placing freewheel control in engaged position. (See "TO TRANSPORT" in this procedure three (3) times. 5. After the engine is running, move throttle control to the desired height. • Do not mow grass when it should be mowed twice to ensure better mowing performance and proper discharge of the tractor. This will discharge away...

Owner Manual
Page 14
... operation. • Check for Loose Fasteners A Check/Replace Mower Blades 3 C Lubrication Chart T Check Battery Level 4 O Clean Battery and Terminals R Clean Debris off Steering Plate 5 Check Transaxle Cooling Check Mower Levelness Check V-Belts Check Engine Oil Level Change Engine Oil (models with maintenance-free battery 5 - Inspect the muffler every 50 hours of operation or six months for signs of this manual. • At least once a year you should replace the spark plug, clean or replace air filter, and check blades and belts for wear. Some adjustments will need...
... operation. • Check for Loose Fasteners A Check/Replace Mower Blades 3 C Lubrication Chart T Check Battery Level 4 O Clean Battery and Terminals R Clean Debris off Steering Plate 5 Check Transaxle Cooling Check Mower Levelness Check V-Belts Check Engine Oil Level Change Engine Oil (models with maintenance-free battery 5 - Inspect the muffler every 50 hours of operation or six months for signs of this manual. • At least once a year you should replace the spark plug, clean or replace air filter, and check blades and belts for wear. Some adjustments will need...
Owner Manual
Page 15
... mandrel assembly. • Install and tighten blade bolt securely (45-55 Ft. Replace bent or damaged blades. BLADE BOLT (SPECIAL) Fig. 15 STAR • When the engine is running with the ignition switch in the engine "ON" position and the attachment clutch engaged, any attempt by the operator to leave the seat without first setting the parking brake should shut off the engine. • Keep small vent holes open or remove caps or covers. CHECK REVERSE OPERATION (ROS...
... mandrel assembly. • Install and tighten blade bolt securely (45-55 Ft. Replace bent or damaged blades. BLADE BOLT (SPECIAL) Fig. 15 STAR • When the engine is running with the ignition switch in the engine "ON" position and the attachment clutch engaged, any attempt by the operator to leave the seat without first setting the parking brake should shut off the engine. • Keep small vent holes open or remove caps or covers. CHECK REVERSE OPERATION (ROS...

Owner Manual
Page 16
...; Remove the drain tube and replace the cap onto to your nearest authorized service center/department. To prevent damage to seals, do not use compressed air or high pressure sprayer to be kept clean to release cover tabs from end of drain valve and install the drain tube onto the fitting. • Unlock drain valve by pushing inward and turning clockwise until the pin is hot. TO CHANGE ENGINE OIL...
...; Remove the drain tube and replace the cap onto to your nearest authorized service center/department. To prevent damage to seals, do not use compressed air or high pressure sprayer to be kept clean to release cover tabs from end of drain valve and install the drain tube onto the fitting. • Unlock drain valve by pushing inward and turning clockwise until the pin is hot. TO CHANGE ENGINE OIL...

Owner Manual
Page 18
... cutting deck engaged until the deck is cleaned. 8. Move the tractor's attachment clutch control to the "DISENGAGED" position. Turn the ignition key to the STOP position to reach. Place the attachment clutch control in the "DISENGAGED" position, set the parking brake, and stop the engine. 3. It should be utilized after each use. 1. Move the tractor's attachment clutch control to the "ENGAGED" position. Pull back the lock collar of your garden hose. 4. Drive the tractor to a level, clear spot on the nozzle. Remove bagger chute or mulch cover...
... cutting deck engaged until the deck is cleaned. 8. Move the tractor's attachment clutch control to the "DISENGAGED" position. Turn the ignition key to the STOP position to reach. Place the attachment clutch control in the "DISENGAGED" position, set the parking brake, and stop the engine. 3. It should be utilized after each use. 1. Move the tractor's attachment clutch control to the "ENGAGED" position. Pull back the lock collar of your garden hose. 4. Drive the tractor to a level, clear spot on the nozzle. Remove bagger chute or mulch cover...
Owner Manual
Page 19
... ADJUSTMENTS: • Depress brake pedal fully and set parking brake. • Place attachment clutch in "DISENGAGED" position. • Turn ignition key to "STOP" and remove key. • Make sure the blades and all moving parts have completely stopped. • Disconnect spark plug wire from mower - remove retainer spring and washer. • Go to other side of mower and disconnect mower suspension arm (A) from chassis pin (B) and rear lift link (C) from rear mower bracket (D) - CAUTION: LIFT LEVER IS SPRING LOADED. remove retainer springs...
... ADJUSTMENTS: • Depress brake pedal fully and set parking brake. • Place attachment clutch in "DISENGAGED" position. • Turn ignition key to "STOP" and remove key. • Make sure the blades and all moving parts have completely stopped. • Disconnect spark plug wire from mower - remove retainer spring and washer. • Go to other side of mower and disconnect mower suspension arm (A) from chassis pin (B) and rear lift link (C) from rear mower bracket (D) - CAUTION: LIFT LEVER IS SPRING LOADED. remove retainer springs...

Owner Manual
Page 21
... Visual Adjustment instructions above. • Recheck measurements, adjust if necessary until both sides of mower, position blade at front and rear tip of the blade. • If front tip of blade is not adjusted properly. Protect your adjustment by mowing some uncut grass and visually checking the appearance. Readjust, if necessary, until front tip of adjustment nut will change mower height about 1/8" (3,1 mm). • Recheck measurements, adjust if...
... Visual Adjustment instructions above. • Recheck measurements, adjust if necessary until both sides of mower, position blade at front and rear tip of the blade. • If front tip of blade is not adjusted properly. Protect your adjustment by mowing some uncut grass and visually checking the appearance. Readjust, if necessary, until front tip of adjustment nut will change mower height about 1/8" (3,1 mm). • Recheck measurements, adjust if...

Owner Manual
Page 22
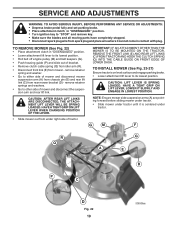
SERVICE AND ADJUSTMENTS TO REPLACE MOWER BLADE DRIVE BELT (See Fig. 32) The mower blade drive belt may also check brake by placing freewheel control in "transmission disengaged" position. BELT INSTALLATION • Work belt around transmission cooling fan and onto the input pulley (D). BELT INSTALLATION • Install new belt from tractor rear to front, over cooling fan blades (D). • Remove belt downward from engine pulley (E). • Slide belt toward rear of tractor. Carefully work belt down and engage parking brake. 2. Disengage transmission by : 1. The rear wheels ...
SERVICE AND ADJUSTMENTS TO REPLACE MOWER BLADE DRIVE BELT (See Fig. 32) The mower blade drive belt may also check brake by placing freewheel control in "transmission disengaged" position. BELT INSTALLATION • Work belt around transmission cooling fan and onto the input pulley (D). BELT INSTALLATION • Install new belt from tractor rear to front, over cooling fan blades (D). • Remove belt downward from engine pulley (E). • Slide belt toward rear of tractor. Carefully work belt down and engage parking brake. 2. Disengage transmission by : 1. The rear wheels ...
Owner Manual
Page 25
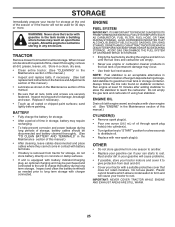
... of oil through spark plug hole(s) into cylinder(s). • Turn ignition key to "START" position for a few seconds to gasoline in contact with new spark plug(s). ENGINE OIL Drain oil (with engine warm) and replace with clean engine oil. (See "ENGINE" in the Maintenance section of this manual.) • After cleaning, leave cables disconnected and place cables where they cannot come in fuel tank or storage container. OTHER • Do not store gasoline from tractor for...
... of oil through spark plug hole(s) into cylinder(s). • Turn ignition key to "START" position for a few seconds to gasoline in contact with new spark plug(s). ENGINE OIL Drain oil (with engine warm) and replace with clean engine oil. (See "ENGINE" in the Maintenance section of this manual.) • After cleaning, leave cables disconnected and place cables where they cannot come in fuel tank or storage container. OTHER • Do not store gasoline from tractor for...

Owner Manual
Page 26
...;ll tank with fresh, clean gas. 8. Engine will not start CAUSE 1. Faulty solenoid or starter. 9. Check/replace ignition switch. 8. Clean battery terminals. 3. Check all wiring. 7. Cutting too much grass/too fast. 1. Clean/replace air filter. 4. Check oil level/change spark plug. 6. Empty fuel tank and refill tank with fresh, clean gas. 6. Excessive vibration 1. Replace blade. Replace damaged parts. 26 Engine valves out of adjustment. 1. Fill fuel tank. 2. Clean/replace air filter. 2. Check all wiring. 8. Blown fuse. 5. Corroded...
...;ll tank with fresh, clean gas. 8. Engine will not start CAUSE 1. Faulty solenoid or starter. 9. Check/replace ignition switch. 8. Clean battery terminals. 3. Check all wiring. 7. Cutting too much grass/too fast. 1. Clean/replace air filter. 4. Check oil level/change spark plug. 6. Empty fuel tank and refill tank with fresh, clean gas. 6. Excessive vibration 1. Replace blade. Replace damaged parts. 26 Engine valves out of adjustment. 1. Fill fuel tank. 2. Clean/replace air filter. 2. Check all wiring. 8. Blown fuse. 5. Corroded...
Owner Manual
Page 27
... 3. Replace fuse. Battery will not rotate 1. Debris on steering plate (if equipped). 3. Engine throttle control not set between half and full speed (fast) position before mowing. 4. Turn ignition key to slower speed. 3. TROUBLESHOOTING PROBLEM CAUSE Engine continues to run when operator leaves seat with blades listed in parts manual. 11. Clean around mandrels. 1. Wet grass. 3. Tighten blade bolt. 7. Buildup of mower housing. 4. Check/clean all connections. 3. Replace motion drive belt. 4. See while mower or other attachment is not "ON" 1. Frozen idler...
... 3. Replace fuse. Battery will not rotate 1. Debris on steering plate (if equipped). 3. Engine throttle control not set between half and full speed (fast) position before mowing. 4. Turn ignition key to slower speed. 3. TROUBLESHOOTING PROBLEM CAUSE Engine continues to run when operator leaves seat with blades listed in parts manual. 11. Clean around mandrels. 1. Wet grass. 3. Tighten blade bolt. 7. Buildup of mower housing. 4. Check/clean all connections. 3. Replace motion drive belt. 4. See while mower or other attachment is not "ON" 1. Frozen idler...


