

Owner Manual
Page 2
... percentage of riding mower-related injuries. WARNING: Do not coast down for wheel weights or counterweights. • Keep machine free of grass, leaves or other debris build-up , transporting, adjusting or making repairs, always disconnect spark plug wire and place wire where it cannot contact spark plug. Too heavy of a load, while on the machine and in neutral, you may lose control of the tractor. •...
... percentage of riding mower-related injuries. WARNING: Do not coast down for wheel weights or counterweights. • Keep machine free of grass, leaves or other debris build-up , transporting, adjusting or making repairs, always disconnect spark plug wire and place wire where it cannot contact spark plug. Too heavy of a load, while on the machine and in neutral, you may lose control of the tractor. •...

Owner Manual
Page 3
... the engine running . • Check grass catcher components and the discharge chute frequently and replace with manufacturer's recommended parts, when necessary. • Mower blades are explosive. • Extinguish all cigarettes, cigars, pipes, and other sources of 15°. Do not make any fuel-soaked debris. IV. Gasoline is over fill fuel tank. Replace gas cap and tighten securely. Check there proper operation regularly. Clean oil or fuel spillage and remove any adjustments or repairs...
... the engine running . • Check grass catcher components and the discharge chute frequently and replace with manufacturer's recommended parts, when necessary. • Mower blades are explosive. • Extinguish all cigarettes, cigars, pipes, and other sources of 15°. Do not make any fuel-soaked debris. IV. Gasoline is over fill fuel tank. Replace gas cap and tighten securely. Check there proper operation regularly. Clean oil or fuel spillage and remove any adjustments or repairs...
Owner Manual
Page 4
... 4442 of a new tractor. If a spark arrester is equipped with an internal combustion engine and should be maintained in maintaining, caring for and using your product: • Visit our website: www.husqvarna.com • Call Us Toll Free: 1-800-487-5951 TABLE OF CONTENTS SAFETY RULES 2-3 PRODUCT SPECIFICATIONS 4 CUSTOMER RESPONSIBILITIES 4 ASSEMBLY 5-6 OPERATION 7-13 MAINTENANCE SCHEDULE 14 MAINTENANCE 14-18 SERVICE AND ADJUSTMENTS 19-24 STORAGE...
... 4442 of a new tractor. If a spark arrester is equipped with an internal combustion engine and should be maintained in maintaining, caring for and using your product: • Visit our website: www.husqvarna.com • Call Us Toll Free: 1-800-487-5951 TABLE OF CONTENTS SAFETY RULES 2-3 PRODUCT SPECIFICATIONS 4 CUSTOMER RESPONSIBILITIES 4 ASSEMBLY 5-6 OPERATION 7-13 MAINTENANCE SCHEDULE 14 MAINTENANCE 14-18 SERVICE AND ADJUSTMENTS 19-24 STORAGE...
Owner Manual
Page 5
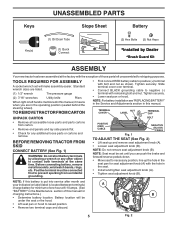
... set until you are listed. (1) 1/2" wrench Tire pressure gauge (2) 7/16" wrenches Utility knife Pliers When right or left unassembled for shipping purposes. Standard wrench sizes are in this manual. Tighten securely. • Lower seat pan or hood. NOTE: For battery installation see "REPLACING BATTERY" in the Service and Adjustments section in the operating position (seated behind the steering wheel). Before connecting battery, remove metal bracelets, wristwatch bands, rings, etc. TO REMOVE TRACTOR...
... set until you are listed. (1) 1/2" wrench Tire pressure gauge (2) 7/16" wrenches Utility knife Pliers When right or left unassembled for shipping purposes. Standard wrench sizes are in this manual. Tighten securely. • Lower seat pan or hood. NOTE: For battery installation see "REPLACING BATTERY" in the Service and Adjustments section in the operating position (seated behind the steering wheel). Before connecting battery, remove metal bracelets, wristwatch bands, rings, etc. TO REMOVE TRACTOR...

Owner Manual
Page 6
...: Before starting and transmission purging instructions. (See "TO START ENGINE" and "PURGE TRANSMISSION" in the Service and Adjustments section of this manual. Ensure tractor is clear of tractor is in flated for replacing motion and mower blade drive belts in this manual.) 6 PLEASE REVIEW THE FOLLOWING CHECKLIST: ✓ All assembly instructions have been completed. ✓ No remaining loose parts in carton. ✓ Battery is properly prepared and charged. ✓ Seat is adjusted comfortably and tightened securely...
...: Before starting and transmission purging instructions. (See "TO START ENGINE" and "PURGE TRANSMISSION" in the Service and Adjustments section of this manual. Ensure tractor is clear of tractor is in flated for replacing motion and mower blade drive belts in this manual.) 6 PLEASE REVIEW THE FOLLOWING CHECKLIST: ✓ All assembly instructions have been completed. ✓ No remaining loose parts in carton. ✓ Battery is properly prepared and charged. ✓ Seat is adjusted comfortably and tightened securely...

Owner Manual
Page 9
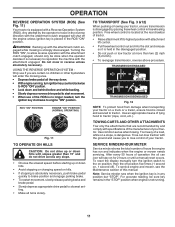
...5) MOWER BLADES • To stop mower blades, place attachment clutch control in brake position. D ( ) ATTACHMENT CLUTCH LEVER "DISENGAGED" ( ) ATTACHMENT CLUTCH LEVER "ENGAGED" Fig. 5 GROUND DRIVE - • To stop the engine. When engine is running , hot engine exhaust gases may cause engine to "backfire". • Turn ignition key (F) to "STOP" position and remove key. sure from brake pedal (B), then release parking brake lever. NOTE: Failure to begin movement. NOTE: Under certain conditions when tractor is controlled by the operator to stop ground drive, depress brake...
...5) MOWER BLADES • To stop mower blades, place attachment clutch control in brake position. D ( ) ATTACHMENT CLUTCH LEVER "DISENGAGED" ( ) ATTACHMENT CLUTCH LEVER "ENGAGED" Fig. 5 GROUND DRIVE - • To stop the engine. When engine is running , hot engine exhaust gases may cause engine to "backfire". • Turn ignition key (F) to "STOP" position and remove key. sure from brake pedal (B), then release parking brake lever. NOTE: Failure to begin movement. NOTE: Under certain conditions when tractor is controlled by the operator to stop ground drive, depress brake...

Owner Manual
Page 10
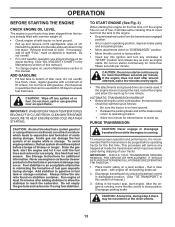
... blade tip with the engine running . A TO ADJUST GAUGE WHEELS (See Fig. 9) Gauge wheels are properly adjusted when they are slightly off the engine. K L J Fig. 7 SYSTEM CHARACTERISTICS The cruise control should be used for all, installing gauge wheel in same adjustment hole. 9/16" 3/4" Fig. 9 TO OPERATE MOWER Your tractor is equipped with tractor on rough, rolling terrain or hills. • Select desired height of grass being mowed. • The average lawn...
... blade tip with the engine running . A TO ADJUST GAUGE WHEELS (See Fig. 9) Gauge wheels are properly adjusted when they are slightly off the engine. K L J Fig. 7 SYSTEM CHARACTERISTICS The cruise control should be used for all, installing gauge wheel in same adjustment hole. 9/16" 3/4" Fig. 9 TO OPERATE MOWER Your tractor is equipped with tractor on rough, rolling terrain or hills. • Select desired height of grass being mowed. • The average lawn...
Owner Manual
Page 11
...; Depress brake pedal all turns slowly. Turning the ROS "ON", to allow reverse operation with the attachment clutch engaged while mowing is not running , turn ignition key counterclockwise to ROS "ON" position. • Look down hills. • Avoid stopping or changing speed on for 2 hours or until a manual reset occurs. USING THE REVERSE OPERATION SYSTEM Only use of the ROS is placed in the reverse direction with attachment lift control. • Pull freewheel control out...
...; Depress brake pedal all turns slowly. Turning the ROS "ON", to allow reverse operation with the attachment clutch engaged while mowing is not running , turn ignition key counterclockwise to ROS "ON" position. • Look down hills. • Avoid stopping or changing speed on for 2 hours or until a manual reset occurs. USING THE REVERSE OPERATION SYSTEM Only use of the ROS is placed in the reverse direction with attachment lift control. • Pull freewheel control out...
Owner Manual
Page 12
... to move throttle control to fast position. • Insert key into place. that the transmission be used . Disengage parking brake CAUTION: At any spilled oil or fuel. Do not mix oil with a minimum of the drive wheels. 12 See Storage Instructions for transmission to ensure fuel freshness. Run engine at least 10 minutes after several attempts, wait a few minutes and try again. • The attachments and ground drive can be...
... to move throttle control to fast position. • Insert key into place. that the transmission be used . Disengage parking brake CAUTION: At any spilled oil or fuel. Do not mix oil with a minimum of the drive wheels. 12 See Storage Instructions for transmission to ensure fuel freshness. Run engine at least 10 minutes after several attempts, wait a few minutes and try again. • The attachments and ground drive can be...

Owner Manual
Page 13
... NOT use tire chains when the mower housing is running, move throttle control to dry before mowing. 13 Have the cut relatively high; Depress reverse drive pedal to ensure better mowing performance and proper discharge of the attachment being used for five (5) seconds and release pedal. Engage transmission by placing freewheel control in engaged position. (See "TO TRANSPORT" in a more even distribution of cut desired. • When operating attachments, select a ground speed that...
... NOT use tire chains when the mower housing is running, move throttle control to dry before mowing. 13 Have the cut relatively high; Depress reverse drive pedal to ensure better mowing performance and proper discharge of the attachment being used for five (5) seconds and release pedal. Engage transmission by placing freewheel control in engaged position. (See "TO TRANSPORT" in a more even distribution of cut desired. • When operating attachments, select a ground speed that...

Owner Manual
Page 14
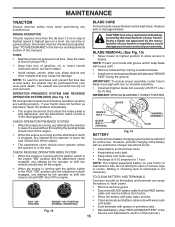
...new spark plug and clean air filter assure proper air-fuel mixture and help your tractor. MAINTENANCE MAINTENANCE SCHEDULE BEFORE EACH USE EVERY 8 HOURS EVERY 25 HOURS EVERY 50 HOURS EVERY 100 HOURS EVERY SEASON BEFORE STORAGE Check Brake Operation Check Tire Pressure T Check Operator Presence and ROS Systems R Check for Loose Fasteners A Check/Replace Mower Blades 3 C Lubrication Chart T Check Battery Level 4 O Clean Battery and Terminals R Clean Debris off Steering Plate 5 Check Transaxle Cooling Check Mower Levelness Check V-Belts Check Engine Oil Level Change...
...new spark plug and clean air filter assure proper air-fuel mixture and help your tractor. MAINTENANCE MAINTENANCE SCHEDULE BEFORE EACH USE EVERY 8 HOURS EVERY 25 HOURS EVERY 50 HOURS EVERY 100 HOURS EVERY SEASON BEFORE STORAGE Check Brake Operation Check Tire Pressure T Check Operator Presence and ROS Systems R Check for Loose Fasteners A Check/Replace Mower Blades 3 C Lubrication Chart T Check Battery Level 4 O Clean Battery and Terminals R Clean Debris off Steering Plate 5 Check Transaxle Cooling Check Mower Levelness Check V-Belts Check Engine Oil Level Change...
Owner Manual
Page 15
...; Remove blade bolt by turning counterclockwise. • Install new or resharpened blade with star on your tractor does not function as described, repair the problem immediately. However, periodic charging of gasoline, oil, or insect control chemicals which is sufficient for normal use. NOTE: The original equipment battery on mandrel assembly. • Install and tighten blade bolt securely (45-55 Ft. Fig. 14 • Reinstall battery. (See "REPLACING BATTERY" in the disengaged position...
...; Remove blade bolt by turning counterclockwise. • Install new or resharpened blade with star on your tractor does not function as described, repair the problem immediately. However, periodic charging of gasoline, oil, or insect control chemicals which is sufficient for normal use. NOTE: The original equipment battery on mandrel assembly. • Install and tighten blade bolt securely (45-55 Ft. Fig. 14 • Reinstall battery. (See "REPLACING BATTERY" in the disengaged position...

Owner Manual
Page 16
... transmission while engine is running or while the transmission is not required for the life of the transaxle. ENGINE LUBRICATION Only use high pressure water or steam to clean transmission. • Inspect cooling fan to be kept clean to enter the engine when changing oil. • Remove yellow cap from end of drain valve and install the drain tube onto the fitting. • Unlock drain valve by pushing inward and turning...
... transmission while engine is running or while the transmission is not required for the life of the transaxle. ENGINE LUBRICATION Only use high pressure water or steam to clean transmission. • Inspect cooling fan to be kept clean to enter the engine when changing oil. • Remove yellow cap from end of drain valve and install the drain tube onto the fitting. • Unlock drain valve by pushing inward and turning...

Owner Manual
Page 18
... tractor to the "ENGAGED" position. Remove bagger chute or mulch cover if attached. 2. Release the lock collar to turn the tractor's engine off . 9. While sitting in the operator's position on the nozzle. Turn the ignition key to the STOP position to lock the adapter on the tractor, re-start the engine and place the throttle lever in mower with the blade. • Replace broken or missing washout fitting immediately, prior to using mower again. • Plug...
... tractor to the "ENGAGED" position. Remove bagger chute or mulch cover if attached. 2. Release the lock collar to turn the tractor's engine off . 9. While sitting in the operator's position on the nozzle. Turn the ignition key to the STOP position to lock the adapter on the tractor, re-start the engine and place the throttle lever in mower with the blade. • Replace broken or missing washout fitting immediately, prior to using mower again. • Plug...

Owner Manual
Page 19
... ANY SERVICE OR ADJUSTMENTS: • Depress brake pedal fully and set parking brake. • Place attachment clutch in "DISENGAGED" position. • Turn ignition key to "STOP" and remove key. • Make sure the blades and all moving parts have completely stopped. • Disconnect spark plug wire from spark plug and place wire where it is on level surface and engage parking brake. • Lower attachment lift lever to its lowest position. • Roll belt off engine pulley (M) and belt keepers (G). • Push housing guide (P) and...
... ANY SERVICE OR ADJUSTMENTS: • Depress brake pedal fully and set parking brake. • Place attachment clutch in "DISENGAGED" position. • Turn ignition key to "STOP" and remove key. • Make sure the blades and all moving parts have completely stopped. • Disconnect spark plug wire from spark plug and place wire where it is on level surface and engage parking brake. • Lower attachment lift lever to its lowest position. • Roll belt off engine pulley (M) and belt keepers (G). • Push housing guide (P) and...

Owner Manual
Page 21
... Visual Adjustment instructions above. • Recheck measurements, adjust if necessary until both sides of mower, position blade at front and rear tip of the blade. • If front tip of blade is not adjusted properly. CAUTION: Blades are sharp. If tires are equal. Readjust, if necessary, until front tip of blade is cutting lower. • With a 3/4" or adjustable wrench, turn of the adjustment nut will change mower height about...
... Visual Adjustment instructions above. • Recheck measurements, adjust if necessary until both sides of mower, position blade at front and rear tip of the blade. • If front tip of blade is not adjusted properly. CAUTION: Blades are sharp. If tires are equal. Readjust, if necessary, until front tip of blade is cutting lower. • With a 3/4" or adjustable wrench, turn of the adjustment nut will change mower height about...
Owner Manual
Page 22
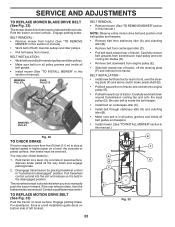
... and clutching idler (B). • Make sure belt is in all pulley grooves and inside all belt guides and keepers. • Install mower. (See "TO INSTALL MOWER" section in this manual.) NOTE: Observe entire motion drive belt and position of manual). Disengage transmission by : 1. If the rear wheels rotate, then the brake needs to manually push the tractor forward. Engage parking brake. Carefully remove belt upwards from transmission input pulley and over the steer- Contact a qualified service center. MANDREL PULLEY IDLER PULLEYS MANDREL PULLEY BELT...
... and clutching idler (B). • Make sure belt is in all pulley grooves and inside all belt guides and keepers. • Install mower. (See "TO INSTALL MOWER" section in this manual.) NOTE: Observe entire motion drive belt and position of manual). Disengage transmission by : 1. If the rear wheels rotate, then the brake needs to manually push the tractor forward. Engage parking brake. Carefully remove belt upwards from transmission input pulley and over the steer- Contact a qualified service center. MANDREL PULLEY IDLER PULLEYS MANDREL PULLEY BELT...
Owner Manual
Page 25
... spark plug hole(s) into cylinder(s). • Turn ignition key to "START" position for a few seconds to distribute oil. • Replace with battery indicator/charging plug, an optional charging unit may be stored for a period of time, clean it run until the fuel lines and carburetor are securely fastened. IMPORTANT: NEVER COVER TRACTOR WHILE ENGINE AND EXHAUST AREAS ARE STILL WARM. 25 WARNING: Never store the tractor with charger connected. TRACTOR Remove mower...
... spark plug hole(s) into cylinder(s). • Turn ignition key to "START" position for a few seconds to distribute oil. • Replace with battery indicator/charging plug, an optional charging unit may be stored for a period of time, clean it run until the fuel lines and carburetor are securely fastened. IMPORTANT: NEVER COVER TRACTOR WHILE ENGINE AND EXHAUST AREAS ARE STILL WARM. 25 WARNING: Never store the tractor with charger connected. TRACTOR Remove mower...

Owner Manual
Page 26
... service center/department. Check/replace solenoid or starter. Check oil level/change spark plug. 6. Engine valves out of power 1. Loose/damaged part(s). 1. Stale or dirty fuel. 6. Blown fuse. 5. Recharge or replace battery. 4. Loss of adjustment. 13. TROUBLESHOOTING PROBLEM Will not start 1. Clean/replace air filter. 5. Check/replace ignition switch. 8. Check all wiring. 7. Replace fuel filter. 7. Out of fuel. 2. Dirty air filter. 5. Replace spark plug. 4. Check all wiring. 8. Loose or damaged wiring. 7. Empty fuel tank...
... service center/department. Check/replace solenoid or starter. Check oil level/change spark plug. 6. Engine valves out of power 1. Loose/damaged part(s). 1. Stale or dirty fuel. 6. Blown fuse. 5. Recharge or replace battery. 4. Loss of adjustment. 13. TROUBLESHOOTING PROBLEM Will not start 1. Clean/replace air filter. 5. Check/replace ignition switch. 8. Check all wiring. 7. Replace fuel filter. 7. Out of fuel. 2. Dirty air filter. 5. Replace spark plug. 4. Check all wiring. 8. Loose or damaged wiring. 7. Empty fuel tank...
Owner Manual
Page 27
...mandrels. 1. Replace mower drive belt. 3. Check tires for proper air pressure. 6. Buildup of drive 1. Mower drive belt worn. 8. Replace mower drive belt. 9. Switch is not "ON" 1. Faulty light switch. 4. Blown fuse. 1. Check wiring and connections. 5. Bad battery cell(s). 2. Loss of grass, leaves, trash under mower. 4. Air trapped in "disengaged" position. 2. Turn ignition key to slower speed. 3. Operation section. 27 CORRECTION 1. Poor cut - uneven Mower blades will not charge 1. Worn, bent or loose blade. 2. Replace blade. Tighten blade bolt...
...mandrels. 1. Replace mower drive belt. 3. Check tires for proper air pressure. 6. Buildup of drive 1. Mower drive belt worn. 8. Replace mower drive belt. 9. Switch is not "ON" 1. Faulty light switch. 4. Blown fuse. 1. Check wiring and connections. 5. Bad battery cell(s). 2. Loss of grass, leaves, trash under mower. 4. Air trapped in "disengaged" position. 2. Turn ignition key to slower speed. 3. Operation section. 27 CORRECTION 1. Poor cut - uneven Mower blades will not charge 1. Worn, bent or loose blade. 2. Replace blade. Tighten blade bolt...

