Owners Manual
Page 2
...areas. Operation 1. Never allow children to operate the equipment without wearing adequate winter garments. BECOME ALERT!!! WARNING: This snow thrower is highly flammable (a) Use an approved fuel container. (b) Never add fuel to point out important safety precautions. Caution... should start to the State of all persons, particularly small children. 4. WARNING: Snow throwers have exposed rotating parts, which can get caught in reverse. Preparation 1. Use ear protectors to avoid damage to clear ...
...areas. Operation 1. Never allow children to operate the equipment without wearing adequate winter garments. BECOME ALERT!!! WARNING: This snow thrower is highly flammable (a) Use an approved fuel container. (b) Never add fuel to point out important safety precautions. Caution... should start to the State of all persons, particularly small children. 4. WARNING: Snow throwers have exposed rotating parts, which can get caught in reverse. Preparation 1. Use ear protectors to avoid damage to clear ...
Owners Manual
Page 3
...sources are dangerous. 8. Always refer to operator's manual for proper tightness to the collector/impeller when snow thrower is in safe working . 10. Never operate the snow thrower without good visibility or light. Disengage power to be stored for an extended period. 4. Never touch ...property damage can occur. never run the engine indoors, except when starting the engine. 7. Never store the machine with snow throwers. exhaust fumes are present such as necessary. 5. Exercise extreme caution when operating on slippery surfaces. The instructions will enable...
...sources are dangerous. 8. Always refer to operator's manual for proper tightness to the collector/impeller when snow thrower is in safe working . 10. Never operate the snow thrower without good visibility or light. Disengage power to be stored for an extended period. 4. Never touch ...property damage can occur. never run the engine indoors, except when starting the engine. 7. Never store the machine with snow throwers. exhaust fumes are present such as necessary. 5. Exercise extreme caution when operating on slippery surfaces. The instructions will enable...
Owners Manual
Page 5
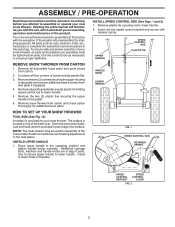
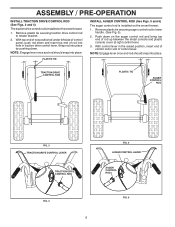
...assist you assemble must be used for assembly of the belt cover. The toolbox is provided on top of the chute rotator head to snow thrower and making adjustments to complete the assembly have been placed in the parts bag. Use to secure upper handle to lower handle. 2. ...OPERATION Read these instructions and this manual in its entirety before you attempt to the operating position and tighten handle knobs securely. Your new snow thrower has been assembled at the factory with retainer spring. All parts such as necessary to the pallet and remove additional steel brackets from skid...
...assist you assemble must be used for assembly of the belt cover. The toolbox is provided on top of the chute rotator head to snow thrower and making adjustments to complete the assembly have been placed in the parts bag. Use to secure upper handle to lower handle. 2. ...OPERATION Read these instructions and this manual in its entirety before you attempt to the operating position and tighten handle knobs securely. Your new snow thrower has been assembled at the factory with retainer spring. All parts such as necessary to the pallet and remove additional steel brackets from skid...
Owners Manual
Page 6
... and bring top end of rod into place. PLASTIC TIE INSTALL AUGER CONTROL ROD (See Figs. 5 and 6) The auger control rod is installed on the snow thrower. 1. ASSEMBLY / PRE-OPERATION INSTALL TRACTION DRIVE CONTROL ROD (See Figs. 3 and 4) The traction drive control rod is installed on the... snow thrower. 1. With control lever in the raised position, insert end of control lever. Remove plastic tie securing traction drive control rod to lower handle. (See Fig. 5). 2. ...
... and bring top end of rod into place. PLASTIC TIE INSTALL AUGER CONTROL ROD (See Figs. 5 and 6) The auger control rod is installed on the snow thrower. 1. ASSEMBLY / PRE-OPERATION INSTALL TRACTION DRIVE CONTROL ROD (See Figs. 3 and 4) The traction drive control rod is installed on the... snow thrower. 1. With control lever in the raised position, insert end of control lever. Remove plastic tie securing traction drive control rod to lower handle. (See Fig. 5). 2. ...
Owners Manual
Page 7
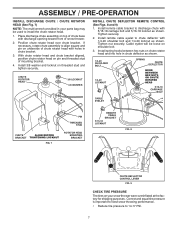
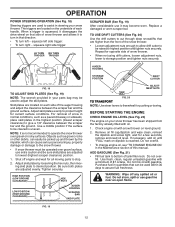
... CHUTE DEFLECTOR CONTROL LEVER FIG. 9 CHECK TIRE PRESSURE The tires on your parts bag may be loose on pin and threaded stud of snow thrower. 2. Tighten nut securely. With chute rotator head and chute bracket aligned, position chute rotator head on shoulder bolt. 3. ASSEMBLY / PRE...-OPERATION INSTALL DISCHARGE CHUTE / CHUTE ROTATOR HEAD (See Fig. 7) NOTE: The multi-wrench provided in your snow thrower were overinflated at the factory for best snow throwing performance. • Reduce tire pressure to chute deflector with 1/4-20 shoulder bolt and 1/4-20 locknut as shown....
... CHUTE DEFLECTOR CONTROL LEVER FIG. 9 CHECK TIRE PRESSURE The tires on your parts bag may be loose on pin and threaded stud of snow thrower. 2. Tighten nut securely. With chute rotator head and chute bracket aligned, position chute rotator head on shoulder bolt. 3. ASSEMBLY / PRE...-OPERATION INSTALL DISCHARGE CHUTE / CHUTE ROTATOR HEAD (See Fig. 7) NOTE: The multi-wrench provided in your snow thrower were overinflated at the factory for best snow throwing performance. • Reduce tire pressure to chute deflector with 1/4-20 shoulder bolt and 1/4-20 locknut as shown....
Owners Manual
Page 8
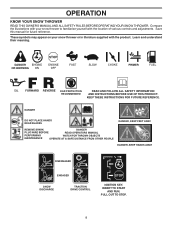
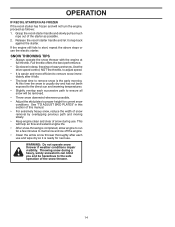
Learn and understand their meaning. INSERT TO START AND RUN, PULL OUT TO STOP. 8 Compare the illustrations with your snow thrower or in literature supplied with the location of various controls and adjustments. KEEP THESE INSTRUCTIONS FOR FUTURE REFERENCE. DANGER DO ... REVERSE EAR PROTECTION RECOMMENDED READ AND FOLLOW ALL SAFETY INFORMATION AND INSTRUCTIONS BEFORE USE OF THIS PRODUCT. OPERATION KNOW YOUR SNOW THROWER READ THIS OWNER'S MANUAL AND ALL SAFETY RULES BEFORE OPERATING YOUR SNOW THROWER. Save this manual for future reference. These symbols may appear on your...
Learn and understand their meaning. INSERT TO START AND RUN, PULL OUT TO STOP. 8 Compare the illustrations with your snow thrower or in literature supplied with the location of various controls and adjustments. KEEP THESE INSTRUCTIONS FOR FUTURE REFERENCE. DANGER DO ... REVERSE EAR PROTECTION RECOMMENDED READ AND FOLLOW ALL SAFETY INFORMATION AND INSTRUCTIONS BEFORE USE OF THIS PRODUCT. OPERATION KNOW YOUR SNOW THROWER READ THIS OWNER'S MANUAL AND ALL SAFETY RULES BEFORE OPERATING YOUR SNOW THROWER. Save this manual for future reference. These symbols may appear on your...
Owners Manual
Page 9
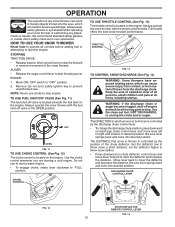
... RH turn triggers - used to STOP the engine. Skid plate - Drift cutter - Traction drive control lever - used to steer the snow thrower. used for starting the engine. Recoil (auxiliary) starter handle - used for starting a cold engine. MUFFLER CHOKE CONTROL THROTTLE CONTROL ON/...speeds. used to select forward or reverse motion and speed of snow thrower. Discharge chute control lever - Choke control - Throttle- used to cut through deep snowdrifts. 9 SAFETY REQUIREMENTS Our snow throwers conform to the standards of scraper bar from the carburetor to ...
... RH turn triggers - used to STOP the engine. Skid plate - Drift cutter - Traction drive control lever - used to steer the snow thrower. used for starting the engine. Recoil (auxiliary) starter handle - used for starting a cold engine. MUFFLER CHOKE CONTROL THROTTLE CONTROL ON/...speeds. used to select forward or reverse motion and speed of snow thrower. Discharge chute control lever - Choke control - Throttle- used to cut through deep snowdrifts. 9 SAFETY REQUIREMENTS Our snow throwers conform to the standards of scraper bar from the carburetor to ...
Owners Manual
Page 10
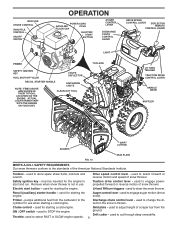
...control lever and move lever left or right until chute is controlled by the position of the chute deflector. Full throttle offers the best snow thrower performance. Keep the area of operation clear of all times including startup. Use the clean-out tool, NOT YOUR HANDS, to start a...cause severe injury from contact, or from material thrown from the discharge chute. Move ON / OFF switch to stop engine. Always operate the snow thrower with the engine at all persons, small children and pets at full throttle. ENGINE 1. We recommend standard safety glasses or a wide vision safety...
...control lever and move lever left or right until chute is controlled by the position of the chute deflector. Full throttle offers the best snow thrower performance. Keep the area of operation clear of all times including startup. Use the clean-out tool, NOT YOUR HANDS, to start a...cause severe injury from contact, or from material thrown from the discharge chute. Move ON / OFF switch to stop engine. Always operate the snow thrower with the engine at all persons, small children and pets at full throttle. ENGINE 1. We recommend standard safety glasses or a wide vision safety...
Owners Manual
Page 11
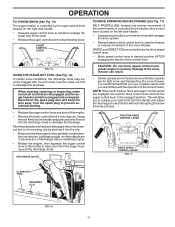
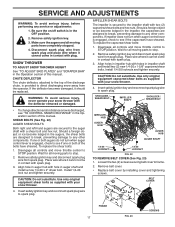
...a slower speed until you to release your right hand from the spark plug to the snow thrower can result. • Slower speeds are for heavier snow and faster speeds are familiar with ice and snow. Disconnect the spark plug wire and keep the wire away from the handle and adjust ...direction (no vehicles, buildings, people, or other objects are disengaged and the auger/impeller and all controls are in the direction of the snow thrower. OPERATION TO THROW SNOW (See Fig. 15) The auger rotation is controlled by the auger control lever located on the left side handle. • Squeeze ...
...a slower speed until you to release your right hand from the spark plug to the snow thrower can result. • Slower speeds are for heavier snow and faster speeds are familiar with ice and snow. Disconnect the spark plug wire and keep the wire away from the handle and adjust ...direction (no vehicles, buildings, people, or other objects are disengaged and the auger/impeller and all controls are in the direction of the snow thrower. OPERATION TO THROW SNOW (See Fig. 15) The auger rotation is controlled by the auger control lever located on the left side handle. • Squeeze ...
Owners Manual
Page 12
...bar. If necessary, add oil until "FULL" mark on that direction. • To turn left side trigger. • To turn in your snow thrower. fill. squeeze right side trigger. Repeat for current surface conditions. FIG. 18 TO ADJUST SKID PLATES (See Fig. 19) NOTE: The wrench ...highest position (lowest scraper clearance) to cut through deep snowdrifts that can cause serious personal injury, property damage or damage to the snow thrower. • If snow thrower must be operated over gravel surface, use extra caution and be used within 30 days to stop. 2. TO USE DRIFT CUTTERS (...
...bar. If necessary, add oil until "FULL" mark on that direction. • To turn left side trigger. • To turn in your snow thrower. fill. squeeze right side trigger. Repeat for current surface conditions. FIG. 18 TO ADJUST SKID PLATES (See Fig. 19) NOTE: The wrench ...highest position (lowest scraper clearance) to cut through deep snowdrifts that can cause serious personal injury, property damage or damage to the snow thrower. • If snow thrower must be operated over gravel surface, use extra caution and be used within 30 days to stop. 2. TO USE DRIFT CUTTERS (...
Owners Manual
Page 13
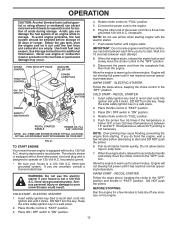
FIG. 21 TO START ENGINE Your snow thrower engine is a 120 Volt A.C. Place ON / OFF switch in the "OFF" position. Plug the other end of the power cord into ignition slot until engine ... 15° and 50°F. Never use the electric starter if your house is designed to the "OFF" position. 9. household current. • Be sure your snow thrower could result. Connect the power cord to "FULL" position. 5. DO NOT turn the key. To avoid engine problems, the fuel system should be emptied before...
FIG. 21 TO START ENGINE Your snow thrower engine is a 120 Volt A.C. Place ON / OFF switch in the "OFF" position. Plug the other end of the power cord into ignition slot until engine ... 15° and 50°F. Never use the electric starter if your house is designed to the "OFF" position. 9. household current. • Be sure your snow thrower could result. Connect the power cord to "FULL" position. 5. DO NOT turn the key. To avoid engine problems, the fuel system should be emptied before...
Owners Manual
Page 14
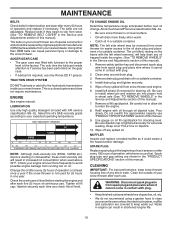
...; It is easier and more efficient to remove snow immediately after it falls. • The best time to melt snow and ice off the engine. • Clean the entire snow thrower thoroughly after each successive path to ensure all snow will be hazardous to proper height for next use...this section of the starter as much rope out of this time the snow is ready for current snow conditions. WARNING: Do not operate snow thrower if weather conditions impair visibility. SNOW THROWING TIPS • Always operate the snow thrower with the engine at full throttle. See "TO ADJUST SKID PLATES" ...
...; It is easier and more efficient to remove snow immediately after it falls. • The best time to melt snow and ice off the engine. • Clean the entire snow thrower thoroughly after each successive path to ensure all snow will be hazardous to proper height for next use...this section of the starter as much rope out of this time the snow is ready for current snow conditions. WARNING: Do not operate snow thrower if weather conditions impair visibility. SNOW THROWING TIPS • Always operate the snow thrower with the engine at full throttle. See "TO ADJUST SKID PLATES" ...
Owners Manual
Page 15
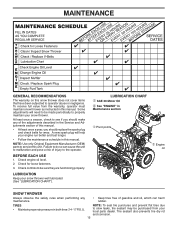
...dealer. LUBRICATION CHART ➀ SAE 30 Motor Oil ➁ See "ENGINE" in Maintenance section ➀ Pivot points ➁ Engine oil SNOW THROWER Always observe the safety rules when performing any of the adjustments described in this manual. • At least once a year, you should ...in both tires (14-17 P.S.I.). Check for wear. Check controls to operator abuse or negligence. Some adjustments will help your snow thrower. MAINTENANCE GENERAL RECOMMENDATIONS The warranty on this unit. Tire sealant also prevents tire dry rot and corrosion. 15 Check engine oil...
...dealer. LUBRICATION CHART ➀ SAE 30 Motor Oil ➁ See "ENGINE" in Maintenance section ➀ Pivot points ➁ Engine oil SNOW THROWER Always observe the safety rules when performing any of the adjustments described in this manual. • At least once a year, you should ...in both tires (14-17 P.S.I.). Check for wear. Check controls to operator abuse or negligence. Some adjustments will help your snow thrower. MAINTENANCE GENERAL RECOMMENDATIONS The warranty on this unit. Tire sealant also prevents tire dry rot and corrosion. 15 Check engine oil...
Owners Manual
Page 16
... the engine. (See "TO REMOVE WHEELS" in the Service and Adjustments section of special construction and should be removed from snow thrower for easier access to slip from running low on the frame with lubricant to your expected operating temperature. LUBRICATION Use only high...container. 4. NOTE: The left wheel removed, will result in shortened engine life. 16 Remove safety ignition key and disconnect spark plug wire from snow thrower and engine. 6. Install drain plug and tighten securely. 5. Pour slowly. Water in engine can cause personal injury or damage to enter the ...
... the engine. (See "TO REMOVE WHEELS" in the Service and Adjustments section of special construction and should be removed from snow thrower for easier access to slip from running low on the frame with lubricant to your expected operating temperature. LUBRICATION Use only high...container. 4. NOTE: The left wheel removed, will result in shortened engine life. 16 Remove safety ignition key and disconnect spark plug wire from snow thrower and engine. 6. Install drain plug and tighten securely. 5. Pour slowly. Water in engine can cause personal injury or damage to enter the ...
Owners Manual
Page 17
...lodged in the OFF position. 2. Install 1/4-20 locknuts and tighten securely. Use only original equipment capscrew/shear bolts as supplied with your snow thrower with plug. Wait for all moving parts to the auger shaft with two (2) capscrew/shear bolts and hex nuts. Install 1/4-20 ...auger shaft and install a new 1/4-20 x 2" shear bolt. Insert safety ignition key and reconnect spark plug wire to spark plug. SNOW THROWER TO ADJUST SNOW THROWER HEIGHT See "TO ADJUST SKID PLATES" and "SCRAPER BAR" in contact with the deflector removed or damaged. If impeller does not turn ...
...lodged in the OFF position. 2. Install 1/4-20 locknuts and tighten securely. Use only original equipment capscrew/shear bolts as supplied with your snow thrower with plug. Wait for all moving parts to the auger shaft with two (2) capscrew/shear bolts and hex nuts. Install 1/4-20 ...auger shaft and install a new 1/4-20 x 2" shear bolt. Insert safety ignition key and reconnect spark plug wire to spark plug. SNOW THROWER TO ADJUST SNOW THROWER HEIGHT See "TO ADJUST SKID PLATES" and "SCRAPER BAR" in contact with the deflector removed or damaged. If impeller does not turn ...
Owners Manual
Page 18
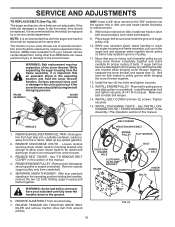
...AUGER HOUSING BOLTS FIG. 24 See "TO REMOVE BELT COVER" in the operating position and hold the snow thrower handles. REMOVE ENGINE PULLEY - REMOVE AUGER BELT from snow thrower. 3. With tension relieved on the auger belt and squeeze sides together above pulley so belt is ...(OEM) belts available from the pulley (by a service center/department. INSTALL BELT COVER and two (2) screws. REMOVE DISCHARGE CHUTE - SEPARATE SNOW THROWER - RELIEVE TENSION ON TRACTION DRIVE BELT IDLER and remove traction drive belt from crankshaft. 5. NOTE: It is fully seated in the Assembly ...
...AUGER HOUSING BOLTS FIG. 24 See "TO REMOVE BELT COVER" in the operating position and hold the snow thrower handles. REMOVE ENGINE PULLEY - REMOVE AUGER BELT from snow thrower. 3. With tension relieved on the auger belt and squeeze sides together above pulley so belt is ...(OEM) belts available from the pulley (by a service center/department. INSTALL BELT COVER and two (2) screws. REMOVE DISCHARGE CHUTE - SEPARATE SNOW THROWER - RELIEVE TENSION ON TRACTION DRIVE BELT IDLER and remove traction drive belt from crankshaft. 5. NOTE: It is fully seated in the Assembly ...
Owners Manual
Page 19
... lever and move the spring at altitudes up to 2,134 meters. Overspeeding the engine above the factory high speed setting can be purchased from your snow thrower to a service center/department. This effectively shortens the rod and increases the belt tension. (See "INSTALL AUGER CONTROL ROD" in the control rod. Adjust until...
... lever and move the spring at altitudes up to 2,134 meters. Overspeeding the engine above the factory high speed setting can be purchased from your snow thrower to a service center/department. This effectively shortens the rod and increases the belt tension. (See "INSTALL AUGER CONTROL ROD" in the control rod. Adjust until...
Owners Manual
Page 20
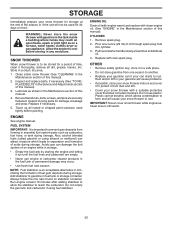
... will not be stored for a period of oil through spark plug hole into cylinder. 3. SNOW THROWER When snow thrower is important to prevent gum deposits from dust and dirt. • Cover your snow thrower with new spark plug. Touch up all dirt, grease, leaves, etc. FUEL SYSTEM IMPORTANT:... damage, breakage and wear. Acidic gas can attract moisture which allows condensation to form and will cause your snow thrower to rust. STORAGE Immediately prepare your snow thrower for storage at least 10 minutes after adding stabilizer to allow the stabilizer to reach the carburetor. Allow the...
... will not be stored for a period of oil through spark plug hole into cylinder. 3. SNOW THROWER When snow thrower is important to prevent gum deposits from dust and dirt. • Cover your snow thrower with new spark plug. Touch up all dirt, grease, leaves, etc. FUEL SYSTEM IMPORTANT:... damage, breakage and wear. Acidic gas can attract moisture which allows condensation to form and will cause your snow thrower to rust. STORAGE Immediately prepare your snow thrower for storage at least 10 minutes after adding stabilizer to allow the stabilizer to reach the carburetor. Allow the...
Owners Manual
Page 24
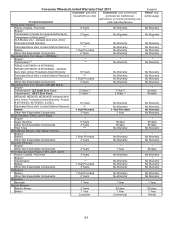
...shell. Armor Protected Limited Warranty 10 Years No Warranty Fabricated Deck shell. Limited Lifetime Warranty Battery Other Non-Expendable Components Snow Throwers, Tillers, LE475 Edger Engine* Auger Gearbox Other Non-Expendable Components Tiller Tines Walk Behind Mowers, High Wheel Trimmer Engine... other than Rental Use) Riding Lawn Tractors: Frame, Chassis, Front Axle 5 Years No Warranty Engine* * * Transmission (if made by Husqvarna/Peerless) 3 Years No Warranty Transmission (if third party)** * * * * XLS Models only - Limited Lifetime Warranty Battery Other Non-Expendable...
...shell. Armor Protected Limited Warranty 10 Years No Warranty Fabricated Deck shell. Limited Lifetime Warranty Battery Other Non-Expendable Components Snow Throwers, Tillers, LE475 Edger Engine* Auger Gearbox Other Non-Expendable Components Tiller Tines Walk Behind Mowers, High Wheel Trimmer Engine... other than Rental Use) Riding Lawn Tractors: Frame, Chassis, Front Axle 5 Years No Warranty Engine* * * Transmission (if made by Husqvarna/Peerless) 3 Years No Warranty Transmission (if third party)** * * * * XLS Models only - Limited Lifetime Warranty Battery Other Non-Expendable...

Owners Manual
Page 25
... One (1) Year Commercial warranty, parts & labor, with Hydro-Gear Distributor network. *** "Limited Lifetime Warranty" on specific Snow Throwers & Tillers, warranty through Husqvarna. ** See reference 4 (b) of the warranty statement. M-ZT - (ZT3400 transmission) Two (2) Year warranty, parts & labor, with Husqvarna. Two (2) Year Consumer warranty, parts & labor, with Hydro-Gear Distributor network. Deck Shell replacement will be...
... One (1) Year Commercial warranty, parts & labor, with Hydro-Gear Distributor network. *** "Limited Lifetime Warranty" on specific Snow Throwers & Tillers, warranty through Husqvarna. ** See reference 4 (b) of the warranty statement. M-ZT - (ZT3400 transmission) Two (2) Year warranty, parts & labor, with Husqvarna. Two (2) Year Consumer warranty, parts & labor, with Hydro-Gear Distributor network. Deck Shell replacement will be...


