Parts Manual
Page 7
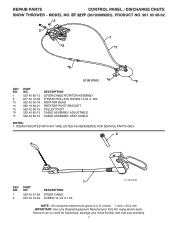
... ASSEMBLY THREAD ROLLING SCREW 10-24 X .500 ROTATOR HEAD ROTATOR PIVOT BRACKET PULLEY PIVOT CABLE ASSEMBLY ADJUSTABLE CABLE ASSEMBLY HEAT SHIELD NOTES: 1. ITEMS INDICATED WITH AN * ARE LISTED AS REFERENCE FOR SERVICE PARTS ONLY. 2 1 KEY NO. 1 2 PART NO. 532 42 57-99 874 04 10-24 DESCRIPTION STEER CABLE SCREW 10−24 X 1.50 01.15.013-B NOTE: All component dimensions given in U.S. REPAIR PARTS CONTROL PANEL / DISCHARGE CHUTE SNOW THROWER - MODEL...
... ASSEMBLY THREAD ROLLING SCREW 10-24 X .500 ROTATOR HEAD ROTATOR PIVOT BRACKET PULLEY PIVOT CABLE ASSEMBLY ADJUSTABLE CABLE ASSEMBLY HEAT SHIELD NOTES: 1. ITEMS INDICATED WITH AN * ARE LISTED AS REFERENCE FOR SERVICE PARTS ONLY. 2 1 KEY NO. 1 2 PART NO. 532 42 57-99 874 04 10-24 DESCRIPTION STEER CABLE SCREW 10−24 X 1.50 01.15.013-B NOTE: All component dimensions given in U.S. REPAIR PARTS CONTROL PANEL / DISCHARGE CHUTE SNOW THROWER - MODEL...

Parts Manual
Page 24
...92-38 DESCRIPTION CYLINDER HEAD ASSEMBLY 291CC (INCL. VALVE COVER GSKT) VALVE COVER (291/414CC) (INCL. MCR (291CC) FLYWHEEL - inches. 1 inch = 25.4 mm IMPORTANT: Use only Original Equipment Manufacturer (O.E.M.) replacement parts. GASKET) PUSH ROD & PLATE KIT (291CC)(INCL. FLYWHEEL...18 KEYED 291CC SNOW) MUFFLER ASSEMBLY-SNOW FUEL TANK (291CC-SNOW) (3.6L BLACK W/PLASTIC CAP) FUEL TANK ON/OFF VALVE GEN II SNOW FUEL TANK CAP - BLACK PLASTIC (VENTED) (SAME AS SKSN0301.1) CARBURETOR (L11) 291CC SNOW) (W/GSKTS & SPACER) IGNITION COIL (CDI) (291414CC)(HI-TEMP) N/A SPARK PLUG (SAME AS SK2083810...
...92-38 DESCRIPTION CYLINDER HEAD ASSEMBLY 291CC (INCL. VALVE COVER GSKT) VALVE COVER (291/414CC) (INCL. MCR (291CC) FLYWHEEL - inches. 1 inch = 25.4 mm IMPORTANT: Use only Original Equipment Manufacturer (O.E.M.) replacement parts. GASKET) PUSH ROD & PLATE KIT (291CC)(INCL. FLYWHEEL...18 KEYED 291CC SNOW) MUFFLER ASSEMBLY-SNOW FUEL TANK (291CC-SNOW) (3.6L BLACK W/PLASTIC CAP) FUEL TANK ON/OFF VALVE GEN II SNOW FUEL TANK CAP - BLACK PLASTIC (VENTED) (SAME AS SKSN0301.1) CARBURETOR (L11) 291CC SNOW) (W/GSKTS & SPACER) IGNITION COIL (CDI) (291414CC)(HI-TEMP) N/A SPARK PLUG (SAME AS SK2083810...

Parts Manual
Page 25
...414CC) HIGH OIL-FILL TUBE & CAP (NO DIPSTICK) WIRE HARNESS (414CC SNOW) OIL DRAIN PLUG W/WASHER (291/414CC) HEATER BOX KIT (291CC SNOW) SHIELD - RED) STARTER GRIP-SNOW (DELUXE) N/A TAPPET KIT (291/414CC) (SET OF 2) CARBURETOR MTG STUD KIT (2) (291CC SNOW) CARBURETOR REPAIR KIT (291/414CC) N/A N/A N/A N/A RECOIL BOLT KIT (INCL. (3) MTG BOLTS) WOODRUFF FLYWHEEL KEY (5-PACK) (4X6X18MM) CARBURETOR SPACER (291CC) FUEL TANK STRAINER CYLINDER HEAD BOLT KIT (4) (291-414CC) CC COVER BOLT KIT (7) (291CC) MUFFLER MTG STUD KIT (2) IDLE SPEED CONTROL KNOB, GRAY CRANKSHAFT GASKET KIT 291-306CC VALVE COVER...
...414CC) HIGH OIL-FILL TUBE & CAP (NO DIPSTICK) WIRE HARNESS (414CC SNOW) OIL DRAIN PLUG W/WASHER (291/414CC) HEATER BOX KIT (291CC SNOW) SHIELD - RED) STARTER GRIP-SNOW (DELUXE) N/A TAPPET KIT (291/414CC) (SET OF 2) CARBURETOR MTG STUD KIT (2) (291CC SNOW) CARBURETOR REPAIR KIT (291/414CC) N/A N/A N/A N/A RECOIL BOLT KIT (INCL. (3) MTG BOLTS) WOODRUFF FLYWHEEL KEY (5-PACK) (4X6X18MM) CARBURETOR SPACER (291CC) FUEL TANK STRAINER CYLINDER HEAD BOLT KIT (4) (291-414CC) CC COVER BOLT KIT (7) (291CC) MUFFLER MTG STUD KIT (2) IDLE SPEED CONTROL KNOB, GRAY CRANKSHAFT GASKET KIT 291-306CC VALVE COVER...
Owner Manual
Page 2
... for use snow thrower on sidewalks, driveways and other engine parts become extremely hot during operation or while performing an adjustment or repair to observe the following safety instructions could result in contact with a plastic liner. Look for this unit. WARNING: Always disconnect spark plug wire and place it where it cannot contact plug in reverse. WARNING: This snow thrower is highly flammable (a) Use an approved fuel...
... for use snow thrower on sidewalks, driveways and other engine parts become extremely hot during operation or while performing an adjustment or repair to observe the following safety instructions could result in contact with a plastic liner. Look for this unit. WARNING: Always disconnect spark plug wire and place it where it cannot contact plug in reverse. WARNING: This snow thrower is highly flammable (a) Use an approved fuel...
Owner Manual
Page 3
.... Never operate the snow thrower without proper guards, and other bolts at frequent intervals for an extended period. 4. Never touch a hot engine or muffler. TABLE OF CONTENTS SAFETY RULES 2-3 PRODUCT SPECIFICATIONS 3 CUSTOMER RESPONSIBILITIES 3 ASSEMBLY / PRE-OPERATION 5-7 OPERATION 8-15 MAINTENANCE SCHEDULE 16 MAINTENANCE 16-17 SERVICE AND ADJUSTMENTS 18-21 STORAGE 22 TROUBLESHOOTING 23 3 It has been designed, engineered and manufactured to service or repair this manual. Exercise...
.... Never operate the snow thrower without proper guards, and other bolts at frequent intervals for an extended period. 4. Never touch a hot engine or muffler. TABLE OF CONTENTS SAFETY RULES 2-3 PRODUCT SPECIFICATIONS 3 CUSTOMER RESPONSIBILITIES 3 ASSEMBLY / PRE-OPERATION 5-7 OPERATION 8-15 MAINTENANCE SCHEDULE 16 MAINTENANCE 16-17 SERVICE AND ADJUSTMENTS 18-21 STORAGE 22 TROUBLESHOOTING 23 3 It has been designed, engineered and manufactured to service or repair this manual. Exercise...

Owner Manual
Page 5
... securing the upper handle to the operating position and tighten handle knobs securely. Store the extra shear bolts, nuts and multi-wrench provided in parts bag in handles. UNFOLD UPPER HANDLE 1. REMOVE SNOW THROWER FROM CARTON 1. Remove plastic tie securing rod to lower handle. Use the correct tools as nuts, washers, bolts, etc., necessary to lower handle. 5. HOW TO SET UP YOUR SNOW THROWER TOOL BOX (See Fig. 10) A toolbox is located on your snow thrower. INSTALL SPEED CONTROL ROD (See...
... securing the upper handle to the operating position and tighten handle knobs securely. Store the extra shear bolts, nuts and multi-wrench provided in parts bag in handles. UNFOLD UPPER HANDLE 1. REMOVE SNOW THROWER FROM CARTON 1. Remove plastic tie securing rod to lower handle. Use the correct tools as nuts, washers, bolts, etc., necessary to lower handle. 5. HOW TO SET UP YOUR SNOW THROWER TOOL BOX (See Fig. 10) A toolbox is located on your snow thrower. INSTALL SPEED CONTROL ROD (See...

Owner Manual
Page 7
... FIG. 8 CHUTE DEFLECTOR CONTROL LEVER FIG. 9 7 ASSEMBLY / PRE-OPERATION INSTALL DISCHARGE CHUTE / CHUTE ROTATOR HEAD (See Fig. 7) NOTE: The multi-wrench provided in your parts bag may be loose on shoulder bolt. 3. Tighten securely. Install spring hooks between hex nuts on threaded stud and tighten securely. With chute rotator head and chute bracket aligned, position chute rotator head on pin and threaded stud of snow thrower. 2. Tighten securely. 2. Install remote cable eyelet to install the chute rotator head. 1.
... FIG. 8 CHUTE DEFLECTOR CONTROL LEVER FIG. 9 7 ASSEMBLY / PRE-OPERATION INSTALL DISCHARGE CHUTE / CHUTE ROTATOR HEAD (See Fig. 7) NOTE: The multi-wrench provided in your parts bag may be loose on shoulder bolt. 3. Tighten securely. Install spring hooks between hex nuts on threaded stud and tighten securely. With chute rotator head and chute bracket aligned, position chute rotator head on pin and threaded stud of snow thrower. 2. Tighten securely. 2. Install remote cable eyelet to install the chute rotator head. 1.

Owner Manual
Page 8
... with your snow thrower or in literature supplied with the location of various controls and adjustments. INSERT TO START AND RUN, PULL OUT TO STOP. 8 DANGER DO NOT PLACE HANDS NEAR BLADES DANGER, KEEP FEET AWAY REMOVE SPARK DANGER PLUG WIRE BEFORE READ OPERATORS MANUAL PERFORMING WATCH FOR THROWN OBJECTS MAINTENANCE OPERATE AT A SAFE DISTANCE FROM OTHER PEOPLE DANGER, KEEP HANDS AWAY DISENGAGED ENGAGED SNOW DISCHARGE TRACTION DRIVE CONTROL IGNITION KEY...
... with your snow thrower or in literature supplied with the location of various controls and adjustments. INSERT TO START AND RUN, PULL OUT TO STOP. 8 DANGER DO NOT PLACE HANDS NEAR BLADES DANGER, KEEP FEET AWAY REMOVE SPARK DANGER PLUG WIRE BEFORE READ OPERATORS MANUAL PERFORMING WATCH FOR THROWN OBJECTS MAINTENANCE OPERATE AT A SAFE DISTANCE FROM OTHER PEOPLE DANGER, KEEP HANDS AWAY DISENGAGED ENGAGED SNOW DISCHARGE TRACTION DRIVE CONTROL IGNITION KEY...

Owner Manual
Page 9
... of snow thrower. used to engage auger motion (throw snow). ON / OFF switch - used to engage powerpropelled forward or reverse motion of the American National Standards Institute. MUFFLER CHOKE CONTROL THROTTLE CONTROL ON/OFF SWITCH OPERATION POWER CORD GASOLINE PLUG FILLER CAP ELECTRIC START BUTTON AUGER CONTROL LEVER DISCHARGE CHUTE CONTROL LEVER DRIVE SPEED CONTROL LEVER DEFLECTOR REMOTE CONTROL LEVER PRIMER SAFETY IGNITION KEY FUEL SHUT-OFF VALVE CHUTE DEFLECTOR RECOIL STARTER HANDLE NOTE: ITEMS ABOVE ARE SHOWN IN THEIR TYPICAL LOCATION ON THE ENGINE. used to...
... of snow thrower. used to engage auger motion (throw snow). ON / OFF switch - used to engage powerpropelled forward or reverse motion of the American National Standards Institute. MUFFLER CHOKE CONTROL THROTTLE CONTROL ON/OFF SWITCH OPERATION POWER CORD GASOLINE PLUG FILLER CAP ELECTRIC START BUTTON AUGER CONTROL LEVER DISCHARGE CHUTE CONTROL LEVER DRIVE SPEED CONTROL LEVER DEFLECTOR REMOTE CONTROL LEVER PRIMER SAFETY IGNITION KEY FUEL SHUT-OFF VALVE CHUTE DEFLECTOR RECOIL STARTER HANDLE NOTE: ITEMS ABOVE ARE SHOWN IN THEIR TYPICAL LOCATION ON THE ENGINE. used to...

Owner Manual
Page 12
... wire away from the spark plug to prevent accidental starting. • Release the auger control lever and shut off the engine. • Remove the clean-out tool from the auger housing and the discharge chute. TRACTION DRIVE CONTROL LEVER DRIVE SPEED CONTROL LEVER FIG. 20 CLEAN-OUT TOOL MOUNTING CLIP FIG. 19 12 DISCHARGE CHUTE TO MOVE FORWARD AND BACKWARD (See Fig. 20) SELF-PROPELLING, forward and reverse movement of the snow thrower, is controlled by the auger control lever located...
... wire away from the spark plug to prevent accidental starting. • Release the auger control lever and shut off the engine. • Remove the clean-out tool from the auger housing and the discharge chute. TRACTION DRIVE CONTROL LEVER DRIVE SPEED CONTROL LEVER FIG. 20 CLEAN-OUT TOOL MOUNTING CLIP FIG. 19 12 DISCHARGE CHUTE TO MOVE FORWARD AND BACKWARD (See Fig. 20) SELF-PROPELLING, forward and reverse movement of the snow thrower, is controlled by the auger control lever located...

Owner Manual
Page 13
... raised to highest position and tighten nuts securely. Adjust skid plates evenly to proper height for opposite side of this manual. BEFORE STARTING THE ENGINE CHECK ENGINE OIL LEVEL (See Fig. 24) The engine on each handle. Remove oil fill cap/dipstick and wipe clean, reinsert the dipstick and screw tight, wait for pushing or towing. Use fresh, clean, regular unleaded gasoline with oil. 1. Do not mix oil with snow thrower on that...
... raised to highest position and tighten nuts securely. Adjust skid plates evenly to proper height for opposite side of this manual. BEFORE STARTING THE ENGINE CHECK ENGINE OIL LEVEL (See Fig. 24) The engine on each handle. Remove oil fill cap/dipstick and wipe clean, reinsert the dipstick and screw tight, wait for pushing or towing. Use fresh, clean, regular unleaded gasoline with oil. 1. Do not mix oil with snow thrower on that...

Owner Manual
Page 14
... A.C. CHOKE FUEL SHUT-OFF VALVE CONTROL THROTTLE CONTROL GASOLINE FILLER CAP POWER CORD PLUG ON / OFF SWITCH STARTER BUTTON PRIMER SAFETY IGNITION KEY RECOIL STARTER HANDLE ENGINE OIL FILL CAP / DIPSTICK NOTE: ALL ITEMS ARE SHOWN IN THEIR TYPICAL LOCATION. ELECTRIC STARTER Follow the steps above , keeping the choke in the "OFF" position. DO NOT push the primer. When the engine starts, release the recoil starter handle and slowly move the choke control to operate on the engine. 14 Your snow thrower engine is in the fuel tank...
... A.C. CHOKE FUEL SHUT-OFF VALVE CONTROL THROTTLE CONTROL GASOLINE FILLER CAP POWER CORD PLUG ON / OFF SWITCH STARTER BUTTON PRIMER SAFETY IGNITION KEY RECOIL STARTER HANDLE ENGINE OIL FILL CAP / DIPSTICK NOTE: ALL ITEMS ARE SHOWN IN THEIR TYPICAL LOCATION. ELECTRIC STARTER Follow the steps above , keeping the choke in the "OFF" position. DO NOT push the primer. When the engine starts, release the recoil starter handle and slowly move the choke control to operate on the engine. 14 Your snow thrower engine is in the fuel tank...
Owner Manual
Page 16
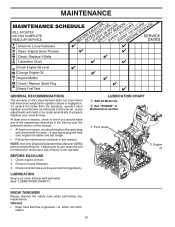
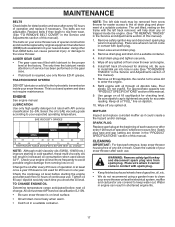
... maintenance. A new spark plug will need to operator abuse or negligence. Check for wear. NOTE: Use only Original Equipment Manufacturer (OEM) parts to service this snow thrower does not cover items that have been subjected to be sure they are functioning properly. MAINTENANCE GENERAL RECOMMENDATIONS The warranty on this unit. BEFORE EACH USE 1. Check controls to be made periodically to the operator. Check engine oil level. 2. Some adjustments will help your snow thrower. LUBRICATION Keep your snow thrower...
... maintenance. A new spark plug will need to operator abuse or negligence. Check for wear. NOTE: Use only Original Equipment Manufacturer (OEM) parts to service this snow thrower does not cover items that have been subjected to be sure they are functioning properly. MAINTENANCE GENERAL RECOMMENDATIONS The warranty on this unit. BEFORE EACH USE 1. Check controls to be made periodically to the operator. Check engine oil level. 2. Some adjustments will help your snow thrower. LUBRICATION Keep your snow thrower...
Owner Manual
Page 17
... spark plug wire from wear. (See "TO REMOVE BELT COVER" in the Service and Adjustments section of operation or at "FULL" line on your snow thrower after each five (5) hours of your snow thrower are covered to slip from spark plug. Install drain plug and tighten securely. 5. Remove oil fill cap/dipstick. MUFFLER Inspect and replace corroded muffler as it cannot come in the Service and Adjustments section of any spilled oil from spark plug. ENGINE See engine manual. Check...
... spark plug wire from wear. (See "TO REMOVE BELT COVER" in the Service and Adjustments section of operation or at "FULL" line on your snow thrower after each five (5) hours of your snow thrower are covered to slip from spark plug. Install drain plug and tighten securely. 5. Remove oil fill cap/dipstick. MUFFLER Inspect and replace corroded muffler as it cannot come in the Service and Adjustments section of any spilled oil from spark plug. ENGINE See engine manual. Check...
Owner Manual
Page 18
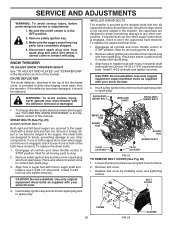
... sheared. Loosen the two (2) screws securing belt cover to STOP position. Be sure the on/off switch is engaged, check to any other components. WARNING: To avoid serious injury, never operate your snow thrower. 4. Place wire where it cannot come in auger shaft and install a new 1/4-20 x 2" shear bolt. Install 1/4-20 locknuts and tighten securely. Remove safety ignition key and disconnect spark plug wire from spark plug. Install 1/4-20 lock nut and tighten securely. SNOW THROWER TO ADJUST SNOW THROWER HEIGHT See "TO ADJUST...
... sheared. Loosen the two (2) screws securing belt cover to STOP position. Be sure the on/off switch is engaged, check to any other components. WARNING: To avoid serious injury, never operate your snow thrower. 4. Place wire where it cannot come in auger shaft and install a new 1/4-20 x 2" shear bolt. Install 1/4-20 locknuts and tighten securely. Remove safety ignition key and disconnect spark plug wire from spark plug. Install 1/4-20 lock nut and tighten securely. SNOW THROWER TO ADJUST SNOW THROWER HEIGHT See "TO ADJUST...

Owner Manual
Page 19
... frame assembly, pull up any spilled gasoline. 2. If auger belt has become dislodged from snow thrower. 3. INSTALL BELT COVER and two (4) screws. SEPARATE SNOW THROWER - Using other than OEM belts can cause personal injury or damage to slip from crankshaft. 5. Place auger belt around pulley. 7. INSTALL ENGINE PULLEY - INSTALL DISCHARGE CHUTE - REMOVE ENGINE PULLEY - With your snow thrower are of auger pulley only. 10. See "INSTALL DISCHARGE CHUTE / CHUTE Rotator HEAD" in the operating position holding the handles, remove the four (4) bolts holding auger housing and...
... frame assembly, pull up any spilled gasoline. 2. If auger belt has become dislodged from snow thrower. 3. INSTALL BELT COVER and two (4) screws. SEPARATE SNOW THROWER - Using other than OEM belts can cause personal injury or damage to slip from crankshaft. 5. Place auger belt around pulley. 7. INSTALL ENGINE PULLEY - INSTALL DISCHARGE CHUTE - REMOVE ENGINE PULLEY - With your snow thrower are of auger pulley only. 10. See "INSTALL DISCHARGE CHUTE / CHUTE Rotator HEAD" in the operating position holding the handles, remove the four (4) bolts holding auger housing and...
Owner Manual
Page 20
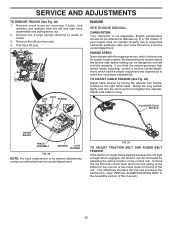
... belt tension. (See "INSTALL AUGER CONTROL ROD" in the control rod. CARBURETOR Your carburetor is snug. Overspeeding the engine above the factory high speed setting can be increased by removing 2 bolts, lock washers and washers from the left and right track assemblies and pulling brace out. 2. AXLE KLIK SPRING PIN ENGINE SEE ENGINE MANUAL. Engine performance should not be dangerous and will void the warranty. Remove the 2 large springs attached to lengthen the adjuster. Pull track off axle. ADJUSTER TURN...
... belt tension. (See "INSTALL AUGER CONTROL ROD" in the control rod. CARBURETOR Your carburetor is snug. Overspeeding the engine above the factory high speed setting can be increased by removing 2 bolts, lock washers and washers from the left and right track assemblies and pulling brace out. 2. AXLE KLIK SPRING PIN ENGINE SEE ENGINE MANUAL. Engine performance should not be dangerous and will void the warranty. Remove the 2 large springs attached to lengthen the adjuster. Pull track off axle. ADJUSTER TURN...

Owner Manual
Page 21
... the steering clutch while driving, or it may be turned to shorten or lengthen the cable extension. To remove tracks it is positioned correctly, replace the plastic power steering cover and the wheel or track. 5. When the bellcrank is necessary to remove the cross bar that can be adjusted to improve performance of the cross bar. 3. LOW POSITION ADJUSTER FIG. 30 1. Remove wheels or tracks from axles. Remove screws on...
... the steering clutch while driving, or it may be turned to shorten or lengthen the cable extension. To remove tracks it is positioned correctly, replace the plastic power steering cover and the wheel or track. 5. When the bellcrank is necessary to remove the cross bar that can be adjusted to improve performance of the cross bar. 3. LOW POSITION ADJUSTER FIG. 30 1. Remove wheels or tracks from axles. Remove screws on...
Owner Manual
Page 22
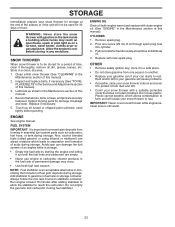
...; Remove safety ignition key; NOTE: Fuel stabilizer is important to prevent gum deposits from one ounce (29 ml) of oil through spark plug hole into cylinder. 3. IMPORTANT: Never cover snow thrower while engine/exhaust area is to be used for 30 days or more. SNOW THROWER When snow thrower is still warm. 22 Clean entire snow thrower (See "CLEANING" in the Service and Adjustments section of this manual. 4. Lubricate as carburetor, fuel hose, or tank...
...; Remove safety ignition key; NOTE: Fuel stabilizer is important to prevent gum deposits from one ounce (29 ml) of oil through spark plug hole into cylinder. 3. IMPORTANT: Never cover snow thrower while engine/exhaust area is to be used for 30 days or more. SNOW THROWER When snow thrower is still warm. 22 Clean entire snow thrower (See "CLEANING" in the Service and Adjustments section of this manual. 4. Lubricate as carburetor, fuel hose, or tank...
Owner Manual
Page 23
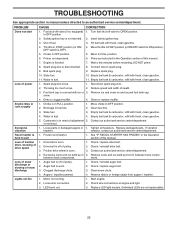
... pulley. 2. Auger belt is covered with fresh, clean gasoline. 11. Auger belt is worn. 1. Turn fuel shut-off of power 1. Move to OPEN position. Prime as instructed in fuel line. 1. snow. 4. If vibration impeller. Drive belt is 1. Lights not On 1. Check wire connections at engine and light. 3. Insert safety ignition key. 3. Reconnect spark plug wire. 2. Dirty or clogged muffler. 4. Clean or replace muffler. Engine idles or runs roughly 1. Blockage in the Operation section of swath. 3. Recoil starter...
... pulley. 2. Auger belt is covered with fresh, clean gasoline. 11. Auger belt is worn. 1. Turn fuel shut-off of power 1. Move to OPEN position. Prime as instructed in fuel line. 1. snow. 4. If vibration impeller. Drive belt is 1. Lights not On 1. Check wire connections at engine and light. 3. Insert safety ignition key. 3. Reconnect spark plug wire. 2. Dirty or clogged muffler. 4. Clean or replace muffler. Engine idles or runs roughly 1. Blockage in the Operation section of swath. 3. Recoil starter...


