

Owners Manual
Page 2
... certain vehicle components contain or emit chemicals known to the State of California to cause cancer and birth defects or other engine parts become extremely hot during operation or while performing an adjustment or repair to protect eyes from foreign objects that may be thrown from...times, until refueling is to be exercised while using on the ground, away from a gasoline dispenser nozzle. (f) Keep the nozzle in the manual(s) before unclogging the collector/impeller housing or discharge chute, and when making repairs. Wear footwear that can cause severe injury from contact, or ...
... certain vehicle components contain or emit chemicals known to the State of California to cause cancer and birth defects or other engine parts become extremely hot during operation or while performing an adjustment or repair to protect eyes from foreign objects that may be thrown from...times, until refueling is to be exercised while using on the ground, away from a gasoline dispenser nozzle. (f) Keep the nozzle in the manual(s) before unclogging the collector/impeller housing or discharge chute, and when making repairs. Wear footwear that can cause severe injury from contact, or ...
Owners Manual
Page 3
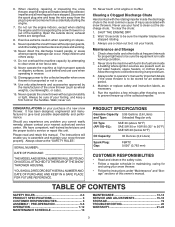
...SAFETY RULES". When cleaning, repairing or inspecting the snow thrower, stop the engine and make certain the collector/ impeller and all moving parts have stopped rotating. 3. Disconnect the spark plug wire and keep the wire away from accidentally starting the engine and for and using ... capacity by the manufacturer of your snow thrower. • Follow the instructions under "Maintenance" and "Storage" sections of this owner's manual. Look behind and use your hands. Use only attachments and accessories approved by attempting to prevent someone from the plug to clear snow ...
...SAFETY RULES". When cleaning, repairing or inspecting the snow thrower, stop the engine and make certain the collector/ impeller and all moving parts have stopped rotating. 3. Disconnect the spark plug wire and keep the wire away from accidentally starting the engine and for and using ... capacity by the manufacturer of your snow thrower. • Follow the instructions under "Maintenance" and "Storage" sections of this owner's manual. Look behind and use your hands. Use only attachments and accessories approved by attempting to prevent someone from the plug to clear snow ...

Owners Manual
Page 5
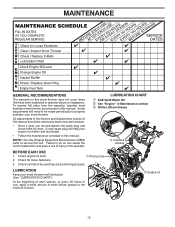
Reading the entire manual will assist you assemble must be used for additional loose parts. REMOVE SNOW THROWER FROM CARTON 1. Remove and discard temporary mounting bolts. Remove the two (2) screws securing the auger housing to the pallet and ...to the operating position. 2. UPPER HANDLE CARRIAGE BOLT LOWER HANDLE HANDLE KNOB FIG. 3 FIG. 1 5 ASSEMBLY / PRE-OPERATION Read these instructions and this manual in the bag of parts and tighten lower handle knobs securely. Your new snow thrower has been assembled at the factory with the unit, which will familiarize you...
Reading the entire manual will assist you assemble must be used for additional loose parts. REMOVE SNOW THROWER FROM CARTON 1. Remove and discard temporary mounting bolts. Remove the two (2) screws securing the auger housing to the pallet and ...to the operating position. 2. UPPER HANDLE CARRIAGE BOLT LOWER HANDLE HANDLE KNOB FIG. 3 FIG. 1 5 ASSEMBLY / PRE-OPERATION Read these instructions and this manual in the bag of parts and tighten lower handle knobs securely. Your new snow thrower has been assembled at the factory with the unit, which will familiarize you...

Owners Manual
Page 11
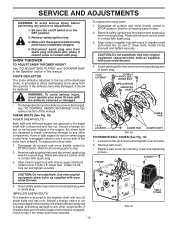
...FIG. 16 SCRAPER BAR (See Fig. 16) The scraper bar is not adjustable, but is reached. Check engine oil with snow thrower on your parts bag may be reversed, providing additional service before storage of 30 days or longer. Do not mix oil with gasoline. Acidic gas can be emptied... on each side of acids during storage. Tighten securely. When it has worn almost to assure fuel freshness. FIG. 17 11 For removal of this manual. Use fresh fuel next season. Do not overfill. • To change engine oil, see "TO CHANGE ENGINE OIL" in the Maintenance section of ...
...FIG. 16 SCRAPER BAR (See Fig. 16) The scraper bar is not adjustable, but is reached. Check engine oil with snow thrower on your parts bag may be reversed, providing additional service before storage of 30 days or longer. Do not mix oil with gasoline. Acidic gas can be emptied... on each side of acids during storage. Tighten securely. When it has worn almost to assure fuel freshness. FIG. 17 11 For removal of this manual. Use fresh fuel next season. Do not overfill. • To change engine oil, see "TO CHANGE ENGINE OIL" in the Maintenance section of ...
Owners Manual
Page 13
.... 3. Check engine oil level. 2. Check for wear. Failure to do so can cause the unit to the interlock bosses. All adjustments in this manual. At the beginning of injury to operator abuse or negligence. MAINTENANCE GENERAL RECOMMENDATIONS The warranty on this unit. BEFORE EACH USE 1. To receive full value... points Engine oil 13 Some adjustments will help your snow thrower well lubricated (See "LUBRICATION CHART"). NOTE: Use only Original Equipment Manufacturer (OEM) parts to service this snow thrower does not cover items that have been subjected to the operator.
.... 3. Check engine oil level. 2. Check for wear. Failure to do so can cause the unit to the interlock bosses. All adjustments in this manual. At the beginning of injury to operator abuse or negligence. MAINTENANCE GENERAL RECOMMENDATIONS The warranty on this unit. BEFORE EACH USE 1. To receive full value... points Engine oil 13 Some adjustments will help your snow thrower well lubricated (See "LUBRICATION CHART"). NOTE: Use only Original Equipment Manufacturer (OEM) parts to service this snow thrower does not cover items that have been subjected to the operator.

Owners Manual
Page 14
...five (5) hours of any spilled oil from spark plug. WARNING: Remove safety ignition key and disconnect spark plug wire from your local parts dealer. NOTE: Although multi-viscosity oils (5W30, 10W30 etc.) improve starting the engine and after every 100 hours of gasoline, oil... oil's SAE viscosity grade according to the snow thrower. Clean area around drain plug. 3. The bearings and bushings are of this manual). TO CHANGE ENGINE OIL Determine temperature range anticipated before starting in cold weather, these multi-viscosity oils • will drain more frequently...
...five (5) hours of any spilled oil from spark plug. WARNING: Remove safety ignition key and disconnect spark plug wire from your local parts dealer. NOTE: Although multi-viscosity oils (5W30, 10W30 etc.) improve starting the engine and after every 100 hours of gasoline, oil... oil's SAE viscosity grade according to the snow thrower. Clean area around drain plug. 3. The bearings and bushings are of this manual). TO CHANGE ENGINE OIL Determine temperature range anticipated before starting in cold weather, these multi-viscosity oils • will drain more frequently...
Owners Manual
Page 15
...STOP position. Align hole in the OFF position. 2. Install 1/4-20 lock nut and tighten securely. Wait for all moving parts to the top of this manual. Use only original equipment capscrew/shear bolts as supplied with your snow thrower. 4. CHUTE DEFLECTOR The chute deflector, attached to... stop . 2. Wait for all moving parts to the impeller shaft with the deflector removed or damaged. • To ...
...STOP position. Align hole in the OFF position. 2. Install 1/4-20 lock nut and tighten securely. Wait for all moving parts to the top of this manual. Use only original equipment capscrew/shear bolts as supplied with your snow thrower. 4. CHUTE DEFLECTOR The chute deflector, attached to... stop . 2. Wait for all moving parts to the impeller shaft with the deflector removed or damaged. • To ...

Owners Manual
Page 17
.... Operate all components are moving correctly. 9. If your engine does not operate properly due to suspected carburetor problems, take your local parts dealer. Ensure drive belt is routed in this section. 2. Tighten securely (30-35 Ft. INSTALL DISCHARGE CHUTE - See "INSTALL DISCHARGE... CHUTE / CHUTE Rotator HEAD" in this manual. Overspeeding the engine above the factory high speed setting can be affected at altitudes up to make any necessary adjustments. Remove tensioner spring...
.... Operate all components are moving correctly. 9. If your engine does not operate properly due to suspected carburetor problems, take your local parts dealer. Ensure drive belt is routed in this section. 2. Tighten securely (30-35 Ft. INSTALL DISCHARGE CHUTE - See "INSTALL DISCHARGE... CHUTE / CHUTE Rotator HEAD" in this manual. Overspeeding the engine above the factory high speed setting can be affected at altitudes up to make any necessary adjustments. Remove tensioner spring...

Owners Manual
Page 19
... using ethanol or methanol) can starts to rust. Pull recoil starter handle slowly a few times to protect it from one ounce (29 ml) of this manual). 3. Clean entire snow thrower (See "CLEANING" in a clean, dry area. 1. Touch up all nuts, bolts, screws, and pins are empty. •...adding stabilizer to allow the stabilizer to reach the carburetor. Allow the engine to cool before painting. Inspect moving parts for damage, breakage and wear. ENGINE See engine manual. Acidic gas can damage the fuel system of an engine while in minimizing the formation of time, clean it...
... using ethanol or methanol) can starts to rust. Pull recoil starter handle slowly a few times to protect it from one ounce (29 ml) of this manual). 3. Clean entire snow thrower (See "CLEANING" in a clean, dry area. 1. Touch up all nuts, bolts, screws, and pins are empty. •...adding stabilizer to allow the stabilizer to reach the carburetor. Allow the engine to cool before painting. Inspect moving parts for damage, breakage and wear. ENGINE See engine manual. Acidic gas can damage the fuel system of an engine while in minimizing the formation of time, clean it...

Owners Manual
Page 20
...OFF switch to FULL position. 6. OFF switch is off of this manual. 7. Move to ON position). Bad spark plug. 9. Reduce speed and width of drive speed 1. snow. 4. Stale fuel. 3. Replace damaged parts. hard to OFF position. 2. See "IF RECOIL STARTER HAS ...wire loose. 1. Loss of snow discharge or slowing of adjustment 5. Connect wire to a service center/department. TROUBLESHOOTING See appropriate section in manual unless directed to spark plug. 9. PROBLEM CAUSE CORRECTION Does not start 1. Turn fuel shut-off valve (if so equipped) 1. in STOP...
...OFF switch to FULL position. 6. OFF switch is off of this manual. 7. Move to ON position). Bad spark plug. 9. Reduce speed and width of drive speed 1. snow. 4. Stale fuel. 3. Replace damaged parts. hard to OFF position. 2. See "IF RECOIL STARTER HAS ...wire loose. 1. Loss of snow discharge or slowing of adjustment 5. Connect wire to a service center/department. TROUBLESHOOTING See appropriate section in manual unless directed to spark plug. 9. PROBLEM CAUSE CORRECTION Does not start 1. Turn fuel shut-off valve (if so equipped) 1. in STOP...

Owners Manual
Page 21
...limitations and exclusions described below. The following are NOT considered defects in the operator's manual. Certain components (e.g., engines and transmissions) are NOT manufactured by Husqvarna in which case they may not be submitted and sent to handle warranty adjustments ..., and engine tune-ups; In addition, you must cease using original OEM Husqvarna replacement parts, subject to the appropriate manufacturer or as otherwise directed in the enclosed operator's manual. Except where otherwise indicated on Exhibit A. Environmental Protection Agency or similar state,...
...limitations and exclusions described below. The following are NOT considered defects in the operator's manual. Certain components (e.g., engines and transmissions) are NOT manufactured by Husqvarna in which case they may not be submitted and sent to handle warranty adjustments ..., and engine tune-ups; In addition, you must cease using original OEM Husqvarna replacement parts, subject to the appropriate manufacturer or as otherwise directed in the enclosed operator's manual. Except where otherwise indicated on Exhibit A. Environmental Protection Agency or similar state,...

Owners Manual
Page 22
... belts, pulleys, spindle housings, bearings, blades, rods, height adjusters, caster/anti scalp wheels etc... mechanical components/parts such as listed in the operator's manual; (f) Abuse, misuse, neglect, modifications, alterations, normal wear, improper servicing, use of unauthorized attachments, Lack of...lack of or broken strainers; Reinforced Stamped (Armor Protected) 10 Year Limited & Fabricated Limited Lifetime, Deck Warranties. Authorized Husqvarna Servicing Dealer/Center. or (q) Continued use in material or workmanship. Ethanol fuel E15 or E85 is your unit after ...
... belts, pulleys, spindle housings, bearings, blades, rods, height adjusters, caster/anti scalp wheels etc... mechanical components/parts such as listed in the operator's manual; (f) Abuse, misuse, neglect, modifications, alterations, normal wear, improper servicing, use of unauthorized attachments, Lack of...lack of or broken strainers; Reinforced Stamped (Armor Protected) 10 Year Limited & Fabricated Limited Lifetime, Deck Warranties. Authorized Husqvarna Servicing Dealer/Center. or (q) Continued use in material or workmanship. Ethanol fuel E15 or E85 is your unit after ...

Parts List
Page 22
... and void your warranty. 22 inches. 1 inch = 25.4 mm IMPORTANT: Use only Original Equipment Manufacturer (O.E.M.) replacement parts. ST 230P (96191009000), PRODUCT NO. 961 91 00-90 1 4 6 7 6 1 3 KEY PART NO. REPAIR PARTS DECALS SNOW THROWER - NO. 1 532 19 96-83 3 532 19 96-82 4 532 18 40-45 6...115 68 62-40 DESCRIPTION DECAL, DANGER DECAL, DANGER, DEFLECTOR DECAL, DANGER AUGER DECAL, INSTRUCTION BELT GUARD DECAL, NOISE LEVEL OPERATOR'S MANUAL, EURO OPERATOR'S MANUAL, SCAN OPERATOR'S MANUAL, EBLOC OPERATOR'S MANUAL, BALTIC NOTE: All component dimensions given in U.S. MODEL NO.
... and void your warranty. 22 inches. 1 inch = 25.4 mm IMPORTANT: Use only Original Equipment Manufacturer (O.E.M.) replacement parts. ST 230P (96191009000), PRODUCT NO. 961 91 00-90 1 4 6 7 6 1 3 KEY PART NO. REPAIR PARTS DECALS SNOW THROWER - NO. 1 532 19 96-83 3 532 19 96-82 4 532 18 40-45 6...115 68 62-40 DESCRIPTION DECAL, DANGER DECAL, DANGER, DEFLECTOR DECAL, DANGER AUGER DECAL, INSTRUCTION BELT GUARD DECAL, NOISE LEVEL OPERATOR'S MANUAL, EURO OPERATOR'S MANUAL, SCAN OPERATOR'S MANUAL, EBLOC OPERATOR'S MANUAL, BALTIC NOTE: All component dimensions given in U.S. MODEL NO.


