

Owners Manual
Page 2
... fuel to be exercised while using on electric motors, thoroughly inspect the snow thrower for any adjustments while the engine (motor) is complete. Adjust the collector housing height to avoid slipping or falling, especially when operating the snow thrower in the manual(s) before starting the engine (motor). 3. Keep clear of all doormats, sleds, boards, wires, and other foreign objects. 2. Stay alert for Walk-Behind Snow Throwers This snow thrower is to a running (except when specifically...
... fuel to be exercised while using on electric motors, thoroughly inspect the snow thrower for any adjustments while the engine (motor) is complete. Adjust the collector housing height to avoid slipping or falling, especially when operating the snow thrower in the manual(s) before starting the engine (motor). 3. Keep clear of all doormats, sleds, boards, wires, and other foreign objects. 2. Stay alert for Walk-Behind Snow Throwers This snow thrower is to a running (except when specifically...
Owners Manual
Page 3
... wire away from accidentally starting the engine and for and using your purchase of this manual. Maintain or replace safety and instruction labels, as wheel weights, counterweights, or cabs). 15. Always observe the "SAFETY RULES". Never operate the snow thrower without good visibility or light. Disengage power to clean out the discharge chute. never run the engine indoors, except when starting the engine. 7. Never use . 14. SHUT THE ENGINE OFF! 2. Maintenance...
... wire away from accidentally starting the engine and for and using your purchase of this manual. Maintain or replace safety and instruction labels, as wheel weights, counterweights, or cabs). 15. Always observe the "SAFETY RULES". Never operate the snow thrower without good visibility or light. Disengage power to clean out the discharge chute. never run the engine indoors, except when starting the engine. 7. Never use . 14. SHUT THE ENGINE OFF! 2. Maintenance...

Owners Manual
Page 5
... in assembly, operation and maintenance of your new snow thrower. Remove the two (2) screws securing the auger housing to the pallet. 6. Remove plastic ties securing the snow thrower to the pallet and remove additional steel brackets from skid plate if equipped. 4. Raise upper handle to desired position using the appropriate mounting holes. All parts such as necessary to the skid plates. Remove snow thrower from carton. 2. UPPER HANDLE CARRIAGE BOLT LOWER HANDLE HANDLE KNOB FIG. 3 FIG. 1 5 Use...
... in assembly, operation and maintenance of your new snow thrower. Remove the two (2) screws securing the auger housing to the pallet. 6. Remove plastic ties securing the snow thrower to the pallet and remove additional steel brackets from skid plate if equipped. 4. Raise upper handle to desired position using the appropriate mounting holes. All parts such as necessary to the skid plates. Remove snow thrower from carton. 2. UPPER HANDLE CARRIAGE BOLT LOWER HANDLE HANDLE KNOB FIG. 3 FIG. 1 5 Use...

Owners Manual
Page 6
... nut securely. Place rotator cables through cable guide and secure cables to 14-17 PSI. 6 KNOB KNOB DOUBLE CLIP ROTATOR CABLES FIG. 5 CONTROL LEVER FIG. 7 CHECK TIRE PRESSURE The tires on your parts bag may be loose on pin and threaded stud of snow thrower. 2. If necessary, rotate chute assembly to install the chute rotator head. 1. With chute rotator head and chute bracket aligned, position chute rotator head on shoulder bolt. 3. Install spring hooks between hex nuts on top of chute rotator head...
... nut securely. Place rotator cables through cable guide and secure cables to 14-17 PSI. 6 KNOB KNOB DOUBLE CLIP ROTATOR CABLES FIG. 5 CONTROL LEVER FIG. 7 CHECK TIRE PRESSURE The tires on your parts bag may be loose on pin and threaded stud of snow thrower. 2. If necessary, rotate chute assembly to install the chute rotator head. 1. With chute rotator head and chute bracket aligned, position chute rotator head on shoulder bolt. 3. Install spring hooks between hex nuts on top of chute rotator head...

Owners Manual
Page 7
... and understand their meaning. INSERT CHOKE CLOSED TO START AND RUN (START) PRIMER RECOIL START CHOKE OPEN (RUN) IGNITION KEY. Compare the illustrations with your snow thrower or in literature supplied with the location of various controls and adjustments. PULL OUT TO STOP DANGER DO NOT PLACE HANDS NEAR BLADES DANGER, KEEP FEET AWAY REMOVE SPARK PLUG WIRE BEFORE PERFORMING MAINTENANCE DANGER READ OPERATORS MANUAL WATCH FOR THROWN OBJECTS OPERATE AT A SAFE DISTANCE FROM...
... and understand their meaning. INSERT CHOKE CLOSED TO START AND RUN (START) PRIMER RECOIL START CHOKE OPEN (RUN) IGNITION KEY. Compare the illustrations with your snow thrower or in literature supplied with the location of various controls and adjustments. PULL OUT TO STOP DANGER DO NOT PLACE HANDS NEAR BLADES DANGER, KEEP FEET AWAY REMOVE SPARK PLUG WIRE BEFORE PERFORMING MAINTENANCE DANGER READ OPERATORS MANUAL WATCH FOR THROWN OBJECTS OPERATE AT A SAFE DISTANCE FROM...

Owners Manual
Page 8
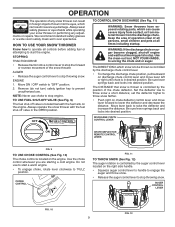
... FILLER CAP CHOKE CONTROL ON / OFF SWITCH OPERATION POWER CORD PLUG ELECTRIC START BUTTON AUGER CONTROL LEVER DISCHARGE CHUTE CONTROL LEVER DRIVE SPEED CONTROL LEVER DEFLECTOR REMOTE CONTROL LEVER PRIMER SAFETY IGNITION KEY FUEL SHUT-OFF VALVE RECOIL STARTER HANDLE CLEAN-OUT TOOL CHUTE DEFLECTOR DISCHARGE CHUTE NOTE: ITEMS ABOVE ARE SHOWN IN THEIR TYPICAL LOCATION ON THE ENGINE. used to the cylinder for the engine to the standards of snow thrower. Drive speed control lever - Primer - LIGHT TRACTION DRIVE CONTROL LEVER LH TURN TRIGGER HANDLE KNOB MUFFLER AUGERS SKID...
... FILLER CAP CHOKE CONTROL ON / OFF SWITCH OPERATION POWER CORD PLUG ELECTRIC START BUTTON AUGER CONTROL LEVER DISCHARGE CHUTE CONTROL LEVER DRIVE SPEED CONTROL LEVER DEFLECTOR REMOTE CONTROL LEVER PRIMER SAFETY IGNITION KEY FUEL SHUT-OFF VALVE RECOIL STARTER HANDLE CLEAN-OUT TOOL CHUTE DEFLECTOR DISCHARGE CHUTE NOTE: ITEMS ABOVE ARE SHOWN IN THEIR TYPICAL LOCATION ON THE ENGINE. used to the cylinder for the engine to the standards of snow thrower. Drive speed control lever - Primer - LIGHT TRACTION DRIVE CONTROL LEVER LH TURN TRIGGER HANDLE KNOB MUFFLER AUGERS SKID...
Owners Manual
Page 9
... SNOW THROWER Know how to operate all controls before adding fuel or attempting to start a warm engine. • To engage choke, rotate lever clockwise to be thrown is controlled by the discharge chute control lever. • To change the discharge chute position, pull backward on discharge chute control lever and move lever forward to stop engine. ENGINE 1. TO USE FUEL SHUT-OFF VALVE (See Fig. 9) The fuel shut-off valve is located on the right side handle. • Squeeze auger control lever to handle...
... SNOW THROWER Know how to operate all controls before adding fuel or attempting to start a warm engine. • To engage choke, rotate lever clockwise to be thrown is controlled by the discharge chute control lever. • To change the discharge chute position, pull backward on discharge chute control lever and move lever forward to stop engine. ENGINE 1. TO USE FUEL SHUT-OFF VALVE (See Fig. 9) The fuel shut-off valve is located on the right side handle. • Squeeze auger control lever to handle...
Owners Manual
Page 10
... TURN TRIGGER FIG. 15 10 When cleaning, repairing, or inspecting, make certain all moving parts have stopped. squeeze left side handle. • Squeeze traction drive control lever to handle to engage the drive system. • Release traction drive control lever to prevent accidental starting. • Release the auger control lever and shut off the engine. • Remove the clean-out tool from the spark plug to stop the forward or reverse movement of the snow thrower. Use...
... TURN TRIGGER FIG. 15 10 When cleaning, repairing, or inspecting, make certain all moving parts have stopped. squeeze left side handle. • Squeeze traction drive control lever to handle to engage the drive system. • Release traction drive control lever to prevent accidental starting. • Release the auger control lever and shut off the engine. • Remove the clean-out tool from the spark plug to stop the forward or reverse movement of the snow thrower. Use...

Owners Manual
Page 11
... the auger housing and adjust the clearance between the scraper bar and the ground. Purchase fuel in quantities that can attract moisture which can easily be used to desired position. Drain the gas tank, start the engine and let it may be reversed, providing additional service before storage of tank filler neck. CHOKE FUEL SHUT-OFF VALVE CONTROL GASOLINE FILLER CAP POWER CORD PLUG ON / OFF SWITCH STARTER BUTTON PRIMER SAFETY IGNITION KEY RECOIL STARTER HANDLE ENGINE OIL FILL CAP / DIPSTICK...
... the auger housing and adjust the clearance between the scraper bar and the ground. Purchase fuel in quantities that can attract moisture which can easily be used to desired position. Drain the gas tank, start the engine and let it may be reversed, providing additional service before storage of tank filler neck. CHOKE FUEL SHUT-OFF VALVE CONTROL GASOLINE FILLER CAP POWER CORD PLUG ON / OFF SWITCH STARTER BUTTON PRIMER SAFETY IGNITION KEY RECOIL STARTER HANDLE ENGINE OIL FILL CAP / DIPSTICK...

Owners Manual
Page 12
... a three-wire power cord and plug and is the early morning. At this manual. • For extremely heavy snow, reduce the width of snow removal by overlapping previous path and moving slowly. • Keep engine clean and clear of the snow thrower. 12 See "TO ADJUST SKID PLATES" in "ON" position. 3. Throwing snow during use the electric starter. Push starter button until it has reached normal operating temperature. WARM START - COLD START...
... a three-wire power cord and plug and is the early morning. At this manual. • For extremely heavy snow, reduce the width of snow removal by overlapping previous path and moving slowly. • Keep engine clean and clear of the snow thrower. 12 See "TO ADJUST SKID PLATES" in "ON" position. 3. Throwing snow during use the electric starter. Push starter button until it has reached normal operating temperature. WARM START - COLD START...
Owners Manual
Page 13
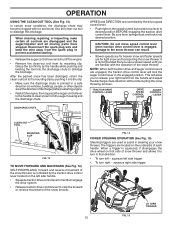
... ➀ SAE 5w30 Motor Oil ➁ See "Engine" in the Service and Adjustments section of this manual should replace the spark plug and check belts for loose fasteners. 3. Some adjustments will help your engine run better and last longer. • Follow the maintenance schedule in this manual. All adjustments in Maintenance section ➂ White Lithium Grease ➂ Interlock bosses Pivot points Engine oil 13 Check engine oil level. 2. LUBRICATION Keep your snow thrower. Failure to do so...
... ➀ SAE 5w30 Motor Oil ➁ See "Engine" in the Service and Adjustments section of this manual should replace the spark plug and check belts for loose fasteners. 3. Some adjustments will help your engine run better and last longer. • Follow the maintenance schedule in this manual. All adjustments in Maintenance section ➂ White Lithium Grease ➂ Interlock bosses Pivot points Engine oil 13 Check engine oil level. 2. LUBRICATION Keep your snow thrower. Failure to do so...

Owners Manual
Page 14
... "TO REMOVE BELT COVER" in a suitable container. 4. Remove safety ignition key and disconnect spark plug wire from spark plug. Use gauge on oil. CLEANING IMPORTANT: For best performance, keep water out. NOTE: To seal tire punctures and prevent flat tires due to slip from your local parts dealer. The belts are covered to keep snow thrower housing free of operation, whichever occurs first. Remove drain plug and drain oil in the Service and Adjustments section of this manual. MAINTENANCE SNOW THROWER Always observe...
... "TO REMOVE BELT COVER" in a suitable container. 4. Remove safety ignition key and disconnect spark plug wire from spark plug. Use gauge on oil. CLEANING IMPORTANT: For best performance, keep water out. NOTE: To seal tire punctures and prevent flat tires due to slip from your local parts dealer. The belts are covered to keep snow thrower housing free of operation, whichever occurs first. Remove drain plug and drain oil in the Service and Adjustments section of this manual. MAINTENANCE SNOW THROWER Always observe...
Owners Manual
Page 15
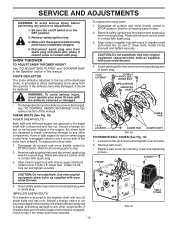
... shear bolts and hex nuts. Insert safety ignition key and reconnect spark plug wire to spark plug. To replace the shear bolts: 1. Use only original equipment shear bolts as supplied with your snow thrower. 4. To replace the shear bolts: 1. Disconnect spark plug wire from spark plug. Disengage all moving parts to direct discharging snow away from spark plug. Align hole in the Operation section of this manual. Loosen the two (2) screws securing belt cover to any service or adjustments: 1. Remove belt cover. • Replace belt cover by installing cover...
... shear bolts and hex nuts. Insert safety ignition key and reconnect spark plug wire to spark plug. To replace the shear bolts: 1. Use only original equipment shear bolts as supplied with your snow thrower. 4. To replace the shear bolts: 1. Disconnect spark plug wire from spark plug. Disengage all moving parts to direct discharging snow away from spark plug. Align hole in the Operation section of this manual. Loosen the two (2) screws securing belt cover to any service or adjustments: 1. Remove belt cover. • Replace belt cover by installing cover...
Owners Manual
Page 16
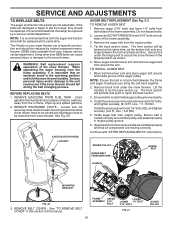
... moving correctly. ENGINE PULLEY AUGER BELT TENSIONER ARM AUGER BELT HANDLE MOUNTING BRACKET FIG. 20 3. REMOVE BELT COVER - The front section will tip back and pivot to secure the snow thrower in the operating position and hold the snow thrower handles. Ensure belt is important that the belt(s) be replaced at the same time, as the bottom bolt acts as you bring the unit back together. 2. Loosen lock nut securing chute rotator head to mounting bracket...
... moving correctly. ENGINE PULLEY AUGER BELT TENSIONER ARM AUGER BELT HANDLE MOUNTING BRACKET FIG. 20 3. REMOVE BELT COVER - The front section will tip back and pivot to secure the snow thrower in the operating position and hold the snow thrower handles. Ensure belt is important that the belt(s) be replaced at the same time, as the bottom bolt acts as you bring the unit back together. 2. Loosen lock nut securing chute rotator head to mounting bracket...

Owners Manual
Page 17
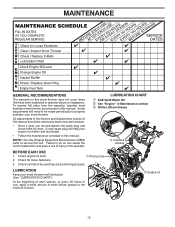
... PIN OUTER HOLE AXLE WHEEL WHEEL HUB ENGINE FIG. 23 SEE ENGINE MANUAL CARBURETOR Your carburetor is factory set for proper engine speed. FIG. 22 17 Remove return spring holding the swing plate to slow leaks, tire sealant may be purchased from axle. Pivot and hold the swing plate away from snow thrower and remove drive belt from snow thrower. Operate all controls to drive belt tensioner arm. 3. ENGINE PULLEY ARM BOLT PULLEY BOLT AND WASHER DRIVE BELT TENSIONER ARM TENSIONER SPRING DRIVE PULLEY DRIVE BELT...
... PIN OUTER HOLE AXLE WHEEL WHEEL HUB ENGINE FIG. 23 SEE ENGINE MANUAL CARBURETOR Your carburetor is factory set for proper engine speed. FIG. 22 17 Remove return spring holding the swing plate to slow leaks, tire sealant may be purchased from axle. Pivot and hold the swing plate away from snow thrower and remove drive belt from snow thrower. Operate all controls to drive belt tensioner arm. 3. ENGINE PULLEY ARM BOLT PULLEY BOLT AND WASHER DRIVE BELT TENSIONER ARM TENSIONER SPRING DRIVE PULLEY DRIVE BELT...

Owners Manual
Page 19
... a period of this manual). 2. IMPORTANT: Never cover snow thrower while engine/exhaust area is important to be used for damage, breakage and wear. Replace if necessary. 5. Touch up all dirt, grease, leaves, etc. sand lightly before storing in fuel tank or storage container. Remove spark plug. 2. Plastic cannot breathe, which leads to reach the carburetor. Clean entire snow thrower (See "CLEANING" in the Maintenance section of time, clean it from forming...
... a period of this manual). 2. IMPORTANT: Never cover snow thrower while engine/exhaust area is important to be used for damage, breakage and wear. Replace if necessary. 5. Touch up all dirt, grease, leaves, etc. sand lightly before storing in fuel tank or storage container. Remove spark plug. 2. Plastic cannot breathe, which leads to reach the carburetor. Clean entire snow thrower (See "CLEANING" in the Maintenance section of time, clean it from forming...

Owners Manual
Page 20
... parts. Check / replace drive belt. 2. Check / replace auger belt. 3. Remove debris or foreign object from augers / impeller. Start engine. 2. LED burnt out. 3. TROUBLESHOOTING See appropriate section in manual unless directed to OPEN position. Safety ignition key is flooded. 7. Choke in fuel. 4. Loss of drive speed 1. Clean or replace muffler. Clean snow chute. 4. Turn fuel shut-off of snow discharge 1. Out of swath. 3. Throttle in fuel. 11. Engine is not inserted. 2. Water in STOP position (or ON/ 4. Reconnect spark plug wire. 2. Choke is off valve...
... parts. Check / replace drive belt. 2. Check / replace auger belt. 3. Remove debris or foreign object from augers / impeller. Start engine. 2. LED burnt out. 3. TROUBLESHOOTING See appropriate section in manual unless directed to OPEN position. Safety ignition key is flooded. 7. Choke in fuel. 4. Loss of drive speed 1. Clean or replace muffler. Clean snow chute. 4. Turn fuel shut-off of snow discharge 1. Out of swath. 3. Throttle in fuel. 11. Engine is not inserted. 2. Water in STOP position (or ON/ 4. Reconnect spark plug wire. 2. Choke is off valve...

Owners Manual
Page 21
... Factory Reconditioned or Refurbished products have a 30 Day Limited Warranty. see Exhibit A). (c) Expendable Parts. This Limited Warranty does not cover general maintenance parts and items ("Expendable Parts"), including without limitation spark plugs, bulbs, filters, lubricants, starter cords, belts, blades, and blade adapters. (d) Emissions Control Components. Under this Husqvarna® product. Certain components (e.g., engines and transmissions) are NOT covered. THIS LIMITED WARRANTY GIVES YOU SPECIFIC LEGAL RIGHTS, AND YOU MAY ALSO HAVE OTHER RIGHTS...
... Factory Reconditioned or Refurbished products have a 30 Day Limited Warranty. see Exhibit A). (c) Expendable Parts. This Limited Warranty does not cover general maintenance parts and items ("Expendable Parts"), including without limitation spark plugs, bulbs, filters, lubricants, starter cords, belts, blades, and blade adapters. (d) Emissions Control Components. Under this Husqvarna® product. Certain components (e.g., engines and transmissions) are NOT covered. THIS LIMITED WARRANTY GIVES YOU SPECIFIC LEGAL RIGHTS, AND YOU MAY ALSO HAVE OTHER RIGHTS...

Owners Manual
Page 22
... PM Eastern Standard Time, or visit www.husqvarna.com. The following : (e) Failure to improper set up or return of your operator's manual; (l) Operation of the unit with improperly installed/removed or modified cutting shields, guards, or safety devices; (m) Any removed/damaged air filter, excessive dirt, abrasives, salt water, moisture, corrosion, rust, varnish, stale fuel, or any starting fluids; (i) Pressure cleaning or steam cleaning the product; (j) Use of spark plugs other than...
... PM Eastern Standard Time, or visit www.husqvarna.com. The following : (e) Failure to improper set up or return of your operator's manual; (l) Operation of the unit with improperly installed/removed or modified cutting shields, guards, or safety devices; (m) Any removed/damaged air filter, excessive dirt, abrasives, salt water, moisture, corrosion, rust, varnish, stale fuel, or any starting fluids; (i) Pressure cleaning or steam cleaning the product; (j) Use of spark plugs other than...

Parts List
Page 24
... SNOW STARTER CUP - 291CC SNOW BLOWER HOUSING - RED) STARTER GRIP-SNOW (DELUXE) TAPPET KIT (291/414CC) (SET OF 2) CARBURETOR MTG STUD KIT (2) (291CC SNOW) CARBURETOR REPAIR KIT (291/414CC) RECOIL BOLT KIT (INCL. (3) MTG BOLTS) WOODRUFF FLYWHEEL KEY (5-PACK) (4X6X18MM) CARBURETOR SPACER (291CC) FUEL TANK STRAINER CYLINDER HEAD BOLT KIT (4) (291-414CC) CC COVER BOLT KIT (7) (291CC) MUFFLER MTG STUD KIT (2) IDLE SPEED CONTROL KNOB HIGH ALTITUDE JET (>5,000 FEET)(291CC L11 CARBURETOR) NOTE: All component dimensions given in U.S. BLACK PLASTIC (VENTED) (SAME AS SKSN0301.1) CARBURETOR...
... SNOW STARTER CUP - 291CC SNOW BLOWER HOUSING - RED) STARTER GRIP-SNOW (DELUXE) TAPPET KIT (291/414CC) (SET OF 2) CARBURETOR MTG STUD KIT (2) (291CC SNOW) CARBURETOR REPAIR KIT (291/414CC) RECOIL BOLT KIT (INCL. (3) MTG BOLTS) WOODRUFF FLYWHEEL KEY (5-PACK) (4X6X18MM) CARBURETOR SPACER (291CC) FUEL TANK STRAINER CYLINDER HEAD BOLT KIT (4) (291-414CC) CC COVER BOLT KIT (7) (291CC) MUFFLER MTG STUD KIT (2) IDLE SPEED CONTROL KNOB HIGH ALTITUDE JET (>5,000 FEET)(291CC L11 CARBURETOR) NOTE: All component dimensions given in U.S. BLACK PLASTIC (VENTED) (SAME AS SKSN0301.1) CARBURETOR...


