
Owners Manual
Page 2
... the controls and the proper use a nozzle lock-open device. (g) Replace gasoline cap securely and wipe up , transporting, adjusting or making any adjustments while the engine (motor) is not possible, then refuel such equipment on a trailer with a portable container, rather than from the spark plug, disconnect the cord on electric motors, thoroughly inspect the snow thrower for use snow thrower on clothing, change clothing immediately. 5. Exercise extreme caution when operating on...
... the controls and the proper use a nozzle lock-open device. (g) Replace gasoline cap securely and wipe up , transporting, adjusting or making any adjustments while the engine (motor) is not possible, then refuel such equipment on a trailer with a portable container, rather than from the spark plug, disconnect the cord on electric motors, thoroughly inspect the snow thrower for use snow thrower on clothing, change clothing immediately. 5. Exercise extreme caution when operating on...

Owners Manual
Page 3
... from the plug to service or repair this manual. Wait 10 seconds to be sure of a new snow thrower. Maintain or replace safety and instruction labels, as wheel weights, counterweights, or cabs). 15. Should you experience any enclosure. 3. TABLE OF CONTENTS SAFETY RULES 2-3 PRODUCT SPECIFICATIONS 3 CUSTOMER RESPONSIBILITIES 3 ASSEMBLY / PRE-OPERATION 5-6 OPERATION 7-12 MAINTENANCE SCHEDULE 13 MAINTENANCE 13-14 SERVICE AND ADJUSTMENTS 15-18 STORAGE 19 TROUBLESHOOTING 20 WARRANTY 21-24...
... from the plug to service or repair this manual. Wait 10 seconds to be sure of a new snow thrower. Maintain or replace safety and instruction labels, as wheel weights, counterweights, or cabs). 15. Should you experience any enclosure. 3. TABLE OF CONTENTS SAFETY RULES 2-3 PRODUCT SPECIFICATIONS 3 CUSTOMER RESPONSIBILITIES 3 ASSEMBLY / PRE-OPERATION 5-6 OPERATION 7-12 MAINTENANCE SCHEDULE 13 MAINTENANCE 13-14 SERVICE AND ADJUSTMENTS 15-18 STORAGE 19 TROUBLESHOOTING 20 WARRANTY 21-24...

Owners Manual
Page 5
... desired position using the appropriate mounting holes. Install carriage bolts that are supplied in the bag of parts and tighten lower handle knobs securely. CARRIAGE BOLT MOUNTING HOLES TEMPORARY MOUNTING BOLT HANDLE KNOB FIG. 2 3. Reading the entire manual will assist you in assembly, operation and maintenance of carton and lay panels flat. 3. REMOVE SNOW THROWER FROM CARTON 1. Cut down all packing materials. 5. HOW TO SET UP YOUR SNOW THROWER Store the extra shear bolts, nuts...
... desired position using the appropriate mounting holes. Install carriage bolts that are supplied in the bag of parts and tighten lower handle knobs securely. CARRIAGE BOLT MOUNTING HOLES TEMPORARY MOUNTING BOLT HANDLE KNOB FIG. 2 3. Reading the entire manual will assist you in assembly, operation and maintenance of carton and lay panels flat. 3. REMOVE SNOW THROWER FROM CARTON 1. Cut down all packing materials. 5. HOW TO SET UP YOUR SNOW THROWER Store the extra shear bolts, nuts...

Owners Manual
Page 6
... BOLT 1/4-20 LOCKNUT SPRING CHUTE DEFLECTOR HOOK BETWEEN HEX NUTS ON CHUTE ROTATOR HEAD 5/16-18 CARRIAGE BOLT CABLE EYELET PIN THREADED STUD CHUTE BRACKET ROTATOR HEAD ALIGN BEFORE MOUNTING TIGHTENING LOCKNUT BRACKET FIG. 4 5. Tighten securely. 2. CHUTE ROTATOR HEAD LOCKNUT CABLE GUIDE INSTALL CHUTE DEFLECTOR REMOTE CONTROL (See Figs. 6 and 7) 1. If necessary, rotate chute assembly to the lower handle using the double clip. Position chute rotator head over chute bracket. Install locknut and cable guide on underside of chute rotator head...
... BOLT 1/4-20 LOCKNUT SPRING CHUTE DEFLECTOR HOOK BETWEEN HEX NUTS ON CHUTE ROTATOR HEAD 5/16-18 CARRIAGE BOLT CABLE EYELET PIN THREADED STUD CHUTE BRACKET ROTATOR HEAD ALIGN BEFORE MOUNTING TIGHTENING LOCKNUT BRACKET FIG. 4 5. Tighten securely. 2. CHUTE ROTATOR HEAD LOCKNUT CABLE GUIDE INSTALL CHUTE DEFLECTOR REMOTE CONTROL (See Figs. 6 and 7) 1. If necessary, rotate chute assembly to the lower handle using the double clip. Position chute rotator head over chute bracket. Install locknut and cable guide on underside of chute rotator head...

Owners Manual
Page 7
... START AND RUN (START) PRIMER RECOIL START CHOKE OPEN (RUN) IGNITION KEY. Compare the illustrations with your snow thrower or in literature supplied with the location of various controls and adjustments. DANGER OR WARNING EAR PROTECTION RECOMMENDED READ AND FOLLOW ALL SAFETY INFORMATION AND INSTRUCTIONS BEFORE USE OF THIS PRODUCT. PULL OUT TO STOP DANGER DO NOT PLACE HANDS NEAR BLADES DANGER, KEEP FEET AWAY REMOVE SPARK PLUG WIRE BEFORE PERFORMING MAINTENANCE...
... START AND RUN (START) PRIMER RECOIL START CHOKE OPEN (RUN) IGNITION KEY. Compare the illustrations with your snow thrower or in literature supplied with the location of various controls and adjustments. DANGER OR WARNING EAR PROTECTION RECOMMENDED READ AND FOLLOW ALL SAFETY INFORMATION AND INSTRUCTIONS BEFORE USE OF THIS PRODUCT. PULL OUT TO STOP DANGER DO NOT PLACE HANDS NEAR BLADES DANGER, KEEP FEET AWAY REMOVE SPARK PLUG WIRE BEFORE PERFORMING MAINTENANCE...
Owners Manual
Page 8
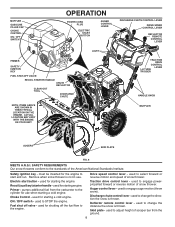
MUFFLER GASOLINE FILLER CAP CHOKE CONTROL ON / OFF SWITCH OPERATION POWER CORD PLUG ELECTRIC START BUTTON AUGER CONTROL LEVER DISCHARGE CHUTE CONTROL LEVER DRIVE SPEED CONTROL LEVER DEFLECTOR REMOTE CONTROL LEVER PRIMER SAFETY IGNITION KEY FUEL SHUT-OFF VALVE RECOIL STARTER HANDLE CHUTE DEFLECTOR CLEAN-OUT TOOL DISCHARGE CHUTE NOTE: ITEMS ABOVE ARE SHOWN IN THEIR TYPICAL LOCATION ON THE ENGINE. used to the engine. Recoil (auxiliary) starter handle - Choke Control - Fuel shut off the fuel flow to select forward or reverse motion and speed of snow thrower. used to change ...
MUFFLER GASOLINE FILLER CAP CHOKE CONTROL ON / OFF SWITCH OPERATION POWER CORD PLUG ELECTRIC START BUTTON AUGER CONTROL LEVER DISCHARGE CHUTE CONTROL LEVER DRIVE SPEED CONTROL LEVER DEFLECTOR REMOTE CONTROL LEVER PRIMER SAFETY IGNITION KEY FUEL SHUT-OFF VALVE RECOIL STARTER HANDLE CHUTE DEFLECTOR CLEAN-OUT TOOL DISCHARGE CHUTE NOTE: ITEMS ABOVE ARE SHOWN IN THEIR TYPICAL LOCATION ON THE ENGINE. used to the engine. Recoil (auxiliary) starter handle - Choke Control - Fuel shut off the fuel flow to select forward or reverse motion and speed of snow thrower. used to change ...

Owners Manual
Page 9
... right until chute is controlled by the position of the chute deflector. Keep the area of operation clear of all persons, small children and pets at all times including startup. Use the clean-out tool, NOT YOUR HANDS, to "OFF" position. 2. Be sure lever springs back and locks into desired position. The DISTANCE that snow is thrown is located beneath the fuel tank on the engine. Do not use . AUGER CONTROL LEVER FIG...
... right until chute is controlled by the position of the chute deflector. Keep the area of operation clear of all persons, small children and pets at all times including startup. Use the clean-out tool, NOT YOUR HANDS, to "OFF" position. 2. Be sure lever springs back and locks into desired position. The DISTANCE that snow is thrown is located beneath the fuel tank on the engine. Do not use . AUGER CONTROL LEVER FIG...

Owners Manual
Page 10
... handle. LH TURN TRIGGER FIG. 15 10 This will lock the auger control lever in steering your right hand from the handle and adjust the discharge chute direction without interrupting the snow throwing process. The triggers are engaged, the traction drive control lever will allow you are controlled by the traction drive control lever located on the speed control lever and move speed control lever when traction drive control lever is recommended that direction. • To turn right - OPERATION USING THE CLEAN-OUT TOOL...
... handle. LH TURN TRIGGER FIG. 15 10 This will lock the auger control lever in steering your right hand from the handle and adjust the discharge chute direction without interrupting the snow throwing process. The triggers are engaged, the traction drive control lever will allow you are controlled by the traction drive control lever located on the speed control lever and move speed control lever when traction drive control lever is recommended that direction. • To turn right - OPERATION USING THE CLEAN-OUT TOOL...

Owners Manual
Page 11
... VALVE CONTROL GASOLINE FILLER CAP POWER CORD PLUG ON / OFF SWITCH STARTER BUTTON PRIMER SAFETY IGNITION KEY RECOIL STARTER HANDLE ENGINE OIL FILL CAP / DIPSTICK NOTE: ALL ITEMS ARE SHOWN IN THEIR TYPICAL LOCATION. FIG. 17 11 Skid plates are located on your parts bag may be used within 30 days to proper height for a few seconds, remove and read oil level. Adjust skid plates evenly to assure fuel freshness. For removal of the auger housing and adjust...
... VALVE CONTROL GASOLINE FILLER CAP POWER CORD PLUG ON / OFF SWITCH STARTER BUTTON PRIMER SAFETY IGNITION KEY RECOIL STARTER HANDLE ENGINE OIL FILL CAP / DIPSTICK NOTE: ALL ITEMS ARE SHOWN IN THEIR TYPICAL LOCATION. FIG. 17 11 Skid plates are located on your parts bag may be used within 30 days to proper height for a few seconds, remove and read oil level. Adjust skid plates evenly to assure fuel freshness. For removal of the auger housing and adjust...

Owners Manual
Page 12
... START - Allow the engine to warm up for a few minutes before attempting to 10 seconds between each use the electric starter if your house is equipped with a three-wire power cord and plug and is a 120 Volt A.C. RECOIL STARTER Follow the steps above, keeping the choke in the "OFF" position. See "TO ADJUST SKID PLATES" in this section of the snow thrower. 12 Push the primer three (3) times...
... START - Allow the engine to warm up for a few minutes before attempting to 10 seconds between each use the electric starter if your house is equipped with a three-wire power cord and plug and is a 120 Volt A.C. RECOIL STARTER Follow the steps above, keeping the choke in the "OFF" position. See "TO ADJUST SKID PLATES" in this section of the snow thrower. 12 Push the primer three (3) times...

Owners Manual
Page 13
... warranty on this snow thrower does not cover items that have been subjected to service this unit. Some adjustments will help your engine run better and last longer. • Follow the maintenance schedule in the Service and Adjustments section of injury to malfunction and pose a risk of this manual should replace the spark plug and check belts for loose fasteners. 3. Check for wear. LUBRICATION Keep your snow thrower. BEFORE EACH USE 1. Check engine oil level. 2. Check controls...
... warranty on this snow thrower does not cover items that have been subjected to service this unit. Some adjustments will help your engine run better and last longer. • Follow the maintenance schedule in the Service and Adjustments section of injury to malfunction and pose a risk of this manual should replace the spark plug and check belts for loose fasteners. 3. Check for wear. LUBRICATION Keep your snow thrower. BEFORE EACH USE 1. Check engine oil level. 2. Check controls...

Owners Manual
Page 14
.... ENGINE See engine manual. Remove oil fill cap/dipstick. WARNING: Remove safety ignition key and disconnect spark plug wire from spark plug. Remove drain plug and drain oil in both tires (14-17 PSI). • Keep tires free of your snow thrower unless the electrical system, muffler and carburetor are covered to slow leaks, tire sealant may be replaced by original equipment manufacturer (OEM) belts available from running low on oil fill cap/dipstick for easier access to install wheel pin and retainer pin...
.... ENGINE See engine manual. Remove oil fill cap/dipstick. WARNING: Remove safety ignition key and disconnect spark plug wire from spark plug. Remove drain plug and drain oil in both tires (14-17 PSI). • Keep tires free of your snow thrower unless the electrical system, muffler and carburetor are covered to slow leaks, tire sealant may be replaced by original equipment manufacturer (OEM) belts available from running low on oil fill cap/dipstick for easier access to install wheel pin and retainer pin...

Owners Manual
Page 15
... augers do not turn when auger control lever is in the Operation section of this manual. Make sure the augers and all moving parts have sheared. WARNING: To avoid serious injury, never operate your snow thrower with your snow thrower. 4. Wait for all moving parts to see if the shear bolts have sheared. 15 FIG. 19 BELT COVER CAUTION: Do not substitute. Remove belt cover. • Replace belt cover by installing cover and tightening screws. Insert safety ignition key and reconnect spark plug wire...
... augers do not turn when auger control lever is in the Operation section of this manual. Make sure the augers and all moving parts have sheared. WARNING: To avoid serious injury, never operate your snow thrower with your snow thrower. 4. Wait for all moving parts to see if the shear bolts have sheared. 15 FIG. 19 BELT COVER CAUTION: Do not substitute. Remove belt cover. • Replace belt cover by installing cover and tightening screws. Insert safety ignition key and reconnect spark plug wire...

Owners Manual
Page 16
... a service center/department. It is important that all controls to secure the snow thrower in the operating position and hold the snow thrower handles. The V-belts on both the auger and traction drive belt be replaced by original equipment manufacturer (OEM) belts available from your snow thrower are not adjustable. REMOVE GASOLINE FROM FUEL TANK - Drain gasoline from fuel tank into a suitable container, outdoors, away from the engine pulley. 4. See Fig. 20. Do not discard bolts. 2. Remove the auger belt...
... a service center/department. It is important that all controls to secure the snow thrower in the operating position and hold the snow thrower handles. The V-belts on both the auger and traction drive belt be replaced by original equipment manufacturer (OEM) belts available from your snow thrower are not adjustable. REMOVE GASOLINE FROM FUEL TANK - Drain gasoline from fuel tank into a suitable container, outdoors, away from the engine pulley. 4. See Fig. 20. Do not discard bolts. 2. Remove the auger belt...

Owners Manual
Page 17
... factory high speed setting can be affected at altitudes up to ensure belts are installed properly and that all controls to 2,134 meters. Remove arm bolt and drive belt tensioner arm. 5. Install previously removed top bolt. Tighten securely (30-35 Ft. ENGINE PULLEY ARM BOLT PULLEY BOLT AND WASHER DRIVE BELT TENSIONER ARM TENSIONER SPRING DRIVE PULLEY DRIVE BELT TOP BOLT RETURN SPRING SWING PLATE AFTER REPLACING BELT(S) 1. TO REMOVE WHEELS (See Fig. 23) • Remove the wheel pin and retainer pin and remove wheel from snow thrower. NOTE...
... factory high speed setting can be affected at altitudes up to ensure belts are installed properly and that all controls to 2,134 meters. Remove arm bolt and drive belt tensioner arm. 5. Install previously removed top bolt. Tighten securely (30-35 Ft. ENGINE PULLEY ARM BOLT PULLEY BOLT AND WASHER DRIVE BELT TENSIONER ARM TENSIONER SPRING DRIVE PULLEY DRIVE BELT TOP BOLT RETURN SPRING SWING PLATE AFTER REPLACING BELT(S) 1. TO REMOVE WHEELS (See Fig. 23) • Remove the wheel pin and retainer pin and remove wheel from snow thrower. NOTE...
Owners Manual
Page 19
.... Clean entire snow thrower (See "CLEANING" in the Maintenance section of this manual). 2. Lubricate as shown in the Maintenance section of this manual. 4. Touch up all nuts, bolts, screws, and pins are empty. • Never use plastic. ENGINE OIL Drain oil (with engine warm) and replace with gasoline in storage. • Empty the fuel tank by starting the engine and letting it from one ounce (29 ml) of acids during storage. Remove spark plug. 2. Inspect and replace belts...
.... Clean entire snow thrower (See "CLEANING" in the Maintenance section of this manual). 2. Lubricate as shown in the Maintenance section of this manual. 4. Touch up all nuts, bolts, screws, and pins are empty. • Never use plastic. ENGINE OIL Drain oil (with engine warm) and replace with gasoline in storage. • Empty the fuel tank by starting the engine and letting it from one ounce (29 ml) of acids during storage. Remove spark plug. 2. Inspect and replace belts...

Owners Manual
Page 20
...Drive belt is in the Operation section of pulley. 2. Check / reinstall auger belt. 2. Loose wire connection. 2. Safety ignition key is flooded. 7. Out of drive speed 1. Move to ON position). Spark plug wire loose. 1. Reconnect spark plug wire. 2. Carburetor is off of this manual. 7. Replace damaged parts. Contact an authorized Sears service center/department. Clogged discharge chute. 1. Clean snow chute. 4. Turn fuel shut-off valve (if so equipped) 1. Empty fuel tank & carburetor, refill with fresh, clean gasoline. 5. Dirty or clogged muffler...
...Drive belt is in the Operation section of pulley. 2. Check / reinstall auger belt. 2. Loose wire connection. 2. Safety ignition key is flooded. 7. Out of drive speed 1. Move to ON position). Spark plug wire loose. 1. Reconnect spark plug wire. 2. Carburetor is off of this manual. 7. Replace damaged parts. Contact an authorized Sears service center/department. Clogged discharge chute. 1. Clean snow chute. 4. Turn fuel shut-off valve (if so equipped) 1. Empty fuel tank & carburetor, refill with fresh, clean gasoline. 5. Dirty or clogged muffler...
Owners Manual
Page 21
... A, all Engines and Attachments are not covered by this Limited Warranty. Husqvarna will assign the transmission / transaxle manufacturer's warranty or any warranty obligation of the following: (a) Engines and Attachments.Except where otherwise indicated on ExhibitA, Transmission / Transaxle (including Drive Systems) are not covered by law. This Limited Warranty does not cover general maintenance parts and items ("Expendable Parts"), including without limitation spark plugs, bulbs, filters, lubricants, starter cords, belts, blades, and blade adapters. (d) Emissions Control Components...
... A, all Engines and Attachments are not covered by this Limited Warranty. Husqvarna will assign the transmission / transaxle manufacturer's warranty or any warranty obligation of the following: (a) Engines and Attachments.Except where otherwise indicated on ExhibitA, Transmission / Transaxle (including Drive Systems) are not covered by law. This Limited Warranty does not cover general maintenance parts and items ("Expendable Parts"), including without limitation spark plugs, bulbs, filters, lubricants, starter cords, belts, blades, and blade adapters. (d) Emissions Control Components...

Owners Manual
Page 22
... order to obtain warranty coverage it is listed in the Husqvarna oil label and covered in your operator's manual. (h) Use of ether or any of the following are NOT considered defects in your operator's manual; (l) Operation of the unit with improperly installed/removed or modified cutting shields, guards, or safety devices; (m) Any removed/damaged air filter, excessive dirt, abrasives, salt water, moisture, corrosion, rust, varnish, stale fuel, or any...
... order to obtain warranty coverage it is listed in the Husqvarna oil label and covered in your operator's manual. (h) Use of ether or any of the following are NOT considered defects in your operator's manual; (l) Operation of the unit with improperly installed/removed or modified cutting shields, guards, or safety devices; (m) Any removed/damaged air filter, excessive dirt, abrasives, salt water, moisture, corrosion, rust, varnish, stale fuel, or any...
Parts Manual
Page 20
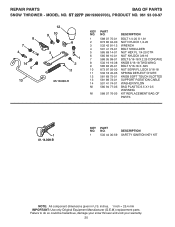
... DESCRIPTION BOLT 1/4-20 X 1.81 NUT NYLOCK 1/4-20 WRENCH BOLT SHOULDER NUT HEX FL 1/4-20 CTR NUT NYLOCK 3/8-16 BOLT 5/16-18 X 2.25 CONCAVE KNOB 5/16-18 TWO-WING BOLT 5/16-18 X .625 NUT SERR FL LOCK 5/16-18 SPRING DEFLECT CHUTE KNOB SOFT TOUCH SLOTTED SUPPORT ROTATION CABLE WASHER NYLON BAG PLASTIC 6.5 X 10.5 WARNING KIT REPLACEMENT BAG OF PARTS 1 01.14.009-B KEY NO. 1 PART NO. REPAIR PARTS BAG OF PARTS SNOW THROWER - MODEL NO...
... DESCRIPTION BOLT 1/4-20 X 1.81 NUT NYLOCK 1/4-20 WRENCH BOLT SHOULDER NUT HEX FL 1/4-20 CTR NUT NYLOCK 3/8-16 BOLT 5/16-18 X 2.25 CONCAVE KNOB 5/16-18 TWO-WING BOLT 5/16-18 X .625 NUT SERR FL LOCK 5/16-18 SPRING DEFLECT CHUTE KNOB SOFT TOUCH SLOTTED SUPPORT ROTATION CABLE WASHER NYLON BAG PLASTIC 6.5 X 10.5 WARNING KIT REPLACEMENT BAG OF PARTS 1 01.14.009-B KEY NO. 1 PART NO. REPAIR PARTS BAG OF PARTS SNOW THROWER - MODEL NO...


