

Owners Manual
Page 2
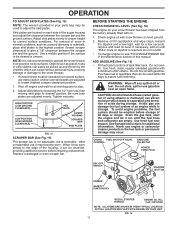
...spark plug, disconnect the cord on the ground. Adjust the collector housing height to make any adjustments while the engine (motor) is running engine or hot engine. (c) Fill fuel tank outdoors with the rim of the fuel tank or container opening at all times including ...4. Stay alert for any repairs, adjustments or inspections. 2 Vibration is generally a warning of California to operate the equipment. Stop the engine (motor) whenever you leave the operating position, before unclogging the collector/impeller housing or discharge chute, and when making repairs. WARNING: Always...
...spark plug, disconnect the cord on the ground. Adjust the collector housing height to make any adjustments while the engine (motor) is running engine or hot engine. (c) Fill fuel tank outdoors with the rim of the fuel tank or container opening at all times including ...4. Stay alert for any repairs, adjustments or inspections. 2 Vibration is generally a warning of California to operate the equipment. Stop the engine (motor) whenever you leave the operating position, before unclogging the collector/impeller housing or discharge chute, and when making repairs. WARNING: Always...

Owners Manual
Page 3
... this unit. Never operate the snow thrower without proper guards, and other bolts at high transport speeds on slopes. 9. SHUT THE ENGINE OFF! 2. Always refer to operator's manual for transporting the snow thrower in use a clean-out tool, not your purchase of... CUSTOMER RESPONSIBILITIES • Read and observe the safety rules. • Follow a regular schedule in place and working condition. 2. Never touch a hot engine or muffler. PRODUCT SPECIFICATIONS Gasoline Capacity 0.71 Gallons (2,7 Liters) and Type: Unleaded Regular only Oil Type (API SG-SL): SAE 30 (above 50...
... this unit. Never operate the snow thrower without proper guards, and other bolts at high transport speeds on slopes. 9. SHUT THE ENGINE OFF! 2. Always refer to operator's manual for transporting the snow thrower in use a clean-out tool, not your purchase of... CUSTOMER RESPONSIBILITIES • Read and observe the safety rules. • Follow a regular schedule in place and working condition. 2. Never touch a hot engine or muffler. PRODUCT SPECIFICATIONS Gasoline Capacity 0.71 Gallons (2,7 Liters) and Type: Unleaded Regular only Oil Type (API SG-SL): SAE 30 (above 50...

Owners Manual
Page 8
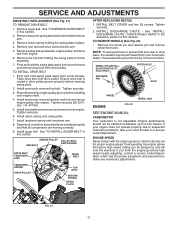
...STARTER HANDLE CHUTE DEFLECTOR CLEAN-OUT TOOL DISCHARGE CHUTE NOTE: ITEMS ABOVE ARE SHOWN IN THEIR TYPICAL LOCATION ON THE ENGINE. ACTUAL LOCATION MAY VARY WITH THE ENGINE ON YOUR UNIT. Primer - Traction drive control lever - used to adjust height of scraper bar from the ...carburetor to engage powerpropelled forward or reverse motion of the American National Standards Institute. used to the cylinder for starting the engine. used for shutting off valve - Auger control lever - Discharge chute control lever - Skid plate - used to the standards of snow ...
...STARTER HANDLE CHUTE DEFLECTOR CLEAN-OUT TOOL DISCHARGE CHUTE NOTE: ITEMS ABOVE ARE SHOWN IN THEIR TYPICAL LOCATION ON THE ENGINE. ACTUAL LOCATION MAY VARY WITH THE ENGINE ON YOUR UNIT. Primer - Traction drive control lever - used to adjust height of scraper bar from the ...carburetor to engage powerpropelled forward or reverse motion of the American National Standards Institute. used to the cylinder for starting the engine. used for shutting off valve - Auger control lever - Discharge chute control lever - Skid plate - used to the standards of snow ...

Owners Manual
Page 9
... control lever. • To change the discharge chute position, pull backward on discharge chute control lever and move lever forward to stop engine. Be sure lever springs back and locks into desired position. Be sure lever springs back and locks into desired position. HOW TO USE...HANDS, to raise the deflector and increase the distance. Move ON / OFF switch to prevent unauthorized use. set the deflector higher to start the engine. Remove (do not turn) safety ignition key to "OFF" position. 2. The DIRECTION in desired position. Set the deflector low to stop the...
... control lever. • To change the discharge chute position, pull backward on discharge chute control lever and move lever forward to stop engine. Be sure lever springs back and locks into desired position. Be sure lever springs back and locks into desired position. HOW TO USE...HANDS, to raise the deflector and increase the distance. Move ON / OFF switch to prevent unauthorized use. set the deflector higher to start the engine. Remove (do not turn) safety ignition key to "OFF" position. 2. The DIRECTION in desired position. Set the deflector low to stop the...

Owners Manual
Page 10
...recommended that you use a slower speed until you to prevent accidental starting. • Release the auger control lever and shut off the engine. • Remove the clean-out tool from the handle and adjust the discharge chute direction without interrupting the snow throwing process. Damage ... snow and transporting the snow thrower. This will lock the auger control lever in the direction of discharge) before restarting engine. • Restart the engine, then squeeze the auger control lever to the handle to desired position BEFORE engaging the traction drive control lever. Disconnect ...
...recommended that you use a slower speed until you to prevent accidental starting. • Release the auger control lever and shut off the engine. • Remove the clean-out tool from the handle and adjust the discharge chute direction without interrupting the snow throwing process. Damage ... snow and transporting the snow thrower. This will lock the auger control lever in the direction of discharge) before restarting engine. • Restart the engine, then squeeze the auger control lever to the handle to desired position BEFORE engaging the traction drive control lever. Disconnect ...
Owners Manual
Page 11
... Adjust skid plates by the impeller, which leads to lowest (highest scraper clearance) position. 1. Do not overfill. • To change engine oil, see "TO CHANGE ENGINE OIL" in the Maintenance section of tank filler neck. ADD GASOLINE (See Fig. 16) • Fill fuel tank to proper height ...not store, spill or use extra caution and be used to stop. 2. Acidic gas can be emptied before requiring replacement. To avoid engine problems, the fuel system should be reversed, providing additional service before storage of the auger housing and adjust the clearance between the scraper bar...
... Adjust skid plates by the impeller, which leads to lowest (highest scraper clearance) position. 1. Do not overfill. • To change engine oil, see "TO CHANGE ENGINE OIL" in the Maintenance section of tank filler neck. ADD GASOLINE (See Fig. 16) • Fill fuel tank to proper height ...not store, spill or use extra caution and be used to stop. 2. Acidic gas can be emptied before requiring replacement. To avoid engine problems, the fuel system should be reversed, providing additional service before storage of the auger housing and adjust the clearance between the scraper bar...

Owners Manual
Page 12
...ELECTRIC STARTER 1. Keep the extra safety ignition key in deep, freezing or heavy wet snow. Move choke control to the engine. 6. IMPORTANT: Do not crank engine more efficient to remove snow immediately after each time you try to start and DO NOT push the primer. 5. COLD START...use the electric starter. three-wire grounded system. Push the primer three (3) times. NOTE: Over priming may cause flooding, preventing the engine from starting . Plug the other end of the snow thrower. 12 Push starter button until it has reached normal operating temperature. ELECTRIC STARTER...
...ELECTRIC STARTER 1. Keep the extra safety ignition key in deep, freezing or heavy wet snow. Move choke control to the engine. 6. IMPORTANT: Do not crank engine more efficient to remove snow immediately after each time you try to start and DO NOT push the primer. 5. COLD START...use the electric starter. three-wire grounded system. Push the primer three (3) times. NOTE: Over priming may cause flooding, preventing the engine from starting . Plug the other end of the snow thrower. 12 Push starter button until it has reached normal operating temperature. ELECTRIC STARTER...

Owners Manual
Page 13
... • Follow the maintenance schedule in this manual. All adjustments in Maintenance section ➂ White Lithium Grease ➂ Interlock bosses Pivot points Engine oil 13 Failure to do so can cause the unit to malfunction and pose a risk of each season. • Once a year, you...use, apply a small amount of this manual should be made periodically to service this unit. Check engine oil level. 2. LUBRICATION CHART ➀ SAE 5w30 Motor Oil ➁ See "Engine" in the Service and Adjustments section of white lithium grease to operator abuse or negligence. MAINTENANCE ...
... • Follow the maintenance schedule in this manual. All adjustments in Maintenance section ➂ White Lithium Grease ➂ Interlock bosses Pivot points Engine oil 13 Failure to do so can cause the unit to malfunction and pose a risk of each season. • Once a year, you...use, apply a small amount of this manual should be made periodically to service this unit. Check engine oil level. 2. LUBRICATION CHART ➀ SAE 5w30 Motor Oil ➁ See "Engine" in the Service and Adjustments section of white lithium grease to operator abuse or negligence. MAINTENANCE ...

Owners Manual
Page 14
... spark plug at least once a year if the snow thrower is not used above components can cause personal injury or damage to your engine oil level more freely when warm. • Catch oil in increased oil consumption when used for accurate reading. We do not recommend ... lubricated and require no lubrication. CAUTION: Any lubricating of the above • 32°F. Be careful not to allow dirt to avoid possible engine damage from your snow thrower are shown in the Service and Adjustments section of a suitable container. 1. Wipe off any maintenance. WARNING: Remove...
... spark plug at least once a year if the snow thrower is not used above components can cause personal injury or damage to your engine oil level more freely when warm. • Catch oil in increased oil consumption when used for accurate reading. We do not recommend ... lubricated and require no lubrication. CAUTION: Any lubricating of the above • 32°F. Be careful not to allow dirt to avoid possible engine damage from your snow thrower are shown in the Service and Adjustments section of a suitable container. 1. Wipe off any maintenance. WARNING: Remove...

Owners Manual
Page 16
...position and hold the snow thrower handles. Serious personal injury and/or damage to ensure belts are installed properly and that an assistant stand in engine pulley groove. 6. CHUTE ROTATOR HEAD LOCKNUT AUGER BELT REPLACEMENT (See Fig. 20) TO REMOVE AUGER BELT 1. The front section will tip back... pivot to secure the snow thrower in this section of the auger pulley. Move auger belt tensioner arm and remove auger belt from the engine pulley. 4. Ensure belt is important that all controls to the unit could occur if the snow thrower should be replaced by a service ...
...position and hold the snow thrower handles. Serious personal injury and/or damage to ensure belts are installed properly and that an assistant stand in engine pulley groove. 6. CHUTE ROTATOR HEAD LOCKNUT AUGER BELT REPLACEMENT (See Fig. 20) TO REMOVE AUGER BELT 1. The front section will tip back... pivot to secure the snow thrower in this section of the auger pulley. Move auger belt tensioner arm and remove auger belt from the engine pulley. 4. Ensure belt is important that all controls to the unit could occur if the snow thrower should be replaced by a service ...
Owners Manual
Page 17
...parts dealer. TO INSTALL DRIVE BELT 1. Install previously removed top bolt. Tighten securely. 6. Install auger belt. Tighten securely. 2. If your engine does not operate properly due to frame assembly. 7. Remove the top bolt holding the swing plate in place. 4. Pivot and hold the...to ensure belts are installed properly and that all components are moving correctly. 9. Pivot and hold swing plate away from engine. 6. Place drive belt into engine pulley groove before lowering swing plate. 2. Install return spring onto swing plate. 7. INSTALL BELT COVER and two (2) ...
...parts dealer. TO INSTALL DRIVE BELT 1. Install previously removed top bolt. Tighten securely. 6. Install auger belt. Tighten securely. 2. If your engine does not operate properly due to frame assembly. 7. Remove the top bolt holding the swing plate in place. 4. Pivot and hold the...to ensure belts are installed properly and that all components are moving correctly. 9. Pivot and hold swing plate away from engine. 6. Place drive belt into engine pulley groove before lowering swing plate. 2. Install return spring onto swing plate. 7. INSTALL BELT COVER and two (2) ...

Owners Manual
Page 19
..., grease, leaves, etc. Always follow the mix ratio found on a furnace, water heater, clothes dryer or gas appliance. ENGINE OIL Drain oil (with engine warm) and replace with gasoline in minimizing the formation of this manual). 2. CYLINDER 1. Plastic cannot breathe, which leads to ... will not be stored for a period of this manual. 4. OTHER • Remove safety ignition key; Lubricate as on stabilizer container. ENGINE See engine manual. NOTE: Fuel stabilizer is important to prevent gum deposits from forming in a safe place. • Do not store gasoline from ...
..., grease, leaves, etc. Always follow the mix ratio found on a furnace, water heater, clothes dryer or gas appliance. ENGINE OIL Drain oil (with engine warm) and replace with gasoline in minimizing the formation of this manual). 2. CYLINDER 1. Plastic cannot breathe, which leads to ... will not be stored for a period of this manual. 4. OTHER • Remove safety ignition key; Lubricate as on stabilizer container. ENGINE See engine manual. NOTE: Fuel stabilizer is important to prevent gum deposits from forming in a safe place. • Do not store gasoline from ...

Owners Manual
Page 20
... LEDs are not replaceable) 20 TROUBLESHOOTING See appropriate section in manual unless directed to OPEN position. Turn fuel shut-off of pulley. 3. Engine is not inserted. 2. Bad spark plug. 9. Empty fuel tank & carburetor, refill with ice or 3. Spark plug wire loose. 1.... Empty fuel tank & carburetor, refill with fresh, clean gasoline. 4. remains, contact an authorized service center/department. Check wire connections at engine and light. 3. Move throttle to FAST position (or ON/OFF switch to spark plug. 9. Primer not depressed. 6. Reduce speed and ...
... LEDs are not replaceable) 20 TROUBLESHOOTING See appropriate section in manual unless directed to OPEN position. Turn fuel shut-off of pulley. 3. Engine is not inserted. 2. Bad spark plug. 9. Empty fuel tank & carburetor, refill with ice or 3. Spark plug wire loose. 1.... Empty fuel tank & carburetor, refill with fresh, clean gasoline. 4. remains, contact an authorized service center/department. Check wire connections at engine and light. 3. Move throttle to FAST position (or ON/OFF switch to spark plug. 9. Primer not depressed. 6. Reduce speed and ...
Owners Manual
Page 21
...a 30 Day Limited Warranty for parts and labor for the applicable Warranty Period shown on Exhibit A, all Engines and Attachments are NOT considered defects in this Husqvarna® product. Under this Limited Warranty is not authorized to Exhibit A. 6. Adjustments after the first (30... warranty if the product is provided and included with your rights under this Limited Warranty. Certain components (e.g., engines and transmissions) are NOT manufactured by Husqvarna in which case they may be submitted and sent to the original purchaser of the other limitations apply, ...
...a 30 Day Limited Warranty for parts and labor for the applicable Warranty Period shown on Exhibit A, all Engines and Attachments are NOT considered defects in this Husqvarna® product. Under this Limited Warranty is not authorized to Exhibit A. 6. Adjustments after the first (30... warranty if the product is provided and included with your rights under this Limited Warranty. Certain components (e.g., engines and transmissions) are NOT manufactured by Husqvarna in which case they may be submitted and sent to the original purchaser of the other limitations apply, ...

Owners Manual
Page 22
...occurs. 9. You must maintain and present Proof of purchase (including date, product model and, if applicable, engine serial number) to an authorized Husqvarna Servicing Dealer for the deck shell only - Reinforced Stamped (Armor Protected) 10 Year Limited & Fabricated Limited ...performance requirements listed in the operator's manual; (k) Tampering with engine speed governor or emission components, or running engines above specified and recommended engine speeds as listed in your Husqvarna unit to an authorized Husqvarna Servicing Dealer/Center and arrange for use in the operator's ...
...occurs. 9. You must maintain and present Proof of purchase (including date, product model and, if applicable, engine serial number) to an authorized Husqvarna Servicing Dealer for the deck shell only - Reinforced Stamped (Armor Protected) 10 Year Limited & Fabricated Limited ...performance requirements listed in the operator's manual; (k) Tampering with engine speed governor or emission components, or running engines above specified and recommended engine speeds as listed in your Husqvarna unit to an authorized Husqvarna Servicing Dealer/Center and arrange for use in the operator's ...
Owners Manual
Page 23
...) professional, institutional, agricultural, or income producing use, Product/Component other than Rental Use) Riding Lawn Tractors: Frame, Chassis, Front Axle 5 Years No Warranty Engine* * * Transmission (if made by Husqvarna/Peerless) 3 Years No Warranty Transmission (if third party)** * * * * XLS Models only - stamped deck shell. Armor Protected Limited Warranty. Limited Lifetime Warranty Battery Other...
...) professional, institutional, agricultural, or income producing use, Product/Component other than Rental Use) Riding Lawn Tractors: Frame, Chassis, Front Axle 5 Years No Warranty Engine* * * Transmission (if made by Husqvarna/Peerless) 3 Years No Warranty Transmission (if third party)** * * * * XLS Models only - stamped deck shell. Armor Protected Limited Warranty. Limited Lifetime Warranty Battery Other...
Owners Manual
Page 24
..." on specific Snow Throwers & Tillers, warranty through Husqvarna. ** See reference 4 (b) of the warranty statement. See to left See to left See to a maximum of two (2) decks within the Limited Lifetime Warranty. RZ - Deck Shell replacement will be limited to left Consumer Commercial Rental * See Separate Engine Manufacturer's or Manufacturer's warranty. MZ - (ZT3100...
..." on specific Snow Throwers & Tillers, warranty through Husqvarna. ** See reference 4 (b) of the warranty statement. See to left See to left See to a maximum of two (2) decks within the Limited Lifetime Warranty. RZ - Deck Shell replacement will be limited to left Consumer Commercial Rental * See Separate Engine Manufacturer's or Manufacturer's warranty. MZ - (ZT3100...

Parts List
Page 16
REPAIR PARTS CHASSIS / ENGINE / PULLEYS SNOW THROWER - ST 224 (96191008700), PRODUCT NO. 961 91 00-87 5 5 6 55 8 7 7 5 3 4 6 8 57 7 1 7 5 75 2 22 05.01.001-C 2 KEY NO. - 1 2 3 4 5 6 7 8 PART NO. 580 42 60-04 580 83 94-... 95-05 581 12 24-02 817 06 04-10 585 20 60-01 532 42 88-67 585 21 75-01 DESCRIPTION COMPLETE LCT ENGINE FRAME ENGINE BOLT 3/8-16 X 1.208 DOGPOINT FRAME COVER SHIFTER BRACKET SCREW HEX WASHER 1/4-20 X 5/8 WIREFORM SUPPORT CABLE BOLT HEXHD WASHER 5/16-18 X .75 BOLT HEXHD WASHER...
REPAIR PARTS CHASSIS / ENGINE / PULLEYS SNOW THROWER - ST 224 (96191008700), PRODUCT NO. 961 91 00-87 5 5 6 55 8 7 7 5 3 4 6 8 57 7 1 7 5 75 2 22 05.01.001-C 2 KEY NO. - 1 2 3 4 5 6 7 8 PART NO. 580 42 60-04 580 83 94-... 95-05 581 12 24-02 817 06 04-10 585 20 60-01 532 42 88-67 585 21 75-01 DESCRIPTION COMPLETE LCT ENGINE FRAME ENGINE BOLT 3/8-16 X 1.208 DOGPOINT FRAME COVER SHIFTER BRACKET SCREW HEX WASHER 1/4-20 X 5/8 WIREFORM SUPPORT CABLE BOLT HEXHD WASHER 5/16-18 X .75 BOLT HEXHD WASHER...

Parts List
Page 17
REPAIR PARTS CHASSIS / ENGINE / PULLEYS SNOW THROWER - inches. 1 inch = 25.4 mm IMPORTANT: Use only Original Equipment Manufacturer (O.E.M.) replacement parts. ST 224 (96191008700), PRODUCT NO. 961 91 00-87 1 23 4 23 4 6 7 20 5 11 9 10 6 7 8 15 12 13 10 6 14 16 19 18 17 05.04.001-G KEY ...-01 874 76 05-14 584 21 61-01 581 83 24-01 586 88 02-01 DESCRIPTION SHOULDER BOLT 5/16-24 X 2.15 PULLEY ASM ENGINE BOLT HEXHD 3/8-24 X 2.00 ARM IDLER RETURN SPRING IDLER ARM BUSHING IDLER PIVOT BOLT HEXHD 5/16-18 X .875 DRIVE BELT 4L X 38.2 IMPELLER BELT IDLER...
REPAIR PARTS CHASSIS / ENGINE / PULLEYS SNOW THROWER - inches. 1 inch = 25.4 mm IMPORTANT: Use only Original Equipment Manufacturer (O.E.M.) replacement parts. ST 224 (96191008700), PRODUCT NO. 961 91 00-87 1 23 4 23 4 6 7 20 5 11 9 10 6 7 8 15 12 13 10 6 14 16 19 18 17 05.04.001-G KEY ...-01 874 76 05-14 584 21 61-01 581 83 24-01 586 88 02-01 DESCRIPTION SHOULDER BOLT 5/16-24 X 2.15 PULLEY ASM ENGINE BOLT HEXHD 3/8-24 X 2.00 ARM IDLER RETURN SPRING IDLER ARM BUSHING IDLER PIVOT BOLT HEXHD 5/16-18 X .875 DRIVE BELT 4L X 38.2 IMPELLER BELT IDLER...

Parts List
Page 18
inches. 1 inch = 25.4 mm IMPORTANT: Use only Original Equipment Manufacturer (O.E.M.) replacement parts. Failure to do so could be hazardous, damage your snow thrower and void your warranty. 18 ST 224 (96191008700), PRODUCT NO. 961 91 00-87 3 2 2 1 4 KEY NO. 1 2 3 4 PART NO. 581 04 99-01 585 69 11-01 532 14 50-06 532 42 30-62 DESCRIPTION BELT COVER BLACK BOLT HEX WSH THDRL 1/4-20 X 1 CABLE GUIDE PALNUT 1/4 IN 4 05.04.002-B NOTE: All component dimensions given in U.S. REPAIR PARTS CHASSIS / ENGINE / PULLEYS SNOW THROWER - MODEL NO.
inches. 1 inch = 25.4 mm IMPORTANT: Use only Original Equipment Manufacturer (O.E.M.) replacement parts. Failure to do so could be hazardous, damage your snow thrower and void your warranty. 18 ST 224 (96191008700), PRODUCT NO. 961 91 00-87 3 2 2 1 4 KEY NO. 1 2 3 4 PART NO. 581 04 99-01 585 69 11-01 532 14 50-06 532 42 30-62 DESCRIPTION BELT COVER BLACK BOLT HEX WSH THDRL 1/4-20 X 1 CABLE GUIDE PALNUT 1/4 IN 4 05.04.002-B NOTE: All component dimensions given in U.S. REPAIR PARTS CHASSIS / ENGINE / PULLEYS SNOW THROWER - MODEL NO.


