
Owners Manual
Page 1
The use in this machine. Please read the owner's manual carefully and make sure you understand the instructions before using the machine. English Owner's Manual ST 121E / 96183000100 532 44 30-86 Gasoline containing up to 10% ethanol (E10) is acceptable for use of any gasoline exceeding 10% ethanol (E10) will void the product warranty.
The use in this machine. Please read the owner's manual carefully and make sure you understand the instructions before using the machine. English Owner's Manual ST 121E / 96183000100 532 44 30-86 Gasoline containing up to 10% ethanol (E10) is acceptable for use of any gasoline exceeding 10% ethanol (E10) will void the product warranty.
Owners Manual
Page 2
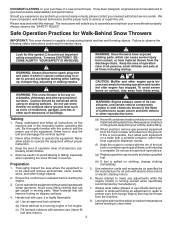
... is to operate the equipment. Let engine and machine adjust to a running (except when specifically recommended by the manufacturer for this manual. The instructions will improve footing on slippery surfaces. 4. Safe Operation Practices for use snow thrower on a truck or trailer bed ...clothing that can cause severe injury from contact, or from material thrown from a gasoline dispenser nozzle. (f) Keep the nozzle in the manual(s) before starting to cause cancer and birth defects or other reproductive harm. it cannot contact plug in reverse. (g) Replace gasoline cap...
... is to operate the equipment. Let engine and machine adjust to a running (except when specifically recommended by the manufacturer for this manual. The instructions will improve footing on slippery surfaces. 4. Safe Operation Practices for use snow thrower on a truck or trailer bed ...clothing that can cause severe injury from contact, or from material thrown from a gasoline dispenser nozzle. (f) Keep the nozzle in the manual(s) before starting to cause cancer and birth defects or other reproductive harm. it cannot contact plug in reverse. (g) Replace gasoline cap...
Owners Manual
Page 3
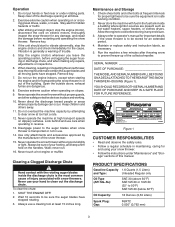
... protective devices in or out of your hand to be stored for proper tightness to clean out the discharge chute. Always refer to operator's manual for important details if the snow thrower is to be sure the equipment is the most common cause of trouble. 5. Operation 1. Stop the...Never touch a hot engine or muffler. Keep clear of the snow thrower. 15. If the unit should start to prevent freeze-up of this manual. Maintenance and Storage 1. Run the machine a few minutes after throwing snow to vibrate abnormally, stop the engine and make certain the auger blades and...
... protective devices in or out of your hand to be stored for proper tightness to clean out the discharge chute. Always refer to operator's manual for important details if the snow thrower is to be sure the equipment is the most common cause of trouble. 5. Operation 1. Stop the...Never touch a hot engine or muffler. Keep clear of the snow thrower. 15. If the unit should start to prevent freeze-up of this manual. Maintenance and Storage 1. Run the machine a few minutes after throwing snow to vibrate abnormally, stop the engine and make certain the auger blades and...
Owners Manual
Page 4
... ENGINE OFF OIL FUEL ENGAGING AND DISENGAGING THE AUGER BLADES READ AND FOLLOW ALL SAFETY INFORMATION AND INSTRUCTIONS BEFORE USE OF THIS PRODUCT. Save this manual for future reference. IMPORTANT: Safety and instruction decals are located near areas of various controls and adjustments. IGNITION KEY. These symbols may appear on your... 5-6 PRODUCT OVERVIEW 7 OPERATION 8-11 MAINTENANCE 12-16 STORAGE 17 TROUBLESHOOTING 18 REPAIR PARTS 20-35 WARRANTY 36-39 KNOW YOUR SNOW THROWER READ THIS OWNER'S MANUAL AND ALL SAFETY RULES BEFORE OPERATING YOUR SNOW THROWER.
... ENGINE OFF OIL FUEL ENGAGING AND DISENGAGING THE AUGER BLADES READ AND FOLLOW ALL SAFETY INFORMATION AND INSTRUCTIONS BEFORE USE OF THIS PRODUCT. Save this manual for future reference. IMPORTANT: Safety and instruction decals are located near areas of various controls and adjustments. IGNITION KEY. These symbols may appear on your... 5-6 PRODUCT OVERVIEW 7 OPERATION 8-11 MAINTENANCE 12-16 STORAGE 17 TROUBLESHOOTING 18 REPAIR PARTS 20-35 WARRANTY 36-39 KNOW YOUR SNOW THROWER READ THIS OWNER'S MANUAL AND ALL SAFETY RULES BEFORE OPERATING YOUR SNOW THROWER.
Owners Manual
Page 6
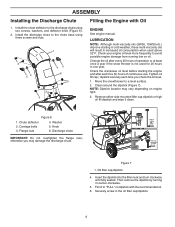
... securely each five (5) hours of operation or at least once a year if the snow thrower is below "Add" on dipstick with Oil ENGINE See engine manual. Chute deflector 2. Discharge chute IMPORTANT: Do not overtighten the flange nuts; Install the discharge chute to the chute base using two screws, washers, and deflector...
... securely each five (5) hours of operation or at least once a year if the snow thrower is below "Add" on dipstick with Oil ENGINE See engine manual. Chute deflector 2. Discharge chute IMPORTANT: Do not overtighten the flange nuts; Install the discharge chute to the chute base using two screws, washers, and deflector...
Owners Manual
Page 7
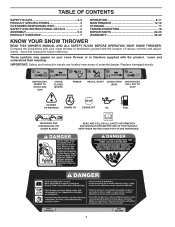
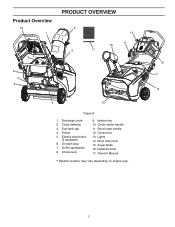
Discharge chute 2. Primer 5. Ignition key 10. Chute rotator handle 11. Recoil start button (if equipped) 6. Chute deflector 3. Oil drain plug 7. Lights 14. Electric-start handle 12. Owner's Manual * Dipstick location may vary depending on engine type. 13 *7 14 7 Control bar 13. Drive side cover 15. Auger blade 16. Fuel tank cap 4. Choke lever 9. Oil fill cap/dipstick 8. Product Overview 10 1 94 PRODUCT OVERVIEW 2 12 11 16 3 17 8 *7 6 5 15 Figure 8 1. Deflector knob 17.
Discharge chute 2. Primer 5. Ignition key 10. Chute rotator handle 11. Recoil start button (if equipped) 6. Chute deflector 3. Oil drain plug 7. Lights 14. Electric-start handle 12. Owner's Manual * Dipstick location may vary depending on engine type. 13 *7 14 7 Control bar 13. Drive side cover 15. Auger blade 16. Fuel tank cap 4. Choke lever 9. Oil fill cap/dipstick 8. Product Overview 10 1 94 PRODUCT OVERVIEW 2 12 11 16 3 17 8 *7 6 5 15 Figure 8 1. Deflector knob 17.
Owners Manual
Page 16
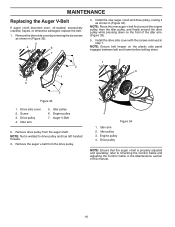
NOTE: Ensure belt keeper on the plastic side panel engages between belt and frame before bolting down on the front of this manual. 16 Drive pulley 4. Auger V-Belt 2. Engine pulley 4. Install the new auger v-belt and drive pulley, routing it as shown in the Maintenance section of the ...
NOTE: Ensure belt keeper on the plastic side panel engages between belt and frame before bolting down on the front of this manual. 16 Drive pulley 4. Auger V-Belt 2. Engine pulley 4. Install the new auger v-belt and drive pulley, routing it as shown in the Maintenance section of the ...
Owners Manual
Page 17
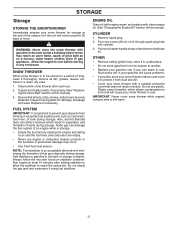
.... 3. ENGINE OIL Drain oil (with engine warm) and replace with clean engine oil. (See "Changing the Engine Oil" section of this manual). 3. Replace if necessary. Also, alcohol blended fuels can attract moisture which allows condensation to form and will cause your snow thrower to be ... thrower while engine/ exhaust area is to rust. Inspect and replace belts, if necessary (See "Replaceing the Drive Belt" section of this manual). CYLINDER 1. Do not empty the gas tank and carburetor if using fuel stabilizer. Pour one season to separation and formation of acids during ...
.... 3. ENGINE OIL Drain oil (with engine warm) and replace with clean engine oil. (See "Changing the Engine Oil" section of this manual). 3. Replace if necessary. Also, alcohol blended fuels can attract moisture which allows condensation to form and will cause your snow thrower to be ... thrower while engine/ exhaust area is to rust. Inspect and replace belts, if necessary (See "Replaceing the Drive Belt" section of this manual). CYLINDER 1. Do not empty the gas tank and carburetor if using fuel stabilizer. Pour one season to separation and formation of acids during ...
Owners Manual
Page 18
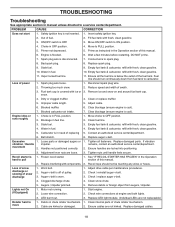
... position. 2. Prime as instructed in fuel line. 1. snow. 4. Improper cable length. 5. Blockage in the Operation section of this manual. 2. Empty fuel tank & carburetor, refill with fresh, clean gasoline. 3. remains, contact an authorized service center/department. movement 2. ...positioned correctly. 2. Loose wire connection. 1. Replace LED light module. (Individual LEDs are loose. 3. ON/OFF switch is in manual unless directed to spark plug. 8. Empty fuel tank & carburetor, refill with ice or 3. Clean or replace muffler. 5. Belt ...
... position. 2. Prime as instructed in fuel line. 1. snow. 4. Improper cable length. 5. Blockage in the Operation section of this manual. 2. Empty fuel tank & carburetor, refill with fresh, clean gasoline. 3. remains, contact an authorized service center/department. movement 2. ...positioned correctly. 2. Loose wire connection. 1. Replace LED light module. (Individual LEDs are loose. 3. ON/OFF switch is in manual unless directed to spark plug. 8. Empty fuel tank & carburetor, refill with ice or 3. Clean or replace muffler. 5. Belt ...
Owners Manual
Page 35
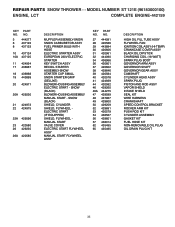
SNOW (BLACK) SHIELD, CYLINDER SHIELD, FLYWHEEL ELECTRIC START (IF EQUIPPED) SHIELD, FLYWHEEL MANUAL START VALVE COVER ELECTRIC START FLYWHEEL ASSY MANUAL START FLYWHEEL ASSY KEY PART NO. MODEL NUMBER ST 121E (96183000100) ENGINE, LCT COMPLETE ENGINE-442159 KEY PART NO. NO. 27 444091 28 420586 29 443894 30 420606 31 420961 32 444090 34 436966... RECOIL STARTER ASSEMBLY-SNOW STARTER CUP SMALL SNOW STARTER GRIP (DELUXE) BLOWER HOUSING ASSEMBLY ELECTRIC START - REPAIR PARTS SNOW THROWER - - SNOW (BLACK) BLOWER HOUSING ASSEMBLY MANUAL START -
SNOW (BLACK) SHIELD, CYLINDER SHIELD, FLYWHEEL ELECTRIC START (IF EQUIPPED) SHIELD, FLYWHEEL MANUAL START VALVE COVER ELECTRIC START FLYWHEEL ASSY MANUAL START FLYWHEEL ASSY KEY PART NO. MODEL NUMBER ST 121E (96183000100) ENGINE, LCT COMPLETE ENGINE-442159 KEY PART NO. NO. 27 444091 28 420586 29 443894 30 420606 31 420961 32 444090 34 436966... RECOIL STARTER ASSEMBLY-SNOW STARTER CUP SMALL SNOW STARTER GRIP (DELUXE) BLOWER HOUSING ASSEMBLY ELECTRIC START - REPAIR PARTS SNOW THROWER - - SNOW (BLACK) BLOWER HOUSING ASSEMBLY MANUAL START -


