
Owners Manual
Page 3
... Controls 17 Control Locations 17 Steering Control Levers 18 Parking Brake 19 Throttle Control 19 Blade Switch 19 Ignition Switch 20 Choke Control 20 Fuses 20 Fuel Tank 21 Fuel Shut Off Valve 22 Cutting Height Adjuster 22 Hour Meter 23 Tracking Knob 23 Operation 24 Training 24 Steering 24 Before Starting 25 Starting the Engine 25 Jumper Cables 28 Running 29 Operating On Hills 30 Mowing Tips 31 Stopping the Engine 32 Manual Transport 33 Maintenance 34 Maintenance Schedule 34 Battery 36 Ignition System 37 Safety System 37 Engine Cooling Air...
... Controls 17 Control Locations 17 Steering Control Levers 18 Parking Brake 19 Throttle Control 19 Blade Switch 19 Ignition Switch 20 Choke Control 20 Fuses 20 Fuel Tank 21 Fuel Shut Off Valve 22 Cutting Height Adjuster 22 Hour Meter 23 Tracking Knob 23 Operation 24 Training 24 Steering 24 Before Starting 25 Starting the Engine 25 Jumper Cables 28 Running 29 Operating On Hills 30 Mowing Tips 31 Stopping the Engine 32 Manual Transport 33 Maintenance 34 Maintenance Schedule 34 Battery 36 Ignition System 37 Safety System 37 Engine Cooling Air...
Owners Manual
Page 5
... not tow on mower. Operating instructions for towed equipment. Use only approved repair parts to the operator and a hydrostatic transmission regulated by the manufacturer. INTRODUCTION Congratulations Thank you for purchasing a Husqvarna ride-on sloped ground. Make wide turns to the design of the machine may cause loss of traction and loss of uses are documented. This machine is important for mowing grass on the...
... not tow on mower. Operating instructions for towed equipment. Use only approved repair parts to the operator and a hydrostatic transmission regulated by the manufacturer. INTRODUCTION Congratulations Thank you for purchasing a Husqvarna ride-on sloped ground. Make wide turns to the design of the machine may cause loss of traction and loss of uses are documented. This machine is important for mowing grass on the...
Owners Manual
Page 13
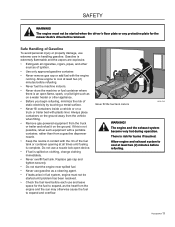
... problem has been resolved. • Check the fuel level before refueling. • Never fuel the machine indoors. • Never store the machine or fuel container where there is complete. If this is spilled on clothing, change clothing immediately. • Never overfill fuel tank. Allow engine to cool at least two (2) minutes before refueling. Husqvarna-13 The engine must not be started when the driver...
... problem has been resolved. • Check the fuel level before refueling. • Never fuel the machine indoors. • Never store the machine or fuel container where there is complete. If this is spilled on clothing, change clothing immediately. • Never overfill fuel tank. Allow engine to cool at least two (2) minutes before refueling. Husqvarna-13 The engine must not be started when the driver...

Owners Manual
Page 14
... governors and avoid running . • Check grass catcher components and the discharge guard frequently and replace with overly high engine speeds. Clean oil or fuel spillage and remove any adjustments or repairs with the engine running the engine with manufacturer's recommended parts, when necessary. • Mower blades are sharp. Repair, if necessary, before storing. • If you risk damaging the machine components. • Be very careful when handling battery acid. Check regularly to be sure...
... governors and avoid running . • Check grass catcher components and the discharge guard frequently and replace with overly high engine speeds. Clean oil or fuel spillage and remove any adjustments or repairs with the engine running the engine with manufacturer's recommended parts, when necessary. • Mower blades are sharp. Repair, if necessary, before storing. • If you risk damaging the machine components. • Be very careful when handling battery acid. Check regularly to be sure...

Owners Manual
Page 15
... battery and the heavy cables of sparking 8009-728 Husqvarna-15 If necessary, make repairs before putting it last. • Do not make adjustments with overly high engine speeds. Only use protective gloves when handling them. • Check the parking brake's functionality regularly. Avoid electrical sparking and its consequences by the following routines: 6003-009 Do not smoke when performing maintenance on the machine. SAFETY • Do not change...
... battery and the heavy cables of sparking 8009-728 Husqvarna-15 If necessary, make repairs before putting it last. • Do not make adjustments with overly high engine speeds. Only use protective gloves when handling them. • Check the parking brake's functionality regularly. Avoid electrical sparking and its consequences by the following routines: 6003-009 Do not smoke when performing maintenance on the machine. SAFETY • Do not change...
Owners Manual
Page 17
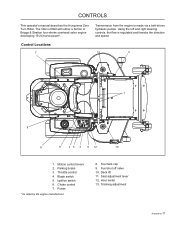
... 6 12 10 1. Ignition switch 6. Deck lift 11. Throttle control 4. Fuel shut off valve 10. Using the left and right steering controls, the flow is fitted with either a Kohler or Briggs & Stratton four-stroke overhead valve engine developing 19-24 horse power*. Choke control 7. Hour meter 13. Tracking adjustment Husqvarna-17 Parking brake 3. Seat adjustment lever 12. Fuses *As rated by the engine manufacturer. 8. Fuel tank cap 9. Blade switch 5. Motion control levers 2. CONTROLS This operator's manual describes the Husqvarna Zero Turn Rider. The rider is...
... 6 12 10 1. Ignition switch 6. Deck lift 11. Throttle control 4. Fuel shut off valve 10. Using the left and right steering controls, the flow is fitted with either a Kohler or Briggs & Stratton four-stroke overhead valve engine developing 19-24 horse power*. Choke control 7. Hour meter 13. Tracking adjustment Husqvarna-17 Parking brake 3. Seat adjustment lever 12. Fuses *As rated by the engine manufacturer. 8. Fuel tank cap 9. Blade switch 5. Motion control levers 2. CONTROLS This operator's manual describes the Husqvarna Zero Turn Rider. The rider is...
Owners Manual
Page 24
... Starting" in Operation section), adjust engine speed to idle, disengage parking brake, do not engage blades at this will slow the rotation of mower. Slowly move forward and backward The direction and speed of the control lever(s) on control levers, this will allow mower to start moving in a straight line. This will not move the mower under its own power, the operator must be reviewed in that direction. Push forward on turf. To zero turn...
... Starting" in Operation section), adjust engine speed to idle, disengage parking brake, do not engage blades at this will slow the rotation of mower. Slowly move forward and backward The direction and speed of the control lever(s) on control levers, this will allow mower to start moving in a straight line. This will not move the mower under its own power, the operator must be reviewed in that direction. Push forward on turf. To zero turn...
Owners Manual
Page 25
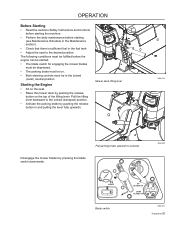
... lever 8058-019 Pull parking brake upwards to the desired position. FAST CHOKE SLOW UP BLADES ON DOWN BLADES OFF 8058-020 Blade switch 8052-001 Husqvarna-25 The following conditions must be fulfilled before starting (see Maintenance Schedule in the Maintenance section). • Check that there is sufficient fuel in the fuel tank. • Adjust the seat to activate. Starting the Engine • Sit on the seat. • Raise the mower deck by pushing...
... lever 8058-019 Pull parking brake upwards to the desired position. FAST CHOKE SLOW UP BLADES ON DOWN BLADES OFF 8058-020 Blade switch 8052-001 Husqvarna-25 The following conditions must be fulfilled before starting (see Maintenance Schedule in the Maintenance section). • Check that there is sufficient fuel in the fuel tank. • Adjust the seat to activate. Starting the Engine • Sit on the seat. • Raise the mower deck by pushing...

Owners Manual
Page 34
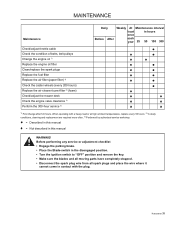
... those points not described in this manual Maintenance Check the parking brake Check the engine's oil level (every refueling) Check the safety system Check for fuel and oil leakages Check/clean the engine's cooling air intake Check the mower deck Check for loose hardware (screws, nuts) Clean under the mower deck Start the engine and blades, listen for unusual sounds Check for damage Thoroughly clean around the engine Clean around belts, belt pulleys Check the tire pressures Check battery Sharpen/Replace mower blades Clean the engine's cooling air intake 2) Clean the air cleaner's pre-filter...
... those points not described in this manual Maintenance Check the parking brake Check the engine's oil level (every refueling) Check the safety system Check for fuel and oil leakages Check/clean the engine's cooling air intake Check the mower deck Check for loose hardware (screws, nuts) Clean under the mower deck Start the engine and blades, listen for unusual sounds Check for damage Thoroughly clean around the engine Clean around belts, belt pulleys Check the tire pressures Check battery Sharpen/Replace mower blades Clean the engine's cooling air intake 2) Clean the air cleaner's pre-filter...
Owners Manual
Page 35
... Before After Weekly At Maintenance interval least in this manual ♦ = Not described in hours once each year 25 50 100 300 Check/adjust throttle cable Check the condition of belts, belt pulleys Change the engine oil 1) Replace the engine oil filter Clean/replace the spark plugs Replace the fuel filter Replace the air filter (paper filter) 2) Check the caster wheels (every 200 hours) Replace the air cleaner's pre-filter 2) (foam) Check/adjust the mower deck Check the engine valve clearance 3) Perform the 300-hour service 3) ● ● ● ●...
... Before After Weekly At Maintenance interval least in this manual ♦ = Not described in hours once each year 25 50 100 300 Check/adjust throttle cable Check the condition of belts, belt pulleys Change the engine oil 1) Replace the engine oil filter Clean/replace the spark plugs Replace the fuel filter Replace the air filter (paper filter) 2) Check the caster wheels (every 200 hours) Replace the air cleaner's pre-filter 2) (foam) Check/adjust the mower deck Check the engine valve clearance 3) Perform the 300-hour service 3) ● ● ● ●...
Owners Manual
Page 36
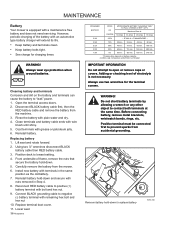
... battery. Position deck to prevent sparks from accidental grounding. Reinstall battery hold -down to negative (-) battery terminal with plain water and dry. 4. Replace terminal boot cover. 11. Remove battery hold -down . 5. MAINTENANCE Battery Your mower is not necessary. Reconnect RED battery cable to open or remove caps or covers. Positive terminal must be connected first to lowest setting. 4. Using two ½" wrenches disconnect BLACK battery cable then RED battery cable. 3. However, periodic charging of...
... battery. Position deck to prevent sparks from accidental grounding. Reinstall battery hold -down to negative (-) battery terminal with plain water and dry. 4. Replace terminal boot cover. 11. Remove battery hold -down . 5. MAINTENANCE Battery Your mower is not necessary. Reconnect RED battery cable to open or remove caps or covers. Positive terminal must be connected first to lowest setting. 4. Using two ½" wrenches disconnect BLACK battery cable then RED battery cable. 3. However, periodic charging of...
Owners Manual
Page 37
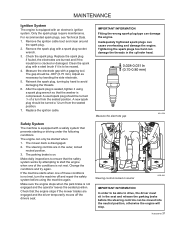
... parking brake is not engaged and the operator leaves the seated position. Tightening the spark plugs too hard can cause overheating and damage the engine. If the machine starts when one of a turn from the seated position. Steering controls locked in the cylinder head. Remove the spark plug with an electronic ignition system. Reinsert the spark plug, turning by bending the side electrode. 5. Replace the ignition cable. Change the conditions and try again. MAINTENANCE Ignition System The engine...
... parking brake is not engaged and the operator leaves the seated position. Tightening the spark plugs too hard can cause overheating and damage the engine. If the machine starts when one of a turn from the seated position. Steering controls locked in the cylinder head. Remove the spark plug with an electronic ignition system. Reinsert the spark plug, turning by bending the side electrode. 5. Replace the ignition cable. Change the conditions and try again. MAINTENANCE Ignition System The engine...

Owners Manual
Page 39
... damaged. maintenance Air Filter If the engine seems weak or runs unevenly, the air filter may be installed on the inside of the cover. 2. Remove the filter element. Handle the new element carefully and do not use compressed air to the sealing. If running with a new one. As an option, a prefilter can become very hot during operation. Replace a dirty, bent or damaged element with a dirty air filter, the spark plugs can be clogged. Check that...
... damaged. maintenance Air Filter If the engine seems weak or runs unevenly, the air filter may be installed on the inside of the cover. 2. Remove the filter element. Handle the new element carefully and do not use compressed air to the sealing. If running with a new one. As an option, a prefilter can become very hot during operation. Replace a dirty, bent or damaged element with a dirty air filter, the spark plugs can be clogged. Check that...

Owners Manual
Page 46
... to the routing decal on a level surface. Replace belt shields on the idler arm and carefully route belt over the top of operation. MAINTENANCE V-belts Check every 100 hours of the cutter housing pulleys and remove belt. Apply parking brake. 2. Check for severe cracking and large nicks. NOTE: The belt will show some small cracks in installing the deck belt, refer to the deck, and the belt does not have accumulated around the electric clutch pulley that may...
... to the routing decal on a level surface. Replace belt shields on the idler arm and carefully route belt over the top of operation. MAINTENANCE V-belts Check every 100 hours of the cutter housing pulleys and remove belt. Apply parking brake. 2. Check for severe cracking and large nicks. NOTE: The belt will show some small cracks in installing the deck belt, refer to the deck, and the belt does not have accumulated around the electric clutch pulley that may...

Owners Manual
Page 47
... INFORMATION Special blade bolt is important that result in a breakdown. Damaged blades should be replaced. Check the blades WARNING! Do not use lower grade hardware than specified. 2 1. Blade 2. Cutter housing Blade attachment 8011-604-1 3 1 8053-027 Husqvarna-47 Check the blade mounts. Let the service workshop decide whether the blade can be repaired/ ground or must be replaced. Install new or resharpened blade with a Husqvarna bolt if required. Blade bolt (special) 3. Install and tighten blade bolt securely. 4. Replace with stamped "GRASS SIDE...
... INFORMATION Special blade bolt is important that result in a breakdown. Damaged blades should be replaced. Check the blades WARNING! Do not use lower grade hardware than specified. 2 1. Blade 2. Cutter housing Blade attachment 8011-604-1 3 1 8053-027 Husqvarna-47 Check the blade mounts. Let the service workshop decide whether the blade can be repaired/ ground or must be replaced. Install new or resharpened blade with a Husqvarna bolt if required. Blade bolt (special) 3. Install and tighten blade bolt securely. 4. Replace with stamped "GRASS SIDE...

Owners Manual
Page 56
... the carburetor or fuel line. • Fouled spark plugs • Poor contact of the battery terminal cable connections • Charging lead is disconnected • Parking brake on • Bypass valve on pump open • Drive belt for the transmission slack or has come off • Air trapped in hydraulic system • Drive belt for the mower deck has come loose • Contact for the electromagnetic coupling has loosened • Blade switch...
... the carburetor or fuel line. • Fouled spark plugs • Poor contact of the battery terminal cable connections • Charging lead is disconnected • Parking brake on • Bypass valve on pump open • Drive belt for the transmission slack or has come off • Air trapped in hydraulic system • Drive belt for the mower deck has come loose • Contact for the electromagnetic coupling has loosened • Blade switch...
Owners Manual
Page 57
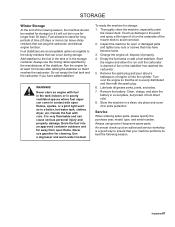
... during storage. Run the engine for at an authorized service workshop is drained of the mower deck to stand for storage: 1. Remove the spark plug and pour about a tablespoon of engine oil into an approved container outdoors and far away from direct cold. 8. Service When ordering spare parts, please specify the purchase year, model, type, and serial number. Handle the fuel with open flame. Drain the fuel into the cylinder...
... during storage. Run the engine for at an authorized service workshop is drained of the mower deck to stand for storage: 1. Remove the spark plug and pour about a tablespoon of engine oil into an approved container outdoors and far away from direct cold. 8. Service When ordering spare parts, please specify the purchase year, model, type, and serial number. Handle the fuel with open flame. Drain the fuel into the cylinder...
Owners Manual
Page 67
... include date purchased, model number, serial number, and complete name and address of purchase; Ask about Husqvarna's extended service plan! SECTION 4 - or: (4) Additional damage to parts or components due to continued use , including, but not limited to belts, blades, blade adapters, bulbs, clutches, clutch drums, filters (fuel line, fuel filters, air filters, oil filters), sprockets, guide bars, lubricants, rewind springs, spark plugs; (2) Natural discoloration of incidental or consequential damages, or limitations on the Online Product Registration link...
... include date purchased, model number, serial number, and complete name and address of purchase; Ask about Husqvarna's extended service plan! SECTION 4 - or: (4) Additional damage to parts or components due to continued use , including, but not limited to belts, blades, blade adapters, bulbs, clutches, clutch drums, filters (fuel line, fuel filters, air filters, oil filters), sprockets, guide bars, lubricants, rewind springs, spark plugs; (2) Natural discoloration of incidental or consequential damages, or limitations on the Online Product Registration link...

Owners Manual
Page 74
Replace the engine oil filter (100 hours). 6. Clean/change the spark plugs (100 hours). 9. Date, mtr reading, stamp, sign 74-Husqvarna Clean the engine's cooling air intake (25 hours). 2. Replace the air filter's paper cartridge. 4. Change the engine oil (50 hours). 5. Check/adjust the parking brake (50 hours). 8. Change the fuel filter (100 hours). 10. Check the engine valve clearance. Replace the air cleaner's pre-filter (foam) (300 hours). 3. SERVICE JOURNAL Action At Least Once Each Year 1. Check/adjust the cutting height. 7.
Replace the engine oil filter (100 hours). 6. Clean/change the spark plugs (100 hours). 9. Date, mtr reading, stamp, sign 74-Husqvarna Clean the engine's cooling air intake (25 hours). 2. Replace the air filter's paper cartridge. 4. Change the engine oil (50 hours). 5. Check/adjust the parking brake (50 hours). 8. Change the fuel filter (100 hours). 10. Check the engine valve clearance. Replace the air cleaner's pre-filter (foam) (300 hours). 3. SERVICE JOURNAL Action At Least Once Each Year 1. Check/adjust the cutting height. 7.

Parts Manual
Page 19
... 2 WASHER ½ FLT 19 DESCRIPTION 1.. 522 744401 1 DECK w/ SAFETY DECALS 2.. 539 114557 1 V-BELT 3.. 532 187256 3 BLADE, BAGGING 4.. 532 187297 1 BELT SHIELD, LT 5.. 532 188187 1 BELT SHIELD, RT 6.. 539 112057 3 HOUSING, CUTTER 7.. 539 107610 5 WHEEL, GAUGE 8.. 539 112171 3 PULLEY 9.. 532 196106 2 PULLEY, IDLER 10.. 532 196104 1 PULLEY, IDLER 11.. 539 112054 1 DEFLECTOR 12.. 522 629701 1 KEEPER, BELT 13.. 539 110462 1 ROD, HINGE 14.. 539 112050 1 BEARING 15.. 510...
... 2 WASHER ½ FLT 19 DESCRIPTION 1.. 522 744401 1 DECK w/ SAFETY DECALS 2.. 539 114557 1 V-BELT 3.. 532 187256 3 BLADE, BAGGING 4.. 532 187297 1 BELT SHIELD, LT 5.. 532 188187 1 BELT SHIELD, RT 6.. 539 112057 3 HOUSING, CUTTER 7.. 539 107610 5 WHEEL, GAUGE 8.. 539 112171 3 PULLEY 9.. 532 196106 2 PULLEY, IDLER 10.. 532 196104 1 PULLEY, IDLER 11.. 539 112054 1 DEFLECTOR 12.. 522 629701 1 KEEPER, BELT 13.. 539 110462 1 ROD, HINGE 14.. 539 112050 1 BEARING 15.. 510...


