Owners Manual
Page 3
...36 Safety System 37 Fuel Pump Air Filter 37 Tire Pressures 38 Parking Brake 38 V-belts 39 Deck Belt 39 Cutting Blades 40 Blade replacement 40 Adjusting the Mower Deck 41 Leveling deck 41 Anti-scalp Rollers 42 Caster Wheels 43 Cleaning 43 Hardware 43 LUBRICATION 44 Front Wheel Mount ...45 Front Wheel Bearings 45 Deck Spindles 45 Transmission 45 TROUBLESHOOTING 46 STORAGE 48 Winter Storage 48 Service 48 schematics 49 TECHNICAL DATA 50 Torque Specifications 56 Accessories...
...36 Safety System 37 Fuel Pump Air Filter 37 Tire Pressures 38 Parking Brake 38 V-belts 39 Deck Belt 39 Cutting Blades 40 Blade replacement 40 Adjusting the Mower Deck 41 Leveling deck 41 Anti-scalp Rollers 42 Caster Wheels 43 Cleaning 43 Hardware 43 LUBRICATION 44 Front Wheel Mount ...45 Front Wheel Bearings 45 Deck Spindles 45 Transmission 45 TROUBLESHOOTING 46 STORAGE 48 Winter Storage 48 Service 48 schematics 49 TECHNICAL DATA 50 Torque Specifications 56 Accessories...

Owners Manual
Page 8
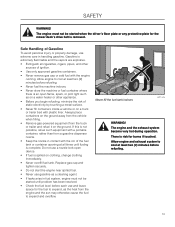
...! symbols and decals Read Operator's Manual Shut off engine and remove key before performing any maintenance or repair work Keep a safe distance from the discharge deck Do not touch parts 8
...! symbols and decals Read Operator's Manual Shut off engine and remove key before performing any maintenance or repair work Keep a safe distance from the discharge deck Do not touch parts 8

Owners Manual
Page 10
Do not allow the mower deck to plow leaves or other debris, causing buildup to occur. • Clean any oil or fuel spillage before operating or storing the machine. • Allow ...
Do not allow the mower deck to plow leaves or other debris, causing buildup to occur. • Clean any oil or fuel spillage before operating or storing the machine. • Allow ...
Owners Manual
Page 13
... agent. • If leaks arise in fuel system, engine must not be started when the driver's floor plate or any protective plate for the mower deck's drive belt is not possible, refuel such equipment with a portable container, rather than from the truck or trailer and refuel it on the ground away...
... agent. • If leaks arise in fuel system, engine must not be started when the driver's floor plate or any protective plate for the mower deck's drive belt is not possible, refuel such equipment with a portable container, rather than from the truck or trailer and refuel it on the ground away...
Owners Manual
Page 16
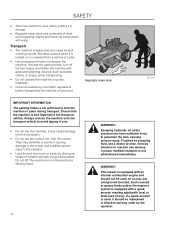
...machine is not administered immediately. Escaping hydraulic oil under pressure can cause serious crushing injuries. If injured by driving up ramps of deck, avoid spraying engine and electrical components with an internal combustion engine and should not be lifted by hand. 16 WARNING! Serious...machine to cool before transporting the machine on any road. Be extra cautious when it should be maintained in storage. • Regularly clean deck and underside of suitable strength using a slow speed. with approved fastening devices, such as bands, chains, or straps, when transporting. ...
...machine is not administered immediately. Escaping hydraulic oil under pressure can cause serious crushing injuries. If injured by driving up ramps of deck, avoid spraying engine and electrical components with an internal combustion engine and should not be lifted by hand. 16 WARNING! Serious...machine to cool before transporting the machine on any road. Be extra cautious when it should be maintained in storage. • Regularly clean deck and underside of suitable strength using a slow speed. with approved fastening devices, such as bands, chains, or straps, when transporting. ...
Owners Manual
Page 17
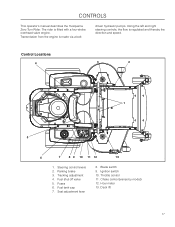
... 11 12 13 1. Fuel shut off valve 5. Seat adjustment lever 8. The rider is fitted with a four-stroke overhead valve engine. driven hydraulic pumps. Parking brake 3. Deck lift 17 CONTROLS This operator's manual describes the Husqvarna Zero Turn Rider. Hour meter 13.
... 11 12 13 1. Fuel shut off valve 5. Seat adjustment lever 8. The rider is fitted with a four-stroke overhead valve engine. driven hydraulic pumps. Parking brake 3. Deck lift 17 CONTROLS This operator's manual describes the Husqvarna Zero Turn Rider. Hour meter 13.
Owners Manual
Page 19
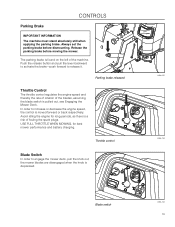
...Blade Switch In order to increase or decrease the engine speed, the control is a risk of the machine. In order to engage the mower deck, pull the knob out; Push the release button and pull the lever backward to activate the brake-push forward to release it. CONTROLS Parking ... must stand absolutely still when applying the parking brake. the mower blades are disengaged when the knob is pulled out, see Engaging the Mower Deck. Parking brake released Throttle Control The throttle control regulates the engine speed and thereby the rate of rotation of the blades, assuming the blade ...
...Blade Switch In order to increase or decrease the engine speed, the control is a risk of the machine. In order to engage the mower deck, pull the knob out; Push the release button and pull the lever backward to activate the brake-push forward to release it. CONTROLS Parking ... must stand absolutely still when applying the parking brake. the mower blades are disengaged when the knob is pulled out, see Engaging the Mower Deck. Parking brake released Throttle Control The throttle control regulates the engine speed and thereby the rate of rotation of the blades, assuming the blade ...
Owners Manual
Page 20
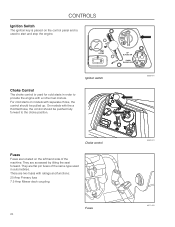
... be pushed fully forward to start and stop the engine. They are located on models with ratings and functions: 20 Amp Primary fuse 7.5 Amp Mower deck coupling Fuses 20 8052-001 8052-001 8011-420 There are flat pin fuses of the machine. On models with a richer fuel mixture. Choke control...
... be pushed fully forward to start and stop the engine. They are located on models with ratings and functions: 20 Amp Primary fuse 7.5 Amp Mower deck coupling Fuses 20 8052-001 8052-001 8011-420 There are flat pin fuses of the machine. On models with a richer fuel mixture. Choke control...
Owners Manual
Page 22
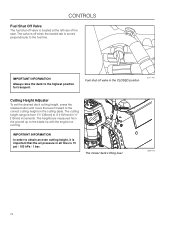
... lever 8058-019 22 IMPORTANT INFORMATION Always raise the deck to the fuel line. The heights are measured from 1½" (38mm) to 4" (102mm) in ½" (13mm) increments. The cutting height range is located at the ... obtain an even cutting height, it is important that the air pressure in the CLOSED position 8011-419 Cutting Height Adjuster To set the desired deck cutting height, press the release button and move the lever forward to the correct cutting height on the cutting plate. The valve is off when...
... lever 8058-019 22 IMPORTANT INFORMATION Always raise the deck to the fuel line. The heights are measured from 1½" (38mm) to 4" (102mm) in ½" (13mm) increments. The cutting height range is located at the ... obtain an even cutting height, it is important that the air pressure in the CLOSED position 8011-419 Cutting Height Adjuster To set the desired deck cutting height, press the release button and move the lever forward to the correct cutting height on the cutting plate. The valve is off when...
Owners Manual
Page 25
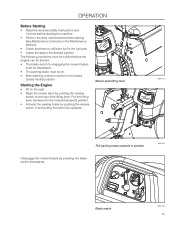
... the lifting lever backward to activate. Starting the Engine • Sit on the seat. • Raise the mower deck by pressing the blade switch downwards. 8058-020 Blade switch 8058-134 25 Mower deck lifting lever 8058-019 Pull parking brake upwards to the locked (transport) position. • Activate the parking brake...
... the lifting lever backward to activate. Starting the Engine • Sit on the seat. • Raise the mower deck by pressing the blade switch downwards. 8058-020 Blade switch 8058-134 25 Mower deck lifting lever 8058-019 Pull parking brake upwards to the locked (transport) position. • Activate the parking brake...
Owners Manual
Page 29
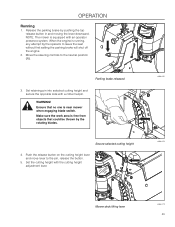
... brake released 3. Set retaining pin into selected cutting height and secure the opposite side with the cutting height adjustment lever. 8058-020 8058-024 Mower deck lifting lever 8058-019 29 Secure selected cutting height 4. Move the steering controls to the pin, release the button. 5. WARNING! Set the cutting height with...
... brake released 3. Set retaining pin into selected cutting height and secure the opposite side with the cutting height adjustment lever. 8058-020 8058-024 Mower deck lifting lever 8058-019 29 Secure selected cutting height 4. Move the steering controls to the pin, release the button. 5. WARNING! Set the cutting height with...
Owners Manual
Page 30
... controls into the neutral position and push to the outside of the mower and press forward to the center of the unit. Engage the mower deck by moving one control backward (behind the neutral position) and carefully moving the other steering control forward from its neutral position. In order, for example...
... controls into the neutral position and push to the outside of the mower and press forward to the center of the unit. Engage the mower deck by moving one control backward (behind the neutral position) and carefully moving the other steering control forward from its neutral position. In order, for example...
Owners Manual
Page 31
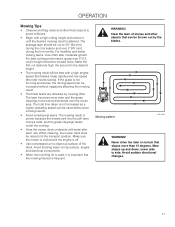
The average lawn should be mowed twice. When cleaning, the mower deck shall be raised into the soft lawn, clumps build, and the grass clippings fasten under the cowling. • Hose the mower deck underside with water after moderate growth. Clear the lawn of stones and other fixed objects to clean top surface... of the deck. Mowing pattern 8011-603 WARNING! If the grass is poorer because the wheels sink into the transport position. The mowing result is not too long ...
The average lawn should be mowed twice. When cleaning, the mower deck shall be raised into the soft lawn, clumps build, and the grass clippings fasten under the cowling. • Hose the mower deck underside with water after moderate growth. Clear the lawn of stones and other fixed objects to clean top surface... of the deck. Mowing pattern 8011-603 WARNING! If the grass is poorer because the wheels sink into the transport position. The mowing result is not too long ...
Owners Manual
Page 32
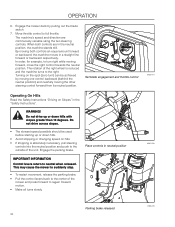
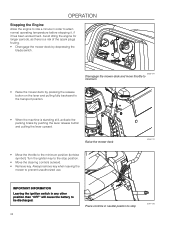
...longer periods, as there is a risk of the spark plugs fouling. • Disengage the mower deck by depressing the blade switch. 8058-134 Disengage the mower deck and move throttle to minimum • Raise the mower deck by pressing the release button on the lever and pulling fully backward to attain normal operating... lever upward. operation Stopping the Engine Allow the engine to idle a minute in neutral position to the minimum position (tortoise symbol). Raise the mower deck • Move the throttle to stop position. • Move the steering controls outward. • Remove key.
...longer periods, as there is a risk of the spark plugs fouling. • Disengage the mower deck by depressing the blade switch. 8058-134 Disengage the mower deck and move throttle to minimum • Raise the mower deck by pressing the release button on the lever and pulling fully backward to attain normal operating... lever upward. operation Stopping the Engine Allow the engine to idle a minute in neutral position to the minimum position (tortoise symbol). Raise the mower deck • Move the throttle to stop position. • Move the steering controls outward. • Remove key.
Owners Manual
Page 33
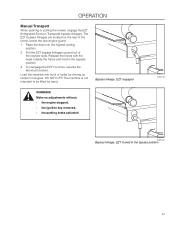
... are located on the rear of the keyhole slots. Pull the EZT bypass linkages up ramps in the bypass position. 3. DO NOT LIFT! Raise the deck into truck or trailer by hand. Load the machine into the highest cutting position. 2. Release the levers with the head outside the frame and held...
... are located on the rear of the keyhole slots. Pull the EZT bypass linkages up ramps in the bypass position. 3. DO NOT LIFT! Raise the deck into truck or trailer by hand. Load the machine into the highest cutting position. 2. Release the levers with the head outside the frame and held...
Owners Manual
Page 34
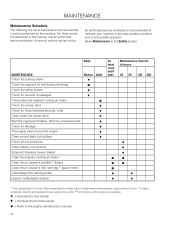
...) Check the safety system Check for fuel and oil leakages Check/clean the engine's cooling air intake Check the mower deck Check for loose hardware (screws, nuts) Clean under the mower deck Start the engine and blades, listen for unusual sounds Check for damage Thoroughly clean around the engine Clean around belts...
...) Check the safety system Check for fuel and oil leakages Check/clean the engine's cooling air intake Check the mower deck Check for loose hardware (screws, nuts) Clean under the mower deck Start the engine and blades, listen for unusual sounds Check for damage Thoroughly clean around the engine Clean around belts...
Owners Manual
Page 35
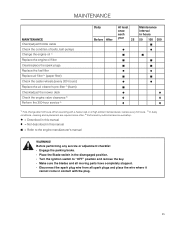
... fuel filter Replace air filter 2) (paper filter) Check the caster wheels (every 200 hours) Replace the air cleaner's pre-filter 2) (foam) Check/adjust the mower deck Check the engine valve clearance 3) Perform the 300-hour service 3) Daily Before After At least once each year 25 Maintenance interval in the disengaged position...
... fuel filter Replace air filter 2) (paper filter) Check the caster wheels (every 200 hours) Replace the air cleaner's pre-filter 2) (foam) Check/adjust the mower deck Check the engine valve clearance 3) Perform the 300-hour service 3) Daily Before After At least once each year 25 Maintenance interval in the disengaged position...
Owners Manual
Page 36
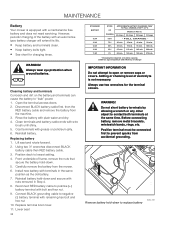
... Amps 10 Amps - Always wear eye protection when around batteries. Clean terminals and battery cable ends with remaining hex bolt and hex nut 10. Position deck to replace battery WARNING! Using two ½" wrenches disconnect BLACK battery cable then RED battery cable. 3. MAINTENANCE Battery Your mower is not necessary. WARNING! Open...
... Amps 10 Amps - Always wear eye protection when around batteries. Clean terminals and battery cable ends with remaining hex bolt and hex nut 10. Position deck to replace battery WARNING! Using two ½" wrenches disconnect BLACK battery cable then RED battery cable. 3. MAINTENANCE Battery Your mower is not necessary. WARNING! Open...
Owners Manual
Page 37
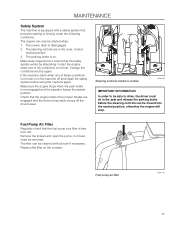
... 8009-147 37 Remove the screws and open the pump, no hoses need be started when: 1. MAINTENANCE Safety System The machine is disengaged. 2. The mower deck is equipped with a brush if necessary. Fuel Pump Air Filter Regularly check that prevents starting or driving under the following conditions. If the machine starts...
... 8009-147 37 Remove the screws and open the pump, no hoses need be started when: 1. MAINTENANCE Safety System The machine is disengaged. 2. The mower deck is equipped with a brush if necessary. Fuel Pump Air Filter Regularly check that prevents starting or driving under the following conditions. If the machine starts...
Owners Manual
Page 39
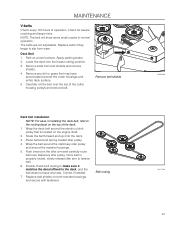
...of operation. Place belt around the mandrel housings. 5. Push inward on the engine shaft. 2. Remove bolts from wear. Remove belt shields Deck belt installation NOTE: For ease in normal operation. Double check belt routing to make sure it matches the decal affixed to tension belt. 6....the belt over stationary idler pulley. NOTE: The belt will show some small cracks in installing the deck belt, refer to slip from belt shields and remove shields. 4. Lower the deck into the lowest cutting position. 3. Correct if needed. 7. Once belt is located on the idler ...
...of operation. Place belt around the mandrel housings. 5. Push inward on the engine shaft. 2. Remove bolts from wear. Remove belt shields Deck belt installation NOTE: For ease in normal operation. Double check belt routing to make sure it matches the decal affixed to tension belt. 6....the belt over stationary idler pulley. NOTE: The belt will show some small cracks in installing the deck belt, refer to slip from belt shields and remove shields. 4. Lower the deck into the lowest cutting position. 3. Correct if needed. 7. Once belt is located on the idler ...


