Owners Manual
Page 3
...System (ROPS 17 Spark Arrestors 17 CONTROLS 18 Control Locations 18 Motion Control Levers 19 Hour Meter 20 Tracking Knob 20 Parking Brake 21 Blade Switch 21 Ignition Switch 21 Fuses 23 Choke Control 23 Cutting Height Pedal 23 Seat Adjustment Lever 24 Fuel Shut Off Valve 24 Hydro Release...Transport 35 MAINTENANCE 36 Battery 38 Safety System 39 Tire Pressures 39 Parking Brake 39 Deck Belt 40 Pump Belt 41 V-belts 41 Cutting Blades 42 Adjusting the Mower Deck 43 Leveling Deck 43 Anti-scalp Rollers 44 Caster Wheels 44 Hardware 45 Cleaning 45 ZT-3400 Powertrain 45 ...
...System (ROPS 17 Spark Arrestors 17 CONTROLS 18 Control Locations 18 Motion Control Levers 19 Hour Meter 20 Tracking Knob 20 Parking Brake 21 Blade Switch 21 Ignition Switch 21 Fuses 23 Choke Control 23 Cutting Height Pedal 23 Seat Adjustment Lever 24 Fuel Shut Off Valve 24 Hydro Release...Transport 35 MAINTENANCE 36 Battery 38 Safety System 39 Tire Pressures 39 Parking Brake 39 Deck Belt 40 Pump Belt 41 V-belts 41 Cutting Blades 42 Adjusting the Mower Deck 43 Leveling Deck 43 Anti-scalp Rollers 44 Caster Wheels 44 Hardware 45 Cleaning 45 ZT-3400 Powertrain 45 ...
Owners Manual
Page 8
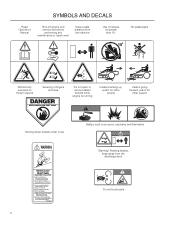
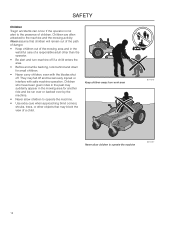
... Shut off engine and remove key before performing any maintenance or repair work Keep a safe distance from the discharge deck Do not touch parts 8 Rotating blades, keep away from the machine Use on slopes no greater than 10° No passengers Whole body Severing of fingers exposure to and toes thrown... open or remove safety shields while engine is running Careful backing up, watch for other people Careful going forward, watch for other people Moving sharp blades under cover Battery acid is corrosive, explosive and flammable Warning!
... Shut off engine and remove key before performing any maintenance or repair work Keep a safe distance from the discharge deck Do not touch parts 8 Rotating blades, keep away from the machine Use on slopes no greater than 10° No passengers Whole body Severing of fingers exposure to and toes thrown... open or remove safety shields while engine is running Careful backing up, watch for other people Careful going forward, watch for other people Moving sharp blades under cover Battery acid is corrosive, explosive and flammable Warning!
Owners Manual
Page 9
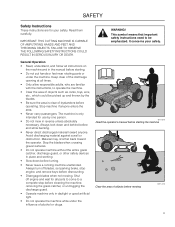
...: THIS CUTTING MACHINE IS CAPABLE OF AMPUTATING HANDS AND FEET AND THROWING OBJECTS. WARNING! Stop machine if anyone . Stop the blades when crossing gravel surfaces. • Do not operate machine without the entire grass catcher, discharge guard, or other safety devices in... reverse unless absolutely necessary. Material may ricochet back toward anyone enters the area. • Never carry passengers. Shut off blades, set parking brake, stop before cleaning the machine, removing the grass catcher, or unclogging the discharge guard. • Operate machine only...
...: THIS CUTTING MACHINE IS CAPABLE OF AMPUTATING HANDS AND FEET AND THROWING OBJECTS. WARNING! Stop machine if anyone . Stop the blades when crossing gravel surfaces. • Do not operate machine without the entire grass catcher, discharge guard, or other safety devices in... reverse unless absolutely necessary. Material may ricochet back toward anyone enters the area. • Never carry passengers. Shut off blades, set parking brake, stop before cleaning the machine, removing the grass catcher, or unclogging the discharge guard. • Operate machine only...

Owners Manual
Page 11
...putting a foot on the ground. • Do not mow near drop-offs, ditches, or embankments. If the tires lose traction, disengage the blades and proceed slowly straight down hills with slopes greater than 10 degrees. Personal protective equipment 8011-670a Mow up and down , not side to ... steel toe caps. • Always wear approved protective glasses or a full visor when assembling or driving. • Always wear gloves when handling the blades. • Never wear loose clothing that can hide obstacles. • Choose a low ground speed so that you have to hearing. Do not make...
...putting a foot on the ground. • Do not mow near drop-offs, ditches, or embankments. If the tires lose traction, disengage the blades and proceed slowly straight down hills with slopes greater than 10 degrees. Personal protective equipment 8011-670a Mow up and down , not side to ... steel toe caps. • Always wear approved protective glasses or a full visor when assembling or driving. • Always wear gloves when handling the blades. • Never wear loose clothing that can hide obstacles. • Choose a low ground speed so that you have to hearing. Do not make...
Owners Manual
Page 12
... of danger. • Keep children out of the mowing area and in the mowing area for small children. • Never carry children, even with the blades shut off and be run over or backed over by the machine. • Never allow children to operate the machine 8011-517 12
... of danger. • Keep children out of the mowing area and in the mowing area for small children. • Never carry children, even with the blades shut off and be run over or backed over by the machine. • Never allow children to operate the machine 8011-517 12
Owners Manual
Page 14
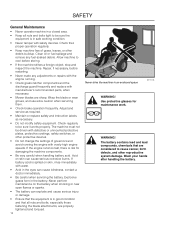
... SAFETY General Maintenance • Never operate machine in a closed area. • Keep all nuts and bolts, especially those fastening the blade attachments, are sharp. Clean oil or fuel spillage and remove any adjustments or repairs with the engine running the engine with safety devices....a foreign object, stop and inspect the machine. Acid on skin, rinse immediately with manufacturer's recommended parts, when necessary. • Mower blades are properly tightened and torqued. 14 Never drive the machine in the battery. If battery acid is spilled on skin can explode and cause...
... SAFETY General Maintenance • Never operate machine in a closed area. • Keep all nuts and bolts, especially those fastening the blade attachments, are sharp. Clean oil or fuel spillage and remove any adjustments or repairs with the engine running the engine with safety devices....a foreign object, stop and inspect the machine. Acid on skin, rinse immediately with manufacturer's recommended parts, when necessary. • Mower blades are properly tightened and torqued. 14 Never drive the machine in the battery. If battery acid is spilled on skin can explode and cause...

Owners Manual
Page 15
...; Reduce the risk of sparking Regularly clean deck 8009-728 8011-514 15 Adjust and service as necessary. • The mulch blades should only be used in familiar areas when higher quality mowing is spilled fuel. • Disconnect the negative cable from the battery.... Avoid electrical sparking and its consequences by the manufacturer. Wrap the blades or use protective gloves when handling them. • Check the parking brake's functionality regularly. SAFETY Sparking can explode and cause serious injury...
...; Reduce the risk of sparking Regularly clean deck 8009-728 8011-514 15 Adjust and service as necessary. • The mulch blades should only be used in familiar areas when higher quality mowing is spilled fuel. • Disconnect the negative cable from the battery.... Avoid electrical sparking and its consequences by the manufacturer. Wrap the blades or use protective gloves when handling them. • Check the parking brake's functionality regularly. SAFETY Sparking can explode and cause serious injury...
Owners Manual
Page 18
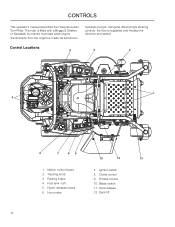
... and speed. Ignition switch 8. Choke control 9. Deck release 12. Deck lift 18 Control Locations 4 3 2 1 5 6 7 89 10 12 13 1. Hydro releases levers 6. Blade switch 11. CONTROLS This operator's manual describes the Husqvarna Zero Turn Rider. Tracking knob 3. Parking brake 4. Throttle control 10. Transmission from the engine is made via belt-driven hydraulic pumps...
... and speed. Ignition switch 8. Choke control 9. Deck release 12. Deck lift 18 Control Locations 4 3 2 1 5 6 7 89 10 12 13 1. Hydro releases levers 6. Blade switch 11. CONTROLS This operator's manual describes the Husqvarna Zero Turn Rider. Tracking knob 3. Parking brake 4. Throttle control 10. Transmission from the engine is made via belt-driven hydraulic pumps...

Owners Manual
Page 21
... to activate the brake and forward to start and stop the engine. Blade switch Ignition Switch The ignition switch is placed on the left of the machine. Parking brake Blade Switch To engage the mower deck, pull the blade switch knob out. Always set the parking brake before moving the mower.... Ignition switch 21 8065-006 8065-084 8050-780 IMPORTANT INFORMATION The machine must stand absolutely still when applying the parking brake. The mower blades are disengaged when the knob is pressed down fully. CONTROLS Parking Brake The parking brake is found on the control panel and is used to...
... to activate the brake and forward to start and stop the engine. Blade switch Ignition Switch The ignition switch is placed on the left of the machine. Parking brake Blade Switch To engage the mower deck, pull the blade switch knob out. Always set the parking brake before moving the mower.... Ignition switch 21 8065-006 8065-084 8050-780 IMPORTANT INFORMATION The machine must stand absolutely still when applying the parking brake. The mower blades are disengaged when the knob is pressed down fully. CONTROLS Parking Brake The parking brake is found on the control panel and is used to...

Owners Manual
Page 26
... mower to suddenly stop moving forward in the Operation section). Adjust the engine speed to idle, disengage the parking brake but do not engage the blades at this will slow the rotation of the mower's movements are effected by alternating one lever slightly to the forward position and the other people...
... mower to suddenly stop moving forward in the Operation section). Adjust the engine speed to idle, disengage the parking brake but do not engage the blades at this will slow the rotation of the mower's movements are effected by alternating one lever slightly to the forward position and the other people...

Owners Manual
Page 27
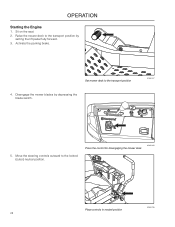
... locked (outer) neutral position. 8065-006 Place controls in upright position 8065-011 Activate parking brake before the engine can be on. The blade switch for engaging the mower blades must be depressed. 2. Perform the daily maintenance before starting (see maintenance schedule in the raised and locked position and use the seat...
... locked (outer) neutral position. 8065-006 Place controls in upright position 8065-011 Activate parking brake before the engine can be on. The blade switch for engaging the mower blades must be depressed. 2. Perform the daily maintenance before starting (see maintenance schedule in the raised and locked position and use the seat...
Owners Manual
Page 28
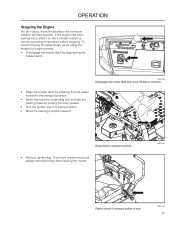
Set mower deck to the locked (outer) neutral position. Press the control for disengaging the mower deck 8065-085 Place controls in neutral position 8065-096 28 Raise the mower deck to the transport position by depressing the blade switch. 8065-087 5. Activate the parking brake. OPERATION Starting the Engine 1. Sit on the seat. 2. Disengage the mower blades by setting the lift pedal fully forward. 3. Move the steering controls outward to the transport position 4.
Set mower deck to the locked (outer) neutral position. Press the control for disengaging the mower deck 8065-085 Place controls in neutral position 8065-096 28 Raise the mower deck to the transport position by depressing the blade switch. 8065-087 5. Activate the parking brake. OPERATION Starting the Engine 1. Sit on the seat. 2. Disengage the mower blades by setting the lift pedal fully forward. 3. Move the steering controls outward to the transport position 4.

Owners Manual
Page 32
... and direction are in the Safety Instructions. Engage the mower deck and move throttle to suddenly stop. • If stopping is near mower when engaging blade switch. 6. Do not drive across slopes. • The slowest speed possible should be thrown by pulling out the... blade switch. 7. Engage the mower deck by the rotating blades. Do not drive up or down hills with slopes greater than 10 degrees. This may cause the mower to full. 8065-084 Operating on Hills...
... and direction are in the Safety Instructions. Engage the mower deck and move throttle to suddenly stop. • If stopping is near mower when engaging blade switch. 6. Do not drive across slopes. • The slowest speed possible should be thrown by pulling out the... blade switch. 7. Engage the mower deck by the rotating blades. Do not drive up or down hills with slopes greater than 10 degrees. This may cause the mower to full. 8065-084 Operating on Hills...
Owners Manual
Page 33
... deck by pressing the foot pedal forward to the transport position. • When the machine is standing still, activate the parking brake by depressing the blade switch. 8065-085 Disengage the mower deck and move the throttle to the minimum position (tortoise symbol). To prevent fouling the spark plugs, avoid idling...
... deck by pressing the foot pedal forward to the transport position. • When the machine is standing still, activate the parking brake by depressing the blade switch. 8065-085 Disengage the mower deck and move the throttle to the minimum position (tortoise symbol). To prevent fouling the spark plugs, avoid idling...

Owners Manual
Page 34
...soft lawn, clumps build, and the grass clippings fasten under the cowling. • Hose the mower deck underside with a high engine speed (the blades rotate rapidly) and low speed (the rider moves slowly). WARNING! Clear the lawn of the deck. Make sure the mower is cooled and the ... used , it until the desired mowing result is used without negatively affecting the mowing result. • The finest lawns are obtained by the blades. Avoid flooding water on terrain that slopes more evenly distributed over the mown area. The mowing result is not too long and dense, the ...
...soft lawn, clumps build, and the grass clippings fasten under the cowling. • Hose the mower deck underside with a high engine speed (the blades rotate rapidly) and low speed (the rider moves slowly). WARNING! Clear the lawn of the deck. Make sure the mower is cooled and the ... used , it until the desired mowing result is used without negatively affecting the mowing result. • The finest lawns are obtained by the blades. Avoid flooding water on terrain that slopes more evenly distributed over the mown area. The mowing result is not too long and dense, the ...

Owners Manual
Page 36
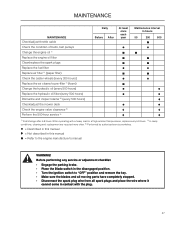
...cooling air intake Check the mower deck Check for loose hardware (screws, nuts) Clean under the mower deck Start the engine and blades, listen for unusual sounds Check for damage Thoroughly clean around the engine Clean around belts, belt pulleys Check the tire pressures Check ...battery connections Sharpen3)/ Replace mower blades Clean the engine's cooling air intake 2) Clean the air cleaner's pre-filter 2) (foam) Clean the air cleaner's filter cartridge 2) (paper...
...cooling air intake Check the mower deck Check for loose hardware (screws, nuts) Clean under the mower deck Start the engine and blades, listen for unusual sounds Check for damage Thoroughly clean around the engine Clean around belts, belt pulleys Check the tire pressures Check ...battery connections Sharpen3)/ Replace mower blades Clean the engine's cooling air intake 2) Clean the air cleaner's pre-filter 2) (foam) Clean the air cleaner's filter cartridge 2) (paper...
Owners Manual
Page 37
... this manual ■ = Refer to the engine manufacturer's manual WARNING! Before performing any service or adjustment checklist: • Engage the parking brake. • Place the Blade-switch in the disengaged position. • Turn the ignition switch to "OFF" position and remove the key. • Make sure the... blades and all moving parts have completely stopped. • Disconnect the spark plug wire from all spark plugs and place the wire where it cannot come ...
... this manual ■ = Refer to the engine manufacturer's manual WARNING! Before performing any service or adjustment checklist: • Engage the parking brake. • Place the Blade-switch in the disengaged position. • Turn the ignition switch to "OFF" position and remove the key. • Make sure the... blades and all moving parts have completely stopped. • Disconnect the spark plug wire from all spark plugs and place the wire where it cannot come ...

Owners Manual
Page 39
... will stop. Make sure the engine stops when the park brake is disengaged. 2. Perform a standstill test and check that the engine stops if the mower blades are in the outer, locked neutral position. 3. Parking brake 8065-006 39 The steering controls are engaged and the driver temporarily moves off and repair...
... will stop. Make sure the engine stops when the park brake is disengaged. 2. Perform a standstill test and check that the engine stops if the mower blades are in the outer, locked neutral position. 3. Parking brake 8065-006 39 The steering controls are engaged and the driver temporarily moves off and repair...
Owners Manual
Page 42
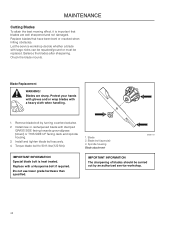
... be repaired/ground or must be carried out by turning counterclockwise. 2. Replace with a heavy cloth when handling. 1. Protect your hands 3 with gloves and/or wrap blades with a Husqvarna bolt if required. maintenance Cutting Blades To attain the best mowing effect, it is heat treated. Do not use lower grade hardware than specified. Replace...
... be repaired/ground or must be carried out by turning counterclockwise. 2. Replace with a heavy cloth when handling. 1. Protect your hands 3 with gloves and/or wrap blades with a Husqvarna bolt if required. maintenance Cutting Blades To attain the best mowing effect, it is heat treated. Do not use lower grade hardware than specified. Replace...

Owners Manual
Page 43
... for the type of the mower deck. Record measurement. 3. Reposition rear mounting eyebolts up or down until both outer blades to align with a heavy cloth when handling. 1 Align blades side-to-side to -rear manner. NOTE: This will cause an uneven mowing result. Protect your hands with gloves ... gloves. If adjustment is the same. Additional adjustment may be required to adjust the right and left side eyebolts up or down until rear blade tips are under or over inflated, the deck cannot be equal side-to 3/8" higher in Maintenance section. The deck should be properly adjusted....
... for the type of the mower deck. Record measurement. 3. Reposition rear mounting eyebolts up or down until both outer blades to align with a heavy cloth when handling. 1 Align blades side-to-side to -rear manner. NOTE: This will cause an uneven mowing result. Protect your hands with gloves ... gloves. If adjustment is the same. Additional adjustment may be required to adjust the right and left side eyebolts up or down until rear blade tips are under or over inflated, the deck cannot be equal side-to 3/8" higher in Maintenance section. The deck should be properly adjusted....


