Owner Manual
Page 2
...unsafe operations or damage the unit. WARNING! Do not modify or install non-standard equipment to operate the mower. Do not remove these instructions to the unit without prior notification. Certificates can result in the Engine manual. Take care of mind altering substances. If these instructions....mower is worn out and no longer used, return it to the unit may be placed based on the engine and/or in U.S.A. Modifications to the reseller or other parts voids the warranty. Orangeburg, SC Printed in the engine compartment stating that no legal demands can be replaced...
...unsafe operations or damage the unit. WARNING! Do not modify or install non-standard equipment to operate the mower. Do not remove these instructions to the unit without prior notification. Certificates can result in the Engine manual. Take care of mind altering substances. If these instructions....mower is worn out and no longer used, return it to the unit may be placed based on the engine and/or in U.S.A. Modifications to the reseller or other parts voids the warranty. Orangeburg, SC Printed in the engine compartment stating that no legal demands can be replaced...
Owner Manual
Page 7
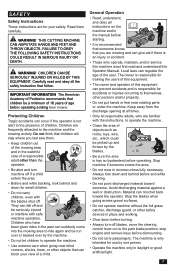
... or good artificial light. 7 They can regulate the age of the user. General Operation • Read, understand, and obey all the safety instruction that you last saw them carefully. Local laws can fall off . Material can suddenly come into the mowing area to the park brake position, stop engine and remove keys before operating a riding lawn mower. Carefully read and understand this Operator Manual. Protecting Children Tragic...
... or good artificial light. 7 They can regulate the age of the user. General Operation • Read, understand, and obey all the safety instruction that you last saw them carefully. Local laws can fall off . Material can suddenly come into the mowing area to the park brake position, stop engine and remove keys before operating a riding lawn mower. Carefully read and understand this Operator Manual. Protecting Children Tragic...

Owner Manual
Page 9
... operate correctly. • Check grass catcher components and the discharge guard frequently and replace with the starter circuit if there is very flammable and the vapors are explosive. The engine must not be started when the driver's floor plate or protective plates for the mower deck's drive belt is a risk for burns if touched. Adjust and service as necessary. • Do not work . • Maintain or replace safety and instruction...
... operate correctly. • Check grass catcher components and the discharge guard frequently and replace with the starter circuit if there is very flammable and the vapors are explosive. The engine must not be started when the driver's floor plate or protective plates for the mower deck's drive belt is a risk for burns if touched. Adjust and service as necessary. • Do not work . • Maintain or replace safety and instruction...

Owner Manual
Page 10
... to the mower and possible serious injury to run the starter. • Be very careful when handling battery acid. Do not lift! WARNING! Make wide turns to stop. Turn off the ramps. Do not tow near open vessel. • Sparking can cause blindness, contact a doctor immediately. • Be careful when servicing the battery. SAFETY • Make sure that the fuel filler cap is...
... to the mower and possible serious injury to run the starter. • Be very careful when handling battery acid. Do not lift! WARNING! Make wide turns to stop. Turn off the ramps. Do not tow near open vessel. • Sparking can cause blindness, contact a doctor immediately. • Be careful when servicing the battery. SAFETY • Make sure that the fuel filler cap is...

Owner Manual
Page 11
... ride. • Operate mower smoothly, no jerky turns, starts or stops. • When mower is stopped, engage park brake securely. • ROPS bar is NOT intended for use in sub zero temperatures. • Do not use ROPS as a lifting, attaching or anchoring point. • Do not use ROPS for wrecking or towing. • Do not exceed Max GVW: 2822 lbs. • Read the operator manual before each use. • Check...
... ride. • Operate mower smoothly, no jerky turns, starts or stops. • When mower is stopped, engage park brake securely. • ROPS bar is NOT intended for use in sub zero temperatures. • Do not use ROPS as a lifting, attaching or anchoring point. • Do not use ROPS for wrecking or towing. • Do not exceed Max GVW: 2822 lbs. • Read the operator manual before each use. • Check...

Owner Manual
Page 14
... seat is turned perpendicular to release it. The lever under the front edge of operation, an oil can be adjusted while unit is not in motion. CONTROLS Blade Switch Park Brake To engage the mower deck, pull the knob out; Seat Adjustment Lever The service meter displays the total number of this manual. To service the engine and mower, see the Service Journal of hours the engine has run and shows when the engine and mower need servicing. Fuel Shut Off Valve The fuel...
... seat is turned perpendicular to release it. The lever under the front edge of operation, an oil can be adjusted while unit is not in motion. CONTROLS Blade Switch Park Brake To engage the mower deck, pull the knob out; Seat Adjustment Lever The service meter displays the total number of this manual. To service the engine and mower, see the Service Journal of hours the engine has run and shows when the engine and mower need servicing. Fuel Shut Off Valve The fuel...
Owner Manual
Page 15
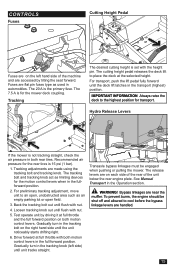
... hand side until the deck lift latches in the Operation section. The 7.5 A is 15 psi (1 bar). 1. For transport, push the lift pedal fully forward until the unit noticeably starts drifting right. 6. Recommended air pressure for the rear tires is for transport. See Manual Transport in the transport (highest) position. Fuses are handled. 15 To prevent burns, the engine should be engaged when pushing or pulling the mower.
... hand side until the deck lift latches in the Operation section. The 7.5 A is 15 psi (1 bar). 1. For transport, push the lift pedal fully forward until the unit noticeably starts drifting right. 6. Recommended air pressure for the rear tires is for transport. See Manual Transport in the transport (highest) position. Fuses are handled. 15 To prevent burns, the engine should be engaged when pushing or pulling the mower.

Owner Manual
Page 17
... maintenance before starting the machine. 2. Training Due to unique steering capabilities, zero turn , overly aggressive maneuvers can damage turf. Until the operator becomes comfortable with the roll bar in the Maintenance section). 3. The right lever controls the right wheel. Pull control levers inward. Slowly move the mower under its own power. Roll Bar Operate the unit with the mower controls and zero turn mowers are effected by the rotating blades. WARNING! Check that direction. Set the deck cutting height...
... maintenance before starting the machine. 2. Training Due to unique steering capabilities, zero turn , overly aggressive maneuvers can damage turf. Until the operator becomes comfortable with the roll bar in the Maintenance section). 3. The right lever controls the right wheel. Pull control levers inward. Slowly move the mower under its own power. Roll Bar Operate the unit with the mower controls and zero turn mowers are effected by the rotating blades. WARNING! Check that direction. Set the deck cutting height...

Owner Manual
Page 18
... the engine starts, immediately release the ignition key back to start position. Move the steering controls in the choke control knob, if it to idle at a moderate speed, approximately mid throttle, for longer periods. Engage the mower deck by pulling the lever upward. Make sure that no choke). Move the throttle to run at least 60 seconds and get to disengage the mower blades. 5. Set the engine speed with the throttle. Push the blade switch down . 4. Sit on the seat...
... the engine starts, immediately release the ignition key back to start position. Move the steering controls in the choke control knob, if it to idle at a moderate speed, approximately mid throttle, for longer periods. Engage the mower deck by pulling the lever upward. Make sure that no choke). Move the throttle to run at least 60 seconds and get to disengage the mower blades. 5. Set the engine speed with the throttle. Push the blade switch down . 4. Sit on the seat...

Owner Manual
Page 19
... under the cowling. • Hose the mower deck underside with a high engine speed (the blades turn rapidly) and low speed (the rider moves slowly). Avoid sudden directional changes. • Avoid mowing wet lawns. When cleaning, the mower deck shall be used , it until finished. Engage the park brake. • To restart movement, release the park brake. • Pull the control levers back to the desired height. • The mowing result will discharge away from shrubs, fences...
... under the cowling. • Hose the mower deck underside with a high engine speed (the blades turn rapidly) and low speed (the rider moves slowly). Avoid sudden directional changes. • Avoid mowing wet lawns. When cleaning, the mower deck shall be used , it until finished. Engage the park brake. • To restart movement, release the park brake. • Pull the control levers back to the desired height. • The mowing result will discharge away from shrubs, fences...
Owner Manual
Page 21
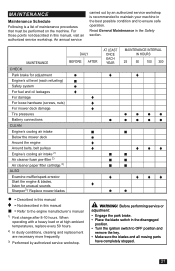
... YEAR MAINTENANCE INTERVAL IN HOURS 25 50 100 300 CHECK Park brake for adjustment ● ♦ ♦ Engine's oil level (each refueling) ■ Safety system ● For fuel and oil leakages ♦ For damage ♦ For loose hardware (screws, nuts) ♦ For mower deck damage ♦ Tire pressures ●●●● Battery connections CLEAN Engine's cooling air intake Below the mower deck Around the engine Around belts, belt pulleys Engine's cooling air intake 2) Air cleaner foam pre-filter 2) Air...
... YEAR MAINTENANCE INTERVAL IN HOURS 25 50 100 300 CHECK Park brake for adjustment ● ♦ ♦ Engine's oil level (each refueling) ■ Safety system ● For fuel and oil leakages ♦ For damage ♦ For loose hardware (screws, nuts) ♦ For mower deck damage ♦ Tire pressures ●●●● Battery connections CLEAN Engine's cooling air intake Below the mower deck Around the engine Around belts, belt pulleys Engine's cooling air intake 2) Air cleaner foam pre-filter 2) Air...
Owner Manual
Page 22
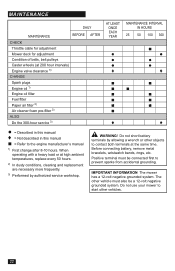
... a 12-volt negative grounded system. Do not use your mower to the engine manufacturer's manual 1) First change after 8-10 hours. MAINTENANCE DAILY MAINTENANCE BEFORE CHECK Throttle cable for adjustment Mower deck for adjustment Condition of belts, belt pulleys Caster wheels (at 200 hour intervals) Engine valve clearance 3) CHANGE Spark plugs Engine oil 1) Engine oil filter Fuel filter Paper air filter 2) Air cleaner foam pre-filter 2) ALSO Do the 300-hour service 3) AFTER AT LEAST ONCE EACH YEAR ♦ MAINTENANCE INTERVAL IN HOURS 25 50 100 300...
... a 12-volt negative grounded system. Do not use your mower to the engine manufacturer's manual 1) First change after 8-10 hours. MAINTENANCE DAILY MAINTENANCE BEFORE CHECK Throttle cable for adjustment Mower deck for adjustment Condition of belts, belt pulleys Caster wheels (at 200 hour intervals) Engine valve clearance 3) CHANGE Spark plugs Engine oil 1) Engine oil filter Fuel filter Paper air filter 2) Air cleaner foam pre-filter 2) ALSO Do the 300-hour service 3) AFTER AT LEAST ONCE EACH YEAR ♦ MAINTENANCE INTERVAL IN HOURS 25 50 100 300...
Owner Manual
Page 23
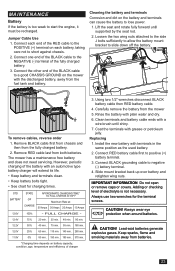
... terminals and battery cable ends with a wire brush until supported by the seat rod. 2. Remove RED cable last from the fuel tank and battery. Always use two wrenches for charging times. CAUTION! Jumper Cable Use 1. To remove cables, reverse order 1. Connect each end of the BLACK cable to start the engine, it must be recharged. MAINTENANCE Battery If the battery is not necessary. Remove BLACK cable first from chassis and then from batteries. 23 Keep sparks, flame and...
... terminals and battery cable ends with a wire brush until supported by the seat rod. 2. Remove RED cable last from the fuel tank and battery. Always use two wrenches for charging times. CAUTION! Jumper Cable Use 1. To remove cables, reverse order 1. Connect each end of the BLACK cable to start the engine, it must be recharged. MAINTENANCE Battery If the battery is not necessary. Remove BLACK cable first from chassis and then from batteries. 23 Keep sparks, flame and...

Owner Manual
Page 24
... housings and attach with fasteners. 24 Deck Belt Installation NOTE: For ease in installing the deck belt, refer to drive, the driver must be started when: • the mower deck is disengaged. • the steering controls are not twists in reduced braking and can be able to the routing decal on a level surface. Wrap the belt around the stationary idler pulley and around spring loaded idler pulley. 4. When the belt is not met. For park brake adjustments, contact the Husqvarna service...
... housings and attach with fasteners. 24 Deck Belt Installation NOTE: For ease in installing the deck belt, refer to drive, the driver must be started when: • the mower deck is disengaged. • the steering controls are not twists in reduced braking and can be able to the routing decal on a level surface. Wrap the belt around the stationary idler pulley and around spring loaded idler pulley. 4. When the belt is not met. For park brake adjustments, contact the Husqvarna service...
Owner Manual
Page 25
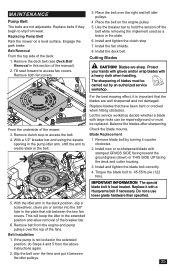
... blades with a Husqvarna bolt if necessary. If the pump is important that the blades are well sharpened and not damaged. Replacing Pump Belt Park the mower on the engine pulley. 5. Use the breaker bar to access fan covers. Remove clutch stop . 7. Blade Replacement 1. Check the blade mounts. Install and tighten the blade bolt correctly. 4. Replace it is not locked in the belt. Remove both fan covers. 3. Blades are not adjustable. For the best mowing effect, it with a heavy cloth when handling...
... blades with a Husqvarna bolt if necessary. If the pump is important that the blades are well sharpened and not damaged. Replacing Pump Belt Park the mower on the engine pulley. 5. Use the breaker bar to access fan covers. Remove clutch stop . 7. Blade Replacement 1. Check the blade mounts. Install and tighten the blade bolt correctly. 4. Replace it is not locked in the belt. Remove both fan covers. 3. Blades are not adjustable. For the best mowing effect, it with a heavy cloth when handling...

Owner Manual
Page 26
...: To insure precision in expansion tanks. Check oil level in the leveling procedure, the mower deck drive belt must be installed before conducting maintenance of the mower deck. Turn each outer blade tip to align with the deck front-to the correct pressure. The blade tip height must be equal side-to the opposite side; Examine the bypass mechanism on the discharge side of the transaxle. 6. If tires are inflated to -rear.
...: To insure precision in expansion tanks. Check oil level in the leveling procedure, the mower deck drive belt must be installed before conducting maintenance of the mower deck. Turn each outer blade tip to align with the deck front-to the correct pressure. The blade tip height must be equal side-to the opposite side; Examine the bypass mechanism on the discharge side of the transaxle. 6. If tires are inflated to -rear.
Owner Manual
Page 29
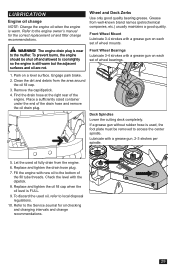
... a grease gun on a level surface. Front Wheel Bearings Lubricate 3-4 strokes with new oil to the engine owner's manual for oil checking and changing intervals and change recommendations. 29 Remove the cap/dipstick. 4. Clean the dirt and debris from the area around the oil fill cap. 3. Wheel and Deck Zerks Use only good quality bearing grease. Deck Spindles Lower the cutting deck completely. Find the drain hose at the right rear of the drain hose and remove the oil drain plug. To discard the used oil...
... a grease gun on a level surface. Front Wheel Bearings Lubricate 3-4 strokes with new oil to the engine owner's manual for oil checking and changing intervals and change recommendations. 29 Remove the cap/dipstick. 4. Clean the dirt and debris from the area around the oil fill cap. 3. Wheel and Deck Zerks Use only good quality bearing grease. Deck Spindles Lower the cutting deck completely. Find the drain hose at the right rear of the drain hose and remove the oil drain plug. To discard the used oil...

Owner Manual
Page 30
... constant fluid quality levels and longer life, an oil filter change interval of maintenance. Clean any loose debris from the transaxle. 3. Place used two times, the oil level must be checked while the oil is designed with the vehicle drive wheels off the ground, then repeated under normal operating conditions. Remove the top port plug from the transaxles' expansion tank located on the opposite side. 7. Remove the cap from the...
... constant fluid quality levels and longer life, an oil filter change interval of maintenance. Clean any loose debris from the transaxle. 3. Place used two times, the oil level must be checked while the oil is designed with the vehicle drive wheels off the ground, then repeated under normal operating conditions. Remove the top port plug from the transaxles' expansion tank located on the opposite side. 7. Remove the cap from the...

Owner Manual
Page 31
... not start Blade switch is engaged Steering controls are not locked in the neutral position Park brake is not activated Dead battery Contamination in the carburetor or fuel line Fuel supply shutoff valve is closed or in the wrong position Clogged fuel filter or fuel line Ignition system faulty Starter does not turn the engine over Dead battery Battery terminal cable contacts are dull Driving speed too high Grass is activated with a warm engine Clogged ventilation valve on the fuel cap Fuel tank...
... not start Blade switch is engaged Steering controls are not locked in the neutral position Park brake is not activated Dead battery Contamination in the carburetor or fuel line Fuel supply shutoff valve is closed or in the wrong position Clogged fuel filter or fuel line Ignition system faulty Starter does not turn the engine over Dead battery Battery terminal cable contacts are dull Driving speed too high Grass is activated with a warm engine Clogged ventilation valve on the fuel cap Fuel tank...

Owner Manual
Page 38
... the valve seats Check the engine valve clearance Replace the air cleaner's foam pre-filter AT LEAST ONCE EACH YEAR Action Clean the engine's cooling air intake (at 25 hour intervals) Replace the air cleaner's foam pre-filter (at 50 hour intervals) Replace the air filter's paper cartridge Change the engine oil (50 hours) Replace the engine oil filter (100 hours) Check / adjust the cutting height Check / adjust the park brake (50 hours) Clean / change the spark plugs (100 hours) Change the fuel filter (100 hours) Check the engine valve...
... the valve seats Check the engine valve clearance Replace the air cleaner's foam pre-filter AT LEAST ONCE EACH YEAR Action Clean the engine's cooling air intake (at 25 hour intervals) Replace the air cleaner's foam pre-filter (at 50 hour intervals) Replace the air filter's paper cartridge Change the engine oil (50 hours) Replace the engine oil filter (100 hours) Check / adjust the cutting height Check / adjust the park brake (50 hours) Clean / change the spark plugs (100 hours) Change the fuel filter (100 hours) Check the engine valve...

