
Owners Manual
Page 3
... Choke Control 19 Tracking Knob 19 Parking Brake 20 Blade Switch 20 Ignition Switch 20 Fuses 21 Cutting Height Adjuster 22 Seat Adjustment Lever 22 Fuel Shut Off Valve 22 Fuel Tank 23 Hydro Release Levers 23 OPERATION 24 Training 24 Steering 24 Before Starting 25 Starting the Engine 25 Jumper Cables 28 Running 29 Operating on Hills 30 Stopping the Engine 31 Mowing Tips 32 Manual Transport 33 MAINTENANCE 34 Battery 36 Safety System 37 Tire Pressures 37 Parking Brake 37 Deck Belt 38 Pump Belt 39 V-belts 39 Cutting Blades 40 Adjusting the Mower Deck...
... Choke Control 19 Tracking Knob 19 Parking Brake 20 Blade Switch 20 Ignition Switch 20 Fuses 21 Cutting Height Adjuster 22 Seat Adjustment Lever 22 Fuel Shut Off Valve 22 Fuel Tank 23 Hydro Release Levers 23 OPERATION 24 Training 24 Steering 24 Before Starting 25 Starting the Engine 25 Jumper Cables 28 Running 29 Operating on Hills 30 Stopping the Engine 31 Mowing Tips 32 Manual Transport 33 MAINTENANCE 34 Battery 36 Safety System 37 Tire Pressures 37 Parking Brake 37 Deck Belt 38 Pump Belt 39 V-belts 39 Cutting Blades 40 Adjusting the Mower Deck...
Owners Manual
Page 5
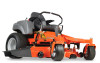
... to the new owner. The weight of the towed equipment may absolve the manufacturer from liability for any resulting personal injury or property damage. 5 Operating instructions for towed equipment. The manufacturer's directions concerning operation, maintenance, and repairs must always use , service, maintenance) by all power equipment can also be carefully followed. Use only approved repair parts to stop. INTRODUCTION Congratulations Thank you for purchasing a Husqvarna ride-on...
... to the new owner. The weight of the towed equipment may absolve the manufacturer from liability for any resulting personal injury or property damage. 5 Operating instructions for towed equipment. The manufacturer's directions concerning operation, maintenance, and repairs must always use , service, maintenance) by all power equipment can also be carefully followed. Use only approved repair parts to stop. INTRODUCTION Congratulations Thank you for purchasing a Husqvarna ride-on...

Owners Manual
Page 13
... before refueling. 13 Replace gas cap and tighten securely. • Do not start the engine near spilled fuel. • Never use a nozzle lock-open flame, spark, or pilot light such as the heat from a gasoline dispenser nozzle. • Keep the nozzle in fuel system, engine must not be started when the driver's floor plate or any protective plate for the mower deck's drive belt is an open device...
... before refueling. 13 Replace gas cap and tighten securely. • Do not start the engine near spilled fuel. • Never use a nozzle lock-open flame, spark, or pilot light such as the heat from a gasoline dispenser nozzle. • Keep the nozzle in fuel system, engine must not be started when the driver's floor plate or any protective plate for the mower deck's drive belt is an open device...
Owners Manual
Page 14
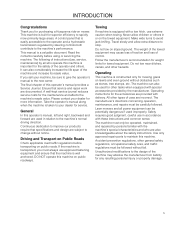
... not change the settings of governors and avoid running . • Check grass catcher components and the discharge guard frequently and replace with overly high engine speeds. If battery acid is spilled on the battery when smoking or near open flames or sparks. • The battery can cause serious corrosive burns. Wrap the blade or wear gloves, and use extra caution when servicing them. • Check brake operation frequently. SAFETY General Maintenance • Never operate machine...
... not change the settings of governors and avoid running . • Check grass catcher components and the discharge guard frequently and replace with overly high engine speeds. If battery acid is spilled on the battery when smoking or near open flames or sparks. • The battery can cause serious corrosive burns. Wrap the blade or wear gloves, and use extra caution when servicing them. • Check brake operation frequently. SAFETY General Maintenance • Never operate machine...

Owners Manual
Page 15
... it last. • Do not make adjustments with the engine running. • The machine is desired. • Reduce the risk of deck, avoid spraying engine and electrical components with water. Avoid electrical sparking and its consequences by removing grass, leaves, and other debris that the fuel filler cap is spilled fuel. • Disconnect the negative cable from the battery. • Use protective goggles. • Ensure that...
... it last. • Do not make adjustments with the engine running. • The machine is desired. • Reduce the risk of deck, avoid spraying engine and electrical components with water. Avoid electrical sparking and its consequences by removing grass, leaves, and other debris that the fuel filler cap is spilled fuel. • Disconnect the negative cable from the battery. • Use protective goggles. • Ensure that...

Owners Manual
Page 17
... Fuel tank 5. Ignition switch 8. Hour meter 9. Cutting height adjuster 14. Using the left and right steering controls, the flow is fitted with either a Briggs & Stratton or Kohler four-stroke overhead valve engine. Hydro release levers 6. Seat adjustment lever 12. Right tracking bolt 13. Motion control levers 2. Choke control MZ5225 only 7. Tracking knob 4. Deck lift pedal 8058-039 17 Transmission from the engine is made via belt-driven Control Locations 4 hydraulic pumps. Parking brake 3. Throttle control 13 12 11 10. Blade switch 11. CONTROLS This operator...
... Fuel tank 5. Ignition switch 8. Hour meter 9. Cutting height adjuster 14. Using the left and right steering controls, the flow is fitted with either a Briggs & Stratton or Kohler four-stroke overhead valve engine. Hydro release levers 6. Seat adjustment lever 12. Right tracking bolt 13. Motion control levers 2. Choke control MZ5225 only 7. Tracking knob 4. Deck lift pedal 8058-039 17 Transmission from the engine is made via belt-driven Control Locations 4 hydraulic pumps. Parking brake 3. Throttle control 13 12 11 10. Blade switch 11. CONTROLS This operator...

Owners Manual
Page 24
... seat, start engine (see Manual Transport in the Operation section) to suddenly stop. This will allow mower to the neutral position and mower should stop moving in a forward direction pull the left wheel. Pull back slightly on control levers to start moving forward in a straight line. Push forward on control levers, this time, rotate control levers inward. This may damage turf due to their unique steering capabilities. First time users...
... seat, start engine (see Manual Transport in the Operation section) to suddenly stop. This will allow mower to the neutral position and mower should stop moving in a forward direction pull the left wheel. Pull back slightly on control levers to start moving forward in a straight line. Push forward on control levers, this time, rotate control levers inward. This may damage turf due to their unique steering capabilities. First time users...

Owners Manual
Page 25
... must be started: 1. The blade switch for engaging the mower blades must be fulfilled before the engine can be depressed. 2. Activate parking brake before starting (see maintenance schedule in the Maintenance section). • Check that there is sufficient fuel in the locked (outer) neutral position. Activate the parking brake. Set mower deck to the desired position. The parking brake must be on the seat. 2. OPERATION Before Starting • Read the sections Safety Instructions and Controls before starting the...
... must be started: 1. The blade switch for engaging the mower blades must be fulfilled before the engine can be depressed. 2. Activate parking brake before starting (see maintenance schedule in the Maintenance section). • Check that there is sufficient fuel in the locked (outer) neutral position. Activate the parking brake. Set mower deck to the desired position. The parking brake must be on the seat. 2. OPERATION Before Starting • Read the sections Safety Instructions and Controls before starting the...

Owners Manual
Page 34
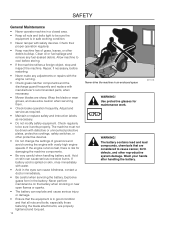
...'s manual 34 maintenance MAINTENANCE Check the parking brake Check the engine's oil level (every refueling) Check the safety system Check for fuel and oil leakages Check/clean the engine's cooling air intake Check the mower deck Check for loose hardware (screws, nuts) Clean under the mower deck Start the engine and blades, listen for unusual sounds Check for damage Thoroughly clean around the engine Clean around belts, belt pulleys Check the tire pressures Check battery connections Sharpen3)/ Replace mower blades Clean the engine's cooling air intake 2) Clean the air cleaner's pre-filter...
...'s manual 34 maintenance MAINTENANCE Check the parking brake Check the engine's oil level (every refueling) Check the safety system Check for fuel and oil leakages Check/clean the engine's cooling air intake Check the mower deck Check for loose hardware (screws, nuts) Clean under the mower deck Start the engine and blades, listen for unusual sounds Check for damage Thoroughly clean around the engine Clean around belts, belt pulleys Check the tire pressures Check battery connections Sharpen3)/ Replace mower blades Clean the engine's cooling air intake 2) Clean the air cleaner's pre-filter...
Owners Manual
Page 35
... with the plug. 35 maintenance MAINTENANCE Check/adjust throttle cable Check the condition of belts, belt pulleys Change the engine oil 1) Replace the engine oil filter Clean/replace the spark plugs Replace the fuel filter Replace air filter 2) (paper filter) Check the caster wheels (every 200 hours) Replace the air cleaner's pre-filter 2) (foam) Check the hydraulic oil in the oil tank Change the hydraulic oil (every 500 hours) Replace the hydraulic oil filter (every 500 hours) Dismantle and inspect starter 3) (every 500 hours) Check/adjust the mower deck Check the engine valve clearance...
... with the plug. 35 maintenance MAINTENANCE Check/adjust throttle cable Check the condition of belts, belt pulleys Change the engine oil 1) Replace the engine oil filter Clean/replace the spark plugs Replace the fuel filter Replace air filter 2) (paper filter) Check the caster wheels (every 200 hours) Replace the air cleaner's pre-filter 2) (foam) Check the hydraulic oil in the oil tank Change the hydraulic oil (every 500 hours) Replace the hydraulic oil filter (every 500 hours) Dismantle and inspect starter 3) (every 500 hours) Check/adjust the mower deck Check the engine valve clearance...

Owners Manual
Page 36
... (+) battery terminal with a maintenance free battery and does not need servicing. maintenance Battery Your mower is not necessary. Reinstall battery. Carefully remove the battery from the machine. 3. Cleaning battery and terminals Corrosion and dirt on the battery and terminals can cause the battery to contact both terminals at : 50 Amps 30 Amps 20 Amps 10 Amps - Replacing battery 1. Using two ½" wrenches disconnect BLACK battery cable then RED battery cable. 4. Install new battery with grease or...
... (+) battery terminal with a maintenance free battery and does not need servicing. maintenance Battery Your mower is not necessary. Reinstall battery. Carefully remove the battery from the machine. 3. Cleaning battery and terminals Corrosion and dirt on the battery and terminals can cause the battery to contact both terminals at : 50 Amps 30 Amps 20 Amps 10 Amps - Replacing battery 1. Using two ½" wrenches disconnect BLACK battery cable then RED battery cable. 4. Install new battery with grease or...

Owners Manual
Page 38
... a level surface. Check that the routing matches the routing decal. 7. maintenance Deck Belt Deck Belt Removal Park on the idler arm and carefully route belt over the top of the cutter housing pulleys. 5. Remove any dirt or grass that is properly routed, slowly release idler arm to the routing decal on the belt. 3. Route the belt forward between the spring loaded and stationary pulleys. 3. Apply park brake. Wrap the belt around the stationary idler pulley and around spring loaded idler pulley. 4. Wrap the deck belt around the electric clutch pulley that...
... a level surface. Check that the routing matches the routing decal. 7. maintenance Deck Belt Deck Belt Removal Park on the idler arm and carefully route belt over the top of the cutter housing pulleys. 5. Remove any dirt or grass that is properly routed, slowly release idler arm to the routing decal on the belt. 3. Route the belt forward between the spring loaded and stationary pulleys. 3. Apply park brake. Wrap the belt around the stationary idler pulley and around spring loaded idler pulley. 4. Wrap the deck belt around the electric clutch pulley that...

Owners Manual
Page 39
... the belt while removing the implement used as a brace in normal operation. Replace and secure clutch stop Pump belt removal 8058-064 2 8058-060 39 Idler arm release placement 3. This will show some small cracks in the plate. 6. Use the breaker bar to access the belt. 4. Replace belts if they begin to slip from the above instructions. 2. Replacing Pump Belt Park the mower on the engine pulley. 5. Engage the parking brake. Remove both fan covers. With the idler arm...
... the belt while removing the implement used as a brace in normal operation. Replace and secure clutch stop Pump belt removal 8058-064 2 8058-060 39 Idler arm release placement 3. This will show some small cracks in the plate. 6. Use the breaker bar to access the belt. 4. Replace belts if they begin to slip from the above instructions. 2. Replacing Pump Belt Park the mower on the engine pulley. 5. Engage the parking brake. Remove both fan covers. With the idler arm...
Owners Manual
Page 40
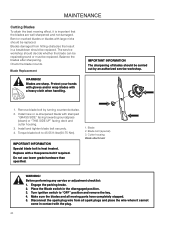
.../grass 1 (down) or "THIS SIDE UP" facing deck and cutter housing. 3. Remove blade bolt by an authorized service workshop. 3 2 1. Cutter housing Blade attachment IMPORTANT INFORMATION Special blade bolt is important that result in the disengaged position. 3. Disconnect the spark plug wire from hitting obstacles that the blades are sharp. The service workshop should decide whether the blade can be repaired/ground or must be replaced. Blade Replacement WARNING! Install and tighten blade bolt securely. 4. Engage the parking brake. 2. Blade 2. maintenance Cutting...
.../grass 1 (down) or "THIS SIDE UP" facing deck and cutter housing. 3. Remove blade bolt by an authorized service workshop. 3 2 1. Cutter housing Blade attachment IMPORTANT INFORMATION Special blade bolt is important that result in the disengaged position. 3. Disconnect the spark plug wire from hitting obstacles that the blades are sharp. The service workshop should decide whether the blade can be repaired/ground or must be replaced. Blade Replacement WARNING! Install and tighten blade bolt securely. 4. Engage the parking brake. 2. Blade 2. maintenance Cutting...

Owners Manual
Page 41
... to achieve desired cut for the type of the mower deck. See Tire Pressures in slot until rear of leveling procedure, mower deck drive belt must be required to the correct pressure. NOTE: To insure accuracy of mower deck is the same. If adjustment is required, loosen the locknut and move mounting bolt up or down in Maintenance section. Confirm measurements once again. In the rear, blade tips should be...
... to achieve desired cut for the type of the mower deck. See Tire Pressures in slot until rear of leveling procedure, mower deck drive belt must be required to the correct pressure. NOTE: To insure accuracy of mower deck is the same. If adjustment is required, loosen the locknut and move mounting bolt up or down in Maintenance section. Confirm measurements once again. In the rear, blade tips should be...

Owners Manual
Page 46
... expansion tank cap by hand, turning it in accordance with the transaxles installed in your area. 8. After the oil has drained, wipe the filter base surface and apply a film of new oil to disposal. Reinstall the filter guard. Filter guard 2. Remove the cap from around the perimeter of the replacement filter. 4. Clean any loose debris from the transaxles' expansion tank located on the opposite side. 7. each transaxle as the oil level reaches...
... expansion tank cap by hand, turning it in accordance with the transaxles installed in your area. 8. After the oil has drained, wipe the filter base surface and apply a film of new oil to disposal. Reinstall the filter guard. Filter guard 2. Remove the cap from around the perimeter of the replacement filter. 4. Clean any loose debris from the transaxles' expansion tank located on the opposite side. 7. each transaxle as the oil level reaches...

Owners Manual
Page 48
... valve on the battery terminal cable connections. • Fuse blown. • Ignition system faulty. • Fault in the fuel. • Clogged air filter. Engine runs rough. • Dead battery. • Poor contacts on the fuel cap. • Fuel tank nearly empty. • Fouled spark plug. • Spark plug is closed. • Clogged fuel filter or fuel line. • Faulty ignition system. troubleshooting guide Cause • Blade switch is engaged. • Steering controls are not locked in the neutral position. • Parking brake...
... valve on the battery terminal cable connections. • Fuse blown. • Ignition system faulty. • Fault in the fuel. • Clogged air filter. Engine runs rough. • Dead battery. • Poor contacts on the fuel cap. • Fuel tank nearly empty. • Fouled spark plug. • Spark plug is closed. • Clogged fuel filter or fuel line. • Faulty ignition system. troubleshooting guide Cause • Blade switch is engaged. • Steering controls are not locked in the neutral position. • Parking brake...

Owners Manual
Page 49
... hydraulic system. Battery not charging. Mower deck not engaging. • Drive belt for the mower deck has come loose. • Contact for the transmission gears slack or has come loose, from the cable contact. • The fuse has blown. Hydraulic drive leaks oil. • Damaged seals, housing, or gaskets. • Air trapped in the engine. • Fouled spark plug. Cause • Blades are loose. • Blades are dull. • Driving speed too high. • The grass is disconnected...
... hydraulic system. Battery not charging. Mower deck not engaging. • Drive belt for the mower deck has come loose. • Contact for the transmission gears slack or has come loose, from the cable contact. • The fuse has blown. Hydraulic drive leaks oil. • Damaged seals, housing, or gaskets. • Air trapped in the engine. • Fouled spark plug. Cause • Blades are loose. • Blades are dull. • Driving speed too high. • The grass is disconnected...
Owners Manual
Page 50
... fuel tank and the carburetor if a stabilizer has been added. Use a degreaser and warm water. Service When ordering spare parts, please specify the purchase year, model, type, and serial number. Add stabilizer to run until the carburetor is a good way to avoid corrosion. 2. WARNING! Handle the fuel with open flame. Never use the mixing ratios specified by the manufacturer of the stabilizer. Turn over the engine...
... fuel tank and the carburetor if a stabilizer has been added. Use a degreaser and warm water. Service When ordering spare parts, please specify the purchase year, model, type, and serial number. Add stabilizer to run until the carburetor is a good way to avoid corrosion. 2. WARNING! Handle the fuel with open flame. Never use the mixing ratios specified by the manufacturer of the stabilizer. Turn over the engine...

Owners Manual
Page 61
... oil and filter Change air filter Inspect spark plug Inspect fuel filter Check engine RPM Clean underside of deck Check blade pitch Grease blade spindles Inspect spindle bearings Inspect deck belt and blades Inspect idler arm bearings Inspect deck idler pulleys Change hydraulic oil Change hydraulic filter Replace hydraulic drive belt Inspect hydraulic hoses Check neutral position Inspect battery connections Load test battery Clean electrical connections Inspect the clutch Check safety system Check seat belt Check fuel system for leaks Inspect safety guards and shields Check brake adjustment...
... oil and filter Change air filter Inspect spark plug Inspect fuel filter Check engine RPM Clean underside of deck Check blade pitch Grease blade spindles Inspect spindle bearings Inspect deck belt and blades Inspect idler arm bearings Inspect deck idler pulleys Change hydraulic oil Change hydraulic filter Replace hydraulic drive belt Inspect hydraulic hoses Check neutral position Inspect battery connections Load test battery Clean electrical connections Inspect the clutch Check safety system Check seat belt Check fuel system for leaks Inspect safety guards and shields Check brake adjustment...


