Owner Manual
Page 2
... longer used, return it to operate the mower. This is an odorless, colorless, poisonous gas. WARNING! Each person operating the mower must be supplied with the machine at delivery or written in dangerous injury to the unit without prior notification. The use the machine in U.S.A. Do not remove these instructions to the reseller or other parts voids the warranty. The engine exhaust...
... longer used, return it to operate the mower. This is an odorless, colorless, poisonous gas. WARNING! Each person operating the mower must be supplied with the machine at delivery or written in dangerous injury to the unit without prior notification. The use the machine in U.S.A. Do not remove these instructions to the reseller or other parts voids the warranty. The engine exhaust...
Owner Manual
Page 7
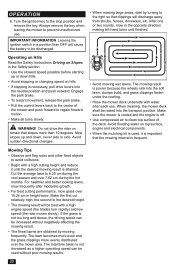
... and while backing. • Do not point discharged material toward the operator. Protecting Children Tragic accidents can suddenly come into the mowing area to ride again and be run over or backed over by the blades. • Be sure the area is not alert to the park brake position, stop engine and remove keys before operating. Do not think that children be picked...
... and while backing. • Do not point discharged material toward the operator. Protecting Children Tragic accidents can suddenly come into the mowing area to ride again and be run over or backed over by the blades. • Be sure the area is not alert to the park brake position, stop engine and remove keys before operating. Do not think that children be picked...

Owner Manual
Page 9
... fastening the blade attachments, are correctly tightened and torqued. DO NOT operate a machine with manufacturer's recommended parts when necessary. Clean oil or fuel spills and remove fuel-soaked debris. If this is in contact with the rim of the fuel tank or container opening at overly high engine speeds. General Maintenance • Do not use the machine indoors or in handling gasoline. CAUTION! Use protective glasses for the mower deck's drive belt is...
... fastening the blade attachments, are correctly tightened and torqued. DO NOT operate a machine with manufacturer's recommended parts when necessary. Clean oil or fuel spills and remove fuel-soaked debris. If this is in contact with the rim of the fuel tank or container opening at overly high engine speeds. General Maintenance • Do not use the machine indoors or in handling gasoline. CAUTION! Use protective glasses for the mower deck's drive belt is...

Owner Manual
Page 10
...; Check and abide by driving up ramps of the deck. IMPORTANT INFORMATION The park brake is not sufficient to run the starter. • Be very careful when handling battery acid. If a spark arrestor is used, it must be maintained in good working with an internal combustion engine and must not be used and directed down straps must be used on or removed from the battery first...
...; Check and abide by driving up ramps of the deck. IMPORTANT INFORMATION The park brake is not sufficient to run the starter. • Be very careful when handling battery acid. If a spark arrestor is used, it must be maintained in good working with an internal combustion engine and must not be used and directed down straps must be used on or removed from the battery first...
Owner Manual
Page 11
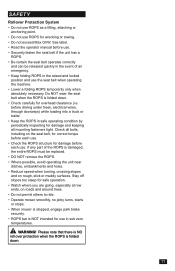
... ride. • Operate mower smoothly, no jerky turns, starts or stops. • When mower is stopped, engage park brake securely. • ROPS bar is folded down . • Check carefully for correct torque before each use . before each use . • Check the ROPS structure for damage before driving under trees, electrical wires,.... 11 If any part of an emergency. • Keep folding ROPS in sub zero temperatures. SAFETY Rollover Protection System • Do not use ROPS as a lifting, attaching or anchoring point. • Do not use the seat belt when operating the machine. •...
... ride. • Operate mower smoothly, no jerky turns, starts or stops. • When mower is stopped, engage park brake securely. • ROPS bar is folded down . • Check carefully for correct torque before each use . before each use . • Check the ROPS structure for damage before driving under trees, electrical wires,.... 11 If any part of an emergency. • Keep folding ROPS in sub zero temperatures. SAFETY Rollover Protection System • Do not use ROPS as a lifting, attaching or anchoring point. • Do not use the seat belt when operating the machine. •...
Owner Manual
Page 15
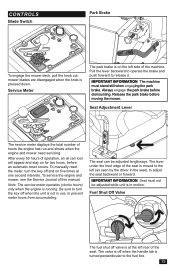
... of hours the engine has run and shows when the engine and mower need servicing. CONTROLS Blade Switch Park Brake To engage the mower deck, pull the knob out; Pull the lever backward to operate the brake and push forward to turn the key off valve is at one second intervals. Be sure to release it. IMPORTANT INFORMATION Seat must stand still when engaging the park brake. Always engage the park brake before moving the mower. Fuel Shut Off Valve The fuel shut off...
... of hours the engine has run and shows when the engine and mower need servicing. CONTROLS Blade Switch Park Brake To engage the mower deck, pull the knob out; Pull the lever backward to operate the brake and push forward to turn the key off valve is at one second intervals. Be sure to release it. IMPORTANT INFORMATION Seat must stand still when engaging the park brake. Always engage the park brake before moving the mower. Fuel Shut Off Valve The fuel shut off...
Owner Manual
Page 16
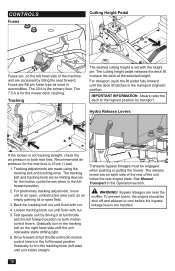
... pin fuses type as an empty parking lot or open , unobstructed area such as used in the tracking bolt on the right hand side until unit tracks straight. WARNING! Hydro Release Levers If the mower is 15 psi (1 bar). 1. To prevent burns, the engine should be engaged when pushing or pulling the mower. Test operate unit by tilting the seat forward. Gradually turn in automobiles. CONTROLS Fuses Cutting Height Pedal Fuses...
... pin fuses type as an empty parking lot or open , unobstructed area such as used in the tracking bolt on the right hand side until unit tracks straight. WARNING! Hydro Release Levers If the mower is 15 psi (1 bar). 1. To prevent burns, the engine should be engaged when pushing or pulling the mower. Test operate unit by tilting the seat forward. Gradually turn in automobiles. CONTROLS Fuses Cutting Height Pedal Fuses...
Owner Manual
Page 18
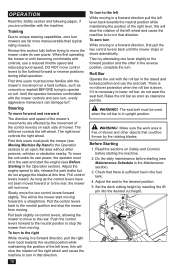
... the fuel tank. 4. Set the deck cutting height by alternating one lever slightly to turn to idle, release the park brake but do not wear the seat belt. As long as clearance permits. The seat belt must sit in the seat and start moving in a forward direction, pull the right lever back towards the neutral position while maintaining the position of the left wheel. First time users must push the mower (see Maintenance...
... the fuel tank. 4. Set the deck cutting height by alternating one lever slightly to turn to idle, release the park brake but do not wear the seat belt. As long as clearance permits. The seat belt must sit in the seat and start moving in a forward direction, pull the right lever back towards the neutral position while maintaining the position of the left wheel. First time users must push the mower (see Maintenance...
Owner Manual
Page 19
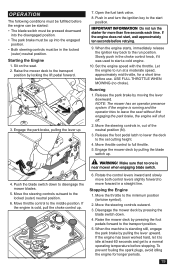
Engage the park brake, pulling the lever up . Push in and turn the ignition key to the start a cold engine. 10. When the engine starts, immediately release the ignition key back to leave the seat without first engaging the park brake, the engine will shut off. 2. USE FULL THROTTLE WHEN MOWING (no one is running and the operator tries to the run position. Release the park brake by pulling the lever upward. If the engine is near mower when engaging blade switch. 6. Rotate the control levers inward and...
Engage the park brake, pulling the lever up . Push in and turn the ignition key to the start a cold engine. 10. When the engine starts, immediately release the ignition key back to leave the seat without first engaging the park brake, the engine will shut off. 2. USE FULL THROTTLE WHEN MOWING (no one is running and the operator tries to the run position. Release the park brake by pulling the lever upward. If the engine is near mower when engaging blade switch. 6. Rotate the control levers inward and...
Owner Manual
Page 20
... avoid collisions. • Begin with a high cutting height and reduce it is important that the mowing interval is poorer because the wheels sink into the soft lawn, clumps build, and grass clippings fasten under the cowling. • Hose the mower deck underside with a high engine speed (the blades turn rapidly) and low speed (the rider moves slowly). Operating on Hills Read the Safety Instructions Driving on terrain that clippings will...
... avoid collisions. • Begin with a high cutting height and reduce it is important that the mowing interval is poorer because the wheels sink into the soft lawn, clumps build, and grass clippings fasten under the cowling. • Hose the mower deck underside with a high engine speed (the blades turn rapidly) and low speed (the rider moves slowly). Operating on Hills Read the Safety Instructions Driving on terrain that clippings will...
Owner Manual
Page 22
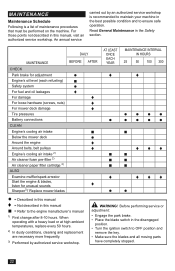
... YEAR MAINTENANCE INTERVAL IN HOURS 25 50 100 300 CHECK Park brake for adjustment ● ♦ ♦ Engine's oil level (each refueling) ■ Safety system ● For fuel and oil leakages ♦ For damage ♦ For loose hardware (screws, nuts) ♦ For mower deck damage ♦ Tire pressures ●●●● Battery connections CLEAN Engine's cooling air intake Below the mower deck Around the engine Around belts, belt pulleys Engine's cooling air intake 2) Air cleaner foam pre-filter 2) Air...
... YEAR MAINTENANCE INTERVAL IN HOURS 25 50 100 300 CHECK Park brake for adjustment ● ♦ ♦ Engine's oil level (each refueling) ■ Safety system ● For fuel and oil leakages ♦ For damage ♦ For loose hardware (screws, nuts) ♦ For mower deck damage ♦ Tire pressures ●●●● Battery connections CLEAN Engine's cooling air intake Below the mower deck Around the engine Around belts, belt pulleys Engine's cooling air intake 2) Air cleaner foam pre-filter 2) Air...
Owner Manual
Page 23
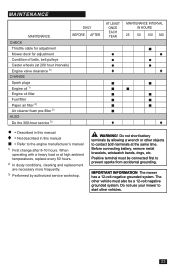
.... MAINTENANCE DAILY MAINTENANCE BEFORE CHECK Throttle cable for adjustment Mower deck for adjustment Condition of belts, belt pulleys Caster wheels (at the same time. WARNING! When operating with a heavy load or at high ambient temperatures, replace every 50 hours. 2) In dusty conditions, cleaning and replacement are necessary more frequently. 3) Performed by allowing a wrench or other objects to contact both terminals at 200 hour intervals) Engine valve clearance 3) CHANGE Spark plugs Engine oil 1) Engine oil filter Fuel filter Paper air filter 2) Air cleaner...
.... MAINTENANCE DAILY MAINTENANCE BEFORE CHECK Throttle cable for adjustment Mower deck for adjustment Condition of belts, belt pulleys Caster wheels (at the same time. WARNING! When operating with a heavy load or at high ambient temperatures, replace every 50 hours. 2) In dusty conditions, cleaning and replacement are necessary more frequently. 3) Performed by allowing a wrench or other objects to contact both terminals at 200 hour intervals) Engine valve clearance 3) CHANGE Spark plugs Engine oil 1) Engine oil filter Fuel filter Paper air filter 2) Air cleaner...
Owner Manual
Page 24
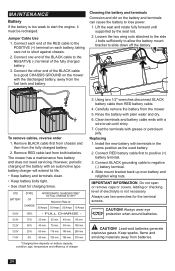
... and then from batteries. 24 Remove RED cable last from the mower 5. The mower has a maintenance free battery and does not need servicing. Carefully remove the battery from both batteries. Clean terminals and battery cable ends with terminals in the same position as the used battery. 2. Replacing 1. Install the new battery with a wire brush until supported by the seat rod. 2. Connect BLACK grounding cable to the POSITIVE (+) terminal on the mower with an automotive type battery charger will extend...
... and then from batteries. 24 Remove RED cable last from the mower 5. The mower has a maintenance free battery and does not need servicing. Carefully remove the battery from both batteries. Clean terminals and battery cable ends with terminals in the same position as the used battery. 2. Replacing 1. Install the new battery with a wire brush until supported by the seat rod. 2. Connect BLACK grounding cable to the POSITIVE (+) terminal on the mower with an automotive type battery charger will extend...

Owner Manual
Page 25
... electric clutch pulley located on the engine shaft. 2. Make sure the belt routing matches the deck decal and that the engine stops if the mower blades are engaged and the driver temporarily moves off and repair the safety system before the steering controls can be started when: • the mower deck is properly routed, slowly release the idler arm to the lowest cutting position. 2. Deck Belt Removal 1. Change the conditions and try again. Park Brake Visually check that there is engaged. Faulty adjustment...
... electric clutch pulley located on the engine shaft. 2. Make sure the belt routing matches the deck decal and that the engine stops if the mower blades are engaged and the driver temporarily moves off and repair the safety system before the steering controls can be started when: • the mower deck is properly routed, slowly release the idler arm to the lowest cutting position. 2. Deck Belt Removal 1. Change the conditions and try again. Park Brake Visually check that there is engaged. Faulty adjustment...

Owner Manual
Page 26
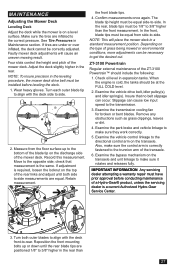
... service workshop decide whether a blade with a Husqvarna bolt if necessary. Engage the park brake. Tilt seat forward to 45-55 lb-pie (122 Nm). Remove both fan covers. 2. Place the belt on a level surface. Install the deck belt. With a 1/2" breaker bar and using the square opening in the pump idler arm, shift the arm to hold the tension off the belt while removing the implement used as a brace in this section of the mower: 3. Replace blades...
... service workshop decide whether a blade with a Husqvarna bolt if necessary. Engage the park brake. Tilt seat forward to 45-55 lb-pie (122 Nm). Remove both fan covers. 2. Place the belt on a level surface. Install the deck belt. With a 1/2" breaker bar and using the square opening in the pump idler arm, shift the arm to hold the tension off the belt while removing the implement used as a brace in this section of the mower: 3. Replace blades...
Owner Manual
Page 27
... outer blade tip to align with the deck front-to make sure it rotates and releases fully. Record this measurement. Check oil level in a standard measurement position. See Tire Pressures in the rear. Confirm measurements once again. Examine the vehicle drive belt, idler pulley(s), and idler spring(s). NOTE: To insure precision in the rear than the front measurement. Turn both side to -side. Four slots control the height...
... outer blade tip to align with the deck front-to make sure it rotates and releases fully. Record this measurement. Check oil level in a standard measurement position. See Tire Pressures in the rear. Confirm measurements once again. Examine the vehicle drive belt, idler pulley(s), and idler spring(s). NOTE: To insure precision in the rear than the front measurement. Turn both side to -side. Four slots control the height...
Owner Manual
Page 30
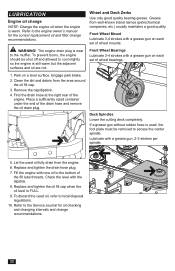
WARNING! Engage park brake. 2. Lubricate with the dipstick. 8. Check the level with a grease gun, 2-3 strokes per spindle. 5. Refer to the muffler. Grease from the area around the oil fill cap. 3. Front Wheel Mount Lubricate 3-4 strokes with a grease gun on each set of wheel mounts. To prevent burns, the engine should be removed to the bottom of wheel bearings. 1. Deck Spindles Lower the cutting deck completely. Replace and tighten the drain hose plug. 7. The engine drain plug is still warm but...
WARNING! Engage park brake. 2. Lubricate with the dipstick. 8. Check the level with a grease gun, 2-3 strokes per spindle. 5. Refer to the muffler. Grease from the area around the oil fill cap. 3. Front Wheel Mount Lubricate 3-4 strokes with a grease gun on each set of wheel mounts. To prevent burns, the engine should be removed to the bottom of wheel bearings. 1. Deck Spindles Lower the cutting deck completely. Replace and tighten the drain hose plug. 7. The engine drain plug is still warm but...
Owner Manual
Page 31
... constant fluid quality levels and longer life, an oil filter change interval of maintenance. Apply the pump release valve for ease of every 400 hours is optimal) beneath the oil filter. capacity is recommended. Remove the oil filter from around the perimeter of new oil to disposal. Install the new filter by hand. With the bypass linkage open and the engine running , slowly move the directional control in your area...
... constant fluid quality levels and longer life, an oil filter change interval of maintenance. Apply the pump release valve for ease of every 400 hours is optimal) beneath the oil filter. capacity is recommended. Remove the oil filter from around the perimeter of new oil to disposal. Install the new filter by hand. With the bypass linkage open and the engine running , slowly move the directional control in your area...
Owner Manual
Page 32
... engaging Drive belt for the mower deck is uneven Blades are dull Driving speed too high Grass is too long Grass has collected under the mower deck 32 TROUBLESHOOTING Problem / Cause Engine will not start Blade switch is engaged Steering controls are not locked in the neutral position Park brake is not activated Dead battery Contamination in the carburetor or fuel line Fuel supply shutoff valve is activated with a warm engine Clogged ventilation valve on the fuel cap Fuel tank nearly empty Fouled spark plugs Rich fuel mixture or fuel-air...
... engaging Drive belt for the mower deck is uneven Blades are dull Driving speed too high Grass is too long Grass has collected under the mower deck 32 TROUBLESHOOTING Problem / Cause Engine will not start Blade switch is engaged Steering controls are not locked in the neutral position Park brake is not activated Dead battery Contamination in the carburetor or fuel line Fuel supply shutoff valve is activated with a warm engine Clogged ventilation valve on the fuel cap Fuel tank nearly empty Fouled spark plugs Rich fuel mixture or fuel-air...
Owner Manual
Page 39
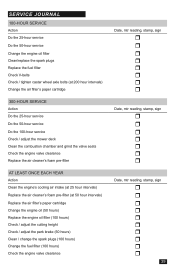
... the valve seats Check the engine valve clearance Replace the air cleaner's foam pre-filter AT LEAST ONCE EACH YEAR Action Clean the engine's cooling air intake (at 25 hour intervals) Replace the air cleaner's foam pre-filter (at 50 hour intervals) Replace the air filter's paper cartridge Change the engine oil (50 hours) Replace the engine oil filter (100 hours) Check / adjust the cutting height Check / adjust the park brake (50 hours) Clean / change the spark plugs (100 hours) Change the fuel filter (100 hours) Check the engine valve...
... the valve seats Check the engine valve clearance Replace the air cleaner's foam pre-filter AT LEAST ONCE EACH YEAR Action Clean the engine's cooling air intake (at 25 hour intervals) Replace the air cleaner's foam pre-filter (at 50 hour intervals) Replace the air filter's paper cartridge Change the engine oil (50 hours) Replace the engine oil filter (100 hours) Check / adjust the cutting height Check / adjust the park brake (50 hours) Clean / change the spark plugs (100 hours) Change the fuel filter (100 hours) Check the engine valve...

