

Owners Manual
Page 2
...operator or other reproductive harm. Do not modify or install non-standard equipment to the unit may cause unsafe operations or damage the unit. Certificates can be altered without consent from the manufacturer. Failure to cause cancer and birth defects or other parts voids the warranty. The use... these instructions to the reseller or other party for repairs. Do not remove any of the states, (California emission rules etc.). WARNING! Orangeburg, SC Printed in the engine compartment stating that no longer used, it should be returned to operate the mower. CONFORMITY...
...operator or other reproductive harm. Do not modify or install non-standard equipment to the unit may cause unsafe operations or damage the unit. Certificates can be altered without consent from the manufacturer. Failure to cause cancer and birth defects or other parts voids the warranty. The use... these instructions to the reseller or other party for repairs. Do not remove any of the states, (California emission rules etc.). WARNING! Orangeburg, SC Printed in the engine compartment stating that no longer used, it should be returned to operate the mower. CONFORMITY...
Owners Manual
Page 3
... Park Brake 12 Ignition Switch 12 Throttle Control 13 Blade Switch 13 Service Minder 13 Choke Control 13 Fuses 14 Seat Adjustment Lever 14 Fuel Shut Off Valve 14 Cutting Height Lever 14 Hydro Release Levers 14 Fuel Tank 15 Tracking Knob 15 OPERATION 16 Training 16 Steering 16 Before Starting 16 Starting the Engine 17 Running 18 Stopping the Engine 18 Operating on Hills 19 Mowing Tips 19 Weak Battery 20 Jumper Cable Use 20 Moving Machine By Hand 20 MAINTENANCE 21 Maintenance Schedule 21 Battery 23 Safety...
... Park Brake 12 Ignition Switch 12 Throttle Control 13 Blade Switch 13 Service Minder 13 Choke Control 13 Fuses 14 Seat Adjustment Lever 14 Fuel Shut Off Valve 14 Cutting Height Lever 14 Hydro Release Levers 14 Fuel Tank 15 Tracking Knob 15 OPERATION 16 Training 16 Steering 16 Before Starting 16 Starting the Engine 17 Running 18 Stopping the Engine 18 Operating on Hills 19 Mowing Tips 19 Weak Battery 20 Jumper Cable Use 20 Moving Machine By Hand 20 MAINTENANCE 21 Maintenance Schedule 21 Battery 23 Safety...
Owners Manual
Page 4
The following of instructions (use extreme caution when towing. Make wide turns to the new owner. Do not tow on public roads. Operating This machine is equipped with a tow hitch, use , service, maintenance) by persons familiar with special accessories provided by steering controls both contribute to stop. The machine can also be operated, maintained, and repaired by all power equipment, can also considerably increase the life span...
The following of instructions (use extreme caution when towing. Make wide turns to the new owner. Do not tow on public roads. Operating This machine is equipped with a tow hitch, use , service, maintenance) by persons familiar with special accessories provided by steering controls both contribute to stop. The machine can also be operated, maintained, and repaired by all power equipment, can also considerably increase the life span...
Owners Manual
Page 7
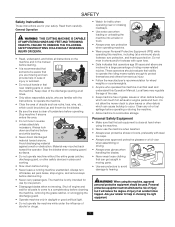
... toe caps. • Always wear approved protective glasses or a full visor when assembling or driving. • Always wear gloves when handling the blades. • Never wear loose clothing that first aid equipment is clear of bystanders before cleaning the machine, removing the grass catcher, or unclogging the discharge guard. • Operate machine only in daylight or good artificial light. • Do not operate the...
... toe caps. • Always wear approved protective glasses or a full visor when assembling or driving. • Always wear gloves when handling the blades. • Never wear loose clothing that first aid equipment is clear of bystanders before cleaning the machine, removing the grass catcher, or unclogging the discharge guard. • Operate machine only in daylight or good artificial light. • Do not operate the...

Owners Manual
Page 9
... careful when servicing the battery. Disconnect the grounding cable from the engine and the sun may otherwise cause the fuel to cool before starting. • Never make any adjustments or repairs with the engine running. • Check grass catcher components and the discharge guard frequently and replace with the engine running the engine with water. Check regularly to cause cancer, birth defects, and other protective devices. • Do not change clothing...
... careful when servicing the battery. Disconnect the grounding cable from the engine and the sun may otherwise cause the fuel to cool before starting. • Never make any adjustments or repairs with the engine running. • Check grass catcher components and the discharge guard frequently and replace with the engine running the engine with water. Check regularly to cause cancer, birth defects, and other protective devices. • Do not change clothing...
Owners Manual
Page 10
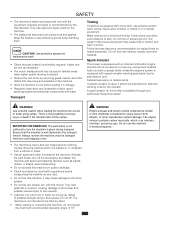
..., such as necessary. • The mulch blades should be used in effective working order by removing grass, leaves, and other reproductive system damage. Do not use approved repair parts for towed equipment. IMPORTANT INFORMATION The park brake is used, it is loaded on sloped ground. WARNING! with a tow hitch, use protective gloves when handling them. Wrap the blades or use extreme caution when towing. Transport Towing...
..., such as necessary. • The mulch blades should be used in effective working order by removing grass, leaves, and other reproductive system damage. Do not use approved repair parts for towed equipment. IMPORTANT INFORMATION The park brake is used, it is loaded on sloped ground. WARNING! with a tow hitch, use protective gloves when handling them. Wrap the blades or use extreme caution when towing. Transport Towing...
Owners Manual
Page 11
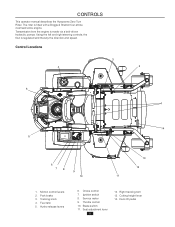
...Cutting height lever 14. Deck lift pedal Transmission from the engine is fitted with a Briggs & Stratton four-stroke overhead valve engine. Park brake 3. Service meter 9. Throttle control 10. Control Locations 3 4 5 2 1 14 5 6 78 9 10 13 12 11 1. Blade switch 11. The rider is made via a belt-driven hydraulic pumps. Using the left and right steering controls, the flow is regulated and thereby the direction and speed. Right tracking bolt 13. Choke control 7. CONTROLS This operator manual describes the Husqvarna Zero Turn Rider. Motion control levers 2. Fuel tank...
...Cutting height lever 14. Deck lift pedal Transmission from the engine is fitted with a Briggs & Stratton four-stroke overhead valve engine. Park brake 3. Service meter 9. Throttle control 10. Control Locations 3 4 5 2 1 14 5 6 78 9 10 13 12 11 1. Blade switch 11. The rider is made via a belt-driven hydraulic pumps. Using the left and right steering controls, the flow is regulated and thereby the direction and speed. Right tracking bolt 13. Choke control 7. CONTROLS This operator manual describes the Husqvarna Zero Turn Rider. Motion control levers 2. Fuel tank...

Owners Manual
Page 14
... mower deck coupling. See Manual Transport in the transport (highest) position. Seat Adjustment Lever The desired cutting height is moved to the fuel line. 14 WARNING! Fuel Shut Off Valve Transaxle bypass linkages must be adjusted lengthways. The 20 A is 15 psi / 103 kPa / 1 bar. Hydro Release Levers The seat can be engaged when pushing or pulling the mower. Fuses are flat pin fuses type as seen by tilting the seat forward. Fuses CONTROLS Cutting Height Lever Fuses are located...
... mower deck coupling. See Manual Transport in the transport (highest) position. Seat Adjustment Lever The desired cutting height is moved to the fuel line. 14 WARNING! Fuel Shut Off Valve Transaxle bypass linkages must be adjusted lengthways. The 20 A is 15 psi / 103 kPa / 1 bar. Hydro Release Levers The seat can be engaged when pushing or pulling the mower. Fuses are flat pin fuses type as seen by tilting the seat forward. Fuses CONTROLS Cutting Height Lever Fuses are located...

Owners Manual
Page 16
... with controls, use the machine in the Operation section). Pull the control levers back to turn in motion. 5. Then by alternating one lever slightly to operate on Safety and Controls before the engine can be started: • The blade switch must be pressed downward into the disengaged position. • The park brake must be up into the desired cut height. 6. Do not use a reduced throttle speed and reduced ground speed. First time users should push the mower...
... with controls, use the machine in the Operation section). Pull the control levers back to turn in motion. 5. Then by alternating one lever slightly to operate on Safety and Controls before the engine can be started: • The blade switch must be pressed downward into the disengaged position. • The park brake must be up into the desired cut height. 6. Do not use a reduced throttle speed and reduced ground speed. First time users should push the mower...
Owners Manual
Page 19
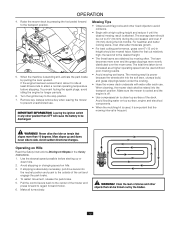
... ignition switch in the Safety Instructions. 1. When the machine is used without poor mowing results. • Avoid mowing wet lawns. The total time taken is poorer because the wheels sink into the neutral position and push to regain forward motion. 6. The mowing result is not increased as a higher operating speed can be discharged. Make all turns slowly. If stopping is absolutely necessary, pull drive levers into the soft lawn...
... ignition switch in the Safety Instructions. 1. When the machine is used without poor mowing results. • Avoid mowing wet lawns. The total time taken is poorer because the wheels sink into the neutral position and push to regain forward motion. 6. The mowing result is not increased as a higher operating speed can be discharged. Make all turns slowly. If stopping is absolutely necessary, pull drive levers into the soft lawn...
Owners Manual
Page 20
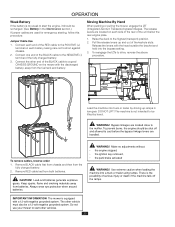
... below the rear engine plate. 1. CAUTION! The release levers are located close to cool before the bypass linkage levers are used for emergency starting, follow this procedure: Jumper Cable Use 1. Keep sparks, flame and smoking materials away from the fuel tank and battery. The machine is equipped with the discharged battery, away from batteries. Make no adjustments without: • the engine stopped, • the ignition key removed, • the park brake activated WARNING...
... below the rear engine plate. 1. CAUTION! The release levers are located close to cool before the bypass linkage levers are used for emergency starting, follow this procedure: Jumper Cable Use 1. Keep sparks, flame and smoking materials away from the fuel tank and battery. The machine is equipped with the discharged battery, away from batteries. Make no adjustments without: • the engine stopped, • the ignition key removed, • the park brake activated WARNING...
Owners Manual
Page 21
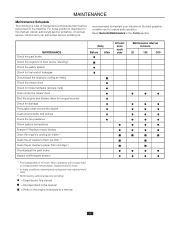
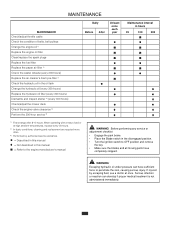
... operation. MAINTENANCE Check the park brake Check the engine's oil level (every refueling) Check the safety system Check for fuel and oil leakages Check/clean the engine's cooling air intake Check the mower deck Check for loose hardware (screws, nuts) Clean under the mower deck Start the engine and blades, listen for unusual sounds Check for damage Thoroughly clean around the engine Clean around belts, belt pulleys Check the tire pressures Check battery connections Sharpen3)/ Replace mower blades Clean the engine's cooling air intake 2) Clean the air cleaner's foam pre-filter 2) Clean the air...
... operation. MAINTENANCE Check the park brake Check the engine's oil level (every refueling) Check the safety system Check for fuel and oil leakages Check/clean the engine's cooling air intake Check the mower deck Check for loose hardware (screws, nuts) Clean under the mower deck Start the engine and blades, listen for unusual sounds Check for damage Thoroughly clean around the engine Clean around belts, belt pulleys Check the tire pressures Check battery connections Sharpen3)/ Replace mower blades Clean the engine's cooling air intake 2) Clean the air cleaner's foam pre-filter 2) Clean the air...
Owners Manual
Page 22
...adjustment checklist • Engage the park brake. • Place the Blade-switch in the disengaged position. • Turn the ignition switch to OFF position and remove the key. • Make sure the blades and all moving parts have sufficient force to the engine manufacturer's manual WARNING! MAINTENANCE MAINTENANCE Check/adjust throttle cable Check the condition of belts, belt pulleys Change the engine oil 1) Replace the engine oil filter Clean/replace the spark plugs Replace the fuel filter Replace the paper air filter 2) Check the caster wheels (every 200 hours) Replace the air...
...adjustment checklist • Engage the park brake. • Place the Blade-switch in the disengaged position. • Turn the ignition switch to OFF position and remove the key. • Make sure the blades and all moving parts have sufficient force to the engine manufacturer's manual WARNING! MAINTENANCE MAINTENANCE Check/adjust throttle cable Check the condition of belts, belt pulleys Change the engine oil 1) Replace the engine oil filter Clean/replace the spark plugs Replace the fuel filter Replace the paper air filter 2) Check the caster wheels (every 200 hours) Replace the air...

Owners Manual
Page 23
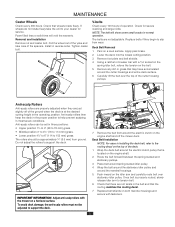
MAINTENANCE Battery Your mower is not necessary. Open the terminal access doors. 2. Clean terminals and battery cable ends with plain water and dry. 4. Open terminal access doors 9. Replace terminal boot cover. 13. Before connecting battery, remove metal bracelets, wristwatch bands, rings, etc. However, periodic charging of electrolyte is equipped with a maintenance free battery and does not need servicing. Rinse the battery with wire brush until shiny. 5. Replacing battery 1. Lift seat and...
MAINTENANCE Battery Your mower is not necessary. Open the terminal access doors. 2. Clean terminals and battery cable ends with plain water and dry. 4. Open terminal access doors 9. Replace terminal boot cover. 13. Before connecting battery, remove metal bracelets, wristwatch bands, rings, etc. However, periodic charging of electrolyte is equipped with a maintenance free battery and does not need servicing. Rinse the battery with wire brush until shiny. 5. Replacing battery 1. Lift seat and...
Owners Manual
Page 25
... deck belt around the electric clutch pulley that is located on a level surface. Wrap the belt around the stationary idler pulley and around spring loaded idler pulley. 4. Check for service. NOTE: The belt will void the warranty. Deck Belt Removal 1. Check that the routing matches the routing decal. 7. Pull the wheel out of the yoke and take the unit to support the deck. Apply park brake. 2. The rollers should be adjusted to slip from wear. Tighten caster bolt. Foam filled tires or solid tires...
... deck belt around the electric clutch pulley that is located on a level surface. Wrap the belt around the stationary idler pulley and around spring loaded idler pulley. 4. Check for service. NOTE: The belt will void the warranty. Deck Belt Removal 1. Check that the routing matches the routing decal. 7. Pull the wheel out of the yoke and take the unit to support the deck. Apply park brake. 2. The rollers should be adjusted to slip from wear. Tighten caster bolt. Foam filled tires or solid tires...
Owners Manual
Page 26
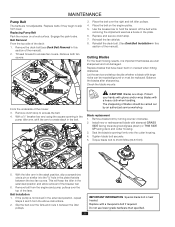
...Engage the park brake. Remove both fan covers. 3. Blades are not adjustable. Remove blade bolt by an authorized service workshop. This will keep the idler in the extended position and allow removal of blades should be replaced. Replacing Pump Belt Park the mower on the engine pulley. 5. Use the breaker bar to access fan covers. Check the blade mounts. CAUTION! Tighten blade bolt securely. 5. Belt Installation 1. Remove the deck belt (see Deck Belt Removal in this section of the manual). Replace blades that sits between the idler pulleys. With the idler arm...
...Engage the park brake. Remove both fan covers. 3. Blades are not adjustable. Remove blade bolt by an authorized service workshop. This will keep the idler in the extended position and allow removal of blades should be replaced. Replacing Pump Belt Park the mower on the engine pulley. 5. Use the breaker bar to access fan covers. Check the blade mounts. CAUTION! Tighten blade bolt securely. 5. Belt Installation 1. Remove the deck belt (see Deck Belt Removal in this section of the manual). Replace blades that sits between the idler pulleys. With the idler arm...
Owners Manual
Page 27
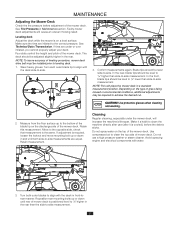
... to the bottom of the blade tip on the type of leveling procedure, mower deck drive belt must be level side-to align with water. 3. Retain measurement. Use compressed air to -side measurement. 27 MAINTENANCE Adjusting the Mower Deck Check the tire pressure before the debris sticks. See Technical Data / Transmission. NOTE: To insure accuracy of grass being mowed or environmental conditions, additional adjustments may be level to 1/8" higher than the side...
... to the bottom of the blade tip on the type of leveling procedure, mower deck drive belt must be level side-to align with water. 3. Retain measurement. Use compressed air to -side measurement. 27 MAINTENANCE Adjusting the Mower Deck Check the tire pressure before the debris sticks. See Technical Data / Transmission. NOTE: To insure accuracy of grass being mowed or environmental conditions, additional adjustments may be level to 1/8" higher than the side...
Owners Manual
Page 29
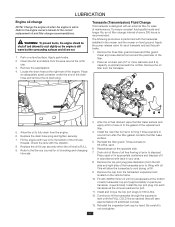
... of all free flowing oil prior to fully drain from around the oil fill cap. 3. Replace the drain hose plug and tighten securely. 7. Install the new filter by hand. Transaxle (Transmission) Fluid Change This transaxle is recommended. Remove the three filter guard screws and filter guard. Apply the pump release valve for oil checking and changing intervals. 3. Fill the engine with an external filter for the correct replacement oil and filter change interval of each transaxle and set the park brake. 1. Apply park brake. 2. This...
... of all free flowing oil prior to fully drain from around the oil fill cap. 3. Replace the drain hose plug and tighten securely. 7. Install the new filter by hand. Transaxle (Transmission) Fluid Change This transaxle is recommended. Remove the three filter guard screws and filter guard. Apply the pump release valve for oil checking and changing intervals. 3. Fill the engine with an external filter for the correct replacement oil and filter change interval of each transaxle and set the park brake. 1. Apply park brake. 2. This...

Owners Manual
Page 31
... in the starter safety circuit. Fouled spark plugs Battery not charging Poor contact of the battery terminal cable connections Blown fuse Fault in the fuel line. Bent blades Suspending for the electromagnetic coupling has loosened Blade switch is too long Grass collected under the mower deck 31 Wrong fuel type Water in fuel Clogged air filter Engine seems weak Clogged air filter Fouled spark plugs Carburetor incorrectly adjusted Air trapped in the Cold Weather starting position Clogged ventilation valve on the...
... in the starter safety circuit. Fouled spark plugs Battery not charging Poor contact of the battery terminal cable connections Blown fuse Fault in the fuel line. Bent blades Suspending for the electromagnetic coupling has loosened Blade switch is too long Grass collected under the mower deck 31 Wrong fuel type Water in fuel Clogged air filter Engine seems weak Clogged air filter Fouled spark plugs Carburetor incorrectly adjusted Air trapped in the Cold Weather starting position Clogged ventilation valve on the...
Owners Manual
Page 32
... is drained of fuel or the stabilizer has reached the carburetor. 5. Touch up at an authorized service workshop is evenly distributed and then refit the spark plug. 6. Remove the spark plug and pour about a tablespoon of engine oil into an approved container outdoors and store far away from direct cold. 8. Remove the battery. Service When ordering spare parts, please specify the purchase year, model, type, and serial number. Fuel...
... is drained of fuel or the stabilizer has reached the carburetor. 5. Touch up at an authorized service workshop is evenly distributed and then refit the spark plug. 6. Remove the spark plug and pour about a tablespoon of engine oil into an approved container outdoors and store far away from direct cold. 8. Remove the battery. Service When ordering spare parts, please specify the purchase year, model, type, and serial number. Fuel...


