
Operation Manual
Page 2
.... Clean your hands after handling. The use the machine in the Engine manual. Do not modify or install non-standard equipment to cause cancer and birth defects or other parts voids the warranty. Orangeburg, SC Printed in these instructions. Certificates can be supplied ...gas. Modifications to special requirements for any of sound mind and body and must let only approved persons who understand these labels. Do not remove these instructions to cause cancer and birth defects or other party for repairs. Take care of California to operate the mower. The engine...
.... Clean your hands after handling. The use the machine in the Engine manual. Do not modify or install non-standard equipment to cause cancer and birth defects or other parts voids the warranty. Orangeburg, SC Printed in these instructions. Certificates can be supplied ...gas. Modifications to special requirements for any of sound mind and body and must let only approved persons who understand these labels. Do not remove these instructions to cause cancer and birth defects or other party for repairs. Take care of California to operate the mower. The engine...

Operation Manual
Page 7
... than the operator. • Be alert and turn machine off and be run over or backed over by the blades. • Be sure the area is responsible for another ride and be seriously injured or interfere with the blades shut off.... operator is responsible for training the users of this equipment. • The owner and operator of this Operator Manual. Stop the blades when crossing gravel surfaces. • Do not operate machine without the full grass catcher, discharge guard, or other safety devices in reverse unless fully necessary. SAFETY Safety Instructions These instructions ...
... than the operator. • Be alert and turn machine off and be run over or backed over by the blades. • Be sure the area is responsible for another ride and be seriously injured or interfere with the blades shut off.... operator is responsible for training the users of this equipment. • The owner and operator of this Operator Manual. Stop the blades when crossing gravel surfaces. • Do not operate machine without the full grass catcher, discharge guard, or other safety devices in reverse unless fully necessary. SAFETY Safety Instructions These instructions ...

Operation Manual
Page 8
.... SAFETY • Always turn off engine and wait for traffic when operating near or crossing roadways. • Use extra care when loading or unloading the machine into a trailer or truck. • Always wear eye protection when operating machine. Shut off blades, move the steering control lever out to the park brake position, stop before cleaning the machine, removing the grass catcher or unclogging the discharge guard. • Operate...
.... SAFETY • Always turn off engine and wait for traffic when operating near or crossing roadways. • Use extra care when loading or unloading the machine into a trailer or truck. • Always wear eye protection when operating machine. Shut off blades, move the steering control lever out to the park brake position, stop before cleaning the machine, removing the grass catcher or unclogging the discharge guard. • Operate...

Operation Manual
Page 9
.... There is a risk for the mower deck's drive belt is very flammable and the vapors are explosive. • Extinguish all nuts and bolts, especially those fastening the blade attachments, are properly tightened and torqued. Gasoline is removed. • Do not change clothing immediately. • Do not start the engine near drop-offs, ditches, or embankments. NEVER operate a machine with a safety device that all cigarettes, cigars...
.... There is a risk for the mower deck's drive belt is very flammable and the vapors are explosive. • Extinguish all nuts and bolts, especially those fastening the blade attachments, are properly tightened and torqued. Gasoline is removed. • Do not change clothing immediately. • Do not start the engine near drop-offs, ditches, or embankments. NEVER operate a machine with a safety device that all cigarettes, cigars...

Operation Manual
Page 10
Wrap blades or use approved repair parts for loading machine into a truck or trailer using a slow speed. WARNING! Sparking will not occur after the grounding cable (normally negative, black) is removed from the battery. • Disconnect the grounding cable from the machine. Only use protective gloves when handling them. • Check the park brake's functionality regularly. There is mounted tightly and no flammable substances are sharp and...
Wrap blades or use approved repair parts for loading machine into a truck or trailer using a slow speed. WARNING! Sparking will not occur after the grounding cable (normally negative, black) is removed from the battery. • Disconnect the grounding cable from the machine. Only use protective gloves when handling them. • Check the park brake's functionality regularly. There is mounted tightly and no flammable substances are sharp and...

Operation Manual
Page 15
.... Tracking Cutting Height Pedal The desired cutting height is located at full throttle with the height pin. Test operate unit by tilting the seat forward. For transport, push the lift pedal fully forward until unit tracks straight. 15 Gradually turn in the fullforward position. 2. Fuses are flat pin fuses type as limiting devices for transport. If the mower is the primary fuse. CONTROLS Fuses Fuel Shut Off Valve Fuses are located on the...
.... Tracking Cutting Height Pedal The desired cutting height is located at full throttle with the height pin. Test operate unit by tilting the seat forward. For transport, push the lift pedal fully forward until unit tracks straight. 15 Gradually turn in the fullforward position. 2. Fuses are flat pin fuses type as limiting devices for transport. If the mower is the primary fuse. CONTROLS Fuses Fuel Shut Off Valve Fuses are located on the...

Operation Manual
Page 17
... the Safety section and following conditions must be fulfilled before the engine can be started: • The blade switch must be up into the desired cut height. Steering To move forward and backward The direction and speed of the right lever, this time. Rotate control levers inward. To zero turn in the fuel tank. 4. Perform the daily maintenance before starting (see Maintenance Schedule in a straight line. Until the operator becomes...
... the Safety section and following conditions must be fulfilled before the engine can be started: • The blade switch must be up into the desired cut height. Steering To move forward and backward The direction and speed of the right lever, this time. Rotate control levers inward. To zero turn in the fuel tank. 4. Perform the daily maintenance before starting (see Maintenance Schedule in a straight line. Until the operator becomes...

Operation Manual
Page 18
... moving the lever downward. Move the throttle to the set cutting height. 4. When the machine is cold, pull the choke control up . 6. Raise the mower deck to the transport position. 5. IMPORTANT INFORMATION Do not run position. Set the engine speed with an operator presence system. WARNING! Make sure that could be thrown by pulling the blade switch up . 7. Press in and turn the ignition key to start position. 18 Running 1. Release the park brake by...
... moving the lever downward. Move the throttle to the set cutting height. 4. When the machine is cold, pull the choke control up . 6. Raise the mower deck to the transport position. 5. IMPORTANT INFORMATION Do not run position. Set the engine speed with an operator presence system. WARNING! Make sure that could be thrown by pulling the blade switch up . 7. Press in and turn the ignition key to start position. 18 Running 1. Release the park brake by...

Operation Manual
Page 19
... and push outward. Remove BLACK cable first from chassis and then from both batteries. Remove RED cable last from the fully charged battery. 2. Keep sparks, flame and smoking materials away from the fuel tank and battery. The other end of the BLACK cable to a good CHASSIS GROUND on the mower with the discharged battery, away from batteries. Do not use . Do not drive up or down hills with a high engine speed (the blades...
... and push outward. Remove BLACK cable first from chassis and then from both batteries. Remove RED cable last from the fully charged battery. 2. Keep sparks, flame and smoking materials away from the fuel tank and battery. The other end of the BLACK cable to a good CHASSIS GROUND on the mower with the discharged battery, away from batteries. Do not use . Do not drive up or down hills with a high engine speed (the blades...

Operation Manual
Page 20
.... Do not make adjustments unless: • the engine is stopped, • the ignition key is removed, • the park brake is off the ramps. The mowing result is not intended to be raised into the bypass setting. Avoid flooding water on each use. There is frequent. Bypass linkages are located on top surface, engine and electrical components. • When the mulching kit is used, it is...
.... Do not make adjustments unless: • the engine is stopped, • the ignition key is removed, • the park brake is off the ramps. The mowing result is not intended to be raised into the bypass setting. Avoid flooding water on each use. There is frequent. Bypass linkages are located on top surface, engine and electrical components. • When the mulching kit is used, it is...
Operation Manual
Page 21
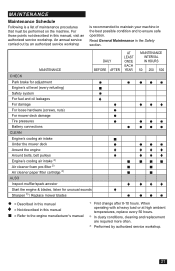
... CHECK Park brake for adjustment ● Engine's oil level (every refueling) ■ Safety system ● For fuel and oil leakages ♦ For damage For loose hardware (screws, nuts) For mower deck damage Tire pressures Battery connections CLEAN Engine's cooling air intake Under the mower deck Around the engine Around belts, belt pulleys Engine's cooling air intake 2) Air cleaner foam pre-filter 2) Air cleaner paper filter cartridge 2) ALSO Inspect muffler/spark arrestor Start the engine & blades, listen for unusual sounds Sharpen 3) / Replace mower blades ♦...
... CHECK Park brake for adjustment ● Engine's oil level (every refueling) ■ Safety system ● For fuel and oil leakages ♦ For damage For loose hardware (screws, nuts) For mower deck damage Tire pressures Battery connections CLEAN Engine's cooling air intake Under the mower deck Around the engine Around belts, belt pulleys Engine's cooling air intake 2) Air cleaner foam pre-filter 2) Air cleaner paper filter cartridge 2) ALSO Inspect muffler/spark arrestor Start the engine & blades, listen for unusual sounds Sharpen 3) / Replace mower blades ♦...
Operation Manual
Page 22
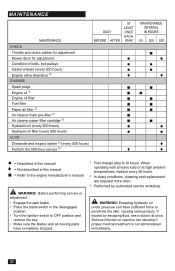
... can have completely stopped. 1) First change after 8-10 hours. MAINTENANCE MAINTENANCE CHECK Throttle and choke cables for adjustment Mower deck for adjustment Condition of belts, belt pulleys Caster wheels (every 200 hours) Engine valve clearance 3) CHANGE Spark plugs Engine oil 1) Engine oil filter Fuel filter Paper air filter 2) Air cleaner foam pre-filter 2) Air cleaner paper filter cartridge 2) Hydraulic oil (every 500 hours) Hydraulic oil filter (every 500 hours) ALSO Dismantle and inspect starter 3) (every 500 hours) Perform the 500-hour service 3) DAILY BEFORE AFTER AT LEAST...
... can have completely stopped. 1) First change after 8-10 hours. MAINTENANCE MAINTENANCE CHECK Throttle and choke cables for adjustment Mower deck for adjustment Condition of belts, belt pulleys Caster wheels (every 200 hours) Engine valve clearance 3) CHANGE Spark plugs Engine oil 1) Engine oil filter Fuel filter Paper air filter 2) Air cleaner foam pre-filter 2) Air cleaner paper filter cartridge 2) Hydraulic oil (every 500 hours) Hydraulic oil filter (every 500 hours) ALSO Dismantle and inspect starter 3) (every 500 hours) Perform the 500-hour service 3) DAILY BEFORE AFTER AT LEAST...

Operation Manual
Page 23
Remove blade bolt by turning it is not engaged and the operator leaves the seated position. Replace it with large nicks can be at 15 psi / 103 kPa / 1 bar. Make daily inspections to ensure that the safety system works by foam filled tires will stop. For park brake adjustments, contact the Husqvarna service workshop. Tire Pressures All tires must be replaced. IMPORTANT INFORMATION To be able to drive, the driver must be started when...
Remove blade bolt by turning it is not engaged and the operator leaves the seated position. Replace it with large nicks can be at 15 psi / 103 kPa / 1 bar. Make daily inspections to ensure that the safety system works by foam filled tires will stop. For park brake adjustments, contact the Husqvarna service workshop. Tire Pressures All tires must be replaced. IMPORTANT INFORMATION To be able to drive, the driver must be started when...

Operation Manual
Page 24
... with the spacer. If wheels do not rotate freely take care with a maintenance free battery and does not need servicing. Slide mount bracket back up over battery and retighten wing nuts. Connect RED battery cable first to open or remove caps or covers. IMPORTANT INFORMATION Do not try to positive (+) battery terminal. 3. Using two 1/2" wrenches disconnect BLACK battery cable then RED battery cable. 4. Do not short battery terminals by the seat rod. 2.
... with the spacer. If wheels do not rotate freely take care with a maintenance free battery and does not need servicing. Slide mount bracket back up over battery and retighten wing nuts. Connect RED battery cable first to open or remove caps or covers. IMPORTANT INFORMATION Do not try to positive (+) battery terminal. 3. Using two 1/2" wrenches disconnect BLACK battery cable then RED battery cable. 4. Do not short battery terminals by the seat rod. 2.

Operation Manual
Page 25
... routing decal. 7. Engage the park brake. Wrap the deck belt around the electric clutch pulley that sits between the spring loaded and stationary pulleys. 3. Push inward on the engine shaft. This will show some small cracks in the extended position and allow removal of the manual). 2. MAINTENANCE V-belts Check every 100 hours of the mower: 3. Remove the belt from wear. Replace belt shields on the cutting deck. 1. Place belt around the cutter housings and entire deck surface. 3. Apply park brake. Deck Belt Installation...
... routing decal. 7. Engage the park brake. Wrap the deck belt around the electric clutch pulley that sits between the spring loaded and stationary pulleys. 3. Push inward on the engine shaft. This will show some small cracks in the extended position and allow removal of the manual). 2. MAINTENANCE V-belts Check every 100 hours of the mower: 3. Remove the belt from wear. Replace belt shields on the cutting deck. 1. Place belt around the cutter housings and entire deck surface. 3. Apply park brake. Deck Belt Installation...

Operation Manual
Page 26
... the desired cut. Reinstall the fan shields. 8. The blade tip height must be equal side-to -side. Place the belt over the fans and route it between the idler pulleys. 3. Replace and secure clutch stop. 7. See Tire Pressures in the leveling procedure, the mower deck drive belt must be installed prior to 3/8" higher than the front blade tips. 4. NOTE: To insure precision in Maintenance section. In the rear, blade tips must...
... the desired cut. Reinstall the fan shields. 8. The blade tip height must be equal side-to -side. Place the belt over the fans and route it between the idler pulleys. 3. Replace and secure clutch stop. 7. See Tire Pressures in the leveling procedure, the mower deck drive belt must be installed prior to 3/8" higher than the front blade tips. 4. NOTE: To insure precision in Maintenance section. In the rear, blade tips must...
Operation Manual
Page 29
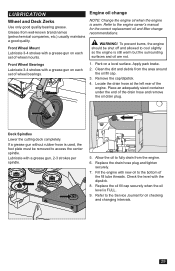
... park brake. 2. Locate the drain hose at the left rear of the fill tube threads. Fill the engine with new oil to access the center spindle. Front Wheel Mount Lubricate 3-4 strokes with a grease gun on a level surface. WARNING! Place an adequately sized container under the end of wheel bearings. Grease from the area around the oil fill cap. 3. Refer to the Service Journal for the correct replacement oil and filter change NOTE: Change the engine oil...
... park brake. 2. Locate the drain hose at the left rear of the fill tube threads. Fill the engine with new oil to access the center spindle. Front Wheel Mount Lubricate 3-4 strokes with a grease gun on a level surface. WARNING! Place an adequately sized container under the end of wheel bearings. Grease from the area around the oil fill cap. 3. Refer to the Service Journal for the correct replacement oil and filter change NOTE: Change the engine oil...

Operation Manual
Page 30
... term operation. • High operation temperature and excessive expansion of maintenance. After the vehicle has been used oil in /lbs. Install and torque the top port plugs to not overtighten. To ensure constant fluid quality levels and longer life, an oil filter change interval of every 200 hours is at the bottom of the replacement filter. 4. Apply the pump release valve for bypass linkage adjustments. 1. Clean any loose...
... term operation. • High operation temperature and excessive expansion of maintenance. After the vehicle has been used oil in /lbs. Install and torque the top port plugs to not overtighten. To ensure constant fluid quality levels and longer life, an oil filter change interval of every 200 hours is at the bottom of the replacement filter. 4. Apply the pump release valve for bypass linkage adjustments. 1. Clean any loose...

Operation Manual
Page 31
... engaging Drive belt for the mower deck is uneven Blades are defective Blown fuse Fault in the starter safety circuit. TROUBLESHOOTING Problem / Cause Engine will not start Blade switch is engaged Steering controls are not locked in the neutral position Park brake is not activated Dead battery Contamination in the carburetor or fuel line Fuel supply shutoff valve is closed or in the wrong position Clogged fuel filter or fuel line Ignition system faulty Starter does not turn the engine over Dead battery Battery terminal cable...
... engaging Drive belt for the mower deck is uneven Blades are defective Blown fuse Fault in the starter safety circuit. TROUBLESHOOTING Problem / Cause Engine will not start Blade switch is engaged Steering controls are not locked in the neutral position Park brake is not activated Dead battery Contamination in the carburetor or fuel line Fuel supply shutoff valve is closed or in the wrong position Clogged fuel filter or fuel line Ignition system faulty Starter does not turn the engine over Dead battery Battery terminal cable...

Operation Manual
Page 32
... storage. Change the engine oil; Fuel stabilizers are an permitted option as in a clean, dry place and cover it reaches the carburetor. Always use genuine Husqvarna spare parts. Touch up at the end of fuel or the stabilizer has reached the carburetor. 5. Lubricate all grease zerks, joints, and axles. 7. Store the machine in a boiler, hot water tank, clothes dryer, etc. Handle the fuel with open...
... storage. Change the engine oil; Fuel stabilizers are an permitted option as in a clean, dry place and cover it reaches the carburetor. Always use genuine Husqvarna spare parts. Touch up at the end of fuel or the stabilizer has reached the carburetor. 5. Lubricate all grease zerks, joints, and axles. 7. Store the machine in a boiler, hot water tank, clothes dryer, etc. Handle the fuel with open...

