
Owners Manual
Page 3
...14 Transport 16 Roll over Protection system (ROPS 17 Controls 18 Control Locations 18 Steering Control Levers 19 Parking Brake 20 Throttle Control 20 Blade Switch 20 Ignition Switch 21 Choke Control 21 Fuses 21 Fuel Tank 22 Fuel Shut Off Valve 23 Hour Meter 24 Tracking Knob 24...41 Replacing the Fuel Filter 42 Tire Pressures 42 Parking Brake 43 V-belts 43 Deck belt 44 Pump Belt 45 Cutting Blades 45 Blade replacement 46 Adjusting the Mower Deck 47 Leveling deck 47 Anti-scalp rollers 48 Cleaning and Washing 49 Caster Wheels 49 Hardware 49 LUBRICATION 50 Lubricating the...
...14 Transport 16 Roll over Protection system (ROPS 17 Controls 18 Control Locations 18 Steering Control Levers 19 Parking Brake 20 Throttle Control 20 Blade Switch 20 Ignition Switch 21 Choke Control 21 Fuses 21 Fuel Tank 22 Fuel Shut Off Valve 23 Hour Meter 24 Tracking Knob 24...41 Replacing the Fuel Filter 42 Tire Pressures 42 Parking Brake 43 V-belts 43 Deck belt 44 Pump Belt 45 Cutting Blades 45 Blade replacement 46 Adjusting the Mower Deck 47 Leveling deck 47 Anti-scalp rollers 48 Cleaning and Washing 49 Caster Wheels 49 Hardware 49 LUBRICATION 50 Lubricating the...
Owners Manual
Page 14
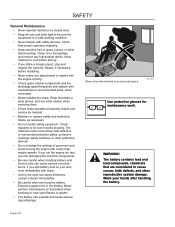
... safety equipment. If you run the engine too fast, you spill battery acid on your hands after handling the battery. Wrap the blade or wear gloves, and use extra caution when servicing them. • Check brake operation frequently. Explosive gases form in an enclosed ... foreign object, stop and inspect the machine. English-14 The machine must not be driven with manufacturer's recommended parts, when necessary. • Mower blades are considered to cool before restarting. • Never make any fuel-soaked debris. If you risk damaging the machine components. • Be very...
... safety equipment. If you run the engine too fast, you spill battery acid on your hands after handling the battery. Wrap the blade or wear gloves, and use extra caution when servicing them. • Check brake operation frequently. Explosive gases form in an enclosed ... foreign object, stop and inspect the machine. English-14 The machine must not be driven with manufacturer's recommended parts, when necessary. • Mower blades are considered to cool before restarting. • Never make any fuel-soaked debris. If you risk damaging the machine components. • Be very...

Owners Manual
Page 16
...• The mulch blades should only be lifted by local traffic regulations before putting it over. If injured by driving up ramps of suitable strength using a slow speed. Be extra cautious when it may jackknife or overturn causing damage to the mower and possibly serious injury..., causing serious injury. IMPORTANT INFORMATION The parking brake is not administered immediately. English-16 Do not lift! SAFETY • The blades are sharp and can have accumulated on the machine. Regularly clean deck 8011-514 WARNING! Serious infection or reaction can cause serious ...
...• The mulch blades should only be lifted by local traffic regulations before putting it over. If injured by driving up ramps of suitable strength using a slow speed. Be extra cautious when it may jackknife or overturn causing damage to the mower and possibly serious injury..., causing serious injury. IMPORTANT INFORMATION The parking brake is not administered immediately. English-16 Do not lift! SAFETY • The blades are sharp and can have accumulated on the machine. Regularly clean deck 8011-514 WARNING! Serious infection or reaction can cause serious ...
Owners Manual
Page 20
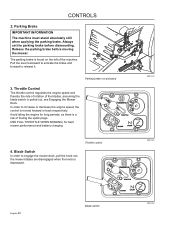
...as there is moved forward or back respectively. Throttle control 8061-010 8061-001 English-20 Blade switch 8061-002 Release the parking brake before dismounting. CONTROLS 2. the mower blades are disengaged when the knob is depressed. Pull the lever backward to activate the brake and... forward to engage the mower deck, pull the knob out; Parking Brake IMPORTANT INFORMATION The machine...
...as there is moved forward or back respectively. Throttle control 8061-010 8061-001 English-20 Blade switch 8061-002 Release the parking brake before dismounting. CONTROLS 2. the mower blades are disengaged when the knob is depressed. Pull the lever backward to activate the brake and... forward to engage the mower deck, pull the knob out; Parking Brake IMPORTANT INFORMATION The machine...
Owners Manual
Page 25
...Pull back on turf. Then by NOT moving forward in Operation section), adjust engine speed to idle, disengage parking brake, do not engage blades at this time, rotate control levers inward. We suggest that direction. In order to move forward and backward The direction and speed of the...its own power, the operator must be in the seat, start moving in the reverse position. Additionally, we suggest when first operating the mower, use a reduced throttle speed and reduced ground speed by alternating one lever slightly to the forward position and the other people or vehicles/...
...Pull back on turf. Then by NOT moving forward in Operation section), adjust engine speed to idle, disengage parking brake, do not engage blades at this time, rotate control levers inward. We suggest that direction. In order to move forward and backward The direction and speed of the...its own power, the operator must be in the seat, start moving in the reverse position. Additionally, we suggest when first operating the mower, use a reduced throttle speed and reduced ground speed by alternating one lever slightly to the forward position and the other people or vehicles/...
Owners Manual
Page 26
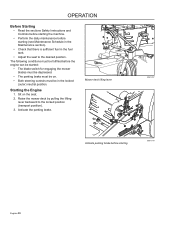
... must be fulfilled before the engine can be started: • The blade switch for engaging the mower blades must be depressed. • The parking brake must be on the seat. 2. Starting the Engine 1. Mower deck lifting lever 8061-007 Activate parking brake before starting (see Maintenance ...sections Safety Instructions and Controls before starting the machine. • Perform the daily maintenance before starting 8061-010 English-26 Raise the mower deck by pulling the lifting lever backward to the desired position. Sit on . • Both steering controls must be in the ...
... must be fulfilled before the engine can be started: • The blade switch for engaging the mower blades must be depressed. • The parking brake must be on the seat. 2. Starting the Engine 1. Mower deck lifting lever 8061-007 Activate parking brake before starting (see Maintenance ...sections Safety Instructions and Controls before starting the machine. • Perform the daily maintenance before starting 8061-010 English-26 Raise the mower deck by pulling the lifting lever backward to the desired position. Sit on . • Both steering controls must be in the ...
Owners Manual
Page 27
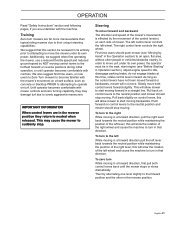
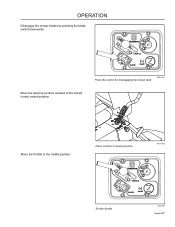
Press the control for disengaging the mower deck 8061-002 Move the throttle to the locked (outer) neutral position. Move the steering controls outward to the middle position. Place controls in neutral position 8061-012b Set the throttle 8061-001 English-27 operation Disengage the mower blades by pressing the blade switch downwards.
Press the control for disengaging the mower deck 8061-002 Move the throttle to the locked (outer) neutral position. Move the steering controls outward to the middle position. Place controls in neutral position 8061-012b Set the throttle 8061-001 English-27 operation Disengage the mower blades by pressing the blade switch downwards.
Owners Manual
Page 31
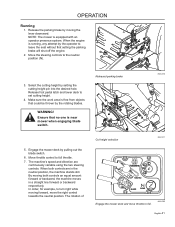
Make sure the work area is free from objects that no one is near mower when engaging blade switch. 5. Ensure that could be thrown by setting the cutting height pin into the desired hole. By moving both controls are continuously variable... using the two steering controls. Select the cutting height by the rotating blades. Engage the mower deck by moving forward, move throttle to the neutral position (N). 3. Move throttle control to turn right while moving the lever downward. operation ...
Make sure the work area is free from objects that no one is near mower when engaging blade switch. 5. Ensure that could be thrown by setting the cutting height pin into the desired hole. By moving both controls are continuously variable... using the two steering controls. Select the cutting height by the rotating blades. Engage the mower deck by moving forward, move throttle to the neutral position (N). 3. Move throttle control to turn right while moving the lever downward. operation ...

Owners Manual
Page 33
... soft lawn, clumps build, and the grass clippings fasten under the cowling. • Hose the mower deck underside with a high engine speed (the blades rotate rapidly) and low speed (the rider moves slowly). WARNING! Make sure the mower is cooled and the engine is frequent. Mowing pattern 8011-603 WARNING! Never drive the...
... soft lawn, clumps build, and the grass clippings fasten under the cowling. • Hose the mower deck underside with a high engine speed (the blades rotate rapidly) and low speed (the rider moves slowly). WARNING! Make sure the mower is cooled and the engine is frequent. Mowing pattern 8011-603 WARNING! Never drive the...

Owners Manual
Page 34
Avoid idling the engine for longer periods, as there is a risk of the spark plugs fouling. • Disengage the mower deck by depressing the blade switch. • Raise the mower deck by pressing the foot pedal forward to the transport position. • When the machine is standing still, activate the parking brake by pulling...
Avoid idling the engine for longer periods, as there is a risk of the spark plugs fouling. • Disengage the mower deck by depressing the blade switch. • Raise the mower deck by pressing the foot pedal forward to the transport position. • When the machine is standing still, activate the parking brake by pulling...
Owners Manual
Page 36
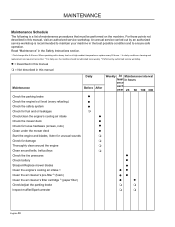
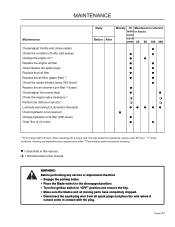
...61549; Check/clean the engine's cooling air intake Check the mower deck Check for loose hardware (screws, nuts) Clean under the mower deck Start the engine and blades, listen for unusual sounds Check for damage Thoroughly clean... around the engine Clean around belts, belt pulleys Check the tire pressures Check battery Sharpen/Replace mower blades Clean the engine's cooling air intake 2) Clean the air cleaner's pre-filter 2) (foam) Clean the air cleaner's filter cartridge 2) ...
...61549; Check/clean the engine's cooling air intake Check the mower deck Check for loose hardware (screws, nuts) Clean under the mower deck Start the engine and blades, listen for unusual sounds Check for damage Thoroughly clean... around the engine Clean around belts, belt pulleys Check the tire pressures Check battery Sharpen/Replace mower blades Clean the engine's cooling air intake 2) Clean the air cleaner's pre-filter 2) (foam) Clean the air cleaner's filter cartridge 2) ...
Owners Manual
Page 37
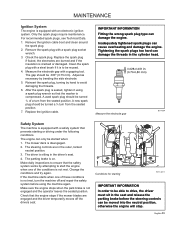
... filter (paper filter) 2) Check the caster wheels (every 200 hours) Replace the air cleaner's pre-filter 2) (foam) Check/adjust the mower deck Check the engine valve clearance 3) Perform the 300-hour service 3) Lubricate according to "OFF" position and remove the key. • Make ...cannot come in contact with the plug. Before performing any service or adjustment checklist • Engage the parking brake. • Place the Blade-switch in the disengaged position. • Turn the ignition switch to Lubrication Schedule Check hydraulic oil at high ambient temperatures, replace every 50 ...
... filter (paper filter) 2) Check the caster wheels (every 200 hours) Replace the air cleaner's pre-filter 2) (foam) Check/adjust the mower deck Check the engine valve clearance 3) Perform the 300-hour service 3) Lubricate according to "OFF" position and remove the key. • Make ...cannot come in contact with the plug. Before performing any service or adjustment checklist • Engage the parking brake. • Place the Blade-switch in the disengaged position. • Turn the ignition switch to Lubrication Schedule Check hydraulic oil at high ambient temperatures, replace every 50 ...
Owners Manual
Page 39
..., tighten it is to drive, the driver must sit in the driver's seat. 4. The engine can cause overheating and damage the engine. The mower deck is sitting in the seat and release the parking brake before using a spark plug wrench so that the safety system works by bending the...can damage the engine. Make sure the engine stops when the park brake is equipped with a safety system that the engine stops if the mower blades are in the cylinder head. Measure the electrode gap 8011-054 Safety System The machine is compressed. Inadequately tightened spark plugs can only be ...
..., tighten it is to drive, the driver must sit in the driver's seat. 4. The engine can cause overheating and damage the engine. The mower deck is sitting in the seat and release the parking brake before using a spark plug wrench so that the safety system works by bending the...can damage the engine. Make sure the engine stops when the park brake is equipped with a safety system that the engine stops if the mower blades are in the cylinder head. Measure the electrode gap 8011-054 Safety System The machine is compressed. Inadequately tightened spark plugs can only be ...
Owners Manual
Page 45
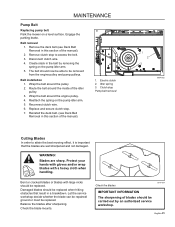
...attain the best mowing effect, it is important that result in this section of the idler pulley. 3. Balance the blades after sharpening. MAINTENANCE Pump Belt Replacing pump belt Park the mower on the pump idler arm. 5. Wrap the belt around the pulley 2. Reattach the spring on the pump idler arm.... 5. Idler spring 3. Protect your hands with gloves and/or wrap blades with large nicks should now be removed from the...
...attain the best mowing effect, it is important that result in this section of the idler pulley. 3. Balance the blades after sharpening. MAINTENANCE Pump Belt Replacing pump belt Park the mower on the pump idler arm. 5. Wrap the belt around the pulley 2. Reattach the spring on the pump idler arm.... 5. Idler spring 3. Protect your hands with gloves and/or wrap blades with large nicks should now be removed from the...
Owners Manual
Page 47
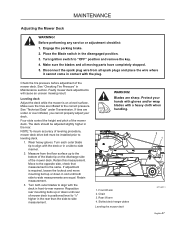
... rear. Measure from all moving parts have completely stopped. 5. Retain measurement. 3. Slotted deck hanger plates Leveling the mower deck 8011-601-1 English-47 Make sure the blades and all spark plugs and place the wire where it cannot come in contact with the deck in a side-to...will cause an uneven mowing result. The deck should be installed prior to the bottom of the mower deck. Reposition rear mounting bolts up or down until both outer blades to -side manner. 2. Blades are under Transmission. Front lift arm 2. See "Technical Data" under or over inflated, you ...
... rear. Measure from all moving parts have completely stopped. 5. Retain measurement. 3. Slotted deck hanger plates Leveling the mower deck 8011-601-1 English-47 Make sure the blades and all spark plugs and place the wire where it cannot come in contact with the deck in a side-to...will cause an uneven mowing result. The deck should be installed prior to the bottom of the mower deck. Reposition rear mounting bolts up or down until both outer blades to -side manner. 2. Blades are under Transmission. Front lift arm 2. See "Technical Data" under or over inflated, you ...
Owners Manual
Page 48
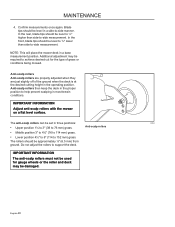
... adjust the rollers to help prevent scalping in three positions: CZ-9 • Upper position 1½ to 3" (38 to -side measurement. Blade tips should be used for the type of the ground when the deck is at the desired cutting height in a base measurement position. Anti-...189;" to 6" (114 to -side measurement. English-48 MAINTENANCE 4. Additional adjustment may be damaged. IMPORTANT INFORMATION Adjust anti-scalp rollers with the mower on a flat level surface. IMPORTANT INFORMATION The anti-scalp rollers must not be level to 1/8" higher than side-to 152 mm) grass. ...
... adjust the rollers to help prevent scalping in three positions: CZ-9 • Upper position 1½ to 3" (38 to -side measurement. Blade tips should be used for the type of the ground when the deck is at the desired cutting height in a base measurement position. Anti-...189;" to 6" (114 to -side measurement. English-48 MAINTENANCE 4. Additional adjustment may be damaged. IMPORTANT INFORMATION Adjust anti-scalp rollers with the mower on a flat level surface. IMPORTANT INFORMATION The anti-scalp rollers must not be level to 1/8" higher than side-to 152 mm) grass. ...
Owners Manual
Page 56
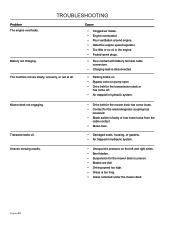
...not engaging. English-56 Uneven mowing results. • Unequal tire pressure on the left and right sides. • Bent blades. • Suspension for the mower deck is uneven. • Blades are dull. • Driving speed too high. • Grass is disconnected. • Parking brake on. •... Bypass valve on pump open. • Drive belt for the electromagnetic coupling has loosened. • Blade switch is faulty or ...
...not engaging. English-56 Uneven mowing results. • Unequal tire pressure on the left and right sides. • Bent blades. • Suspension for the mower deck is uneven. • Blades are dull. • Driving speed too high. • Grass is disconnected. • Parking brake on. •... Bypass valve on pump open. • Drive belt for the electromagnetic coupling has loosened. • Blade switch is faulty or ...
Owners Manual
Page 66
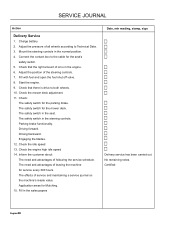
... seat's safety switch. 5. Parking brake functionality. The need and advantages of leaving the machine for service every 300 hours. Engaging the blades. 12. The effects of all wheels according to both wheels. 10. The safety switch in the steering controls. No remaining notes.... a service journal on the machine's resale value. The safety switch in the seat. Start the engine. 9. Application areas for the mower deck. Certified: English-66 Mount the steering controls in the sales papers Date, mtr reading, stamp, sign Delivery service has been carried...
... seat's safety switch. 5. Parking brake functionality. The need and advantages of leaving the machine for service every 300 hours. Engaging the blades. 12. The effects of all wheels according to both wheels. 10. The safety switch in the steering controls. No remaining notes.... a service journal on the machine's resale value. The safety switch in the seat. Start the engine. 9. Application areas for the mower deck. Certified: English-66 Mount the steering controls in the sales papers Date, mtr reading, stamp, sign Delivery service has been carried...
Owners Manual
Page 68
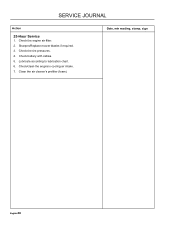
Check the engine air filter. 2. Check battery with cables. 5. Lubricate according to lubrication chart. 6. Date, mtr reading, stamp, sign English-68 Check the tire pressures. 4. Sharpen/Replace mower blades if required. 3. Check/clean the engine's cooling air intake. 7. SERVICE JOURNAL Action 25-Hour Service 1. Clean the air cleaner's prefilter (foam).
Check the engine air filter. 2. Check battery with cables. 5. Lubricate according to lubrication chart. 6. Date, mtr reading, stamp, sign English-68 Check the tire pressures. 4. Sharpen/Replace mower blades if required. 3. Check/clean the engine's cooling air intake. 7. SERVICE JOURNAL Action 25-Hour Service 1. Clean the air cleaner's prefilter (foam).
Owners Manual
Page 76
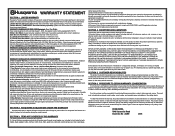
...-equipped with the product information supplied at the owner's residence.) EZ & MZ Zero Turn Riders: 1 year commercial warranty or 600 hours of use except as is to an authorized Husqvarna retailer for evaluation. All consumer product use must be sent to the appropriate... blades, blade adapters, bulbs, clutches, clutch drums, filters, guide bars, lubricants, rewind springs, saw crankshafts for commercial/professional use (parts and labor).Saw must be inapplicable to operate or maintain the unit in accordance with Husqvarna XP 2 cycle oil. 90 Day Commercial Warranty: Automatic mower,...
...-equipped with the product information supplied at the owner's residence.) EZ & MZ Zero Turn Riders: 1 year commercial warranty or 600 hours of use except as is to an authorized Husqvarna retailer for evaluation. All consumer product use must be sent to the appropriate... blades, blade adapters, bulbs, clutches, clutch drums, filters, guide bars, lubricants, rewind springs, saw crankshafts for commercial/professional use (parts and labor).Saw must be inapplicable to operate or maintain the unit in accordance with Husqvarna XP 2 cycle oil. 90 Day Commercial Warranty: Automatic mower,...


