Owners Manual
Page 3
... Controls 18 Control Locations 18 Steering Control Levers 19 Parking Brake 20 Throttle Control 20 Blade Switch 20 Ignition Switch 21 Choke Control 21 Fuses 21 Fuel Tank 22 Fuel Shut Off Valve 23 Hour Meter 24 Tracking Knob 24 Operation 25 Training 25 Steering 25 Before Starting 26 Starting the Engine 26 Jumper cables 30 Running 31 Operating on hills 32 Mowing Tips 33 Stopping the Engine 34 Pump release valves 35 Maintenance 36 Maintenance Schedule 36 Battery 38 Ignition System 39 Safety System 39 Engine Cooling Air...
... Controls 18 Control Locations 18 Steering Control Levers 19 Parking Brake 20 Throttle Control 20 Blade Switch 20 Ignition Switch 21 Choke Control 21 Fuses 21 Fuel Tank 22 Fuel Shut Off Valve 23 Hour Meter 24 Tracking Knob 24 Operation 25 Training 25 Steering 25 Before Starting 26 Starting the Engine 26 Jumper cables 30 Running 31 Operating on hills 32 Mowing Tips 33 Stopping the Engine 34 Pump release valves 35 Maintenance 36 Maintenance Schedule 36 Battery 38 Ignition System 39 Safety System 39 Engine Cooling Air...
Owners Manual
Page 13
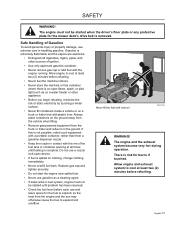
... light such as on a truck or trailer bed with the engine running. If this is removed. The engine and the exhaust system become very hot during operation. The engine must not be started until fueling is extremely flammable and the vapors are explosive. • Extinguish all times until problem has been resolved. • Check the fuel level before refueling. Gasoline is complete. Replace gas cap and tighten...
... light such as on a truck or trailer bed with the engine running. If this is removed. The engine and the exhaust system become very hot during operation. The engine must not be started until fueling is extremely flammable and the vapors are explosive. • Extinguish all times until problem has been resolved. • Check the fuel level before refueling. Gasoline is complete. Replace gas cap and tighten...
Owners Manual
Page 14
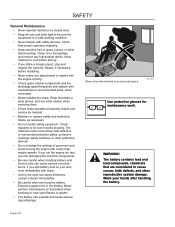
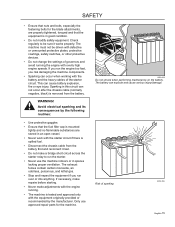
Clean oil or fuel spillage and remove any adjustments or repairs with the engine running the engine with overly high engine speeds. Never drive the machine in the battery. The battery contains lead and lead compounds, chemicals that are sharp. Wrap the blade or wear gloves, and use extra caution when servicing them. • Check brake operation frequently. The machine must not be sure the equipment is in safe working condition...
Clean oil or fuel spillage and remove any adjustments or repairs with the engine running the engine with overly high engine speeds. Never drive the machine in the battery. The battery contains lead and lead compounds, chemicals that are sharp. Wrap the blade or wear gloves, and use extra caution when servicing them. • Check brake operation frequently. The machine must not be sure the equipment is in safe working condition...
Owners Manual
Page 15
If you run the engine too fast, you run the starter. • Never use approved repair parts for the blade attachments, are properly tightened, torqued and that the fuel filler cap is mounted tightly and no flammable substances are stored in an open vessel. • Never work with the starter circuit if there is spilled fuel. • Disconnect the chassis cable from the battery. WARNING! Only use the machine...
If you run the engine too fast, you run the starter. • Never use approved repair parts for the blade attachments, are properly tightened, torqued and that the fuel filler cap is mounted tightly and no flammable substances are stored in an open vessel. • Never work with the starter circuit if there is spilled fuel. • Disconnect the chassis cable from the battery. WARNING! Only use the machine...

Owners Manual
Page 16
... cuts and gashes. Escaping hydraulic oil under pressure can develop if proper medical treatment is desired. • Reduce the risk of deck, avoid spraying engine and electrical components with water. The machine is not intended to the operator. • Load the unit onto truck or trailer by escaping fluid, see a doctor at once. Activate the parking brake, turn off the fuel...
... cuts and gashes. Escaping hydraulic oil under pressure can develop if proper medical treatment is desired. • Reduce the risk of deck, avoid spraying engine and electrical components with water. The machine is not intended to the operator. • Load the unit onto truck or trailer by escaping fluid, see a doctor at once. Activate the parking brake, turn off the fuel...
Owners Manual
Page 25
... mower. First time users should push mower (see "Before Starting" in a forward direction, first pull both control levers forward slightly. This will slow the rotation of the right lever, this section be in the seat, start engine (see "Moving by alternating one lever slightly to suddenly stop moving in Operation section), adjust engine speed to the neutral position and mower should stop . Push forward on control levers to idle, disengage parking brake, do not engage blades...
... mower. First time users should push mower (see "Before Starting" in a forward direction, first pull both control levers forward slightly. This will slow the rotation of the right lever, this section be in the seat, start engine (see "Moving by alternating one lever slightly to suddenly stop moving in Operation section), adjust engine speed to the neutral position and mower should stop . Push forward on control levers to idle, disengage parking brake, do not engage blades...
Owners Manual
Page 26
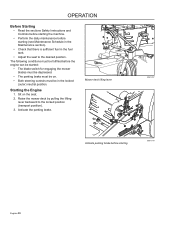
operation Before Starting • Read the sections Safety Instructions and Controls before starting the machine. • Perform the daily maintenance before starting 8061-010 English-26 Sit on . • Both steering controls must be in the fuel tank. • Adjust the seat to the locked position (transport position). 3. Mower deck lifting lever 8061-007 Activate parking brake before the engine can be started: • The blade switch for engaging the mower blades must be depressed. • The...
operation Before Starting • Read the sections Safety Instructions and Controls before starting the machine. • Perform the daily maintenance before starting 8061-010 English-26 Sit on . • Both steering controls must be in the fuel tank. • Adjust the seat to the locked position (transport position). 3. Mower deck lifting lever 8061-007 Activate parking brake before the engine can be started: • The blade switch for engaging the mower blades must be depressed. • The...
Owners Manual
Page 36
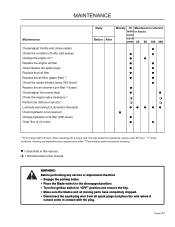
...Check the parking brake Check the engine's oil level (every refueling) Check the safety system Check for fuel and oil leakages Check/clean the engine's cooling air intake Check the mower deck Check for loose hardware (screws, nuts) Clean under the mower deck Start the engine and blades, listen for unusual sounds Check for damage Thoroughly clean around the engine Clean around belts, belt pulleys Check the tire pressures Check battery Sharpen/Replace mower blades...
...Check the parking brake Check the engine's oil level (every refueling) Check the safety system Check for fuel and oil leakages Check/clean the engine's cooling air intake Check the mower deck Check for loose hardware (screws, nuts) Clean under the mower deck Start the engine and blades, listen for unusual sounds Check for damage Thoroughly clean around the engine Clean around belts, belt pulleys Check the tire pressures Check battery Sharpen/Replace mower blades...
Owners Manual
Page 37
...described in this manual WARNING! MAINTENANCE Maintenance Check/adjust throttle and choke cables Check the condition of belts, belt pulleys Change the engine oil 1) Replace the engine oil filter Clean/replace the spark plugs Replace the fuel filter Replace the air filter (paper filter) 2) Check the caster wheels (every 200 hours) Replace the air cleaner's pre-filter 2) (foam) Check/adjust the mower deck Check the engine valve clearance 3) Perform the 300-hour service 3) Lubricate according to "OFF" position and remove the key. • Make sure the blades and all moving parts have completely...
...described in this manual WARNING! MAINTENANCE Maintenance Check/adjust throttle and choke cables Check the condition of belts, belt pulleys Change the engine oil 1) Replace the engine oil filter Clean/replace the spark plugs Replace the fuel filter Replace the air filter (paper filter) 2) Check the caster wheels (every 200 hours) Replace the air cleaner's pre-filter 2) (foam) Check/adjust the mower deck Check the engine valve clearance 3) Perform the 300-hour service 3) Lubricate according to "OFF" position and remove the key. • Make sure the blades and all moving parts have completely...

Owners Manual
Page 38
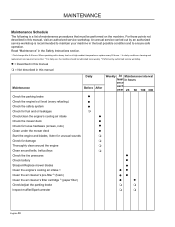
... guard and lift off guard. 5. However, periodic charging of electrolyte is equipped with wire brush until shiny. 5. Clean terminals and battery cable ends with a maintenance free battery and does not need servicing. Coat terminals with an automotive type battery charger will extend its life. • Keep battery and terminals clean. • Keep battery bolts tight. • Recharge at the same time. Adding or checking level of the battery with grease...
... guard and lift off guard. 5. However, periodic charging of electrolyte is equipped with wire brush until shiny. 5. Clean terminals and battery cable ends with a maintenance free battery and does not need servicing. Coat terminals with an automotive type battery charger will extend its life. • Keep battery and terminals clean. • Keep battery bolts tight. • Recharge at the same time. Adding or checking level of the battery with grease...
Owners Manual
Page 39
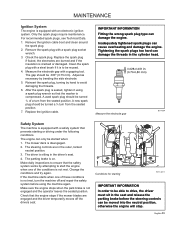
... a gapping tool. The gap should be started when: 1. Inadequately tightened spark plugs can damage the engine. The mower deck is sitting in the driver's seat. 4. The driver is disengaged. 2. Conditions for starting or driving under the following conditions. Remove the ignition cable boot and clean around the spark plug. 2. Check the spark plug. A new spark plug should be reused. 4. IMPORTANT INFORMATION Fitting the wrong spark plug type can cause overheating and damage the engine. Make daily inspections to ensure that the safety...
... a gapping tool. The gap should be started when: 1. Inadequately tightened spark plugs can damage the engine. The mower deck is sitting in the driver's seat. 4. The driver is disengaged. 2. Conditions for starting or driving under the following conditions. Remove the ignition cable boot and clean around the spark plug. 2. Check the spark plug. A new spark plug should be reused. 4. IMPORTANT INFORMATION Fitting the wrong spark plug type can cause overheating and damage the engine. Make daily inspections to ensure that the safety...
Owners Manual
Page 44
... deck. 3. Double check belt routing to make sure it matches the routing decal, and the belt does not have accumulated around the electric clutch pulley that may have any dirt or grass that is properly routed, slowly release idler arm to tension belt. 6. Adjust tension. 8. Carefully roll the belt over stationary idler pulley. Push inward on the engine shaft. 6. Replace belt shields on the belt. 3. Using a ratchet with a 9/16" socket on the spring idler bolt to the routing...
... deck. 3. Double check belt routing to make sure it matches the routing decal, and the belt does not have accumulated around the electric clutch pulley that may have any dirt or grass that is properly routed, slowly release idler arm to tension belt. 6. Adjust tension. 8. Carefully roll the belt over stationary idler pulley. Push inward on the engine shaft. 6. Replace belt shields on the belt. 3. Using a ratchet with a 9/16" socket on the spring idler bolt to the routing...
Owners Manual
Page 45
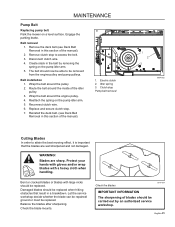
... a level surface. Electric clutch 2. Blades are well sharpened and not damaged. Check the blade mounts. Remove clutch stop to attain the best mowing effect, it is important that result in this section of the idler pulley. 3. Reconnect clutch wire. 6. WARNING! Bent or cracked blades or blades with a heavy cloth when handling. Balance the blades after sharpening. Check the blades IMPORTANT INFORMATION The sharpening of the manual). 1. Wrap the belt around the engine pulley. 4. Idler spring 3. Remove...
... a level surface. Electric clutch 2. Blades are well sharpened and not damaged. Check the blade mounts. Remove clutch stop to attain the best mowing effect, it is important that result in this section of the idler pulley. 3. Reconnect clutch wire. 6. WARNING! Bent or cracked blades or blades with a heavy cloth when handling. Balance the blades after sharpening. Check the blades IMPORTANT INFORMATION The sharpening of the manual). 1. Wrap the belt around the engine pulley. 4. Idler spring 3. Remove...
Owners Manual
Page 47
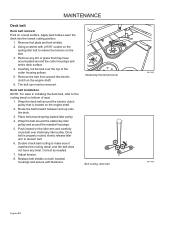
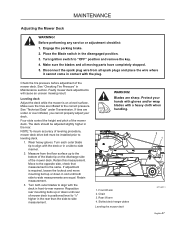
Place the Blade switch in the rear. Check the tire pressure before adjustment of the mower deck. Faulty mower deck adjustments will cause an uneven mowing result. Measure from all moving parts have completely stopped. 5. Front lift arm 2. Chain 3. MAINTENANCE Adjusting the Mower Deck WARNING! Disconnect the spark plug wire from the floor surface up to the bottom of mower deck is required, loosen the locknut and move mounting bolt up or down in the rear than the...
Place the Blade switch in the rear. Check the tire pressure before adjustment of the mower deck. Faulty mower deck adjustments will cause an uneven mowing result. Measure from all moving parts have completely stopped. 5. Front lift arm 2. Chain 3. MAINTENANCE Adjusting the Mower Deck WARNING! Disconnect the spark plug wire from the floor surface up to the bottom of mower deck is required, loosen the locknut and move mounting bolt up or down in the rear than the...
Owners Manual
Page 54
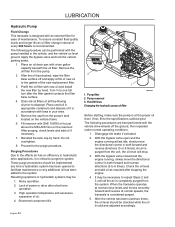
... of oil. 4. Remove the cap from the system. Noisy operation. 2. Fill reservoir with new oil and install the new filter by hand. Purging Procedures Due to the effects air has on efficiency in both forward and reverse directions (5 to the specifications outlined prior. Prefill the oil filter with SAE 10W30 oil to purge the system. With the bypass valve open and the engine running , slowly move the directional control...
... of oil. 4. Remove the cap from the system. Noisy operation. 2. Fill reservoir with new oil and install the new filter by hand. Purging Procedures Due to the effects air has on efficiency in both forward and reverse directions (5 to the specifications outlined prior. Prefill the oil filter with SAE 10W30 oil to purge the system. With the bypass valve open and the engine running , slowly move the directional control...
Owners Manual
Page 55
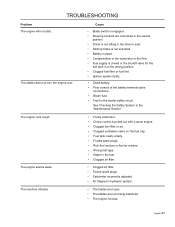
... of the battery terminal cable connections. • Blown fuse. • Fault in the "Maintenance Section" The engine runs rough. English-55 Cause • Blade switch is engaged. • Steering controls are incorrectly balanced. • The engine is pulled out with a warm engine. • Clogged fuel filter or jet. • Clogged ventilation valve on the fuel cap. • Fuel tank nearly empty. • Fouled spark plugs. • Rich fuel mixture or fuel-air mixture. • Wrong fuel type. •...
... of the battery terminal cable connections. • Blown fuse. • Fault in the "Maintenance Section" The engine runs rough. English-55 Cause • Blade switch is engaged. • Steering controls are incorrectly balanced. • The engine is pulled out with a warm engine. • Clogged fuel filter or jet. • Clogged ventilation valve on the fuel cap. • Fuel tank nearly empty. • Fouled spark plugs. • Rich fuel mixture or fuel-air mixture. • Wrong fuel type. •...
Owners Manual
Page 56
... come loose from the cable contact. • Blown fuse. • Damaged seals, housing, or gaskets. • Air trapped in hydraulic system. Mower deck not engaging. Uneven mowing results. • Unequal tire pressure on the left and right sides. • Bent blades. • Suspension for the mower deck is uneven. • Blades are dull. • Driving speed too high. • Grass is disconnected. • Parking brake on. • Bypass valve on pump open. • Drive belt for...
... come loose from the cable contact. • Blown fuse. • Damaged seals, housing, or gaskets. • Air trapped in hydraulic system. Mower deck not engaging. Uneven mowing results. • Unequal tire pressure on the left and right sides. • Bent blades. • Suspension for the mower deck is uneven. • Blades are dull. • Driving speed too high. • Grass is disconnected. • Parking brake on. • Bypass valve on pump open. • Drive belt for...
Owners Manual
Page 57
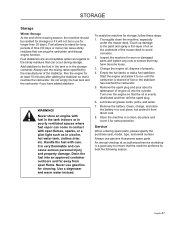
.... Remove the spark plug and pour about a tablespoon of engine oil into an approved container outdoors and far away from direct cold. 8. Remove the battery. English-57 Handle the fuel with open flame. Use a degreaser and warm water instead. Never store an engine with fuel in the tank indoors or in poorly ventilated spaces where fuel vapor can plug the carburetor and disrupt engine function. It is drained...
.... Remove the spark plug and pour about a tablespoon of engine oil into an approved container outdoors and far away from direct cold. 8. Remove the battery. English-57 Handle the fuel with open flame. Use a degreaser and warm water instead. Never store an engine with fuel in the tank indoors or in poorly ventilated spaces where fuel vapor can plug the carburetor and disrupt engine function. It is drained...

Owners Manual
Page 72
Change the engine oil (50 hours). 5. Change the fuel filter (100 hours). 10. Clean the cooling fins (100 hours). 11. SERVICE JOURNAL Action At Least Once Each Year 1. Replace the air filter's paper cartridge. 4. Replace the engine oil filter (100 hours). 6. Clean/Change the spark plugs (100 hours). 9. Date, mtr reading, stamp, sign English-72 Check/adjust the parking brake (50 hours). 8. Check/adjust the cutting height. 7. Replace the air cleaner's pre-filter (foam) (300 hours). 3. Clean the engine's cooling...
Change the engine oil (50 hours). 5. Change the fuel filter (100 hours). 10. Clean the cooling fins (100 hours). 11. SERVICE JOURNAL Action At Least Once Each Year 1. Replace the air filter's paper cartridge. 4. Replace the engine oil filter (100 hours). 6. Clean/Change the spark plugs (100 hours). 9. Date, mtr reading, stamp, sign English-72 Check/adjust the parking brake (50 hours). 8. Check/adjust the cutting height. 7. Replace the air cleaner's pre-filter (foam) (300 hours). 3. Clean the engine's cooling...
Owners Manual
Page 76
... ultraviolet light; (3) Engine and drive systems not manufactured by calling 1-800HUSKY62 for parts or labor if a component fails because of the Retailer Warranty Policy & Procedure Manual. REPAIR OR REPLACEMENT AS PROVIDED UNDER THIS WARRANTY IS THE EXCLUSIVE REMEDY OF THE PURCHASER. Should an operational problem or failure occur, the product should be used, but not limited to, belts, blades, blade adapters, bulbs, clutches, clutch drums, filters, guide bars, lubricants, rewind springs, saw...
... ultraviolet light; (3) Engine and drive systems not manufactured by calling 1-800HUSKY62 for parts or labor if a component fails because of the Retailer Warranty Policy & Procedure Manual. REPAIR OR REPLACEMENT AS PROVIDED UNDER THIS WARRANTY IS THE EXCLUSIVE REMEDY OF THE PURCHASER. Should an operational problem or failure occur, the product should be used, but not limited to, belts, blades, blade adapters, bulbs, clutches, clutch drums, filters, guide bars, lubricants, rewind springs, saw...


