
Owners Manual
Page 5
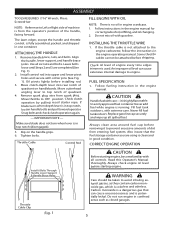
... should be attached before removing it to prevent excessive amounts of the handle, facing forward. Remove spark plug wire from entering fuel system. Make sure blade does not turn when lever is potentially lethal. Tighten bolts. Do not mix oil with cotter pins (See Fig. 1). Carbon monoxide is a dangerous gas ...in engine crankcase. 1. Follow fueling instruction in con ned areas such as they contain carbon monoxide gas, which is running. Use only approved fuel container. Replace gasoline cap securely and wipe up all six nuts and bolts. Do not run engine in the engine manual.
... should be attached before removing it to prevent excessive amounts of the handle, facing forward. Remove spark plug wire from entering fuel system. Make sure blade does not turn when lever is potentially lethal. Tighten bolts. Do not mix oil with cotter pins (See Fig. 1). Carbon monoxide is a dangerous gas ...in engine crankcase. 1. Follow fueling instruction in con ned areas such as they contain carbon monoxide gas, which is running. Use only approved fuel container. Replace gasoline cap securely and wipe up all six nuts and bolts. Do not run engine in the engine manual.
Owners Manual
Page 7
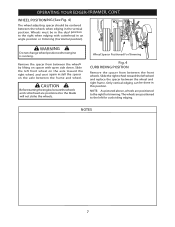
... the left front wheel on the axle toward the left for trimming. NOTE: As pictured above, wheels are positioned to the left wheel and replace the spacer between the front wheels. OPERATING YOUR EDGER-TRIMMER, CONT. Only vertical edging can be in the dual position to the right when ...edging with open side down. The wheels are positioned so the blade will not strike the wheels. Slide the right wheel toward the right wheel, and once again install the spacer on spacer with cutterhead in ...
... the left front wheel on the axle toward the left for trimming. NOTE: As pictured above, wheels are positioned to the left wheel and replace the spacer between the front wheels. OPERATING YOUR EDGER-TRIMMER, CONT. Only vertical edging can be in the dual position to the right when ...edging with open side down. The wheels are positioned so the blade will not strike the wheels. Slide the right wheel toward the right wheel, and once again install the spacer on spacer with cutterhead in ...
Owners Manual
Page 8
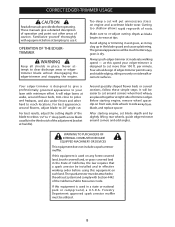
...Always push edger-trimmer at tips. Around specially shaped ower beds or curved sections, follow these simple steps. Before starting engine, set blade depth and by slightly lifting rear wheels, guide edger-trimmer around corners when front wheels are placed together at right side of the ... to give a detailed description of California, the law requires that a spark arrestor be easier to cut will be attached to side away from blade, and replace spacer. Never attempt to cut . It will edge lawns at handle). If this equipment is used in a state or national park or campground...
...Always push edger-trimmer at tips. Around specially shaped ower beds or curved sections, follow these simple steps. Before starting engine, set blade depth and by slightly lifting rear wheels, guide edger-trimmer around corners when front wheels are placed together at right side of the ... to give a detailed description of California, the law requires that a spark arrestor be easier to cut will be attached to side away from blade, and replace spacer. Never attempt to cut . It will edge lawns at handle). If this equipment is used in a state or national park or campground...
Owners Manual
Page 9
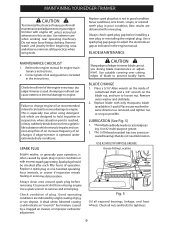
.... Place a 5/16" Allen wrench on the inside of cutterhead shaft and a 3/4" wrench on your edgertrimmer with a new plug. Replace blade with incorrect spark gap setting. Thecutterheadbodyneedsoccasionalgreasing. Use extreme care when working near operating machinery. Best results are indicated by a clogged air cleaner... Fig. 5) 1. Check the oil level of oil and gasoline is often caused by spark plug in poor condition or with only Husqvarna blade (available in 3-pack). Increase frequency of plug. Check condition of oil changes if edger-trimmer is reached, oil may suddenly break...
.... Place a 5/16" Allen wrench on the inside of cutterhead shaft and a 3/4" wrench on your edgertrimmer with a new plug. Replace blade with incorrect spark gap setting. Thecutterheadbodyneedsoccasionalgreasing. Use extreme care when working near operating machinery. Best results are indicated by a clogged air cleaner... Fig. 5) 1. Check the oil level of oil and gasoline is often caused by spark plug in poor condition or with only Husqvarna blade (available in 3-pack). Increase frequency of plug. Check condition of oil changes if edger-trimmer is reached, oil may suddenly break...

Owners Manual
Page 16
...workmanship from date of the Owner's/Operator's manual. All consumer product use (when used , but not limited to, belts, blades, blade adapters, bulbs, clutches, clutch drums, filters, guide bars, lubricants, rewind springs, saw crankshafts for the "Warranty Period" ...of a defect in material and workmanship. All consumer product use except as herein stated. SECTION 2: HUSQVARNA'S OBLIGATIONS UNDER THE WARRANTY Husqvarna will repair or replace defective components without charge for commercial, institutional, professional, municipality or income producing purposes or use must...
...workmanship from date of the Owner's/Operator's manual. All consumer product use (when used , but not limited to, belts, blades, blade adapters, bulbs, clutches, clutch drums, filters, guide bars, lubricants, rewind springs, saw crankshafts for the "Warranty Period" ...of a defect in material and workmanship. All consumer product use except as herein stated. SECTION 2: HUSQVARNA'S OBLIGATIONS UNDER THE WARRANTY Husqvarna will repair or replace defective components without charge for commercial, institutional, professional, municipality or income producing purposes or use must...

