
Owners Manual
Page 2
.... I P M E N T. CHILDREN • Clear the area of accessories. Always look behind and down and behind the handle when the engine (motor) is running machine unattended. Material may have similar laws. Carefully read and follow all instructions on or near or under the influence of ... GENERAL OPERATION • Read, understand, and follow all times. • Only allow children to cause cancer and birth defects or other engine parts become extremely hot during operation and remain hot after handling. Never assume that children be used , it cannot come in the manual(s)...
.... I P M E N T. CHILDREN • Clear the area of accessories. Always look behind and down and behind the handle when the engine (motor) is running machine unattended. Material may have similar laws. Carefully read and follow all instructions on or near or under the influence of ... GENERAL OPERATION • Read, understand, and follow all times. • Only allow children to cause cancer and birth defects or other engine parts become extremely hot during operation and remain hot after handling. Never assume that children be used , it cannot come in the manual(s)...
Owners Manual
Page 3
...and fall accidents, which could lose your vehicle before restarting. • Never attempt to make adjustments or repairs with the engine (motor) running . • Allow engine to cool before storing. • Stop and inspect the equipment if you are a major factor related to wear, damage... shrubs, trees, or other appliances. • Never fill containers inside a closed area. • Never make wheel height adjustments while the engine is generally a warning of 15°. • Wear proper Personal Protective Equipment (PPE) while operating this is complete. Always be sure ...
...and fall accidents, which could lose your vehicle before restarting. • Never attempt to make adjustments or repairs with the engine (motor) running . • Allow engine to cool before storing. • Stop and inspect the equipment if you are a major factor related to wear, damage... shrubs, trees, or other appliances. • Never fill containers inside a closed area. • Never make wheel height adjustments while the engine is generally a warning of 15°. • Wear proper Personal Protective Equipment (PPE) while operating this is complete. Always be sure ...
Owners Manual
Page 4
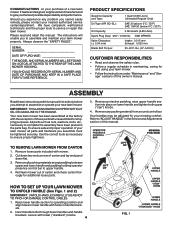
... problem you assemble must be adjusted for and using your lawn mower properly. IMPORTANT: THIS LAWN MOWER IS SHIPPED WITHOUT OIL OR GASOLINE IN THE ENGINE. Use the correct tools as nuts, washers, bolts, etc., necessary to complete the assembly have competent, well-trained technicians and the proper tools to operating...
... problem you assemble must be adjusted for and using your lawn mower properly. IMPORTANT: THIS LAWN MOWER IS SHIPPED WITHOUT OIL OR GASOLINE IN THE ENGINE. Use the correct tools as nuts, washers, bolts, etc., necessary to complete the assembly have competent, well-trained technicians and the proper tools to operating...
Owners Manual
Page 5
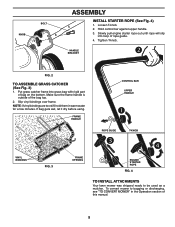
...T-knob. 2. Tighten T-knob. Slip vinyl bindings over frame. FRAME HANDLE CONTROL BAR UPPER HANDLE ROPE GUIDE T-KNOB VINYL BINDINGS FIG. 3 FRAME OPENING ENGINE STARTER ROPE FIG. 4 TO INSTALL ATTACHMENTS Your lawn mower was shipped ready to bagging or discharging, see "TO CONVERT MOWER" in warm water for...minutes. HANDLE BRACKET FIG. 2 TO ASSEMBLE GRASS CATCHER (See Fig. 3) 1. If bag gets wet, let it dry before using. Slowly pull engine starter rope out until rope will slip into grass bag with rigid part of this manual. 5 KNOB BOLT ASSEMBLY INSTALL STARTER ROPE (See Fig. 4)...
...T-knob. 2. Tighten T-knob. Slip vinyl bindings over frame. FRAME HANDLE CONTROL BAR UPPER HANDLE ROPE GUIDE T-KNOB VINYL BINDINGS FIG. 3 FRAME OPENING ENGINE STARTER ROPE FIG. 4 TO INSTALL ATTACHMENTS Your lawn mower was shipped ready to bagging or discharging, see "TO CONVERT MOWER" in warm water for...minutes. HANDLE BRACKET FIG. 2 TO ASSEMBLE GRASS CATCHER (See Fig. 3) 1. If bag gets wet, let it dry before using. Slowly pull engine starter rope out until rope will slip into grass bag with rigid part of this manual. 5 KNOB BOLT ASSEMBLY INSTALL STARTER ROPE (See Fig. 4)...
Owners Manual
Page 6
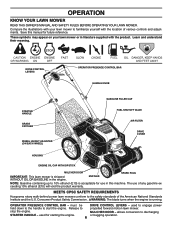
...KNOB STARTER HANDLE GRASS CATCHER WHEEL HEIGHT ADJUSTER (ON EACH WHEEL) GASOLINE FILLER CAP FUEL SHUTOFF VALVE AIR FILTER DRIVE COVER HOUSING ENGINE OIL CAP WITH DIPSTICK MULCHER DOOR IMPORTANT: This lawn mower is shipped WITHOUT OIL OR GASOLINE in literature supplied with the product... BAR - STARTER HANDLE - allows conversion to the safety standards of the American National Standards Institute and the U.S. MEETS CPSC SAFETY REQUIREMENTS Husqvarna rotary walk-behind power lawn mowers conform to discharging or bagging operation. must be held down to the handle to 10% ethanol (E10...
...KNOB STARTER HANDLE GRASS CATCHER WHEEL HEIGHT ADJUSTER (ON EACH WHEEL) GASOLINE FILLER CAP FUEL SHUTOFF VALVE AIR FILTER DRIVE COVER HOUSING ENGINE OIL CAP WITH DIPSTICK MULCHER DOOR IMPORTANT: This lawn mower is shipped WITHOUT OIL OR GASOLINE in literature supplied with the product... BAR - STARTER HANDLE - allows conversion to the safety standards of the American National Standards Institute and the U.S. MEETS CPSC SAFETY REQUIREMENTS Husqvarna rotary walk-behind power lawn mowers conform to discharging or bagging operation. must be held down to the handle to 10% ethanol (E10...
Owners Manual
Page 7
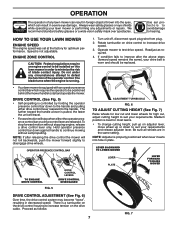
... system may become "loose", resulting in plate. Use ear protectors to avoid damage to test drive speed. ENGINE ZONE CONTROL CAUTION: Federal regulations require an engine control to be positioned behind the mower handle to start and operate the mower. Do not under any lawn... The further toward the handle a lever is controlled by holding the operator presence control bar down against handle to continue mowing without stopping engine, release a drive control lever only. Hold operator presence control bar down to the handle and pulling either the operator presence control bar ...
... system may become "loose", resulting in plate. Use ear protectors to avoid damage to test drive speed. ENGINE ZONE CONTROL CAUTION: Federal regulations require an engine control to be positioned behind the mower handle to start and operate the mower. Do not under any lawn... The further toward the handle a lever is controlled by holding the operator presence control bar down against handle to continue mowing without stopping engine, release a drive control lever only. Hold operator presence control bar down to the handle and pulling either the operator presence control bar ...
Owners Manual
Page 9
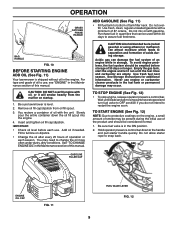
... in the fuel tank or permanent damage may need to change the oil more often under dusty, dirty conditions. BAG HANDLE FIG. 10 BEFORE STARTING ENGINE ADD OIL (See Fig. 11) Your lawnmower is shipped without oil in the ON position. 2. Insert and tighten oil fill cap/dipstick. Fill to full... a container of the product and should be used within 30 days to snap back. Wait until the fuel lines and carburetor are empty. TO START ENGINE (See Fig. 12) NOTE: Due to separation and formation of 30 days or longer. Hold operator presence control bar down the oil fill spout into...
... in the fuel tank or permanent damage may need to change the oil more often under dusty, dirty conditions. BAG HANDLE FIG. 10 BEFORE STARTING ENGINE ADD OIL (See Fig. 11) Your lawnmower is shipped without oil in the ON position. 2. Insert and tighten oil fill cap/dipstick. Fill to full... a container of the product and should be used within 30 days to snap back. Wait until the fuel lines and carburetor are empty. TO START ENGINE (See Fig. 12) NOTE: Due to separation and formation of 30 days or longer. Hold operator presence control bar down the oil fill spout into...
Owners Manual
Page 10
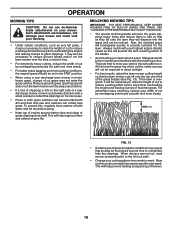
... action of the blades. • Avoid cutting your lawn when it is overgrown it may be mulched a second time to keep from overloading the engine and leaving clumps of the grass blades (See Fig. 13). MULCHING MOWING TIPS IMPORTANT: FOR BEST PERFORMANCE, KEEP MOWER HOUSING FREE OF BUILT-UP ...OF THIS MANUAL. • The special mulching blade will damage your mower and could void your cutting pattern from week to keep from overloading the engine and leaving clumps of clippings is the early afternoon. Always mulch with your lawn is left on the next pass. • Pores in cloth...
... action of the blades. • Avoid cutting your lawn when it is overgrown it may be mulched a second time to keep from overloading the engine and leaving clumps of the grass blades (See Fig. 13). MULCHING MOWING TIPS IMPORTANT: FOR BEST PERFORMANCE, KEEP MOWER HOUSING FREE OF BUILT-UP ...OF THIS MANUAL. • The special mulching blade will damage your mower and could void your cutting pattern from week to keep from overloading the engine and leaving clumps of clippings is the early afternoon. Always mulch with your lawn is left on the next pass. • Pores in cloth...
Owners Manual
Page 11
...See "LUBRICATION CHART"). GENERAL RECOMMENDATIONS The warranty on this manual. Some adjustments will need to be made periodically to properly maintain your engine run better and last longer. • Follow the maintenance schedule in high outdoor temperatures. 2 - Replace blades more often if ...under Drive Cover *** Check Drive Belt / Pulleys *** Check / Sharpen / Replace Blade Lubrication Clean and Recharge Battery ** Check Engine Oil level Change Engine Oil Clean Air Filter Inspect Muffler Replace Spark Plug Replace Air Filter Paper Cartridge Empty fuel system or add Stabilizer * (if so...
...See "LUBRICATION CHART"). GENERAL RECOMMENDATIONS The warranty on this manual. Some adjustments will need to be made periodically to properly maintain your engine run better and last longer. • Follow the maintenance schedule in high outdoor temperatures. 2 - Replace blades more often if ...under Drive Cover *** Check Drive Belt / Pulleys *** Check / Sharpen / Replace Blade Lubrication Clean and Recharge Battery ** Check Engine Oil level Change Engine Oil Clean Air Filter Inspect Muffler Replace Spark Plug Replace Air Filter Paper Cartridge Empty fuel system or add Stabilizer * (if so...
Owners Manual
Page 12
... any maintenance. Position blade on the engine crankshaft. IMPORTANT: TO ENSURE PROPER ASSEMBLY, CENTER HOLE IN BLADE MUST ALIGN WITH STAR ON BLADE ADAPTER. 4. Be sure the trailing edge of blade (opposite ... the mower. • To check blade balance, you do, be sure they move freely. but if you will cause eventual damage to lawn mower or engine. • The blade can harm rubber. • Avoid stumps, stones, deep ruts, sharp objects and other hazards that the drive belt is inside the tab...
... any maintenance. Position blade on the engine crankshaft. IMPORTANT: TO ENSURE PROPER ASSEMBLY, CENTER HOLE IN BLADE MUST ALIGN WITH STAR ON BLADE ADAPTER. 4. Be sure the trailing edge of blade (opposite ... the mower. • To check blade balance, you do, be sure they move freely. but if you will cause eventual damage to lawn mower or engine. • The blade can harm rubber. • Avoid stumps, stones, deep ruts, sharp objects and other hazards that the drive belt is inside the tab...
Owners Manual
Page 13
...attention is balanced. Remove oil fill cap/dipstick; Rock lawn mower back and forth to retighten oil fill cap/dipstick before starting the engine and after every 25 hours of the blade moves downward, sharpen the heavy end until the blade is if service has been performed ... in cold weather, and you check the oil level. OIL FILL CAP / DIPSTICK UPPER MARK NOTE: Multi-viscosity oils (5W30, 10W30 etc.) improve starting engine. 9. If blade is balanced, it reads full. face. 3. Continue adding small amounts of this manual. MAINTENANCE NOTE: Do not use a nail for ...
...attention is balanced. Remove oil fill cap/dipstick; Rock lawn mower back and forth to retighten oil fill cap/dipstick before starting the engine and after every 25 hours of the blade moves downward, sharpen the heavy end until the blade is if service has been performed ... in cold weather, and you check the oil level. OIL FILL CAP / DIPSTICK UPPER MARK NOTE: Multi-viscosity oils (5W30, 10W30 etc.) improve starting engine. 9. If blade is balanced, it reads full. face. 3. Continue adding small amounts of this manual. MAINTENANCE NOTE: Do not use a nail for ...
Owners Manual
Page 14
... engage the drive system during the washout process. 2. FILTER COVER MUFFLER FIG. 18 Inspect and replace corroded muffler as kerosene, are shown in shortened engine life. 8. CLEAN THE UNDERSIDE OF YOUR MOWER AFTER EACH USE. Connect a garden hose to an area of your lawn mower by using a dirty... air filter. CARTRIDGE 6. Shut off the engine. 7. Spark plug type and gap setting are not to be damaged by scraping to clean the outside of cut grass or another hard surface. ...
... engage the drive system during the washout process. 2. FILTER COVER MUFFLER FIG. 18 Inspect and replace corroded muffler as kerosene, are shown in shortened engine life. 8. CLEAN THE UNDERSIDE OF YOUR MOWER AFTER EACH USE. Connect a garden hose to an area of your lawn mower by using a dirty... air filter. CARTRIDGE 6. Shut off the engine. 7. Spark plug type and gap setting are not to be damaged by scraping to clean the outside of cut grass or another hard surface. ...
Owners Manual
Page 15
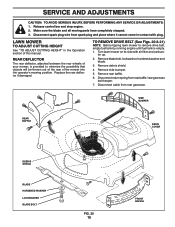
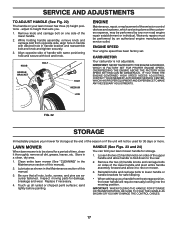
.... 2. TO REMOVE DRIVE BELT (See Figs. 20 & 21) NOTE: Before tipping lawn mower to remove drive belt, empty fuel tank by running engine until fuel tank is provided to minimize the possibility that objects will be thrown out of the rear of the mower into the operator's mowing ... FIG. 20 15 FRONT BAFFLE SERVICE AND ADJUSTMENTS CAUTION: TO AVOID SERIOUS INJURY, BEFORE PERFORMING ANY SERVICE OR ADJUSTMENTS: 1. Release control bar and stop engine. 2. Make sure the blade and all moving parts have completely stopped. 3. Disconnect spark plug wire from spark plug and place where it cannot come ...
.... 2. TO REMOVE DRIVE BELT (See Figs. 20 & 21) NOTE: Before tipping lawn mower to remove drive belt, empty fuel tank by running engine until fuel tank is provided to minimize the possibility that objects will be thrown out of the rear of the mower into the operator's mowing ... FIG. 20 15 FRONT BAFFLE SERVICE AND ADJUSTMENTS CAUTION: TO AVOID SERIOUS INJURY, BEFORE PERFORMING ANY SERVICE OR ADJUSTMENTS: 1. Release control bar and stop engine. 2. Make sure the blade and all moving parts have completely stopped. 3. Disconnect spark plug wire from spark plug and place where it cannot come ...
Owners Manual
Page 16
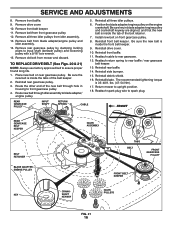
... 12. Remove front baffle. 9. Remove front belt keeper. 11. Reinstall rear gearcase pulley. 3. Route new belt through hole in blade adapter/engine pulley and crankshaft keyway are aligned; Be sure key in housing to input shaft (beneath pulley) and loosening pulley with a 9/16" box ... belt on rear gearcase pulley. Remove belt from idler assembly. 13. Reinstall front belt keeper. Reattach spark plug wire to blade adapter/ engine pulley. 5. IDLER PULLEYS KEY SHAFT KEYWAY FIG. 21 16 Remove rear gearcase pulley by clamping locking pliars to front gearcase pulley. 4. ...
... 12. Remove front baffle. 9. Remove front belt keeper. 11. Reinstall rear gearcase pulley. 3. Route new belt through hole in blade adapter/engine pulley and crankshaft keyway are aligned; Be sure key in housing to input shaft (beneath pulley) and loosening pulley with a 9/16" box ... belt on rear gearcase pulley. Remove belt from idler assembly. 13. Reinstall front belt keeper. Reattach spark plug wire to blade adapter/ engine pulley. 5. IDLER PULLEYS KEY SHAFT KEYWAY FIG. 21 16 Remove rear gearcase pulley by clamping locking pliars to front gearcase pulley. 4. ...
Owners Manual
Page 17
...are securely fastened. Lubricate as shown in a clean, dry area. 1. sand lightly before painting. KNOB HANDLE BRACKET BOLT HIGH MEDIUM LOW ENGINE Maintenance, repair, or replacement of this manual). 2. CARBURETOR Your carburetor is to lower handle or handle brackets for safe keeping. •...bracket and reassemble bolt and knob and tighten securely. 3. Reinstall knobs and carriage bolts to be performed by any non-road engine repair establishment or individual. While holding handle assembly, remove knob and carriage bolt from the storage position, the lower handle will ...
...are securely fastened. Lubricate as shown in a clean, dry area. 1. sand lightly before painting. KNOB HANDLE BRACKET BOLT HIGH MEDIUM LOW ENGINE Maintenance, repair, or replacement of this manual). 2. CARBURETOR Your carburetor is to lower handle or handle brackets for safe keeping. •...bracket and reassemble bolt and knob and tighten securely. 3. Reinstall knobs and carriage bolts to be performed by any non-road engine repair establishment or individual. While holding handle assembly, remove knob and carriage bolt from the storage position, the lower handle will ...
Owners Manual
Page 18
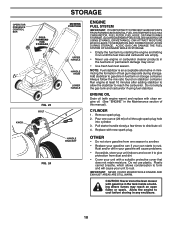
... alternative in fuel tank or storage container. Add stabilizer to give protection from one ounce (29 ml) of this manual). ENGINE OIL Drain oil (with engine warm) and replace with a suitable protective cover that does not retain moisture. Plastic cannot breathe, which allows condensation to form...CONTROL BAR FOLD FORWARD FOR STORAGE KNOB FIG. 23 BOLT FIG. 24 STORAGE MOWING POSITION UPPER HANDLE HANDLE KNOB LOWER HANDLE HANDLE BRACKET ENGINE FUEL SYSTEM IMPORTANT: IT IS IMPORTANT TO PREVENT GUM DEPOSITS FROM FORMING IN ESSENTIAL FUEL SYSTEM PARTS SUCH AS CARBURETOR, FUEL FILTER, ...
... alternative in fuel tank or storage container. Add stabilizer to give protection from one ounce (29 ml) of this manual). ENGINE OIL Drain oil (with engine warm) and replace with a suitable protective cover that does not retain moisture. Plastic cannot breathe, which allows condensation to form...CONTROL BAR FOLD FORWARD FOR STORAGE KNOB FIG. 23 BOLT FIG. 24 STORAGE MOWING POSITION UPPER HANDLE HANDLE KNOB LOWER HANDLE HANDLE BRACKET ENGINE FUEL SYSTEM IMPORTANT: IT IS IMPORTANT TO PREVENT GUM DEPOSITS FROM FORMING IN ESSENTIAL FUEL SYSTEM PARTS SUCH AS CARBURETOR, FUEL FILTER, ...
Owners Manual
Page 19
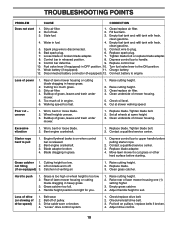
...under mower. 5. Set all wheels at slower walking speed. Excessive vibration 1. Tighten blade bolt. 2. Contact a qualified service center. Bent engine crankshaft. 3. Blade adapter broken. 4. not filling 2. Adjust handle height to pull 1. Drive cable worn or broken. 4. Check/replace drive...tank with fresh, clean gasoline. 4. Bad spark plug. 6. Depress control bar to plug. 6. Loss of drive speed) 1. Bent engine crankshaft. 1. Contact a qualified service center. 3. Replace blade. 3. Put belt on blade worn off of lawn mower housing or ...
...under mower. 5. Set all wheels at slower walking speed. Excessive vibration 1. Tighten blade bolt. 2. Contact a qualified service center. Bent engine crankshaft. 3. Blade adapter broken. 4. not filling 2. Adjust handle height to pull 1. Drive cable worn or broken. 4. Check/replace drive...tank with fresh, clean gasoline. 4. Bad spark plug. 6. Depress control bar to plug. 6. Loss of drive speed) 1. Bent engine crankshaft. 1. Contact a qualified service center. 3. Replace blade. 3. Put belt on blade worn off of lawn mower housing or ...

Owners Manual
Page 20
What is not a condition of warranty service. 2015 www.husqvarna.com/us or www.husqvarna.com/ca 587 70 46-01 Rev. Environmental Protection Agency or similar government agencies. E15, E25, E30, E50, E85), use of ether or similar..., pressure cleaning or steam cleaning the product, excessive dirt, abrasives, salt water, moisture, corrosion, rust, or varnish. Certain components, such as normal wear parts, engines, and transmissions are notified of important product information. We will warrant the product to an authorized Servicing Dealer/Center for warranty service. These are NOT...
What is not a condition of warranty service. 2015 www.husqvarna.com/us or www.husqvarna.com/ca 587 70 46-01 Rev. Environmental Protection Agency or similar government agencies. E15, E25, E30, E50, E85), use of ether or similar..., pressure cleaning or steam cleaning the product, excessive dirt, abrasives, salt water, moisture, corrosion, rust, or varnish. Certain components, such as normal wear parts, engines, and transmissions are notified of important product information. We will warrant the product to an authorized Servicing Dealer/Center for warranty service. These are NOT...
Owners Manual
Page 21
... warrants transmission for the life of two (2) deck shells within the Limited Lifetime Warranty. parts only. Husqvarna warrants the labor in the initial warranty period; For all wheeled products) (9) Engines 180 days 180 days Rato, LCT, Locin 2 years 90 days All Others See Note 5 See Note...Log Splitter (5) Tillers (5) (6) 100, 200, and 300 Series Snow Throwers 2 Years 3 Years 3 Years No Warranty 90 days 90 days Husqvarna Snow Thrower Engines 5 Years 90 days Cast iron impeller and cast iron gear box 10 Years 90 days Robotic Mowers Robotic Mower 2 Years 90 days Battery ...
... warrants transmission for the life of two (2) deck shells within the Limited Lifetime Warranty. parts only. Husqvarna warrants the labor in the initial warranty period; For all wheeled products) (9) Engines 180 days 180 days Rato, LCT, Locin 2 years 90 days All Others See Note 5 See Note...Log Splitter (5) Tillers (5) (6) 100, 200, and 300 Series Snow Throwers 2 Years 3 Years 3 Years No Warranty 90 days 90 days Husqvarna Snow Thrower Engines 5 Years 90 days Cast iron impeller and cast iron gear box 10 Years 90 days Robotic Mowers Robotic Mower 2 Years 90 days Battery ...
Parts List
Page 3
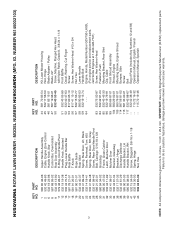
MODEL NUMBER HU800AWDH (MFG. NO. 1 585 85 48-06 2 532 42 49-83 6 532 18 23-98 8 587 68 93-02 9 532 43 ...585 90 08-03 41 532 15 04-06 42 532 19 30-00 43 532 43 81-30 DESCRIPTION Upper Handle Assembly Cable, Engine Zone Control Handle Knob, Star Control Bar, Overmolded Rear Door Assembly E-Ring, Door/Handle Pivot Handle Knob, Standard Plug, Lower Handle Bar... 25.4 mm. ID. NUMBER 96145002103) KEY PART NO. Failure to do so could be hazardous, damage your lawn mower and void your warranty. HUSQVARNA ROTARY LAWN MOWER - NO. 44 581 70 83-54 45 532 17 56-50 46 581 85 15-01 47 587 19 96-01 50...
MODEL NUMBER HU800AWDH (MFG. NO. 1 585 85 48-06 2 532 42 49-83 6 532 18 23-98 8 587 68 93-02 9 532 43 ...585 90 08-03 41 532 15 04-06 42 532 19 30-00 43 532 43 81-30 DESCRIPTION Upper Handle Assembly Cable, Engine Zone Control Handle Knob, Star Control Bar, Overmolded Rear Door Assembly E-Ring, Door/Handle Pivot Handle Knob, Standard Plug, Lower Handle Bar... 25.4 mm. ID. NUMBER 96145002103) KEY PART NO. Failure to do so could be hazardous, damage your lawn mower and void your warranty. HUSQVARNA ROTARY LAWN MOWER - NO. 44 581 70 83-54 45 532 17 56-50 46 581 85 15-01 47 587 19 96-01 50...


