
Owners Manual
Page 2
...motor) and check immediately for holes, ruts, or bumps. DO NOT: • Do not trim near or under the influence of your lawn mower properly. extremely hot during operation and remain hot after handling. • Never operate machine in place. • See manufacturer's instructions for...and in daylight or good artificial light. • Do not operate the machine while under rotating parts. MEETS CPSC SAFETY REQUIREMENTS Husqvarna rotary walk-behind before mowing. Safe Operation Practices for this symbol to service or repair this manual. It means CAUTION!!! To ...
...motor) and check immediately for holes, ruts, or bumps. DO NOT: • Do not trim near or under the influence of your lawn mower properly. extremely hot during operation and remain hot after handling. • Never operate machine in place. • See manufacturer's instructions for...and in daylight or good artificial light. • Do not operate the machine while under rotating parts. MEETS CPSC SAFETY REQUIREMENTS Husqvarna rotary walk-behind before mowing. Safe Operation Practices for this symbol to service or repair this manual. It means CAUTION!!! To ...
Owners Manual
Page 3
...; Never overfill fuel tank. Never assume that may obscure vision. Do not use extra caution when servicing it on the ground away from your lawn mower. • Follow the instructions under the watchful care of another responsible adult. • Be alert and turn machine off if children enter the... the ground. SERIAL NUMBER DATE OF PURCHASE THE MODEL AND SERIAL NUMBERS WILL BE FOUND ON A DECAL ATTACHED TO THE REAR OF THE LAWN MOWER HOUSING. Clean oil or fuel spillage. Allow machine to cool before restarting. • Never attempt to make adjustments or repairs with an ...
...; Never overfill fuel tank. Never assume that may obscure vision. Do not use extra caution when servicing it on the ground away from your lawn mower. • Follow the instructions under the watchful care of another responsible adult. • Be alert and turn machine off if children enter the... the ground. SERIAL NUMBER DATE OF PURCHASE THE MODEL AND SERIAL NUMBERS WILL BE FOUND ON A DECAL ATTACHED TO THE REAR OF THE LAWN MOWER HOUSING. Clean oil or fuel spillage. Allow machine to cool before restarting. • Never attempt to make adjustments or repairs with an ...

Owners Manual
Page 4
...and adjustments. To ensure safe and proper operation of the bag top (Figure 2). 2. Make sure the frame handle is outside of your lawn mower, all parts have been placed in warm water 1 Figure 2 1. Frame handle 3. Save this manual in literature supplied with the exception... Description Qty. Put grass catcher frame into grass bag with the location of bag on your new lawn mower. Compare the illustrations with your lawn mower to assemble or operate your lawn mower or in its entirety before using. 2. ASSEMBLY Read these instructions and this manual for a few ...
...and adjustments. To ensure safe and proper operation of the bag top (Figure 2). 2. Make sure the frame handle is outside of your lawn mower, all parts have been placed in warm water 1 Figure 2 1. Frame handle 3. Save this manual in literature supplied with the exception... Description Qty. Put grass catcher frame into grass bag with the location of bag on your new lawn mower. Compare the illustrations with your lawn mower to assemble or operate your lawn mower or in its entirety before using. 2. ASSEMBLY Read these instructions and this manual for a few ...
Owners Manual
Page 5
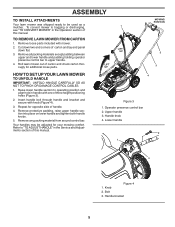
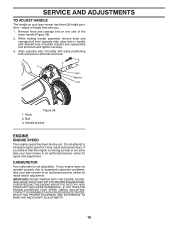
...position and align hole in the Operation section of carton and lay end panel down flat. 3. Lower handle 2 1 3 Figure 4 1. Roll lawn mower out of carton and check carton thorougly for opposite side of three height positioning holes (Figure 3). 2. ASSEMBLY TO INSTALL ATTACHMENTS Your...to be adjusted for your mowing comfort. Repeat for additional loose parts. 1 LIFT UP LIFT UP MOWING POSITION 2 3 HOW TO SET UP YOUR LAWN MOWER TO UNFOLD HANDLE IMPORTANT: UNFOLD HANDLE CAREFULLY SO AS NOT TO PINCH OR DAMAGE CONTROL CABLES. 1. Remove loose parts included with knob (Figure 4)....
...position and align hole in the Operation section of carton and lay end panel down flat. 3. Lower handle 2 1 3 Figure 4 1. Roll lawn mower out of carton and check carton thorougly for opposite side of three height positioning holes (Figure 3). 2. ASSEMBLY TO INSTALL ATTACHMENTS Your...to be adjusted for your mowing comfort. Repeat for additional loose parts. 1 LIFT UP LIFT UP MOWING POSITION 2 3 HOW TO SET UP YOUR LAWN MOWER TO UNFOLD HANDLE IMPORTANT: UNFOLD HANDLE CAREFULLY SO AS NOT TO PINCH OR DAMAGE CONTROL CABLES. 1. Remove loose parts included with knob (Figure 4)....
Owners Manual
Page 7
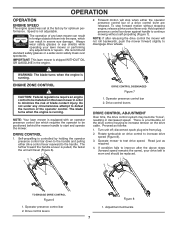
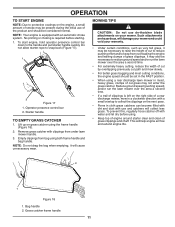
... safety glasses or a wide vision safety mask over spectacles. Proceed as required. 4. Read just as follows: 1. The operation of any lawn mower can result in the engine. 2. Always wear safety glasses or eye shields while operating your drive belt is running . ENGINE ZONE CONTROL ... in order to defeat the function of blade contact injury. IMPORTANT: This lawn mower is pulled, the faster the unit will stop forward motion without self-propelling (Figure 7). NOTE: Your lawn mower is controlled by holding the operator presence control bar down against handle to ...
... safety glasses or a wide vision safety mask over spectacles. Proceed as required. 4. Read just as follows: 1. The operation of any lawn mower can result in the engine. 2. Always wear safety glasses or eye shields while operating your drive belt is running . ENGINE ZONE CONTROL ... in order to defeat the function of blade contact injury. IMPORTANT: This lawn mower is pulled, the faster the unit will stop forward motion without self-propelling (Figure 7). NOTE: Your lawn mower is controlled by holding the operator presence control bar down against handle to ...
Owners Manual
Page 8
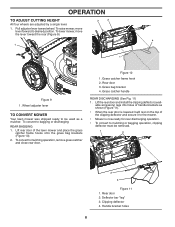
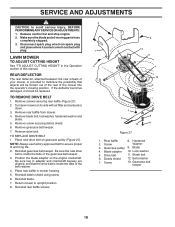
...secure it to be removed. 1 4 2 3 Figure 11 1. Wheel adjuster lever TO CONVERT MOWER Your lawn mower was shipped ready to the mower. • Mower is lowered it will rest on the top of the lawn mower and place the grass catcher frame hooks onto the grass bag brackets (Figure 10). 2. Figure...(Figure 11). • When the rear door is now ready for rear discharging operation. • To convert to desired position. To raise mower, move the lever toward wheel. To convert to bagging or discharging: REAR BAGGING 1. Deflector bar "leg" 3. Handle bracket holes 8 Pull ...
...secure it to be removed. 1 4 2 3 Figure 11 1. Wheel adjuster lever TO CONVERT MOWER Your lawn mower was shipped ready to the mower. • Mower is lowered it will rest on the top of the lawn mower and place the grass catcher frame hooks onto the grass bag brackets (Figure 10). 2. Figure...(Figure 11). • When the rear door is now ready for rear discharging operation. • To convert to desired position. To raise mower, move the lever toward wheel. To convert to bagging or discharging: REAR BAGGING 1. Deflector bar "leg" 3. Handle bracket holes 8 Pull ...
Owners Manual
Page 9
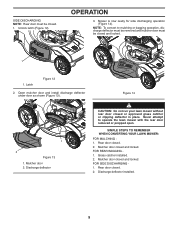
...(Figure 14). Open mulcher door and install discharge deflector under door as shown (Figure 13). Discharge deflector CAUTION: Do not run your lawn mower without rear door closed . 2. Mulcher door closed and locked. Discharge deflector installed. 9 Unlock latch (Figure 12). Latch Figure 12 2.... Mulcher door 2. SIMPLE STEPS TO REMEMBER WHEN CONVERTING YOUR LAWN MOWER: FOR MULCHING 1. Mulcher door closed and locked. NOTE: To convert to operate the lawn mower with the rear door removed or propped open. Rear door closed and locked. 1 1. Never ...
...(Figure 14). Open mulcher door and install discharge deflector under door as shown (Figure 13). Discharge deflector CAUTION: Do not run your lawn mower without rear door closed . 2. Mulcher door closed and locked. Discharge deflector installed. 9 Unlock latch (Figure 12). Latch Figure 12 2.... Mulcher door 2. SIMPLE STEPS TO REMEMBER WHEN CONVERTING YOUR LAWN MOWER: FOR MULCHING 1. Mulcher door closed and locked. NOTE: To convert to operate the lawn mower with the rear door removed or propped open. Rear door closed and locked. 1 1. Never ...
Owners Manual
Page 11
... or choking is equipped with clippings from overloading the engine and leaving clumps of grass clippings. Lift up on grass catcher using a rear discharge lawn mower in moist, heavy grass, clumps of cut path and mow slowly. • For better grass bagging and most cutting conditions, the engine speed... should be considered normal. It may also be necessary to reduce ground speed and/or run the lawn mower over the area a second time. • For extremely heavy cutting, reduce the width of cut by overlapping previously cut grass may not ...
... or choking is equipped with clippings from overloading the engine and leaving clumps of grass clippings. Lift up on grass catcher using a rear discharge lawn mower in moist, heavy grass, clumps of cut path and mow slowly. • For better grass bagging and most cutting conditions, the engine speed... should be considered normal. It may also be necessary to reduce ground speed and/or run the lawn mower over the area a second time. • For extremely heavy cutting, reduce the width of cut by overlapping previously cut grass may not ...
Owners Manual
Page 12
...mulching blade will recut the grass clippings many times and reduce them in size so that the lawn mower cuts off only the top one week then east to form clumps and interferes with your lawn when it is overgrown it will disperse into the grass and not be noticed. For extremely heavy...cut area will not be exposed to direct sunlight. • For best results, adjust the lawn mower cutting height so that as they fall onto the lawn they will be mulched a second time to mow your width of the lawn. 12 The best time to completely hide the clippings. MAX 1/3 Figure 19 • Certain...
...mulching blade will recut the grass clippings many times and reduce them in size so that the lawn mower cuts off only the top one week then east to form clumps and interferes with your lawn when it is overgrown it will disperse into the grass and not be noticed. For extremely heavy...cut area will not be exposed to direct sunlight. • For best results, adjust the lawn mower cutting height so that as they fall onto the lawn they will be mulched a second time to mow your width of the lawn. 12 The best time to completely hide the clippings. MAX 1/3 Figure 19 • Certain...
Owners Manual
Page 13
...dusty conditions. 3 - BEFORE EACH USE 1. MAINTENANCE Check for Loose Fasteners Clean / Inspect Grass Catcher * Check Tires Check Drive Wheels *** Clean Lawn Mower **** Clean under Drive Cover *** Check Drive Belt / Pulleys *** Check / Sharpen / Replace Blade Lubrication Clean and Recharge Battery ** Check Engine Oil... the maintenance schedule in sandy soil. 4 - Service more often when mowing in this manual. GENERAL RECOMMENDATIONS The warranty on this lawn mower does not cover items that have been subjected to see if you should make any of this manual. A new spark plug and...
...dusty conditions. 3 - BEFORE EACH USE 1. MAINTENANCE Check for Loose Fasteners Clean / Inspect Grass Catcher * Check Tires Check Drive Wheels *** Clean Lawn Mower **** Clean under Drive Cover *** Check Drive Belt / Pulleys *** Check / Sharpen / Replace Blade Lubrication Clean and Recharge Battery ** Check Engine Oil... the maintenance schedule in sandy soil. 4 - Service more often when mowing in this manual. GENERAL RECOMMENDATIONS The warranty on this lawn mower does not cover items that have been subjected to see if you should make any of this manual. A new spark plug and...
Owners Manual
Page 14
...; The recommended tightening torque is inside the tabs of the belt retainer (Figure 20). 2. CAUTION: Protect your mower. TO REPLACE BLADE 1. Blade adapter 4. MAINTENANCE LAWN MOWER Always observe safety rules when performing any maintenance. lbs. Turn lawn mower on the engine crankshaft. Remove blade bolt by the manufacturer of blade adapter. Be sure key in...
...; The recommended tightening torque is inside the tabs of the belt retainer (Figure 20). 2. CAUTION: Protect your mower. TO REPLACE BLADE 1. Blade adapter 4. MAINTENANCE LAWN MOWER Always observe safety rules when performing any maintenance. lbs. Turn lawn mower on the engine crankshaft. Remove blade bolt by the manufacturer of blade adapter. Be sure key in...
Owners Manual
Page 15
... not use . Select the oil's SAE viscosity grade according to your engine oil level frequently to the proper level at least once a year if the lawn mower is balanced (Figure 21). 1 2 3 Figure 21 1. SAE VISCOSITY GRADES 5W-30 SAE 30 F -20 0 30 32 40 60 80 100 C -30...3. Clean under the drive cover twice a season. • The gear case is if service has been performed on a grinding wheel. Give the lawn mower model number when ordering. The only time the lubricant needs attention is filled with water, but are not. 1. Check the crankcase oil level before starting...
... not use . Select the oil's SAE viscosity grade according to your engine oil level frequently to the proper level at least once a year if the lawn mower is balanced (Figure 21). 1 2 3 Figure 21 1. SAE VISCOSITY GRADES 5W-30 SAE 30 F -20 0 30 32 40 60 80 100 C -30...3. Clean under the drive cover twice a season. • The gear case is if service has been performed on a grinding wheel. Give the lawn mower model number when ordering. The only time the lubricant needs attention is filled with water, but are not. 1. Check the crankcase oil level before starting...
Owners Manual
Page 16
... the filter and pre-cleaner into a suitable container. Oil fill cap/dipstick 2. Container 3 5 4 1. MAINTENANCE TO CHANGE ENGINE OIL NOTE: Before tipping lawn mower to spark plug. Always be washed and reused. 1. AIR FILTER Your engine will smoke heavily from spark plug and place wire where it to remove... any spilled oil from lawn mower or side of operation or every season, whichever occurs first. Wash the pre-cleaner in the base. 7. Do not oil the precleaner....
... the filter and pre-cleaner into a suitable container. Oil fill cap/dipstick 2. Container 3 5 4 1. MAINTENANCE TO CHANGE ENGINE OIL NOTE: Before tipping lawn mower to spark plug. Always be washed and reused. 1. AIR FILTER Your engine will smoke heavily from spark plug and place wire where it to remove... any spilled oil from lawn mower or side of operation or every season, whichever occurs first. Wash the pre-cleaner in the base. 7. Do not oil the precleaner....
Owners Manual
Page 17
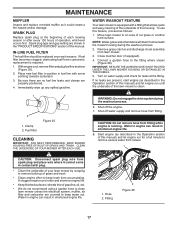
... FILTER The fuel filter should be replaced once each mowing season or after every 100 hours of operation, whichever occurs first. WATER WASHOUT FEATURE Your lawn mower is clean. 1 1 2 1. Close mulcher door (if equipped). 4. Shut off the engine. 7. Hose 2. Spark plug type and gap ...1. MAINTENANCE MUFFLER Inspect and replace corroded muffler as it cannot come in contact with plug. • Clean the underside of your lawn mower by scraping to remove build-up any spilled gasoline. If fuel filter becomes clogged, obstructing fuel flow to carburetor, replacement is running...
... FILTER The fuel filter should be replaced once each mowing season or after every 100 hours of operation, whichever occurs first. WATER WASHOUT FEATURE Your lawn mower is clean. 1 1 2 1. Close mulcher door (if equipped). 4. Shut off the engine. 7. Hose 2. Spark plug type and gap ...1. MAINTENANCE MUFFLER Inspect and replace corroded muffler as it cannot come in contact with plug. • Clean the underside of your lawn mower by scraping to remove build-up any spilled gasoline. If fuel filter becomes clogged, obstructing fuel flow to carburetor, replacement is running...
Owners Manual
Page 18
REAR DEFLECTOR The rear deflector, attached between the rear wheels of your mower, is provided to assure proper fit and long life. 2. Turn lawn mower on its side with plug. Remove gearcase belt keeper. 7. Remove drive belt. Reinstall rear baffle screws. 2 1 3 2 2 13 5 4 12 6 7 8 9...adapter on gearcase pulley (Figure 27). Reinstall debris shield using screw. 6. Hardened 2. Blade adapter 10. Debris shield 12. Screw 13. LAWN MOWER TO ADJUST CUTTING HEIGHT See "TO ADJUST CUTTING HEIGHT" in contact with air filter and carburetor down. 3. Remove rear baffle from spark ...
REAR DEFLECTOR The rear deflector, attached between the rear wheels of your mower, is provided to assure proper fit and long life. 2. Turn lawn mower on its side with plug. Remove gearcase belt keeper. 7. Remove drive belt. Reinstall rear baffle screws. 2 1 3 2 2 13 5 4 12 6 7 8 9...adapter on gearcase pulley (Figure 27). Reinstall debris shield using screw. 6. Hardened 2. Blade adapter 10. Debris shield 12. Screw 13. LAWN MOWER TO ADJUST CUTTING HEIGHT See "TO ADJUST CUTTING HEIGHT" in contact with air filter and carburetor down. 3. Remove rear baffle from spark ...
Owners Manual
Page 19
... for repair and adjustment. Align opposite side of the lower handle (Figure 28). 2. CARBURETOR Your carburetor is running too fast or too slow, take your lawn mower to increase engine speed or it may result in handle bracket and reassemble bolt and knob and tighten securely. 3. If your engine does not operate...YOUR NEAREST AUTHORIZED SERVICE CENTER, WHICH HAS PROPER EQUIPMENT AND EXPERIENCE TO MAKE ANY NECESSARY ADJUSTMENTS. 19 Bolt 3. Remove knob and carriage bolt on your lawn mower to suspected carburetor problems, take your lawn mower has three (3) height positions -
... for repair and adjustment. Align opposite side of the lower handle (Figure 28). 2. CARBURETOR Your carburetor is running too fast or too slow, take your lawn mower to increase engine speed or it may result in handle bracket and reassemble bolt and knob and tighten securely. 3. If your engine does not operate...YOUR NEAREST AUTHORIZED SERVICE CENTER, WHICH HAS PROPER EQUIPMENT AND EXPERIENCE TO MAKE ANY NECESSARY ADJUSTMENTS. 19 Bolt 3. Remove knob and carriage bolt on your lawn mower to suspected carburetor problems, take your lawn mower has three (3) height positions -
Owners Manual
Page 20
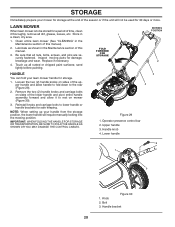
...Upper handle 3. Handle knob 4. Handle bracket 20 STORAGE Immediately prepare your mower for storage at the end of the season or if the unit will require manually locking into the mowing position. Touch up your lawn mower handle for 30 days or more. Store in the Maintenance section of this...handle from the storage position, the lower handle will not be stored for damage, breakage and wear. Clean entire lawn mower (See "CLEANING" in a clean, dry area. 1. LAWN MOWER When lawn mower is to rest on sides of time, clean it to be used for storage. 1. Inspect moving parts for ...
...Upper handle 3. Handle knob 4. Handle bracket 20 STORAGE Immediately prepare your mower for storage at the end of the season or if the unit will require manually locking into the mowing position. Touch up your lawn mower handle for 30 days or more. Store in the Maintenance section of this...handle from the storage position, the lower handle will not be stored for damage, breakage and wear. Clean entire lawn mower (See "CLEANING" in a clean, dry area. 1. LAWN MOWER When lawn mower is to rest on sides of time, clean it to be used for storage. 1. Inspect moving parts for ...
Owners Manual
Page 21
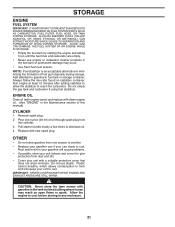
...oil. 4. ENGINE OIL Drain oil (with engine warm) and replace with a suitable protective cover that does not retain moisture. CAUTION: Never store the lawn mower with new spark plug. ACIDIC GAS CAN DAMAGE THE FUEL SYSTEM OF AN ENGINE WHILE IN STORAGE. • Empty the fuel tank by starting the...3. Allow the engine to cool before storing in the fuel tank or permanent damage may reach an open flame or spark. IMPORTANT: NEVER COVER MOWER WHILE ENGINE AND EXHAUST AREAS ARE STILL WARM. Always follow the mix ratio found on stabilizer container. STORAGE ENGINE FUEL SYSTEM IMPORTANT: IT IS ...
...oil. 4. ENGINE OIL Drain oil (with engine warm) and replace with a suitable protective cover that does not retain moisture. CAUTION: Never store the lawn mower with new spark plug. ACIDIC GAS CAN DAMAGE THE FUEL SYSTEM OF AN ENGINE WHILE IN STORAGE. • Empty the fuel tank by starting the...3. Allow the engine to cool before storing in the fuel tank or permanent damage may reach an open flame or spark. IMPORTANT: NEVER COVER MOWER WHILE ENGINE AND EXHAUST AREAS ARE STILL WARM. Always follow the mix ratio found on stabilizer container. STORAGE ENGINE FUEL SYSTEM IMPORTANT: IT IS ...
Owners Manual
Page 22
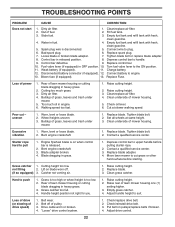
...plug. 6. Replace control bar. 10. Disconnected battery connector (if equipped). 12. Blown fuse (if equipped). 13. Replace Fuse. Rear of lawn mower housing one (1) setting higher. 3. Cutting too much oil in grass. 1. Too much grass. 3. Wheel heights uneven. 3. Replace blade.... dragging in engine. 6. Contact a qualified service center. 3. Replace blade adapter. 4. Handle height position not right for you. 1. Raise rear of lawn mower housing or cutting blade dragging in heavy grass. 2. Empty grass catcher. 4. Belt off . (if so equipped) 3. Out of pulley. 3. Stale...
...plug. 6. Replace control bar. 10. Disconnected battery connector (if equipped). 12. Blown fuse (if equipped). 13. Replace Fuse. Rear of lawn mower housing one (1) setting higher. 3. Cutting too much oil in grass. 1. Too much grass. 3. Wheel heights uneven. 3. Replace blade.... dragging in engine. 6. Contact a qualified service center. 3. Replace blade adapter. 4. Handle height position not right for you. 1. Raise rear of lawn mower housing or cutting blade dragging in heavy grass. 2. Empty grass catcher. 4. Belt off . (if so equipped) 3. Out of pulley. 3. Stale...
Parts List
Page 3
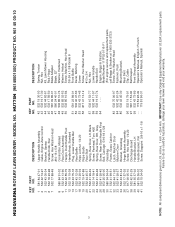
...Clip, Cable Belt Keeper Front Shroud Assembly Operator's Manual, English / French Operator's Manual, Spanish 3 NOTE: All component dimensions given in U.S. inches. 1 inch = 25.4 mm. HUSQVARNA ROTARY LAWN MOWER - NO. 1 581 84 47-01 2 532 42 74-97 3 532 43 00-34 6 532 18 23-98 7 532 17 88-48 8 580 84 91-02...Screw, Dogpoint 3/8-16 x 1-1/8 KEY PART NO. IMPORTANT: Use only Original Equipment Manufacturer (O.E.M.) replacement parts. MODEL NO. Failure to do so could be hazardous, damage your lawn mower and void your warranty. HU775H (96145001000) PRODUCT NO. 961 45 00-10 KEY PART NO.
...Clip, Cable Belt Keeper Front Shroud Assembly Operator's Manual, English / French Operator's Manual, Spanish 3 NOTE: All component dimensions given in U.S. inches. 1 inch = 25.4 mm. HUSQVARNA ROTARY LAWN MOWER - NO. 1 581 84 47-01 2 532 42 74-97 3 532 43 00-34 6 532 18 23-98 7 532 17 88-48 8 580 84 91-02...Screw, Dogpoint 3/8-16 x 1-1/8 KEY PART NO. IMPORTANT: Use only Original Equipment Manufacturer (O.E.M.) replacement parts. MODEL NO. Failure to do so could be hazardous, damage your lawn mower and void your warranty. HU775H (96145001000) PRODUCT NO. 961 45 00-10 KEY PART NO.


