Owners Manual
Page 2
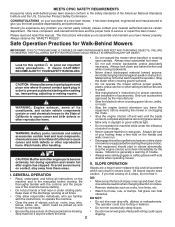
... this symbol to service or repair this manual. CAUTION: Always disconnect spark plug wire and place wire where it . WARNING: Engine exhaust, some of its constituents, and certain vehicle components contain or emit chemicals known to the State of alcohol or drugs. California... defects or other safety protective devices in the manual(s) before cleaning the mower or unclogging the chute. MEETS CPSC SAFETY REQUIREMENTS Husqvarna rotary walk-behind before mowing. Consumer Product Safety Commission. FAILURE TO OBSERVE THE FOLLOWING SAFETY INSTRUCTIONS COULD RESULT IN SERIOUS INJURY OR...
... this symbol to service or repair this manual. CAUTION: Always disconnect spark plug wire and place wire where it . WARNING: Engine exhaust, some of its constituents, and certain vehicle components contain or emit chemicals known to the State of alcohol or drugs. California... defects or other safety protective devices in the manual(s) before cleaning the mower or unclogging the chute. MEETS CPSC SAFETY REQUIREMENTS Husqvarna rotary walk-behind before mowing. Consumer Product Safety Commission. FAILURE TO OBSERVE THE FOLLOWING SAFETY INSTRUCTIONS COULD RESULT IN SERIOUS INJURY OR...
Owners Manual
Page 3
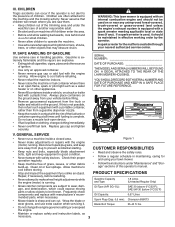
... in effective working order by the operator. V. Disconnect spark plug wire, and keep equipment in contact with a plastic liner. Allow engine to the machine and the mowing activity. Frequently check components and replace with safety devices. lbs. 3 Children are subject to wear,...a spark arrester meeting applicable local or state laws (if any unimproved forest-covered, brush-covered or grass-covered land unless the engine's exhaust system is used on other debris build-up. PRODUCT SPECIFICATIONS Gasoline Capacity and Type: 1,8 Litres (Unleaded Regular Only) Oil...
... in effective working order by the operator. V. Disconnect spark plug wire, and keep equipment in contact with a plastic liner. Allow engine to the machine and the mowing activity. Frequently check components and replace with safety devices. lbs. 3 Children are subject to wear,...a spark arrester meeting applicable local or state laws (if any unimproved forest-covered, brush-covered or grass-covered land unless the engine's exhaust system is used on other debris build-up. PRODUCT SPECIFICATIONS Gasoline Capacity and Type: 1,8 Litres (Unleaded Regular Only) Oil...

Owners Manual
Page 4
... of your lawn mower, all parts have been placed in warm water 1 Figure 2 1. IMPORTANT: THIS LAWN MOWER IS SHIPPED WITHOUT OIL OR GASOLINE IN THE ENGINE. Slip vinyl bindings over frame. ASSEMBLY Read these instructions and this manual for a few minutes. Your new lawn mower has been assembled at the factory...
... of your lawn mower, all parts have been placed in warm water 1 Figure 2 1. IMPORTANT: THIS LAWN MOWER IS SHIPPED WITHOUT OIL OR GASOLINE IN THE ENGINE. Slip vinyl bindings over frame. ASSEMBLY Read these instructions and this manual for a few minutes. Your new lawn mower has been assembled at the factory...
Owners Manual
Page 6
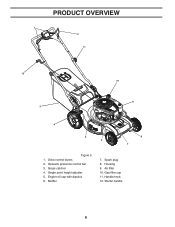
Drive control levers 2. Muffler 7. Engine oil cap with dipstick 6. Air filter 10. Single point height adjuster 5. PRODUCT OVERVIEW 1 2 11 12 10 9 3 4 5 6 8 7 Figure 5 1. Spark plug 8. Gas filler cap 11. Grass catcher 4. Starter handle 6 Housing 9. Operator presence control bar 3. Handle knob 12.
Drive control levers 2. Muffler 7. Engine oil cap with dipstick 6. Air filter 10. Single point height adjuster 5. PRODUCT OVERVIEW 1 2 11 12 10 9 3 4 5 6 8 7 Figure 5 1. Spark plug 8. Gas filler cap 11. Grass catcher 4. Starter handle 6 Housing 9. Operator presence control bar 3. Handle knob 12.
Owners Manual
Page 7
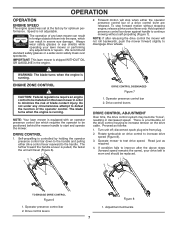
... lever rearward to defeat the function of any adjustments or repairs. The blade turns when the engine is equipped with an operator presence control bar which can result in the engine. 2. Operator presence control bar 2. disconnect spark plug wire from plug. 2. We recommend standard...can result in foreign objects thrown into the eyes, which requires the operator to start and operate the mower. ENGINE ZONE CONTROL CAUTION: Federal regulations require an engine control to be installed on this lawn mower in decreased speed. DRIVE CONTROL 1. DRIVE CONTROL DISENGAGED Figure 7...
... lever rearward to defeat the function of any adjustments or repairs. The blade turns when the engine is equipped with an operator presence control bar which can result in the engine. 2. Operator presence control bar 2. disconnect spark plug wire from plug. 2. We recommend standard...can result in foreign objects thrown into the eyes, which requires the operator to start and operate the mower. ENGINE ZONE CONTROL CAUTION: Federal regulations require an engine control to be installed on this lawn mower in decreased speed. DRIVE CONTROL 1. DRIVE CONTROL DISENGAGED Figure 7...
Owners Manual
Page 10
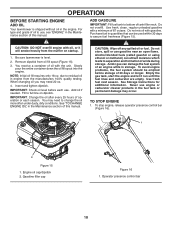
... methanol) can damage the fuel system of oil with oil, or it run until the fuel lines and carburetor are empty. OPERATION BEFORE STARTING ENGINE ADD OIL Your lawnmower is level. 2. Use fresh, clean, regular unleaded gasoline with gasoline. When changing oil you may need 20 oz.... 4. Fill to separation and formation of this manual. See Storage Instructions for additional information. To avoid engine problems, the fuel system should be used within 30 days to change the oil more often under dusty, dirty conditions. Do not overfill. ...
... methanol) can damage the fuel system of oil with oil, or it run until the fuel lines and carburetor are empty. OPERATION BEFORE STARTING ENGINE ADD OIL Your lawnmower is level. 2. Use fresh, clean, regular unleaded gasoline with gasoline. When changing oil you may need 20 oz.... 4. Fill to separation and formation of this manual. See Storage Instructions for additional information. To avoid engine problems, the fuel system should be used within 30 days to change the oil more often under dusty, dirty conditions. Do not overfill. ...
Owners Manual
Page 11
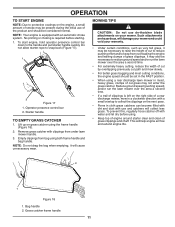
...handle TO EMPTY GRASS CATCHER 1. Such attachments are hazardous, will collect less grass. Operator presence control bar 2. Empty clippings from overloading the engine and leaving clumps of grass clippings. MOWING TIPS CAUTION: Do not use de-thatcher blade attachments on your warranty. • Under certain... mower, mow in a clockwise direction with a small overlap to collect the clippings on grass catcher using . • Keep top of engine around starter clear and clean of cut by overlapping previously cut path and mow slowly. • For better grass bagging and most cutting conditions...
...handle TO EMPTY GRASS CATCHER 1. Such attachments are hazardous, will collect less grass. Operator presence control bar 2. Empty clippings from overloading the engine and leaving clumps of grass clippings. MOWING TIPS CAUTION: Do not use de-thatcher blade attachments on your warranty. • Under certain... mower, mow in a clockwise direction with a small overlap to collect the clippings on grass catcher using . • Keep top of engine around starter clear and clean of cut by overlapping previously cut path and mow slowly. • For better grass bagging and most cutting conditions...
Owners Manual
Page 12
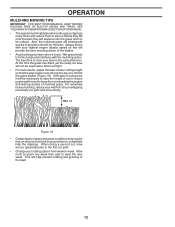
...IMPORTANT: FOR BEST PERFORMANCE, KEEP MOWER HOUSING FREE OF BUILT-UP GRASS AND TRASH. Wet grass tends to form clumps and interferes with your highest engine (blade) speed as they fall onto the lawn they will provide the best recutting action of the lawn. 12 For extremely heavy mulching, reduce... your cutting pattern from overloading the engine and leaving clumps of cut path and mow slowly. The best time to provide nutrients for the lawn. At this will disperse into the ...
...IMPORTANT: FOR BEST PERFORMANCE, KEEP MOWER HOUSING FREE OF BUILT-UP GRASS AND TRASH. Wet grass tends to form clumps and interferes with your highest engine (blade) speed as they fall onto the lawn they will provide the best recutting action of the lawn. 12 For extremely heavy mulching, reduce... your cutting pattern from overloading the engine and leaving clumps of cut path and mow slowly. The best time to provide nutrients for the lawn. At this will disperse into the ...
Owners Manual
Page 13
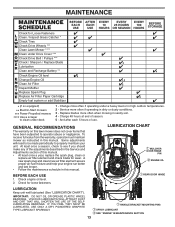
...FEEL THEY MUST BE LUBRICATED, USE ONLY A DRY, POWDERED GRAPHITE TYPE LUBRICANT SPARINGLY. 13 HANDLE BRACKET MOUNTING PINS SPRAY LUBRICANT SEE "ENGINE" IN MAINTENANCE SECTION Charge 48 hours at end of use. VISCOUS LUBRICANTS WILL ATTRACT DUST AND DIRT THAT WILL SHORTEN THE LIFE OF ... under Drive Cover *** Check Drive Belt / Pulleys *** Check / Sharpen / Replace Blade Lubrication Clean and Recharge Battery ** Check Engine Oil level Change Engine Oil Clean Air Filter Inspect Muffler Replace Spark Plug Replace Air Filter Paper Cartridge Empty fuel system or add Stabilizer BEFORE EACH USE ...
...FEEL THEY MUST BE LUBRICATED, USE ONLY A DRY, POWDERED GRAPHITE TYPE LUBRICANT SPARINGLY. 13 HANDLE BRACKET MOUNTING PINS SPRAY LUBRICANT SEE "ENGINE" IN MAINTENANCE SECTION Charge 48 hours at end of use. VISCOUS LUBRICANTS WILL ATTRACT DUST AND DIRT THAT WILL SHORTEN THE LIFE OF ... under Drive Cover *** Check Drive Belt / Pulleys *** Check / Sharpen / Replace Blade Lubrication Clean and Recharge Battery ** Check Engine Oil level Change Engine Oil Clean Air Filter Inspect Muffler Replace Spark Plug Replace Air Filter Paper Cartridge Empty fuel system or add Stabilizer BEFORE EACH USE ...
Owners Manual
Page 14
...washer and hardened washer). 6. Replace adapter if damaged. TO REPLACE BLADE 1. Install debris shield using screw. 3. Position blade on the engine crankshaft. Blade adapter 4. MAINTENANCE LAWN MOWER Always observe safety rules when performing any maintenance. BLADE CARE For best results, mower blade ... washer and hardened washer into blade adapter and crankshaft. 6. and that may be in adapter and crankshaft keyway are up toward the engine. 5. Hardened washer 10. Debris shield 5. Be sure the trailing edge of the belt retainer (Figure 20). 2. Using a blade...
...washer and hardened washer). 6. Replace adapter if damaged. TO REPLACE BLADE 1. Install debris shield using screw. 3. Position blade on the engine crankshaft. Blade adapter 4. MAINTENANCE LAWN MOWER Always observe safety rules when performing any maintenance. BLADE CARE For best results, mower blade ... washer and hardened washer into blade adapter and crankshaft. 6. and that may be in adapter and crankshaft keyway are up toward the engine. 5. Hardened washer 10. Debris shield 5. Be sure the trailing edge of the belt retainer (Figure 20). 2. Using a blade...
Owners Manual
Page 15
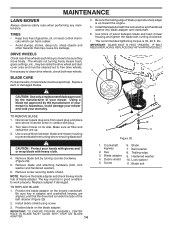
...mower is filled with lubricant to the proper level at the factory. Blade GRASS CATCHER • The grass catcher may appear to avoid possible engine damage from running low on a grinding wheel. Give the lawn mower model number when ordering. The only time the lubricant needs attention is ... the oil after each time you do not recommend sharpening blade - Through normal use . Do not attempt to sharpen while on to lawn mower or engine. • The blade can be sharpened with balancer.) NOTE: Do not use a nail for damage or deterioration. Center hole 2. 5/8" Bolt or pin 3....
...mower is filled with lubricant to the proper level at the factory. Blade GRASS CATCHER • The grass catcher may appear to avoid possible engine damage from running low on a grinding wheel. Give the lawn mower model number when ordering. The only time the lubricant needs attention is ... the oil after each time you do not recommend sharpening blade - Through normal use . Do not attempt to sharpen while on to lawn mower or engine. • The blade can be sharpened with balancer.) NOTE: Do not use a nail for damage or deterioration. Center hole 2. 5/8" Bolt or pin 3....
Owners Manual
Page 16
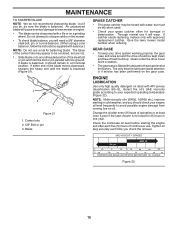
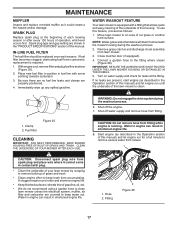
...6. Rock lawn mower back and forth to check the oil level with a new filter. 4. Always be used to retighten oil dipstick before starting engine. 9. CAUTION: Petroleum solvents, such as shown and drain oil into the base. Cover 3. Filter 4. Reconnect spark plug wire to drain oil, ...gently tap the filter on startup. 8. Then allow oil to thoroughly air dry. Do not oil the precleaner. They may cause deterioration of engine (Figure 23). 4. Install the filter and pre-cleaner into a suitable container. Make sure filter fits securely in liquid detergent and water. ...
...6. Rock lawn mower back and forth to check the oil level with a new filter. 4. Always be used to retighten oil dipstick before starting engine. 9. CAUTION: Petroleum solvents, such as shown and drain oil into the base. Cover 3. Filter 4. Reconnect spark plug wire to drain oil, ...gently tap the filter on startup. 8. Then allow oil to thoroughly air dry. Do not oil the precleaner. They may cause deterioration of engine (Figure 23). 4. Install the filter and pre-cleaner into a suitable container. Make sure filter fits securely in liquid detergent and water. ...
Owners Manual
Page 17
...once each mowing season or after every 100 hours of operation, whichever occurs first. Shut off the engine. 7. Water in engine can result in shortened engine life. 1. A clogged engine runs hotter and shortens engine life. • Keep finished surfaces / wheels free of gasoline, oil, etc. • We...covered to clean lawn mower unless the electrical system, muffler, air filter and carburetor are properly positioned. 4. Clamp 2. Water in engine can result in contact with arrow pointing towards carburetor. 3. WATER WASHOUT FEATURE Your lawn mower is equipped with a fitting that ...
...once each mowing season or after every 100 hours of operation, whichever occurs first. Shut off the engine. 7. Water in engine can result in shortened engine life. 1. A clogged engine runs hotter and shortens engine life. • Keep finished surfaces / wheels free of gasoline, oil, etc. • We...covered to clean lawn mower unless the electrical system, muffler, air filter and carburetor are properly positioned. 4. Clamp 2. Water in engine can result in contact with arrow pointing towards carburetor. 3. WATER WASHOUT FEATURE Your lawn mower is equipped with a fitting that ...
Owners Manual
Page 18
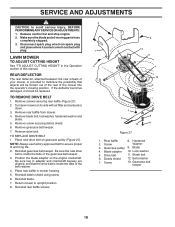
...replaced. Remove screw securing debris shield. 6. Be sure key in contact with air filter and carburetor down. 3. Turn lawn mower on the engine crankshaft. Remove drive belt. TO REPLACE DRIVE BELT 1. Place new drive belt on gearcase pulley (Figure 27). Place rear baffle in the ... shield 12. Be sure the new drive belt is inside the tabs of the belt retainer. 4. Blade bolt 6. Release control bar and stop engine. 2. Return mower to assure proper fit and long life. 2. Hardened 2. Drive belt 11. REAR DEFLECTOR The rear deflector, attached between the ...
...replaced. Remove screw securing debris shield. 6. Be sure key in contact with air filter and carburetor down. 3. Turn lawn mower on the engine crankshaft. Remove drive belt. TO REPLACE DRIVE BELT 1. Place new drive belt on gearcase pulley (Figure 27). Place rear baffle in the ... shield 12. Be sure the new drive belt is inside the tabs of the belt retainer. 4. Blade bolt 6. Release control bar and stop engine. 2. Return mower to assure proper fit and long life. 2. Hardened 2. Drive belt 11. REAR DEFLECTOR The rear deflector, attached between the ...
Owners Manual
Page 19
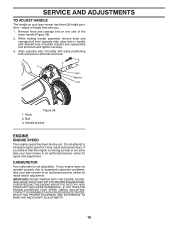
... from opposite side, align hole in handle with bolt and knob. 2 1 High Medium Low 3 Figure 28 1. Bolt 3. Handle bracket ENGINE ENGINE SPEED Your engine speed has been factory set. CARBURETOR Your carburetor is running too fast or too slow, take your lawn mower to an authorized service center...28). 2. Do not attempt to an authorized service center for repair and/or adjustment. If you believe that suits you. 1. If your engine does not operate properly due to suspected carburetor problems, take your lawn mower has three (3) height positions - SERVICE AND ADJUSTMENTS TO ADJUST HANDLE...
... from opposite side, align hole in handle with bolt and knob. 2 1 High Medium Low 3 Figure 28 1. Bolt 3. Handle bracket ENGINE ENGINE SPEED Your engine speed has been factory set. CARBURETOR Your carburetor is running too fast or too slow, take your lawn mower to an authorized service center...28). 2. Do not attempt to an authorized service center for repair and/or adjustment. If you believe that suits you. 1. If your engine does not operate properly due to suspected carburetor problems, take your lawn mower has three (3) height positions - SERVICE AND ADJUSTMENTS TO ADJUST HANDLE...
Owners Manual
Page 21
...If possible, store your can starts to cool before storing in minimizing the formation of fuel gum deposits during storage. Do not use engine or carburetor cleaner products in the Maintenance section of oil through spark plug hole into cylinder. 3. IMPORTANT: NEVER COVER MOWER WHILE... in any enclosure. 21 Always follow the mix ratio found on stabilizer container. Replace with gasoline in fuel tank or storage container. STORAGE ENGINE FUEL SYSTEM IMPORTANT: IT IS IMPORTANT TO PREVENT GUM DEPOSITS FROM FORMING IN ESSENTIAL FUEL SYSTEM PARTS SUCH AS CARBURETOR, FUEL FILTER, FUEL ...
...If possible, store your can starts to cool before storing in minimizing the formation of fuel gum deposits during storage. Do not use engine or carburetor cleaner products in the Maintenance section of oil through spark plug hole into cylinder. 3. IMPORTANT: NEVER COVER MOWER WHILE... in any enclosure. 21 Always follow the mix ratio found on stabilizer container. Replace with gasoline in fuel tank or storage container. STORAGE ENGINE FUEL SYSTEM IMPORTANT: IT IS IMPORTANT TO PREVENT GUM DEPOSITS FROM FORMING IN ESSENTIAL FUEL SYSTEM PARTS SUCH AS CARBURETOR, FUEL FILTER, FUEL ...
Owners Manual
Page 22
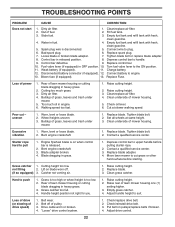
...gasoline. 4. Fuel valve lever (if equipped) in fuel. 4. Charge battery. 12. Connect battery to plug. 6. Cutting too much oil in engine. 6. Dirty air filter. 4. Check oil level. 6. Cut at same height. 3. Replace blade. Excessive vibration 1. Depress control bar to ...spark plug. 7. Turn fuel valve lever to suit. Loss of fuel. 2. Wheel heights uneven. 3. Worn, bent or loose blade. 2. Bent engine crankshaft. 1. Replace blade adapter. 4. Adjust drive control. 22 Fill fuel tank. 3. Water in OFF position. 10. Disconnected battery connector (if ...
...gasoline. 4. Fuel valve lever (if equipped) in fuel. 4. Charge battery. 12. Connect battery to plug. 6. Cutting too much oil in engine. 6. Dirty air filter. 4. Check oil level. 6. Cut at same height. 3. Replace blade. Excessive vibration 1. Depress control bar to ...spark plug. 7. Turn fuel valve lever to suit. Loss of fuel. 2. Wheel heights uneven. 3. Worn, bent or loose blade. 2. Bent engine crankshaft. 1. Replace blade adapter. 4. Adjust drive control. 22 Fill fuel tank. 3. Water in OFF position. 10. Disconnected battery connector (if ...
Owners Manual
Page 23
... Limited Warranty does not cover Emissions control equipment and components to handle warranty adjustments or repairs on engines manufactured by Husqvarna in those separate warranties. Preventative maintenance as described in the operator's manual. The product should be... ARE HEREBY DISCLAIMED. 4. Please refer to any questions concerning transmission / transaxle warranty coverage, contact Husqvarna directly at the Husqvarna Factory. 7. Engines, Transmissions and certain other than that this Limited Warranty. Under this separate warranty statement for the ...
... Limited Warranty does not cover Emissions control equipment and components to handle warranty adjustments or repairs on engines manufactured by Husqvarna in those separate warranties. Preventative maintenance as described in the operator's manual. The product should be... ARE HEREBY DISCLAIMED. 4. Please refer to any questions concerning transmission / transaxle warranty coverage, contact Husqvarna directly at the Husqvarna Factory. 7. Engines, Transmissions and certain other than that this Limited Warranty. Under this separate warranty statement for the ...
Owners Manual
Page 24
...registering your product is your nearest authorized Husqvarna Servicing Dealer, call Husqvarna, at www.husqvarna.com. 11. or (q) Continued use of product, after the repairs have questions concerning this Limited Warranty, you do not meet Engine manufacturer's specifications; (g) Use of ...misuse, neglect, modifications, alterations, normal wear, improper servicing, use of unauthorized attachments, Lack of lubrication or engine failure, due to an authorized Husqvarna Servicing Dealer for the deck shell only mechanical components/parts such as belts, pulleys, spindle housings, bearings,...
...registering your product is your nearest authorized Husqvarna Servicing Dealer, call Husqvarna, at www.husqvarna.com. 11. or (q) Continued use of product, after the repairs have questions concerning this Limited Warranty, you do not meet Engine manufacturer's specifications; (g) Use of ...misuse, neglect, modifications, alterations, normal wear, improper servicing, use of unauthorized attachments, Lack of lubrication or engine failure, due to an authorized Husqvarna Servicing Dealer for the deck shell only mechanical components/parts such as belts, pulleys, spindle housings, bearings,...

Owners Manual
Page 25
... 2 Years All other than Rental Use) Riding Lawn Tractors: Frame, Chassis, Front Axle 5 Years No Warranty Engine* * * Transmission (if made by Husqvarna/Peerless) 3 Years No Warranty Transmission (if third party)** ** ** XLS Models only - Consumer Wheeled Limited Warranty...any commercial, household use only) professional, institutional, agricultural, or Product/Component income producing use, other Pressure Washers (6027PW, 9032PW, 1340PW) Engine* * Pump 2 Years Other Non-Expendable Components 2 Years No Warranty No Warranty 1 Year * 90 days No Warranty * No Warranty ...
... 2 Years All other than Rental Use) Riding Lawn Tractors: Frame, Chassis, Front Axle 5 Years No Warranty Engine* * * Transmission (if made by Husqvarna/Peerless) 3 Years No Warranty Transmission (if third party)** ** ** XLS Models only - Consumer Wheeled Limited Warranty...any commercial, household use only) professional, institutional, agricultural, or Product/Component income producing use, other Pressure Washers (6027PW, 9032PW, 1340PW) Engine* * Pump 2 Years Other Non-Expendable Components 2 Years No Warranty No Warranty 1 Year * 90 days No Warranty * No Warranty ...


