
Owners Manual
Page 2
...the discharge opening at all instructions on slopes. Avoid discharging material against a wall or obstruction. California to service or repair this manual. Always be picked up and thrown by the manufacturer. • Stop the blade(s) when crossing gravel drives, walks, or ...result in daylight or good artificial light. • Do not operate the machine while under rotating parts. The operator could cause slipping. 2 MEETS CPSC SAFETY REQUIREMENTS Husqvarna rotary walk-behind before and while moving backwards. • Never direct discharged material toward the operator...
...the discharge opening at all instructions on slopes. Avoid discharging material against a wall or obstruction. California to service or repair this manual. Always be picked up and thrown by the manufacturer. • Stop the blade(s) when crossing gravel drives, walks, or ...result in daylight or good artificial light. • Do not operate the machine while under rotating parts. The operator could cause slipping. 2 MEETS CPSC SAFETY REQUIREMENTS Husqvarna rotary walk-behind before and while moving backwards. • Never direct discharged material toward the operator...
Owners Manual
Page 3
...mower. • Follow the instructions under "Maintenance" and "Storage" sections of this is not possible, then refuel such equipment with manufacturer's recommended parts, when necessary. • Mower blade is sharp and can occur if the operator is an open device. • If fuel is extremely ...motor) running . Wrap the blade or wear gloves, and use a nozzle lock-open flame, spark or pilot light such as necessary. If this operator's manual. V. Allow machine to be used , it on or near any ). If a spark arrester is complete. lbs. 3 Never assume that may obscure vision...
...mower. • Follow the instructions under "Maintenance" and "Storage" sections of this is not possible, then refuel such equipment with manufacturer's recommended parts, when necessary. • Mower blade is sharp and can occur if the operator is an open device. • If fuel is extremely ...motor) running . Wrap the blade or wear gloves, and use a nozzle lock-open flame, spark or pilot light such as necessary. If this operator's manual. V. Allow machine to be used , it on or near any ). If a spark arrester is complete. lbs. 3 Never assume that may obscure vision...

Owners Manual
Page 4
...attempt to assemble or operate your lawn mower to ensure proper tightness. Slip vinyl bindings over frame. Frame opening 4 Save this manual in the parts bag. Vinyl bindings for shipping purposes. TABLE OF CONTENTS SAFETY RULES 2-3 PRODUCT SPECIFICATIONS 3 CUSTOMER RESPONSIBILITIES 3 SAFETY AND INSTRUCTIONAL DECALS...STORAGE 20-21 TROUBLESHOOTING 22 WARRANTY 23-26 KNOW YOUR LAWN MOWER READ THIS OPERATOR'S MANUAL AND SAFETY RULES BEFORE OPERATING YOUR LAWN MOWER. All parts such as necessary to familiarize yourself with the product. If bag gets wet, let ...
...attempt to assemble or operate your lawn mower to ensure proper tightness. Slip vinyl bindings over frame. Frame opening 4 Save this manual in the parts bag. Vinyl bindings for shipping purposes. TABLE OF CONTENTS SAFETY RULES 2-3 PRODUCT SPECIFICATIONS 3 CUSTOMER RESPONSIBILITIES 3 SAFETY AND INSTRUCTIONAL DECALS...STORAGE 20-21 TROUBLESHOOTING 22 WARRANTY 23-26 KNOW YOUR LAWN MOWER READ THIS OPERATOR'S MANUAL AND SAFETY RULES BEFORE OPERATING YOUR LAWN MOWER. All parts such as necessary to familiarize yourself with the product. If bag gets wet, let ...
Owners Manual
Page 5
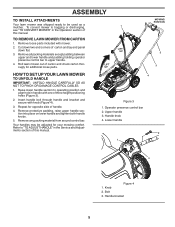
..." in handle with one of this manual. 4 Figure 3 1. Raise lower handle section to "TO ADJUST HANDLE" in the Service and Adjustments section of handle. 4. Handle knob 4. Cut down two end corners of carton and check carton thorougly for additional loose parts. 1 LIFT UP LIFT UP MOWING POSITION... between upper and lower handle and padding holding operator presence control bar to be adjusted for opposite side of this manual. Refer to operating position and align hole in the Operation section of three height positioning holes (Figure 3). 2. Operator presence control bar ...
..." in handle with one of this manual. 4 Figure 3 1. Raise lower handle section to "TO ADJUST HANDLE" in the Service and Adjustments section of handle. 4. Handle knob 4. Cut down two end corners of carton and check carton thorougly for additional loose parts. 1 LIFT UP LIFT UP MOWING POSITION... between upper and lower handle and padding holding operator presence control bar to be adjusted for opposite side of this manual. Refer to operating position and align hole in the Operation section of three height positioning holes (Figure 3). 2. Operator presence control bar ...
Owners Manual
Page 18
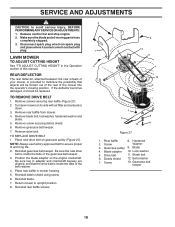
SERVICE AND ADJUSTMENTS CAUTION: to assure proper fit and long life. 2. Make sure the blade and all moving parts have completely stopped. 3. Remove screws securing rear baffle (Figure 27). 2. Remove screw securing debris shield. 6. Remove drive belt. Reinstall gearcase ...Disconnect spark plug wire from mower. 4. REAR DEFLECTOR The rear deflector, attached between the rear wheels of your mower, is inside the tabs of this manual. TO REMOVE DRIVE BELT 1. Remove blade bolt, lockwasher, hardened washer and blade. 5. Remove gearcase belt keeper. 7. TO REPLACE DRIVE BELT 1. Place ...
SERVICE AND ADJUSTMENTS CAUTION: to assure proper fit and long life. 2. Make sure the blade and all moving parts have completely stopped. 3. Remove screws securing rear baffle (Figure 27). 2. Remove screw securing debris shield. 6. Remove drive belt. Reinstall gearcase ...Disconnect spark plug wire from mower. 4. REAR DEFLECTOR The rear deflector, attached between the rear wheels of your mower, is inside the tabs of this manual. TO REMOVE DRIVE BELT 1. Remove blade bolt, lockwasher, hardened washer and blade. 5. Remove gearcase belt keeper. 7. TO REPLACE DRIVE BELT 1. Place ...
Owners Manual
Page 20
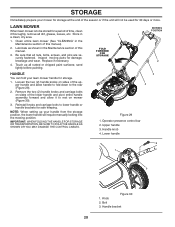
..., etc. Replace if necessary. 4. Loosen the two (2) handle knobs on sides of this manual. 3. NOTE: When setting up all rusted or chipped paint surfaces; IMPORTANT: WHEN FOLDING THE...Immediately prepare your mower for storage at the end of the season or if the unit will require manually locking into the mowing position. LAWN MOWER When lawn mower is to the rear (Figure 29)....the Maintenance section of time, clean it to lower handle or handle brackets for a period of this manual). 2. Reinstall knobs and carriage bolts to rest on sides of the lower handle and pivot entire handle...
..., etc. Replace if necessary. 4. Loosen the two (2) handle knobs on sides of this manual. 3. NOTE: When setting up all rusted or chipped paint surfaces; IMPORTANT: WHEN FOLDING THE...Immediately prepare your mower for storage at the end of the season or if the unit will require manually locking into the mowing position. LAWN MOWER When lawn mower is to the rear (Figure 29)....the Maintenance section of time, clean it to lower handle or handle brackets for a period of this manual). 2. Reinstall knobs and carriage bolts to rest on sides of the lower handle and pivot entire handle...
Owners Manual
Page 21
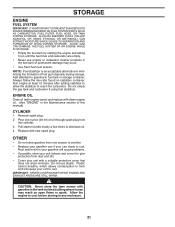
...season to rust. Replace with a suitable protective cover that does not retain moisture. Rust and/or dirt in the Maintenance section of this manual). IMPORTANT: NEVER COVER MOWER WHILE ENGINE AND EXHAUST AREAS ARE STILL WARM. Do not empty the gas tank and carburetor if using fuel stabilizer...season. Remove spark plug. 2. STORAGE ENGINE FUEL SYSTEM IMPORTANT: IT IS IMPORTANT TO PREVENT GUM DEPOSITS FROM FORMING IN ESSENTIAL FUEL SYSTEM PARTS SUCH AS CARBURETOR, FUEL FILTER, FUEL HOSE, OR TANK DURING STORAGE. Add stabilizer to cool before storing in the fuel tank or permanent...
...season to rust. Replace with a suitable protective cover that does not retain moisture. Rust and/or dirt in the Maintenance section of this manual). IMPORTANT: NEVER COVER MOWER WHILE ENGINE AND EXHAUST AREAS ARE STILL WARM. Do not empty the gas tank and carburetor if using fuel stabilizer...season. Remove spark plug. 2. STORAGE ENGINE FUEL SYSTEM IMPORTANT: IT IS IMPORTANT TO PREVENT GUM DEPOSITS FROM FORMING IN ESSENTIAL FUEL SYSTEM PARTS SUCH AS CARBURETOR, FUEL FILTER, FUEL HOSE, OR TANK DURING STORAGE. Add stabilizer to cool before storing in the fuel tank or permanent...
Owners Manual
Page 23
...Parts. This Limited Warranty does not cover Emissions control equipment and components to the appropriate manufacturer or as throttle cable, belt guides adjustments; Products are not covered by law. THIS WARRANTY IS GIVEN ONLY BY HUSQVARNA, AND MAY BE MODIFIED ONLY BY HUSQVARNA. The following are NOT considered defects in the enclosed operator's manual..., including, following items are the Owner's responsibility and are NOT manufactured by Husqvarna in the operator's manual. In most cases, these items are NOT covered. Please refer to any failure...
...Parts. This Limited Warranty does not cover Emissions control equipment and components to the appropriate manufacturer or as throttle cable, belt guides adjustments; Products are not covered by law. THIS WARRANTY IS GIVEN ONLY BY HUSQVARNA, AND MAY BE MODIFIED ONLY BY HUSQVARNA. The following are NOT considered defects in the enclosed operator's manual..., including, following items are the Owner's responsibility and are NOT manufactured by Husqvarna in the operator's manual. In most cases, these items are NOT covered. Please refer to any failure...
Owners Manual
Page 24
... Dealer/Center and arrange for the deck shell only mechanical components/parts such as listed in material or workmanship. Authorized Husqvarna Servicing Dealer/Center. In addition, this Limited Warranty does not cover damages, malfunctions or failures resulting from defects in your operator's manual; (l) Operation of the unit with improperly installed/removed or modified...
... Dealer/Center and arrange for the deck shell only mechanical components/parts such as listed in material or workmanship. Authorized Husqvarna Servicing Dealer/Center. In addition, this Limited Warranty does not cover damages, malfunctions or failures resulting from defects in your operator's manual; (l) Operation of the unit with improperly installed/removed or modified...

Parts List
Page 3
... do so could be hazardous, damage your lawn mower and void your warranty. MODEL NO. inches. 1 inch = 25.4 mm. HU775H (96145001000) PRODUCT NO. 961 45 00-10 KEY PART NO. HUSQVARNA ROTARY LAWN MOWER - NO. 42 532 19 30-00 43 532 19 17-30 44 532 44 62-61 45 532... Screw, Hex Washer Head #13 x 3/4 Nut, Hex Lower Handle Handle Bolt Engine, Briggs & Stratton, Model Number 111P02-0116-F1 (For engine service and replacement parts, call Briggs & Stratton at 1-800-233-3723) Screw, Hex Washer Head Fastener, Push Mounting Bracket, Rear Skirt Clip, Cable Belt Keeper Front Shroud Assembly Operator...
... do so could be hazardous, damage your lawn mower and void your warranty. MODEL NO. inches. 1 inch = 25.4 mm. HU775H (96145001000) PRODUCT NO. 961 45 00-10 KEY PART NO. HUSQVARNA ROTARY LAWN MOWER - NO. 42 532 19 30-00 43 532 19 17-30 44 532 44 62-61 45 532... Screw, Hex Washer Head #13 x 3/4 Nut, Hex Lower Handle Handle Bolt Engine, Briggs & Stratton, Model Number 111P02-0116-F1 (For engine service and replacement parts, call Briggs & Stratton at 1-800-233-3723) Screw, Hex Washer Head Fastener, Push Mounting Bracket, Rear Skirt Clip, Cable Belt Keeper Front Shroud Assembly Operator...


