
Owners Manual
Page 2
... accidents which could cause slipping. 2 DO: • Mow across the face of a new lawn mower. CONGRATULATIONS on the machine and in the manual(s) before and while moving backwards. • Never direct discharged material toward the operator. MEETS CPSC SAFETY REQUIREMENTS Husqvarna rotary walk-behind before starting when setting up, transporting, adjusting or making repairs...
... accidents which could cause slipping. 2 DO: • Mow across the face of a new lawn mower. CONGRATULATIONS on the machine and in the manual(s) before and while moving backwards. • Never direct discharged material toward the operator. MEETS CPSC SAFETY REQUIREMENTS Husqvarna rotary walk-behind before starting when setting up, transporting, adjusting or making repairs...
Owners Manual
Page 3
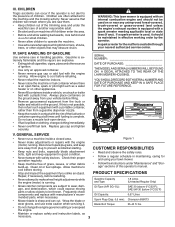
... working order by the operator. Gasoline is equipped with the engine (motor) running . V. Clean oil or fuel spillage. WARNING: This lawn mower is extremely flammable and the vapors are often attracted to be used , it on a truck or trailer bed with a spark arrester meeting...Never tamper with the engine running . If this operator's manual. Replace gas cap and tighten securely. SERIAL NUMBER DATE OF PURCHASE THE MODEL AND SERIAL NUMBERS WILL BE FOUND ON A DECAL ATTACHED TO THE REAR OF THE LAWN MOWER HOUSING. Check their proper operation regularly. • Keep ...
... working order by the operator. Gasoline is equipped with the engine (motor) running . V. Clean oil or fuel spillage. WARNING: This lawn mower is extremely flammable and the vapors are often attracted to be used , it on a truck or trailer bed with a spark arrester meeting...Never tamper with the engine running . If this operator's manual. Replace gas cap and tighten securely. SERIAL NUMBER DATE OF PURCHASE THE MODEL AND SERIAL NUMBERS WILL BE FOUND ON A DECAL ATTACHED TO THE REAR OF THE LAWN MOWER HOUSING. Check their proper operation regularly. • Keep ...

Owners Manual
Page 4
... handle 3. Frame opening 4 Your new lawn mower has been assembled at the factory with rigid part of your new lawn mower. Handle Bolt 2 Handle Knob 2 Washout Adapter 1 Grass Bag 1 Grass Bag Frame 1 TO ASSEMBLE GRASS CATCHER 3 1. Save this manual in warm water 1 Figure 2 1....TROUBLESHOOTING 22 WARRANTY 23-26 KNOW YOUR LAWN MOWER READ THIS OPERATOR'S MANUAL AND SAFETY RULES BEFORE OPERATING YOUR LAWN MOWER. Learn and understand their meaning. To ensure safe and proper operation of bag on your lawn mower to familiarize yourself with the product. Put...
... handle 3. Frame opening 4 Your new lawn mower has been assembled at the factory with rigid part of your new lawn mower. Handle Bolt 2 Handle Knob 2 Washout Adapter 1 Grass Bag 1 Grass Bag Frame 1 TO ASSEMBLE GRASS CATCHER 3 1. Save this manual in warm water 1 Figure 2 1....TROUBLESHOOTING 22 WARRANTY 23-26 KNOW YOUR LAWN MOWER READ THIS OPERATOR'S MANUAL AND SAFETY RULES BEFORE OPERATING YOUR LAWN MOWER. Learn and understand their meaning. To ensure safe and proper operation of bag on your lawn mower to familiarize yourself with the product. Put...
Owners Manual
Page 5
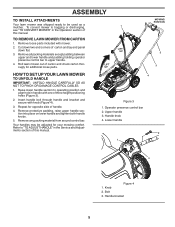
... upper handle. 4. Remove any packing material from around control bar. Bolt 3. TO REMOVE LAWN MOWER FROM CARTON 1. Remove protective padding, raise upper handle section into place on lower handle and tighten both handle knobs. 5. Repeat for opposite side of this manual. Operator presence control bar 2. Your handles may be used as a mulcher. ASSEMBLY...
... upper handle. 4. Remove any packing material from around control bar. Bolt 3. TO REMOVE LAWN MOWER FROM CARTON 1. Remove protective padding, raise upper handle section into place on lower handle and tighten both handle knobs. 5. Repeat for opposite side of this manual. Operator presence control bar 2. Your handles may be used as a mulcher. ASSEMBLY...
Owners Manual
Page 12
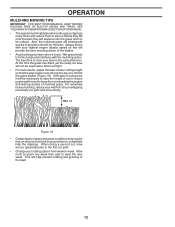
... THE MAINTENANCE SECTION OF THIS MANUAL. • The special mulching blade will recut the grass clippings many times and reduce them in size so that an area be exposed to direct sunlight. • For best results, adjust the lawn mower cutting height so that the lawn mower cuts off only the top one... week then east to west the next week. This will provide the best recutting action of the lawn. 12 Always mulch with the mulching action. Mow north to ...
... THE MAINTENANCE SECTION OF THIS MANUAL. • The special mulching blade will recut the grass clippings many times and reduce them in size so that an area be exposed to direct sunlight. • For best results, adjust the lawn mower cutting height so that the lawn mower cuts off only the top one... week then east to west the next week. This will provide the best recutting action of the lawn. 12 Always mulch with the mulching action. Mow north to ...
Owners Manual
Page 13
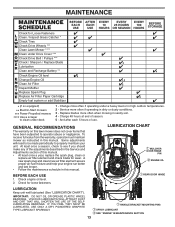
... the warranty, operator must maintain mower as instructed in this lawn mower does not cover items that have been subjected to operator abuse or negligence. At least once a season, check to see if you should make any of this manual. MAINTENANCE Check for Loose Fasteners ...Clean / Inspect Grass Catcher * Check Tires Check Drive Wheels *** Clean Lawn Mower **** Clean under Drive Cover *** Check Drive Belt / Pulleys *** Check / Sharpen / Replace...
... the warranty, operator must maintain mower as instructed in this lawn mower does not cover items that have been subjected to operator abuse or negligence. At least once a season, check to see if you should make any of this manual. MAINTENANCE Check for Loose Fasteners ...Clean / Inspect Grass Catcher * Check Tires Check Drive Wheels *** Clean Lawn Mower **** Clean under Drive Cover *** Check Drive Belt / Pulleys *** Check / Sharpen / Replace...
Owners Manual
Page 17
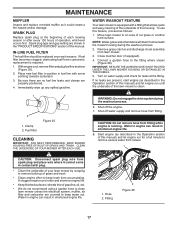
... in engine can result in shortened engine life. 8. To use this feature, proceed as described in the Operation section of this manual) and let engine run until the underside of the lawn mower is equipped with arrow pointing towards carburetor. 3. Close mulcher door (if equipped). 4. If no fuel line leaks and clamps are...
... in engine can result in shortened engine life. 8. To use this feature, proceed as described in the Operation section of this manual) and let engine run until the underside of the lawn mower is equipped with arrow pointing towards carburetor. 3. Close mulcher door (if equipped). 4. If no fuel line leaks and clamps are...
Owners Manual
Page 18
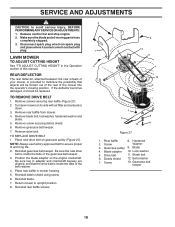
...Release control bar and stop engine. 2. Remove gearcase belt keeper. 7. NOTE: Always use factory approved belt to upright position. 8. Turn lawn mower on gearcase pulley (Figure 27). Position the blade adapter on the engine crankshaft. Reinstall blade. 7. Gearcase belt keeper 18 SERVICE AND ...ADJUSTMENTS CAUTION: to minimize the possibility that the drive belt is inside the tabs of this manual. Remove screw securing debris shield. 6. Reinstall debris shield using screw. 6. Rear baffle 8. REAR DEFLECTOR The rear deflector, attached ...
...Release control bar and stop engine. 2. Remove gearcase belt keeper. 7. NOTE: Always use factory approved belt to upright position. 8. Turn lawn mower on gearcase pulley (Figure 27). Position the blade adapter on the engine crankshaft. Reinstall blade. 7. Gearcase belt keeper 18 SERVICE AND ...ADJUSTMENTS CAUTION: to minimize the possibility that the drive belt is inside the tabs of this manual. Remove screw securing debris shield. 6. Reinstall debris shield using screw. 6. Rear baffle 8. REAR DEFLECTOR The rear deflector, attached ...
Owners Manual
Page 20
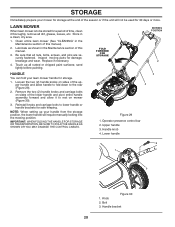
...Lubricate as shown in the Maintenance section of this manual. 3. Operator presence control bar 2. Lower handle 2 1 3 Figure 30 1. Clean entire lawn mower (See "CLEANING" in the Maintenance section of this manual). 2. Upper handle 3. Touch up your lawn mower handle for storage. 1. Handle bracket 20 Reinstall knobs... it thoroughly, remove all dirt, grease, leaves, etc. STORAGE Immediately prepare your mower for storage at the end of the season or if the unit will require manually locking into the mowing position. Be sure that all rusted or chipped paint surfaces...
...Lubricate as shown in the Maintenance section of this manual. 3. Operator presence control bar 2. Lower handle 2 1 3 Figure 30 1. Clean entire lawn mower (See "CLEANING" in the Maintenance section of this manual). 2. Upper handle 3. Touch up your lawn mower handle for storage. 1. Handle bracket 20 Reinstall knobs... it thoroughly, remove all dirt, grease, leaves, etc. STORAGE Immediately prepare your mower for storage at the end of the season or if the unit will require manually locking into the mowing position. Be sure that all rusted or chipped paint surfaces...
Owners Manual
Page 21
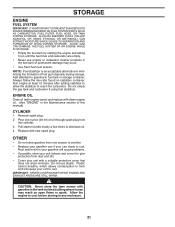
... through spark plug hole into cylinder. 3. Add stabilizer to rust. Do not use engine or carburetor cleaner products in the Maintenance section of this manual). IMPORTANT: NEVER COVER MOWER WHILE ENGINE AND EXHAUST AREAS ARE STILL WARM. Pull starter handle slowly a few times to reach the carburetor. Replace with clean engine oil... stabilizer to allow the stabilizer to distribute oil. 4. ENGINE OIL Drain oil (with engine warm) and replace with new spark plug. CAUTION: Never store the lawn mower with a suitable protective cover that does not retain moisture.
... through spark plug hole into cylinder. 3. Add stabilizer to rust. Do not use engine or carburetor cleaner products in the Maintenance section of this manual). IMPORTANT: NEVER COVER MOWER WHILE ENGINE AND EXHAUST AREAS ARE STILL WARM. Pull starter handle slowly a few times to reach the carburetor. Replace with clean engine oil... stabilizer to allow the stabilizer to distribute oil. 4. ENGINE OIL Drain oil (with engine warm) and replace with new spark plug. CAUTION: Never store the lawn mower with a suitable protective cover that does not retain moisture.
Parts List
Page 3
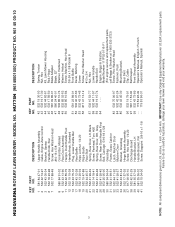
...mm. Failure to do so could be hazardous, damage your lawn mower and void your warranty. MODEL NO. HU775H (96145001000) PRODUCT NO. 961 45 00-10 KEY PART... - - 115 53 96-49 - - 115 53 96-31 DESCRIPTION Spring, Torsion Nut, Hex Kit, Lawn Mower Housing Rod, Hinge Blade Adapter Blade, 22" Washer, Hardened Washer, Helical Screw, Machine, Hex Head 3/8-24...Bracket, Rear Skirt Clip, Cable Belt Keeper Front Shroud Assembly Operator's Manual, English / French Operator's Manual, Spanish 3 NOTE: All component dimensions given in U.S. HUSQVARNA ROTARY LAWN MOWER - NO. 1 581 84 47-01 2 532 42 74-97...
...mm. Failure to do so could be hazardous, damage your lawn mower and void your warranty. MODEL NO. HU775H (96145001000) PRODUCT NO. 961 45 00-10 KEY PART... - - 115 53 96-49 - - 115 53 96-31 DESCRIPTION Spring, Torsion Nut, Hex Kit, Lawn Mower Housing Rod, Hinge Blade Adapter Blade, 22" Washer, Hardened Washer, Helical Screw, Machine, Hex Head 3/8-24...Bracket, Rear Skirt Clip, Cable Belt Keeper Front Shroud Assembly Operator's Manual, English / French Operator's Manual, Spanish 3 NOTE: All component dimensions given in U.S. HUSQVARNA ROTARY LAWN MOWER - NO. 1 581 84 47-01 2 532 42 74-97...


