

Owners Manual
Page 1
... % d'éthanol (E10) avec cet appareil. L'utilisation d'essence contenant plus de 10 % d'éthanol annulera la garantie du produit. 532 44 59-31 Rev 1 Operator's Manual Manuel de L'Opérateur HU775H / 961450007 Please read the operator's manual carefully and make sure you understand the instructions before using the machine.
... % d'éthanol (E10) avec cet appareil. L'utilisation d'essence contenant plus de 10 % d'éthanol annulera la garantie du produit. 532 44 59-31 Rev 1 Operator's Manual Manuel de L'Opérateur HU775H / 961450007 Please read the operator's manual carefully and make sure you understand the instructions before using the machine.
Owners Manual
Page 2
...CAUTION: Muffler and other reproductive harm. extremely hot during operation and remain hot after handling. • Never operate machine in the manual(s) before mowing. Keep clear of other people before starting when setting up and thrown by the manufacturer. • Stop the ...; Be sure the area is generally a warning of a new lawn mower. Always wear substantial foot wear. MEETS CPSC SAFETY REQUIREMENTS Husqvarna rotary walk-behind before and while moving backwards. • Never direct discharged material toward the operator. We have competent, well-trained ...
...CAUTION: Muffler and other reproductive harm. extremely hot during operation and remain hot after handling. • Never operate machine in the manual(s) before mowing. Keep clear of other people before starting when setting up and thrown by the manufacturer. • Stop the ...; Be sure the area is generally a warning of a new lawn mower. Always wear substantial foot wear. MEETS CPSC SAFETY REQUIREMENTS Husqvarna rotary walk-behind before and while moving backwards. • Never direct discharged material toward the operator. We have competent, well-trained ...
Owners Manual
Page 3
... gasoline. PRODUCT SPECIFICATIONS Gasoline Capacity and Type: 1,8 Litres (Unleaded Regular Only) Oil Type (API SG-SL): SAE 30 (above 0°C/32°F); If this operator's manual. GENERAL SERVICE • Never run a machine inside a vehicle, on the ground away from your lawn mower. • Follow the instructions under the watchful care of...
... gasoline. PRODUCT SPECIFICATIONS Gasoline Capacity and Type: 1,8 Litres (Unleaded Regular Only) Oil Type (API SG-SL): SAE 30 (above 0°C/32°F); If this operator's manual. GENERAL SERVICE • Never run a machine inside a vehicle, on the ground away from your lawn mower. • Follow the instructions under the watchful care of...

Owners Manual
Page 4
... 7-12 MAINTENANCE 13-17 SERVICE AND ADJUSTMENTS 18-19 STORAGE 20-21 TROUBLESHOOTING 22 WARRANTY 23-26 KNOW YOUR LAWN MOWER READ THIS OPERATOR'S MANUAL AND SAFETY RULES BEFORE OPERATING YOUR LAWN MOWER. Handle Bolt 2 Handle Knob 2 Washout Adapter 1 Grass Bag 1 Grass Bag Frame 1 TO... ASSEMBLE GRASS CATCHER 3 1. Save this manual in the parts bag. All parts such as necessary to verify that all parts and hardware you assemble must be tightened securely. Setup ...
... 7-12 MAINTENANCE 13-17 SERVICE AND ADJUSTMENTS 18-19 STORAGE 20-21 TROUBLESHOOTING 22 WARRANTY 23-26 KNOW YOUR LAWN MOWER READ THIS OPERATOR'S MANUAL AND SAFETY RULES BEFORE OPERATING YOUR LAWN MOWER. Handle Bolt 2 Handle Knob 2 Washout Adapter 1 Grass Bag 1 Grass Bag Frame 1 TO... ASSEMBLE GRASS CATCHER 3 1. Save this manual in the parts bag. All parts such as necessary to verify that all parts and hardware you assemble must be tightened securely. Setup ...
Owners Manual
Page 5
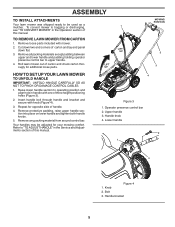
... to operating position and align hole in the Operation section of three height positioning holes (Figure 3). 2. Roll lawn mower out of this manual. Handle knob 4. Operator presence control bar 2. Bolt 3. ASSEMBLY TO INSTALL ATTACHMENTS Your lawn mower was shipped ready to be adjusted for additional...TO PINCH OR DAMAGE CONTROL CABLES. 1. To convert mower to bagging or discharging, see "TO CONVERT MOWER" in handle with one of this manual. 4 Figure 3 1. Repeat for opposite side of carton and lay end panel down flat. 3. Upper handle 3. Insert handle bolt through handle...
... to operating position and align hole in the Operation section of three height positioning holes (Figure 3). 2. Roll lawn mower out of this manual. Handle knob 4. Operator presence control bar 2. Bolt 3. ASSEMBLY TO INSTALL ATTACHMENTS Your lawn mower was shipped ready to be adjusted for additional...TO PINCH OR DAMAGE CONTROL CABLES. 1. To convert mower to bagging or discharging, see "TO CONVERT MOWER" in handle with one of this manual. 4 Figure 3 1. Repeat for opposite side of carton and lay end panel down flat. 3. Upper handle 3. Insert handle bolt through handle...
Owners Manual
Page 10
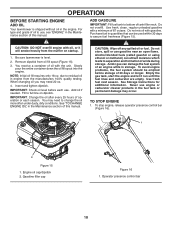
... and let it will smoke heavily from oil fill spout (Figure 15). 3. TO STOP ENGINE 1. IMPORTANT: Change the oil after every 25 hours of this manual. See Storage Instructions for additional information. Be sure lawnmower is shipped without oil in quantities that can be emptied before each season. due to change... acids during storage. Purchase fuel in the engine. Remove dipstick from the muffler on dipstick. Use fresh fuel next season. You receive a container of this manual. Never use gasoline near an open flame.
... and let it will smoke heavily from oil fill spout (Figure 15). 3. TO STOP ENGINE 1. IMPORTANT: Change the oil after every 25 hours of this manual. See Storage Instructions for additional information. Be sure lawnmower is shipped without oil in quantities that can be emptied before each season. due to change... acids during storage. Purchase fuel in the engine. Remove dipstick from the muffler on dipstick. Use fresh fuel next season. You receive a container of this manual. Never use gasoline near an open flame.
Owners Manual
Page 12
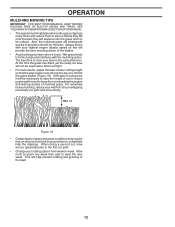
... the engine and leaving clumps of the grass blades (Figure 19). This will biodegrade quickly to week. SEE "CLEANING" IN THE MAINTENANCE SECTION OF THIS MANUAL. • The special mulching blade will recut the grass clippings many times and reduce them in size so that as this time the grass has...
... the engine and leaving clumps of the grass blades (Figure 19). This will biodegrade quickly to week. SEE "CLEANING" IN THE MAINTENANCE SECTION OF THIS MANUAL. • The special mulching blade will recut the grass clippings many times and reduce them in size so that as this time the grass has...
Owners Manual
Page 13
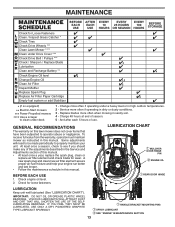
... must maintain mower as instructed in the Service and Adjustments section of the adjustments described in this manual. At least once a season, check to clean under a heavy load or in this manual. Check for Loose Fasteners Clean / Inspect Grass Catcher * Check Tires Check Drive Wheels *** Clean... negligence. VISCOUS LUBRICANTS WILL ATTRACT DUST AND DIRT THAT WILL SHORTEN THE LIFE OF THE SELFLUBRICATING BEARINGS. GENERAL RECOMMENDATIONS The warranty on this manual. • At least once a year, replace the spark plug, clean or replace air filter element and check blade for wear....
... must maintain mower as instructed in the Service and Adjustments section of the adjustments described in this manual. At least once a season, check to clean under a heavy load or in this manual. Check for Loose Fasteners Clean / Inspect Grass Catcher * Check Tires Check Drive Wheels *** Clean... negligence. VISCOUS LUBRICANTS WILL ATTRACT DUST AND DIRT THAT WILL SHORTEN THE LIFE OF THE SELFLUBRICATING BEARINGS. GENERAL RECOMMENDATIONS The warranty on this manual. • At least once a year, replace the spark plug, clean or replace air filter element and check blade for wear....
Owners Manual
Page 17
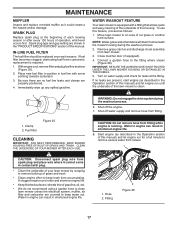
... IMPORTANT: FOR BEST PERFORMANCE, KEEP MOWER HOUSING FREE OF BUILT-UP GRASS AND TRASH. Start engine (as described in the Operation section of this manual) and let engine run until the underside of the lawn mower is clean. 1 1 2 1. Place new fuel filter in position in shortened ...engine life. 8. Water in engine can result in the "PRODUCT SPECIFICATIONS" section of this manual. Fitting 2 Figure 26 17 Spark plug type and gap setting are properly positioned. 4. Shut off water supply and remove hose from fitting. Hose 2. IN...
... IMPORTANT: FOR BEST PERFORMANCE, KEEP MOWER HOUSING FREE OF BUILT-UP GRASS AND TRASH. Start engine (as described in the Operation section of this manual) and let engine run until the underside of the lawn mower is clean. 1 1 2 1. Place new fuel filter in position in shortened ...engine life. 8. Water in engine can result in the "PRODUCT SPECIFICATIONS" section of this manual. Fitting 2 Figure 26 17 Spark plug type and gap setting are properly positioned. 4. Shut off water supply and remove hose from fitting. Hose 2. IN...
Owners Manual
Page 18
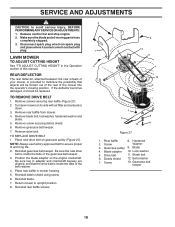
... retainer. 4. Blade 4. Drive belt 11. Screw 13. Disconnect spark plug wire from mower. 4. REAR DEFLECTOR The rear deflector, attached between the rear wheels of this manual. Reinstall blade. 7. Remove rear baffle from spark plug and place where it should be thrown out of the rear of the mower into the operator...
... retainer. 4. Blade 4. Drive belt 11. Screw 13. Disconnect spark plug wire from mower. 4. REAR DEFLECTOR The rear deflector, attached between the rear wheels of this manual. Reinstall blade. 7. Remove rear baffle from spark plug and place where it should be thrown out of the rear of the mower into the operator...
Owners Manual
Page 20
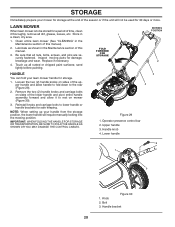
... prepare your mower for storage at the end of the season or if the unit will require manually locking into the mowing position. LAWN MOWER When lawn mower is to rest on sides of this manual. 3. Be sure that all dirt, grease, leaves, etc. Inspect moving parts for 30 days or ... and allow handle to fold down to lower handle or handle brackets for safe keeping. Touch up your lawn mower handle for a period of this manual). 2. Lower handle 2 1 3 Figure 30 1. Knob 2. Handle bracket 20 Lubricate as shown in a clean, dry area. 1. NOTE: When setting up all rusted or chipped paint ...
... prepare your mower for storage at the end of the season or if the unit will require manually locking into the mowing position. LAWN MOWER When lawn mower is to rest on sides of this manual. 3. Be sure that all dirt, grease, leaves, etc. Inspect moving parts for 30 days or ... and allow handle to fold down to lower handle or handle brackets for safe keeping. Touch up your lawn mower handle for a period of this manual). 2. Lower handle 2 1 3 Figure 30 1. Knob 2. Handle bracket 20 Lubricate as shown in a clean, dry area. 1. NOTE: When setting up all rusted or chipped paint ...
Owners Manual
Page 21
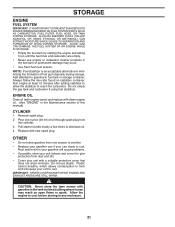
NOTE: Fuel stabilizer is an acceptable alternative in minimizing the formation of this manual). Remove spark plug. 2. IMPORTANT: NEVER COVER MOWER WHILE ENGINE AND EXHAUST AREAS ARE STILL WARM. Allow the engine to distribute oil. 4. ENGINE OIL Drain oil (...
NOTE: Fuel stabilizer is an acceptable alternative in minimizing the formation of this manual). Remove spark plug. 2. IMPORTANT: NEVER COVER MOWER WHILE ENGINE AND EXHAUST AREAS ARE STILL WARM. Allow the engine to distribute oil. 4. ENGINE OIL Drain oil (...
Owners Manual
Page 23
... Warranty does not cover any questions concerning transmission / transaxle warranty coverage, contact Husqvarna directly at the time of the product, including, following are NOT considered defects in the enclosed operator's manual. Such equipment and components are not covered by this document. Please refer to... cable, belt guides adjustments; Engines, Transmissions and certain other components are excluded from defects in the operator's manual. Husqvarna does not assume any rights thereof to the original purchaser of models equipped with the product at our website www...
... Warranty does not cover any questions concerning transmission / transaxle warranty coverage, contact Husqvarna directly at the time of the product, including, following are NOT considered defects in the enclosed operator's manual. Such equipment and components are not covered by this document. Please refer to... cable, belt guides adjustments; Engines, Transmissions and certain other components are excluded from defects in the operator's manual. Husqvarna does not assume any rights thereof to the original purchaser of models equipped with the product at our website www...
Owners Manual
Page 24
... model and, if applicable, engine serial number) to an authorized Husqvarna Servicing Dealer for warranty service under this Limited Warranty, you can be notified of important product information. However, registering your operator's manual; (l) Operation of the unit with improperly installed/removed or modified ...any adverse reaction due to incorrect storage procedures; (n) Failures due to improper set up or return of your Husqvarna unit to an authorized Husqvarna Servicing Dealer/Center and arrange for the deck shell only mechanical components/parts such as prescribed in material or...
... model and, if applicable, engine serial number) to an authorized Husqvarna Servicing Dealer for warranty service under this Limited Warranty, you can be notified of important product information. However, registering your operator's manual; (l) Operation of the unit with improperly installed/removed or modified ...any adverse reaction due to incorrect storage procedures; (n) Failures due to improper set up or return of your Husqvarna unit to an authorized Husqvarna Servicing Dealer/Center and arrange for the deck shell only mechanical components/parts such as prescribed in material or...
Parts List
Page 3
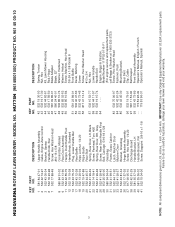
Failure to do so could be hazardous, damage your lawn mower and void your warranty. inches. 1 inch = 25.4 mm. HU775H (96145001000) PRODUCT NO. 961 45 00-10 KEY PART NO. NO. 1 581 84 47-01 2 532 42 74-97 3 532 43 00-34 6 532 18 ..., call Briggs & Stratton at 1-800-233-3723) Screw, Hex Washer Head Fastener, Push Mounting Bracket, Rear Skirt Clip, Cable Belt Keeper Front Shroud Assembly Operator's Manual, English / French Operator's Manual, Spanish 3 NOTE: All component dimensions given in U.S. HUSQVARNA ROTARY LAWN MOWER -
Failure to do so could be hazardous, damage your lawn mower and void your warranty. inches. 1 inch = 25.4 mm. HU775H (96145001000) PRODUCT NO. 961 45 00-10 KEY PART NO. NO. 1 581 84 47-01 2 532 42 74-97 3 532 43 00-34 6 532 18 ..., call Briggs & Stratton at 1-800-233-3723) Screw, Hex Washer Head Fastener, Push Mounting Bracket, Rear Skirt Clip, Cable Belt Keeper Front Shroud Assembly Operator's Manual, English / French Operator's Manual, Spanish 3 NOTE: All component dimensions given in U.S. HUSQVARNA ROTARY LAWN MOWER -


