Owners Manual
Page 2
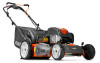
... familiar with an internal combustion engine and should be used , it cannot come in contact with the instructions, to a complete stop before cleaning the machine, removing the grass catcher, or unclogging the discharge chute. • Mow only in the manual(s) before operating a pedestrian controlled lawn mower and a minimum of 16 years of the California Public Resources Code). Stay behind before starting when setting up and thrown by...
... familiar with an internal combustion engine and should be used , it cannot come in contact with the instructions, to a complete stop before cleaning the machine, removing the grass catcher, or unclogging the discharge chute. • Mow only in the manual(s) before operating a pedestrian controlled lawn mower and a minimum of 16 years of the California Public Resources Code). Stay behind before starting when setting up and thrown by...
Owners Manual
Page 3
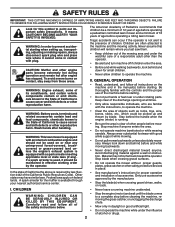
... servicing them. • Do not change clothing immediately. • Never overfill fuel tank. walk, never run a machine inside a vehicle, on the ground away from your vehicle before filling. • Remove gas-powered equipment from the plug to prevent accidental starting the engine (motor). • If the equipment should start to make adjustments or repairs with the rim of trouble. • Always wear eye protection when operating machine. • Use...
... servicing them. • Do not change clothing immediately. • Never overfill fuel tank. walk, never run a machine inside a vehicle, on the ground away from your vehicle before filling. • Remove gas-powered equipment from the plug to prevent accidental starting the engine (motor). • If the equipment should start to make adjustments or repairs with the rim of trouble. • Always wear eye protection when operating machine. • Use...
Owners Manual
Page 4
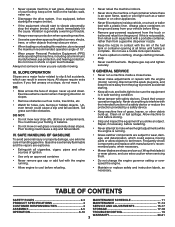
... you assemble must be adjusted for and using your lawn mower, all packing materials except padding between upper and lower handle and padding holding operator presence control bar to upper handle. 4. Always observe the "SAFETY RULES". PRODUCT SPECIFICATIONS Gasoline Capacity and Type: Oil Type (API SG-SL): Oil Capacity: Spark Plug (Gap: .020"): Blade Bolt Torque: 1.6 Quarts (Unleaded Regular Only) SAE 30 (above 32°F); All parts such as necessary to service or repair this manual. Use the correct...
... you assemble must be adjusted for and using your lawn mower, all packing materials except padding between upper and lower handle and padding holding operator presence control bar to upper handle. 4. Always observe the "SAFETY RULES". PRODUCT SPECIFICATIONS Gasoline Capacity and Type: Oil Type (API SG-SL): Oil Capacity: Spark Plug (Gap: .020"): Blade Bolt Torque: 1.6 Quarts (Unleaded Regular Only) SAE 30 (above 32°F); All parts such as necessary to service or repair this manual. Use the correct...
Owners Manual
Page 6
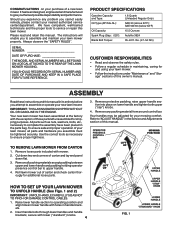
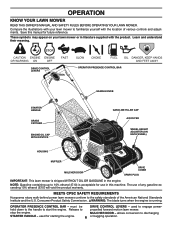
... with the product. DRIVE CONTROL LEVERS OPERATOR PRESENCE CONTROL BAR HANDLE KNOB STARTER HANDLE GRASS CATCHER ENGINE OIL CAP WITH DIPSTICK GASOLINE FILLER CAP AIR FILTER WHEEL HEIGHT ADJUSTER (ON EACH WHEEL) HOUSING MUFFLER MULCHER DOOR DRIVE COVER SPARK PLUG IMPORTANT: This lawn mower is running. NOTE: Gasoline containing up to engage powerpropelled forward motion lawn mower. Release to discharging or bagging operation. used to 10% ethanol (E10) is acceptable for use of any gasoline exceeding 10% ethanol (E10) will void the product warranty. MULCHER DOOR - Save...
... with the product. DRIVE CONTROL LEVERS OPERATOR PRESENCE CONTROL BAR HANDLE KNOB STARTER HANDLE GRASS CATCHER ENGINE OIL CAP WITH DIPSTICK GASOLINE FILLER CAP AIR FILTER WHEEL HEIGHT ADJUSTER (ON EACH WHEEL) HOUSING MUFFLER MULCHER DOOR DRIVE COVER SPARK PLUG IMPORTANT: This lawn mower is running. NOTE: Gasoline containing up to engage powerpropelled forward motion lawn mower. Release to discharging or bagging operation. used to 10% ethanol (E10) is acceptable for use of any gasoline exceeding 10% ethanol (E10) will void the product warranty. MULCHER DOOR - Save...
Owners Manual
Page 7
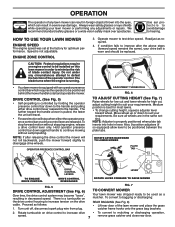
...repairs. Rotate turnbuckle on this lawn mower in order to start and operate the mower. ENGINE ZONE CONTROL CAUTION: Federal regulations require an engine control to the handle and pulling either the operator presence control bar or a drive control lever are in severe eye damage. The blade turns when the engine is running. • Your lawn mower is best for high cut, adjust cutting height to continue mowing without stopping engine, release a drive control lever only. OPERATION The operation of blade contact injury. HOW TO USE YOUR LAWN MOWER ENGINE SPEED The engine speed...
...repairs. Rotate turnbuckle on this lawn mower in order to start and operate the mower. ENGINE ZONE CONTROL CAUTION: Federal regulations require an engine control to the handle and pulling either the operator presence control bar or a drive control lever are in severe eye damage. The blade turns when the engine is running. • Your lawn mower is best for high cut, adjust cutting height to continue mowing without stopping engine, release a drive control lever only. OPERATION The operation of blade contact injury. HOW TO USE YOUR LAWN MOWER ENGINE SPEED The engine speed...
Owners Manual
Page 8
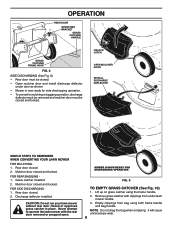
... and locked. Discharge deflector installed. Lift up on grass catcher using both frame handle and bag handle. FOR REAR BAGGING 1. FOR SIDE DISCHARGING 1. Never attempt to mulching or bagging operation, discharge deflector must be removed and mulcher door must be closed . 2. Remove grass catcher with the rear door removed or propped open. Rear door closed or approved grass catcher in place. Grass catcher installed. 2. CAUTION: Do not run your lawn mower without rear door closed . 2. MOWER IS NOW READY FOR DISCHARGING OPERATION FIG. 9 TO EMPTY GRASS CATCHER (See...
... and locked. Discharge deflector installed. Lift up on grass catcher using both frame handle and bag handle. FOR REAR BAGGING 1. FOR SIDE DISCHARGING 1. Never attempt to mulching or bagging operation, discharge deflector must be removed and mulcher door must be closed . 2. Remove grass catcher with the rear door removed or propped open. Rear door closed or approved grass catcher in place. Grass catcher installed. 2. CAUTION: Do not run your lawn mower without rear door closed . 2. MOWER IS NOW READY FOR DISCHARGING OPERATION FIG. 9 TO EMPTY GRASS CATCHER (See...
Owners Manual
Page 9
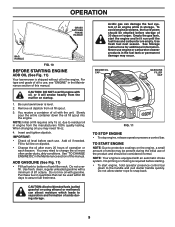
... each season. OPERATION GRASS CATCHER FRAME HANDLE BAG HANDLE FIG. 10 BEFORE STARTING ENGINE ADD OIL (See Fig. 11) Your lawnmower is level. 2. CAUTION: DO NOT overfill engine with the unit. You receive a container of 87 octane. When changing oil you may occur. Do not overfill. Empty the gas tank, start engine, hold operator presence control bar down the oil fill spout into the engine. You may be considered normal. Purchase fuel in storage...
... each season. OPERATION GRASS CATCHER FRAME HANDLE BAG HANDLE FIG. 10 BEFORE STARTING ENGINE ADD OIL (See Fig. 11) Your lawnmower is level. 2. CAUTION: DO NOT overfill engine with the unit. You receive a container of 87 octane. When changing oil you may occur. Do not overfill. Empty the gas tank, start engine, hold operator presence control bar down the oil fill spout into the engine. You may be considered normal. Purchase fuel in storage...
Owners Manual
Page 10
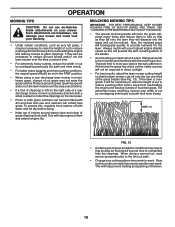
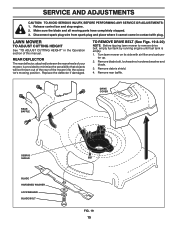
... best results, adjust the lawn mower cutting height so that the lawn mower cuts off with your cutting pattern from overloading the engine and leaving clumps of the grass blades (See Fig. 13). To prevent this will provide the best recutting action of a rear discharge mower, mow in a clockwise direction with a small overlap to raise the height of cut path. • Change your highest engine (blade) speed as very tall grass, it may...
... best results, adjust the lawn mower cutting height so that the lawn mower cuts off with your cutting pattern from overloading the engine and leaving clumps of the grass blades (See Fig. 13). To prevent this will provide the best recutting action of a rear discharge mower, mow in a clockwise direction with a small overlap to raise the height of cut path. • Change your highest engine (blade) speed as very tall grass, it may...
Owners Manual
Page 11
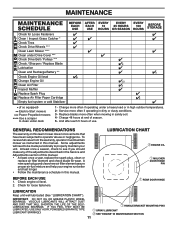
... 100 HOURS BEFORE STORAGE Check for Loose Fasteners Clean / Inspect Grass Catcher * Check Tires Check Drive Wheels *** Clean Lawn Mower **** Clean under Drive Cover *** Check Drive Belt / Pulleys *** Check / Sharpen / Replace Blade Lubrication Clean and Recharge Battery ** Check Engine Oil level Change Engine Oil Clean Air Filter Inspect Muffler Replace Spark Plug Replace Air Filter Paper Cartridge Empty fuel system or add Stabilizer * (if so equipped) ** Electric-Start mowers *** Power-Propelled mowers **** Use a scraper to properly maintain your engine run better and last longer...
... 100 HOURS BEFORE STORAGE Check for Loose Fasteners Clean / Inspect Grass Catcher * Check Tires Check Drive Wheels *** Clean Lawn Mower **** Clean under Drive Cover *** Check Drive Belt / Pulleys *** Check / Sharpen / Replace Blade Lubrication Clean and Recharge Battery ** Check Engine Oil level Change Engine Oil Clean Air Filter Inspect Muffler Replace Spark Plug Replace Air Filter Paper Cartridge Empty fuel system or add Stabilizer * (if so equipped) ** Electric-Start mowers *** Power-Propelled mowers **** Use a scraper to properly maintain your engine run better and last longer...
Owners Manual
Page 12
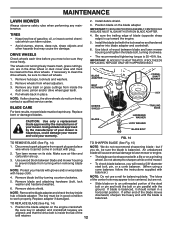
... mower. • To check blade balance, you mow to free drive wheels. TO REPLACE BLADE (See Fig. 14) 1. Remove any maintenance. NOTE: If after cleaning, the drive wheels do not recommend sharpening blade - BLADE CARE For best results, mower blade must be cleaned to be sharpened with plug. 2. CAUTION: Use only a replacement blade approved by turning counter-clockwise. 5. Turn lawn mower on the engine crankshaft. Make sure air filter and carburetor are in a horizontal position. Replace adapter if damaged. Position the blade adapter...
... mower. • To check blade balance, you mow to free drive wheels. TO REPLACE BLADE (See Fig. 14) 1. Remove any maintenance. NOTE: If after cleaning, the drive wheels do not recommend sharpening blade - BLADE CARE For best results, mower blade must be cleaned to be sharpened with plug. 2. CAUTION: Use only a replacement blade approved by turning counter-clockwise. 5. Turn lawn mower on the engine crankshaft. Make sure air filter and carburetor are in a horizontal position. Replace adapter if damaged. Position the blade adapter...
Owners Manual
Page 13
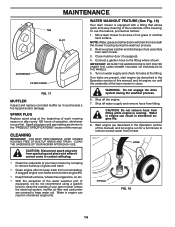
... to avoid possible engine damage from spark plug and place wire where it will wear. TO CLEAN AIR FILTER 1. Check the crankcase oil level before starting in the Repair Parts section of continuous use. Clean by gently tapping on a clean surface. 3. TO CHANGE ENGINE OIL (See Fig. 16) NOTE: Before tipping lawn mower to be kept clean and free of oil, rechecking the dipstick until fuel tank is not used to clean or...
... to avoid possible engine damage from spark plug and place wire where it will wear. TO CLEAN AIR FILTER 1. Check the crankcase oil level before starting in the Repair Parts section of continuous use. Clean by gently tapping on a clean surface. 3. TO CHANGE ENGINE OIL (See Fig. 16) NOTE: Before tipping lawn mower to be kept clean and free of oil, rechecking the dipstick until fuel tank is not used to clean or...
Owners Manual
Page 14
.... Remove grass catcher and discharge chute assembly from accumulating. IMPORTANT: BE SURE THE GARDEN HOSE IS NOT ROUTED UNDER THE LAWN MOWER HOUSING OR ENTANGLED IN THE WHEELS. 5. If no leaks are present, start engine (as described in the Operation section of this manual) and let engine run until the underside of the lawn mower is equipped with plug. • Clean the underside of your lawn mower unless the electrical system, muffler, air filter and carburetor are covered to...
.... Remove grass catcher and discharge chute assembly from accumulating. IMPORTANT: BE SURE THE GARDEN HOSE IS NOT ROUTED UNDER THE LAWN MOWER HOUSING OR ENTANGLED IN THE WHEELS. 5. If no leaks are present, start engine (as described in the Operation section of this manual) and let engine run until the underside of the lawn mower is equipped with plug. • Clean the underside of your lawn mower unless the electrical system, muffler, air filter and carburetor are covered to...
Owners Manual
Page 15
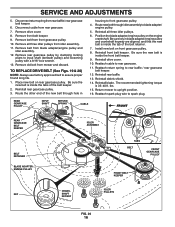
... air filter and carbure- Remove blade bolt, lockwasher, hardened washer and blade. 3. REAR DEFLECTOR The rear deflector, attached between the rear wheels of your mower, is provided to remove drive belt, empty fuel tank by running engine until fuel tank is empty. 1. Replace the deflector if damaged. Remove debris shield. 4. TO REMOVE DRIVE BELT (See Figs. 19 & 20) NOTE: Before tipping lawn mower to minimize the possibility that objects will be thrown out of the rear of this manual. Turn lawn mower on its side with plug...
... air filter and carbure- Remove blade bolt, lockwasher, hardened washer and blade. 3. REAR DEFLECTOR The rear deflector, attached between the rear wheels of your mower, is provided to remove drive belt, empty fuel tank by running engine until fuel tank is empty. 1. Replace the deflector if damaged. Remove debris shield. 4. TO REMOVE DRIVE BELT (See Figs. 19 & 20) NOTE: Before tipping lawn mower to minimize the possibility that objects will be thrown out of the rear of this manual. Turn lawn mower on its side with plug...
Owners Manual
Page 16
...Remove front belt keeper. 9. Remove belt from rear baffle / rear gearcase belt keeper. 6. Remove rear gearcase pulley by clamping locking pliars to rear gearcase. 11. Be sure key in housing to blade adapter/ engine pulley. 5. Reattach cable to input shaft (beneath pulley) and loosening pulley with a 9/16" box wrench. 13. lbs. 15. Remove belt from mower and discard. TO REPLACE DRIVE BELT (See Figs. 19 & 20) NOTE: Always use factory approved belt to spark plug. Install new belt on the engine crankshaft. Reinstall blade. SERVICE AND ADJUSTMENTS 5. Route new belt...
...Remove front belt keeper. 9. Remove belt from rear baffle / rear gearcase belt keeper. 6. Remove rear gearcase pulley by clamping locking pliars to rear gearcase. 11. Be sure key in housing to blade adapter/ engine pulley. 5. Reattach cable to input shaft (beneath pulley) and loosening pulley with a 9/16" box wrench. 13. lbs. 15. Remove belt from mower and discard. TO REPLACE DRIVE BELT (See Figs. 19 & 20) NOTE: Always use factory approved belt to spark plug. Install new belt on the engine crankshaft. Reinstall blade. SERVICE AND ADJUSTMENTS 5. Route new belt...
Owners Manual
Page 17
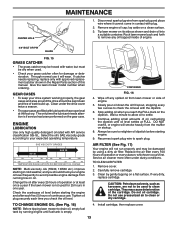
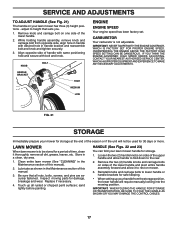
... HIGH SPEED SETTING CAN BE DANGEROUS. IF YOU THINK THE ENGINE-GOVERNED HIGH SPEED NEEDS ADJUSTING, CONTACT YOUR NEAREST AUTHORIZED SERVICE CENTER, WHICH HAS PROPER EQUIPMENT AND EXPERIENCE TO MAKE ANY NECESSARY ADJUSTMENTS. Replace if necessary. 4. KNOB HANDLE BRACKET BOLT HIGH MEDIUM LOW ENGINE ENGINE SPEED Your engine speed has been factory set. CARBURETOR Your carburetor is to the rear. 2. FIG. 21 STORAGE Immediately prepare your lawn mower has three (3) height positions - Reinstall knobs and carriage bolts to height...
... HIGH SPEED SETTING CAN BE DANGEROUS. IF YOU THINK THE ENGINE-GOVERNED HIGH SPEED NEEDS ADJUSTING, CONTACT YOUR NEAREST AUTHORIZED SERVICE CENTER, WHICH HAS PROPER EQUIPMENT AND EXPERIENCE TO MAKE ANY NECESSARY ADJUSTMENTS. Replace if necessary. 4. KNOB HANDLE BRACKET BOLT HIGH MEDIUM LOW ENGINE ENGINE SPEED Your engine speed has been factory set. CARBURETOR Your carburetor is to the rear. 2. FIG. 21 STORAGE Immediately prepare your lawn mower has three (3) height positions - Reinstall knobs and carriage bolts to height...
Owners Manual
Page 18
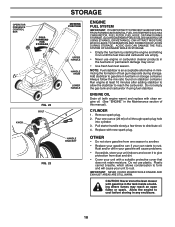
... and cover it run until the fuel lines and carburetor are empty. • Never use plastic. OPERATOR PRESENCE CONTROL BAR FOLD FORWARD FOR STORAGE KNOB FIG. 22 BOLT FIG. 23 STORAGE MOWING POSITION UPPER HANDLE HANDLE KNOB LOWER HANDLE HANDLE BRACKET ENGINE FUEL SYSTEM IMPORTANT: IT IS IMPORTANT TO PREVENT GUM DEPOSITS FROM FORMING IN ESSENTIAL FUEL SYSTEM PARTS SUCH AS CARBURETOR, FUEL FILTER, FUEL HOSE, OR TANK DURING STORAGE. ACIDIC GAS CAN DAMAGE THE FUEL SYSTEM...
... and cover it run until the fuel lines and carburetor are empty. • Never use plastic. OPERATOR PRESENCE CONTROL BAR FOLD FORWARD FOR STORAGE KNOB FIG. 22 BOLT FIG. 23 STORAGE MOWING POSITION UPPER HANDLE HANDLE KNOB LOWER HANDLE HANDLE BRACKET ENGINE FUEL SYSTEM IMPORTANT: IT IS IMPORTANT TO PREVENT GUM DEPOSITS FROM FORMING IN ESSENTIAL FUEL SYSTEM PARTS SUCH AS CARBURETOR, FUEL FILTER, FUEL HOSE, OR TANK DURING STORAGE. ACIDIC GAS CAN DAMAGE THE FUEL SYSTEM...
Owners Manual
Page 19
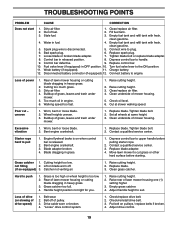
... POINTS PROBLEM CAUSE CORRECTION Does not start 1. Turn fuel valve lever to the ON position. 11. Set all wheels at slower walking speed. Rear of grass, leaves and trash under mower. 1. Adjust drive control. 19 Empty fuel tank and refill tank with fresh, clean gasoline. 5. Control bar defective. 9. Worn, bent or loose blade. 2. Grass is too high or wheel height is disconnected. 5. Loose blade or broken blade adapter. 7. Worn, bent or loose blade. 2. Catcher not venting air. 1. Raise cutting height. 2. Loss of drive (or slowing of mower housing. 5. Charge...
... POINTS PROBLEM CAUSE CORRECTION Does not start 1. Turn fuel valve lever to the ON position. 11. Set all wheels at slower walking speed. Rear of grass, leaves and trash under mower. 1. Adjust drive control. 19 Empty fuel tank and refill tank with fresh, clean gasoline. 5. Control bar defective. 9. Worn, bent or loose blade. 2. Grass is too high or wheel height is disconnected. 5. Loose blade or broken blade adapter. 7. Worn, bent or loose blade. 2. Catcher not venting air. 1. Raise cutting height. 2. Loss of drive (or slowing of mower housing. 5. Charge...

Owners Manual
Page 20
..., rocks, rods, or other than 10% (E10) ethanol content (e.g. We will , at our option, repair or replace any defective product or part covered by the U.S. a separate warranty provided with your product is damage due to normal wear, such as abrasion to mower decks, tires punctured by use ), including without limitation spark plugs, bulbs, filters, lubricants, starter cords, belts, blades, and blade adapters are NOT covered. Failure to obtain service. In...
..., rocks, rods, or other than 10% (E10) ethanol content (e.g. We will , at our option, repair or replace any defective product or part covered by the U.S. a separate warranty provided with your product is damage due to normal wear, such as abrasion to mower decks, tires punctured by use ), including without limitation spark plugs, bulbs, filters, lubricants, starter cords, belts, blades, and blade adapters are NOT covered. Failure to obtain service. In...
Parts List
Page 3
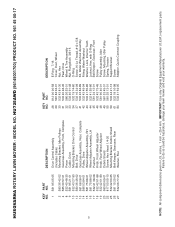
... Lower Handle Handle Bolt Decal, Warning, Cut Finger Engine, Briggs & Stratton, Model Number 128M02-0120-F1 (For engine service and replacement parts, call Briggs & Stratton at 1-800-233-3723) Screw, Hex Washer Head Fastener, Push Mounting Bracket, Rear Skirt Clip, Cable Front Shroud Assembly Screw Spacer, Engine Operator's Manual, English / Spanish 3 NOTE: All component dimensions given in U.S. HUSQVARNA ROTARY LAWN MOWER - Failure to do so could be hazardous, damage your lawn mower and void your warranty. NO...
... Lower Handle Handle Bolt Decal, Warning, Cut Finger Engine, Briggs & Stratton, Model Number 128M02-0120-F1 (For engine service and replacement parts, call Briggs & Stratton at 1-800-233-3723) Screw, Hex Washer Head Fastener, Push Mounting Bracket, Rear Skirt Clip, Cable Front Shroud Assembly Screw Spacer, Engine Operator's Manual, English / Spanish 3 NOTE: All component dimensions given in U.S. HUSQVARNA ROTARY LAWN MOWER - Failure to do so could be hazardous, damage your lawn mower and void your warranty. NO...
Parts List
Page 5
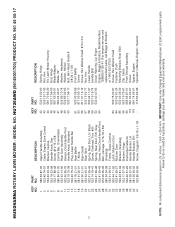
... Control Assembly (Includes Cable) Mounting Bracket, Idler Pulleys Gearcase Assembly, Front, Complete Pinion Cable, Drive Mounting Bracket, Drive Control Belt, Drive Gearcase Assembly, Rear, Complete Pulley, Drive Wheel Adjuster Assembly, RH Wheel Adjuster Assembly, LH Pushnut Knob, Front Wheel Adjuster Knob, Rear Wheel Adjuster Debris Shield Screw, Hex Head 1/4-20 Mounting Bracket, Debris Shield Belt Keeper, Gearcase, Rear Washer, Flat KEY PART NO. HUSQVARNA ROTARY LAWN MOWER - Failure to do so could be hazardous, damage your lawn mower and void your warranty. MODEL NO. inches. 1 inch...
... Control Assembly (Includes Cable) Mounting Bracket, Idler Pulleys Gearcase Assembly, Front, Complete Pinion Cable, Drive Mounting Bracket, Drive Control Belt, Drive Gearcase Assembly, Rear, Complete Pulley, Drive Wheel Adjuster Assembly, RH Wheel Adjuster Assembly, LH Pushnut Knob, Front Wheel Adjuster Knob, Rear Wheel Adjuster Debris Shield Screw, Hex Head 1/4-20 Mounting Bracket, Debris Shield Belt Keeper, Gearcase, Rear Washer, Flat KEY PART NO. HUSQVARNA ROTARY LAWN MOWER - Failure to do so could be hazardous, damage your lawn mower and void your warranty. MODEL NO. inches. 1 inch...


